Table of Contents
Advertisement
Quick Links
Everyday
Rotary Hoists
Owner's Manual
1
A
1
A
B
B
C
C
D
D
7
E
E
F
F
G
DETAIL LINE TIE OFF
G
H
1
2
H
™
8
9
10
DETAIL CROSSES
3
4
5
7
7
TO SUIT MODELS:
Rotary 37
DETAIL LINE TIE OFF
Rotary 47
DETAIL LINE TIE OFF
11
12
A
B
C
D
6
7
GENERAL ASSEMBLY DETAILS
C L UNLESS
1.
ALL DIMENSIONS ARE EQUAL ABOUT
8
8
9
DETAIL HANDLE
8
9
Advertisement
Table of Contents

Subscribe to Our Youtube Channel
Related Manuals for Hills Everyday Rotary 37


Summary of Contents for Hills Everyday Rotary 37
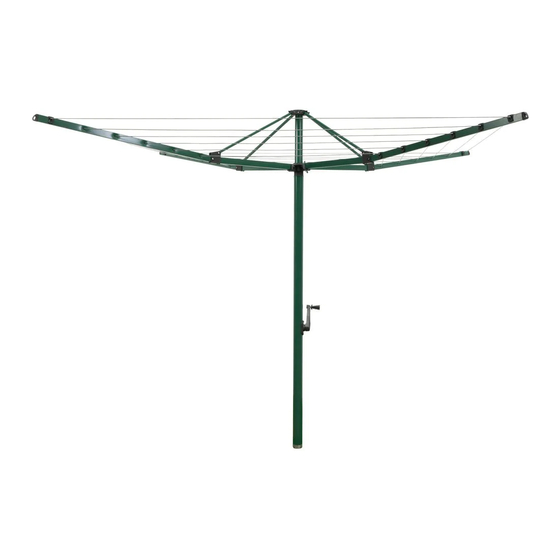
- Page 1 Everyday ™ Rotary Hoists Owner’s Manual TO SUIT MODELS: Rotary 37 DETAIL LINE TIE OFF Rotary 47 DETAIL LINE TIE OFF DETAIL LINE TIE OFF DETAIL HANDLE DETAIL CROSSES GENERAL ASSEMBLY DETAILS C L UNLESS ALL DIMENSIONS ARE EQUAL ABOUT...
-
Page 2: Carton Contents
Introduction Congratulations Congratulations on the purchase of your new Hills Everyday Rotary Hoist, which will bring ™ you many years of trouble free and efficient outdoor drying. It is important that you read this Owner’s Manual thoroughly before installation and use. In this way you will benefit from all of the design features and enjoy safe use of the product. -
Page 3: Installation
Installation Step 1 Fig. 1 500mm (1'7") Select a Suitable Location 1.1 Select a suitable area for installation. 3.2m (10'6") 1.2 Allow a minimum of 500mm (1'7") Rotary 37 clearance around your Rotary Hoist (Fig. 1). 3.6m (11' 9") Rotary 47 Step 2 Install the Ground Socket 2.1 Dig a hole 250mm (10") diameter by 500mm (1'7") approximately 650mm (26") deep (Fig. - Page 4 IF IN DOUBT ASK FOLDED HEAD ASSEMBLY ‘click’ is heard REFER TO DRAWI Finish: REFER TO COLOU Colour: Hills Industries Limited ABN 35 007 573 417 MID MARKET ROT Project: Home & Hardware Products Unit H, 5 Butler Boulevard Description...
-
Page 5: Operation
Operation Step 4 Operating the Hoist 4.3 To Fold: Press the latch to release the 4.1 To adjust the height of your Rotary Hoist, lower cross. Place your hands on the wind the handle and head assembly arms and pull downwards. down and then fit one or more of the plastic spacers in the ground socket. 4.4 Wrap and fasten the line tie-off cord The suggested operating height is the around the hoist to prevent lines from... - Page 6 THE 3D CAD DATA FULLY DEFINE THE FINISHED PART. ALL COMPONENTS TO BE CLEAN AND FREE FROM SHARP EDGES, BURRS AND DEFECTS. IF IN DOUBT ASK Hills Industries Limited ABN 35 007 573 417 Home & Hardware Products Unit H, 5 Butler Boulevard...
- Page 7 Line Tensioning Step 5 (continued) Step 1 Step 2 Pull line out of arm. Remove line from under locking lip. Step 3 Step 4 Pull line out from tensioner. Starting at the furthest arm from the tensioning arm, pull the line tight and move from arm to arm to generate desired line tension. Step 5 Step 6 Swing the line back under the tensioner lip to secure.
- Page 8 Line Tie-Off Cord Step 6 Fig. 6a Line Tie-Off Cord IMPORTANT: The extended length of clothesline fitted with a plastic toggle is called the line tie-off cord, and is designed to keep lines neatly together when the Rotary Hoist is not in use. 6.1 Never leave the line tie-off cord in an unsecured position (Fig.
-
Page 9: Handy Hints
If there is any damage, parts up drying time. should be replaced with original Hills spares or the Hoist repaired before using again. Raise your hoist for maximum drying... -
Page 10: Guarantee And Contact Details
Unless any addition or attachment to this Hills Websites product has Hills specific approval or is sold as a Hills product the warranty on www.hillsproducts.com.au this product is waived. The product is Hills Branded Products designed to perform a specific task under www.hillsholdings.com.au... - Page 11 Notes...
- Page 12 Hills Holdings Limited A.B.N. 35 007 573 417 Issue November 2010 PD4066a...
Need help?
Do you have a question about the Everyday Rotary 37 and is the answer not in the manual?
Questions and answers