Advertisement
Quick Links
Advertisement

Related Manuals for Protocol NEO-DRONE WIFI


Summary of Contents for Protocol NEO-DRONE WIFI
- Page 1 NEO-DRONE WIFI DRONE WITH LIVE STREAMING CAMERA INSTRUCTION MANUAL...
- Page 3 THANK YOU. Thank you for your purchase of Protocol’s Neo-Drone Wifi with Live Streaming Camera. You are about to experience the best of what remote control flight has to offer. We strongly recommend that you take the time to read this manual thoroughly.
-
Page 4: Table Of Contents
TABLE OF CONTENTS Safety & Precautions Parts Remote Batteries & Phone Installation Charging the Drone Start-Up Procedure Operation Performance Modes Trim Adjustment Troubleshooting Flying Outdoors Replacement Parts & Limited Warranty... - Page 5 • Never attempte to modify function of vehicle or controller or attempt • repairs using parts other then those supplied by Protocol. Spare parts are available at www.ProtocolNY.com THIS DEVICE USES COMPONETS THAT OPERATE AT HIGH SPEEDS. AS WITH ANY SUCH DEVICE, USE CAUTION TO OPERATE SAFELY.
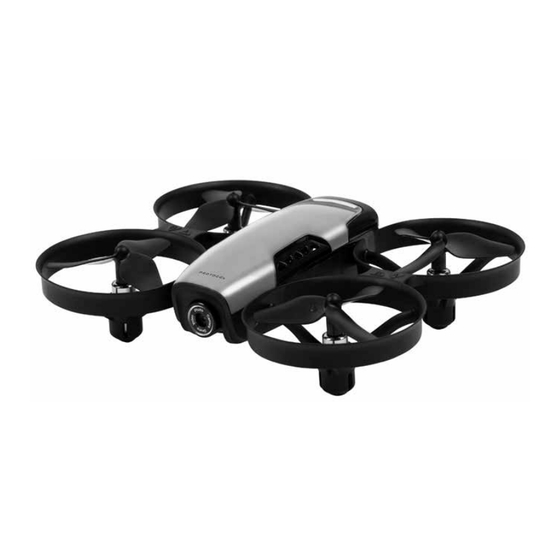
- Page 6 PARTS Top View Bottom View DRONE 1. Canopy 2. Blade 3. Battery Compartment 4. Camera (manually adjusts up & down 90°) 5. On/Off Switch...
- Page 7 PARTS REMOTE SPARE PARTS INCLUDED 1. Power Switch Replacement Blades 2. Forward/Backward Screwdriver 3. Bank Left/Right 4. Throttle 5. Turn Left/Right 6. Take Off/Landing 7. Compass Mode 8. Photo 9. Video 10. Performance Mode Selector (push in) 11. Trimmer (push in) 12.
-
Page 8: Remote Batteries & Phone Installation
REMOTE BATTERIES & PHONE INSTALLATION INSTALLING THE BATTERIES Remove battery cover from controller. Insert 4 x ‘AA’ batteries according to indicated polarities. Replace battery cover. 1. Install batteries carefully. 2. Do not mix old and new batteries. 3. Do not mix different types of batteries. INSTALLING THE PHONE 1. -
Page 9: Charging The Drone
CHARGING THE DRONE BATTERY 1. Make sure the drone is turned off. 2. Pull out the cartridge battery from the drone. 3. Connect the USB charging cable to the battery. 4. Plug the charger into a USB port. The battery light will glow red while charging and will turn green once fully charged. -
Page 10: Start-Up Procedure
START-UP PROCEDURE Before flying, the drone and transmitter must be turned on in sequence and synchronized. 1. Turn on the drone. The light on the drone will flash to indicate it’s on. Place it on an even surface with the drone facing away from you. 2. - Page 11 START-UP PROCEDURE COMPASS MODE Users have the option to exit the default orientation. In Compass Mode, users can operate the drone without orientation. Regardless of where the drone is pointing, it will turn left or right according to the remote’s command. Compass Mode is good for beginners and is useful for drones that fly too far away for the user to be able to tell the orientation.
- Page 12 OPERATION: FLYING THE DRONE TAKE–OFF: 1. Press the take off button. The remote will beep and the drone will hover a few feet off the ground. Then gently advance the throttle to a desired height and release. The drone will hover at that height.* 2.
- Page 13 OPERATION: FLYING THE DRONE FIRST TIME FLYERS!!! TAKE YOUR TIME! GO SLOW! Practice hovering until you are comfortable with flight before attempting any other maneuvers. Make small movements letting the stick return to the center. If you start to lose control, don’t panic. Just press land. LEFT ROTATION RIGHT ROTATION Pull the throttle left or right,...
-
Page 14: Performance Modes
At higher speeds, the drone will pitch more than at lower speeds. Neo-Drone Wifi is quite fast at its highest speed and requires more piloting skills to fly competently. For safety take time to develop advanced skills by practicing at lower speeds first. -
Page 15: Trim Adjustment
TRIM ADJUSTMENT *The remote will emit a short beep for each adjustment and 1 long beep to indicate that it is even. Push in LEFT MOVEMENT RIGHT MOVEMENT SIDEWAYS TRIM When the drone drifts to the left or right side unintentionally, you can correct it by pushing in the trim button and pushing the direction stick in the opposite direction until it evens out. -
Page 16: Troubleshooting
TROUBLESHOOTING LOW BATTERY ALARM The remote will start to beep in flight and the lights will flash when the battery is low. Land the drone as soon as possible and recharge the drone. OUT OF RANGE ALARM When the drone is close to flying out of range, the remote will beep rapidly. Fly the drone back into range immediately or you may lose control of the drone. - Page 17 TROUBLESHOOTING *Allow 15 minutes to pass between full flights as this will give the motors a chance to cool down. Failure to do so could wear out and shorten the life of the motors. SYMPTOM POSSIBLE CAUSE POTENTIAL SOLUTION Neo-Drone 1.
-
Page 18: Flying Outdoors
FLYING OUTDOORS HOW TO PREVENT FLY AWAYS To prevent “fly-away” situations (where drones seem to fly away out of control) it is important to first test and practice within close range before letting the drone fly too far away. Each drone is designed to turn off the engines if the radio signal is lost. It is important to know and test the range of your drone before flying. - Page 19 REPLACEMENT PARTS Thank you for your purchase of Protocol’s Neo-Drone Wifi. We know that accidents can sometimes happen and that is why we offer spare parts kits on our website: www.ProtocolNY.com. LIMITED WARRANTY At Protocol, we’re dedicated to bringing you innovative and well-designed products that make living fun and easy.
Need help?
Do you have a question about the NEO-DRONE WIFI and is the answer not in the manual?
Questions and answers