Table of Contents
Advertisement
Quick Links
Advertisement
Table of Contents

Related Manuals for Digitus Wireless 150N PCI Adapter


Summary of Contents for Digitus Wireless 150N PCI Adapter
- Page 1 Wireless 150N PCI Adapter Manual (DN-7046-1)
- Page 2 COPYRIGHT Copyright ©2009/2010 by this company. All rights reserved. No part of this publication may be reproduced, transmitted, transcribed, stored in a retrieval system, or translated into any language or computer language, in any form or by any means, electronic, mechanical, magnetic, optical, chemical, manual or otherwise, without the prior written permission of this company.
- Page 3 Federal Communication Commission Interference Statement This equipment has been tested and found to comply with the limits for a Class B digital device, pursuant to Part 15 of FCC Rules. These limits are designed to provide reasonable protection against harmful interference in a residential installation.
- Page 4 Federal Communication Commission (FCC) Radiation Exposure Statement This equipment complies with FCC radiation exposure set forth for an uncontrolled environment. In order to avoid the possibility of exceeding the FCC radio frequency exposure limits, human proximity to the antenna shall not be less than 20cm (8 inches) during normal operation.
- Page 5 R&TTE Compliance Statement This equipment complies with all the requirements of DIRECTIVE 1999/5/EC OF THE EUROPEAN PARLIAMENT AND THE COUNCIL of March 9, 1999 on radio equipment and telecommunication terminal Equipment and the mutual recognition of their conformity (R&TTE) The R&TTE Directive repeals and replaces in the directive 98/13/EEC (Telecommunications Terminal Equipment and Satellite Earth Station Equipment) As of April 8, 2000.
-
Page 6: Table Of Contents
C A T A L O G CHAPTER I: Product Information ............1 1-1 Introduction and safety information ............. 1 1-2 Safety Information ................2 1-3 System Requirements ................ 3 1-4 Package Contents ................4 1-5 Familiar with your new wireless network card ........6 CHAPTER II: Driver Installation and Configuration ...... - Page 7 CHAPTER IV: Appendix ..............78 4-1 Specification ..................78 4-2 Troubleshooting ................79 4-3 Glossary ................... 81...
-
Page 8: Chapter I: Product Information
CHAPTER I: Product Information 1-1 Introduction and safety information Thank you for purchasing this high-speed wireless network card! Excepting common wireless standards 802.11b/g, this wireless network card is also able to access 802.11n wireless networks - data transfer rate is 150Mbps, and that’s three times faster than 802.11g wireless network! With easy-to-install PCI interface - a very common expansion port of computers - plug this wireless network card into any empty PCI... -
Page 9: Safety Information
1-2 Safety Information In order to keep the safety of users and your properties, please follow the following safety instructions: 1. This wireless network card is designed for indoor use only. DO NOT expose this network card to direct sun light, rain, or snow. 2. -
Page 10: System Requirements
1-3 System Requirements An empty PCI slot Windows 2000, XP, Vista, or Windows 7 operating system CD-ROM drive At least 100MB of available disk space... -
Page 11: Package Contents
1-4 Package Contents Before you starting to use this wireless network card, please check if there’s anything missing in the package, and contact your dealer of purchase to claim for missing items: PCI Wireless Network Card (1 pcs) ……………………………. □ 3dBi Dipole Antenna (1 pcs) ……………………………..……. -
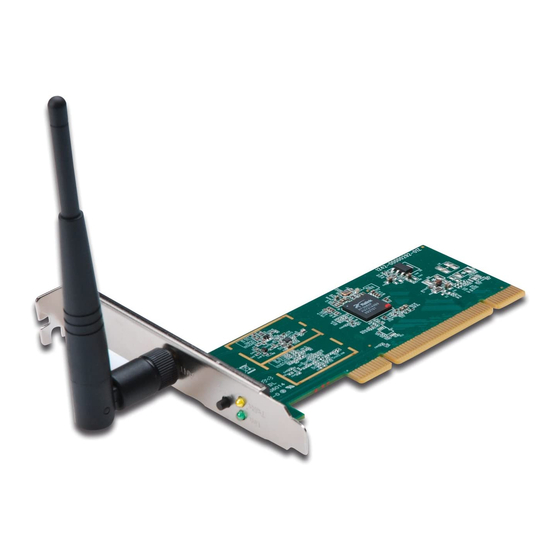
Page 13: Familiar With Your New Wireless Network Card
1-5 Familiar with your new wireless network card 1. Antennas One 3dBi dipole antenna is enclosed with the PCI card. Please secure the antenna to Reverse SMA connector of the card. 2. WPS Button Press this button and hold for 3 seconds to start WPS function. When WPS is enabled, the Link and Tx/Rx LEDs will be steadily 3. -
Page 14: Chapter Ii: Driver Installation And Configuration
CHAPTER II: Driver Installation and Configuration 2-1 Network Card Installation Please follow the following instructions to install your new wireless network card: 1. SWITCH THE COMPUTER OFF, remove the cover and insert the wireless network card into an empty PCI slot of your computer and then replace the cover. - Page 15 3. When you restart the computer, this ‘Found New Hardware Wizard’ screen will appear, click ‘Cancel’. 4. Insert device driver CDROM into the CD/DVD ROM drive of your computer, and execute ‘Setup.exe’ program. Please read the end user license agreement and click ‘I accept the terms of the license agreement’...
- Page 16 5. It is recommend installing driver and utility if the network card is installing the first time. If you want to update the driver only, choose ’Install driver only’. Click ‘Next’ to continue. 6. You can choose the configuration tool used to configure the wireless network card here.
- Page 17 of this wireless network card. If you prefer to use the wireless configuration tool provided by Windows XP, please select ‘Microsoft Zero Configuration Tool’ then click ‘Next’. 7. Now you’ll see the following message, please click ‘Install’ to start utility installation. If you see ‘Found New Hardware’ message again, please ignore it and wait.
- Page 19 8. Please wait while the install procedure is running. When you see this message, please click ‘Finish’ to complete the driver installation process.
- Page 20 9. After installation is complete, wireless configuration utility will be shown in the desktop of your computer automatically. You will also see an icon at the lower-right corner of your windows system. If you put the mouse cursor on the icon, the status of wireless card will be displayed as a popup balloon.
-
Page 22: Using The Wireless Configuration Utility
2-2 Using the Wireless Configuration Utility There are two ways you can configure your wireless network card to connect to wireless access point: using the Ralink configuration utility and using built-in windows zero configuration utility. -
Page 23: Using Ralink Utility
2-2-1 Using Ralink Utility Please follow the following instructions to use Ralink configuration utility to connect to wireless access point. 1. Right-click the Ralink configuration utility icon located at lower-right corner of computer desktop and then clicks ‘Launch Config Utility’. 2. - Page 24 You can click ‘More / Less’ button again, and setup utility window will resume to its original size. Tip: If a setup item requires more information to complete the setup procedure, the setup utility window will expand automatically.
-
Page 25: Scan For Other Wireless Devices
2-2-1-1 Scan for Other Wireless Devices There are two kinds of wireless connection mode: Infrastructure and Ad-Hoc. Infrastructure mode is used by wireless access points, which is able to establish wireless connection for you and other wireless / wired network clients. Ad-Hoc mode is also know as ‘point-to-point’... - Page 26 Scan results will be displayed here, please check if the wireless device (access point or another computer) with the SSID you wish to connect is shown here. Scan result includes 6 types of information, they are: The SSID (Service Set Identifier) of wireless device. If nothing is displayed here, it means the SSID of this wireless device is hidden.
- Page 27 The wireless standard supported by this access point is displayed here. ‘n’ for 802.11n , ‘g; for 802.11g , and ‘b’ for 802.11b WPS icon will appear when the access point supports WPS. If the access point uses encryption, a key icon will appear.
- Page 28 There are 4 types of technical information: General: Displays basic information about this access point, such as SSID, MAC Address, authentication / encryption type, channel etc. WPS: If this access point supports WPS (Wi-Fi Protected Setup), related information will be displayed here. CCX: If this access point supports CCX (Cisco Compatible eXtension), related information will be displayed here.
- Page 29 And here are descriptions of every setup item in setup area: Item Name Description Sorted by >> You can decide how to sort all listed access point by ‘SSID’, ‘Channel’, or ‘Signal’ (signal strength). Show dBm Check this box to show the signal strength of access point, instead of percentage.
-
Page 30: Connect To An Access Point
2-2-1-2 Connect to an Access Point If the wireless access point you wish to connect is found, you can establish connection with it by clicking ‘Connect’ button. Instructions will be given as follow: 1. Click the wireless access point or network device you wish to connect, it will be highlighted, then click ‘Connect’. - Page 31 3. If the wireless access point uses encryption, you will be prompted to input its WEP key or WPA preshared key.
- Page 32 4. Please ask the owner of the wireless access point you want to connect, and input the correct key here and then click ‘OK’. By checking ‘Show Password’ box, the encryption key you inputted here will be displayed. If the value you inputted here is wrong, you will not be able to connect to this wireless access point.
- Page 33 You can also click More / Less button ( ) to see detailed information of connected access point: The current status of wireless connection will be displayed by Ralink configuration utility icon: Wireless connection is established, good signal reception. Wireless connection is established, normal signal reception.
-
Page 34: Add An Access Point To Profile
2-2-1-3 Add an Access Point to Profile If you will connect to some specific wireless access point frequently, you can add their information to the profile. Just like the telephone directory, the profile saves all information of access points, and you can recall them anytime you wish to establish connection. - Page 35 The setup utility will expand: Here are descriptions of every setup item: Item Name Description Profile Name You can give this profile a name. Every profile needs a unique name. SSID Please input the SSID of this access point. If you selected an access point from the list, and its SSID is not hidden, the SSID will be filled automatically;...
- Page 36 connecting to another computer using Ad Hoc mode), please select Ad hoc here. If you selected an access point from the list above, please keep this field unchanged. Tx Power You can select the wireless output power here. If you’re not too far from access point (good signal reception), you can select a lower output power to save energy;...
- Page 37 Fragment Check this box to set the packet fragment Threshold threshold by yourself. You can drag the slider to set the threshold value, or input the value in the box located at right. It’s recommended to keep this value untouched unless you know the effect of changing this value.
- Page 38 To set authentication / encryption information for the access point. Please click ‘Auth. \ Encry.’ tab: Here are descriptions of every setup item: Item Name Description Authentication Select the authentication type of the wireless access point or wireless device you wish to connect. When you’re adding a profile from an existing access point or wireless device, authentication type will be selected automatically, and please do not change it.
- Page 39 adding a profile from an existing access point or wireless device, the encryption type will be selected automatically, and please do not modify it. Input WPA preshared key here. If encryption is not Preshared enabled, or you select ‘WEP’ as encryption type, this field will be disabled and grayed out.
- Page 40 To set 802.1x authentication for the access point. Please click ‘802.1X’ tab: Here are descriptions of every setup item: Item Name Description EAP Method Select 802.1x EAP method from dropdown menu. Please ask the administrator of the access point you wish to connect to select a correct EAP method.
- Page 41 If you need to use protected authentication credential, check ‘Use protected authentication credential’ box, and click ‘Import’ to load .pac credential file; to remove a loaded credential file, click ‘Remove’. Session You can enable or disable session resumption here. If Resumption you don’t know if you should enable session resumption or not, please ask your 802.1x...
- Page 42 After you complete all information related to the access point, click ‘OK’ to save the profile, or click ‘cancel’ to cancel adding a new profile. If the profile is created, you will see the information in the Profile List.
-
Page 44: Using Windows Zero Configuration
2-2-2 Using Windows Zero Configuration Windows XP and Vista has a built-in wireless network configuration utility, called as ‘Windows Zero Configuration’ (WZC). You can also use WZC to configure your wireless network parameter: 1. Right-click Ralink configuration utility icon and select ‘Use Zero Configuration as Configuration utility’. - Page 45 3. Click ‘Start’ button (should be located at the bottom-left corner of windows desktop), click ‘Control Panel’, then click ‘Network and Internet Connections’ in Control Panel. 4. Click ‘Network Connections’.
- Page 46 5. Right-click ‘Wireless Network Connection’ (it may have a number as suffix if you have more than one wireless network card, please make sure you right-click the ‘Ralink 802.11n Wireless LAN Card), then select ‘View Available Wireless Networks’. 6. All wireless access points in proximity will be displayed here. If the access point you want to use is not displayed here, please try to move your computer closer to the access point, or you can click ‘Refresh network list’...
- Page 47 7. If the access point is protected by encryption, you have to input its security key or passphrase here. It must match the encryption setting on the access point. If the access point you selected does not use encryption, you’ll not be prompted for security key or passphrase.
-
Page 49: Profile Management
2-3 Profile Management If you need to connect to different wireless access points at different time, like of access point of your home, office, cybercafe, or public wireless service, you can store the connection parameters (encryption, passphrase, security etc, etc.) as a profile for every access point, so you don’t have to input these parameters every time when you want to connect to a specific wireless access point. -
Page 50: Add A Profile
2-3-1 Add a profile If you want to click new profile, click ‘Profile’ menu, then click ‘Add’ button. You’ll be prompted to input detailed information of access point, as described in Section 2-2-1-3. -
Page 51: Edit An Existing Profile
2-3-2 Edit an existing profile If you have added a profile before, and you wish to change the content of the profile, you can use this function. Please select a profile from the list first, then click ‘Edit’ button. You’ll be provided with the contents of selected profile, and you can edit them. -
Page 52: Delete An Existing Profile
2-3-3 Delete an existing profile If you no longer need a profile, you can delete it. Select the profile you wish to delete from the list, and click ‘Delete’ button to delete it. -
Page 53: Activate A Profile
2-3-4 Activate a profile When you want to connect to a specific wireless device in the profile list, you can select it and click ‘Activate’ button, to establish connection with it. When you selected a profile and click ‘Activate’ button to activate the profile, a icon will be displayed in front of the profile to show that the connection is failed;... -
Page 54: Advanced Settings
2-4 Advanced Settings This wireless network card provides several advanced settings for experienced wireless users. You can change these settings to increase data transfer performance, or change operation mode. Please follow the following instructions to set advanced wireless settings: 1. Right-click the Ralink configuration utility icon located at lower-right corner of computer desktop and then click ‘Launch Config Utility’. - Page 55 Here are descriptions of every setup item: Item Name Description Wireless mode Display the wireless operation mode of the network card. Enable Tx Burst Check this box to accelerate the data transmit rate. It may not work with all wireless access point and wireless devices.
- Page 56 which enables wireless clients to roam between CCKM-enabled access points in very short time. Enable Radio Measurements: When you’re connecting to CCX-compatible access point, check this box to enable radio measurement function to improve wireless connectivity. Non-Serving Channel Measurements Limit: When you’re connecting to CCX-compatible access point, check this box to enable measurement on unused radio channels to...
-
Page 57: View Network Statistics
2-5 View Network Statistics The configuration utility provides information about network statistics and link status. If you want to know how your wireless network card works, you can use these functions to get detailed information about the wireless connection you’re using. Please follow the following instructions to check network statistics: 1. -
Page 58: Wmm Setting
2-6 WMM Setting This wireless network card provides WMM (Wi-Fi Multimedia) function, which can improve the performance of certain network applications, like audio/video streaming, network telephony (VoIP), and others. When you enable the WMM function of this network card, you can define the priority of different kinds of data, to give higher priority to applications which require instant responding. - Page 60 In ‘WMM Setup Status’ block, current WMM settings will be displayed. And here are descriptions of every setup item: Item Name Description WMM Enable Check this box to enable WMM function. Please click ‘Apply’ button on the right of this check box after you check or uncheck this box, so corresponding settings in this window will be activated or deactivated respectively.
-
Page 61: Wps Configuration
2-7 WPS Configuration Wi-Fi Protected Setup (WPS) is the latest wireless network technology which makes wireless network setup become very simple. If you have WPS-enabled wireless access point, and you want to establish a secure connection to it, you don’t have to configure the wireless access point and setup data encryption by yourself. -
Page 62: Wps Setup - Pbc (Push-Button Configuration)
2-7-1 WPS Setup - PBC (Push-Button Configuration) 1. Right-click the Ralink configuration utility icon located at lower-right corner of computer desktop and then click ‘Launch Config Utility’. 2. Click ‘WPS’ menu, and the following settings will appear. 3. Set ‘Config Mode’ to ‘Enrollee’, and then push the ‘WPS’ button on your wireless access point (the button used to activate WPS standby mode may have another name), or use other way to start WPS PBC standby mode as the instruction given by your... - Page 63 4. Before you start to establish the wireless connection by using WPS, you can click ‘Rescan’ button to search for WPS-enabled access points near you again, to make sure the WPS function of your access point is activated. All access points with WPS function enabled will be displayed here.
- Page 64 6. You can click ‘Detail’ button to see detailed information of connected access point. If you wish to save this connection as a profile, you can click ‘Export Profile’ button, and this connection will be saved. You can find this connection in ‘Profile’ tab in a later time.
-
Page 65: Wps Setup - Pin
2-7-2 WPS Setup - PIN If the wireless access point you wish to connect supports PIN, please follow the following instructions to establish connection to it: 1. Right-click the Ralink configuration utility icon located at lower-right corner of computer desktop and then click ‘Launch Config Utility’. - Page 66 4. Click ‘PIN’ button now, and wait for few seconds to one minute. If a wireless access point with correct PIN code is found, you’ll be connected to that access point. 5. You may have to click ‘PIN’ for few more times to try again. If you still can not connect to access point by this way, please make sure the PIN code you provided to access point is correct.
-
Page 67: Radio On/Off
2-8 Radio On/Off You can switch the wireless radio transceiver on and off by the utility, so if you want to disable wireless network function, you don’t have to remove the network card physically. 1. Right-click the Ralink configuration utility icon located at lower-right corner of computer desktop and then click ‘Launch Config Utility’. -
Page 68: About
2-9 About The ‘About’ tab provides you the information about version number of the configuration utility, driver, and other important information about your wireless network card. Please follow the following instructions to see these information: 1. Right-click the Ralink configuration utility icon located at lower-right corner of computer desktop and then click ‘Launch Config Utility’. -
Page 69: On-Line Help
2-10 On-line Help If you need to know the directions of how to use specific function in the utility, please click ‘Help’ button. On-line help documents will be presented in Windows help format. Click this button to view on-line help documents. -
Page 70: Chapter Iii: Soft-Ap Function
CHAPTER III: Soft-AP Function Excepting become a wireless client of other wireless access points, this wireless card can act as a wireless service provider also! You can switch this wireless card’s operating mode to ‘AP’ mode to simulate the function of a real wireless access point by software, and all other computers and wireless devices can connect to your computer wirelessly, even share the internet connection you have! Please follow the instructions in following chapters to use the AP... - Page 71 A configuration window will appear after you switch the operation mode to ‘AP’, which asks you to assign an existing network card with internet connection. If your computer has another network card which is connected to Internet, please select it from ‘Name’ dropdown menu, and click ‘Enable ICS’;...
- Page 72 Here are descriptions of every setup item: Item Name Description SSID Please input the SSID (the name used to identify this wireless access point) here. Up to 32 numerical characters can be accepted here, excepting space. Channel Please select the wireless channel you wish to use.
- Page 73 Wireless Mode Select the operation mode of the access point here. Use Mac Address Click this button to use the MAC address of the wireless card as SSID. A prefix ‘AP’ will be added automatically. Security Setting Set the security options (wireless data encryption).
- Page 74 Tx BURST Check this box to accelerate the data transmit rate. It may not work with all wireless access point and wireless devices. Beacon(ms) You can define the time interval that a beacon signal should be send. Default value is 100. Do not modify this value unless you know what will be affected.
-
Page 75: Security Setting
3-2 Security Setting This wireless card supports wireless encryption in AP mode, which will encrypt the data being transferred over the air to enhance data security level. It’s recommended to enable data encryption unless you wish to open your computer (and its internet connection) to the public. - Page 76 Here are descriptions of every setup item: Item Name Description Authentication Please select a wireless authentication type Type you wish to use. Available options are ‘Open’, ‘Shared’, WPA-PSK’, ‘WPA2-PSK’, and ‘WPA-PSK / WPA2-PSK’. If you want to disable wireless data encryption, you must select ‘Open’.
- Page 77 If you want to use WEP 64 bits encryption, please input 10 characters if you select HEX, or input 5 characters if you select ASCII. If you want to use WEP 128bits encryption, please input 26 characters if you select HEX, or input 13 characters if you select ASCII.
-
Page 78: Access Control
3-3 Access Control If you’re not going to open your computer and wireless resources to the public, you can use MAC address filtering function to enforce your access control policy, so only wireless clients with MAC address you defined by this function can be connected to your software access point. - Page 79 Here are descriptions of every setup item: Item Name Description Access Policy Select the policy type of your access rule. Disable: Allow any wireless client with proper authentication settings to connect to this access point. Allow All: Only allow wireless clients with MAC address listed here to connect to this access point.
-
Page 80: Connection Table
3-4 Connection Table If you want to see the list of all wireless clients connected to this access point, please select ‘Mac Table’ tab from the utility. - Page 81 Here are descriptions of every field: Item Name Description MAC Address Displays the MAC address of this wireless client. The serial number of this wireless connection. Power Saving Displays the capability of power-saving Mode function of this wireless client. Status Displays additional information of this wireless Connection, like current wireless operating mode and data transfer rate.
-
Page 82: Event Log
3-5 Event Log This software access point will log all wireless-related activities as a log. Click ‘Event Log’ tab, and the event log will be displayed. You can click ‘Clear’ to remove all entries in the log. -
Page 83: Statistics
3-6 Statistics If you want to know detailed information about how your software access point works, click ‘Statistics’ tab, and the event log will be displayed. You can click ‘RESET COUNTERS’ button to reset all counters to zero. -
Page 84: About
3-7 About The ‘About’ tab provides you the information about version number of the configuration utility, driver, and other important information about your wireless access point. -
Page 85: Chapter Iv: Appendix
CHAPTER IV: Appendix 4-1 Specification Standards: IEEE 802.11b/g/n (1T1R) Interface: 32Bit PCI Frequency Band: 2.4000 ~ 2.4835GHz (Industrial Scientific Medical Band) Data Rate: 11b: 1/2/5.5/11Mbps 11g: 6/9/12/24/36/48/54Mbps 11n (20MHz): MCS0-7 (up to 72Mbps) 11n (40MHz): MCS0-7 (up to 150Mbps) Securities: WEP 64/128-bit, WPA, WPA2 Cisco CCX Support Antenna: One External Dipole Antenna (1T1R) -
Page 86: Troubleshooting
4-2 Troubleshooting If you encounter any problem when you’re using this wireless network card, don’t panic! Before you call your dealer of purchase for help, please check this troubleshooting table, the solution of your problem could be very simple, and you can solve the problem by yourself! Scenario Solution... - Page 87 correct SSID of the access point you wish to connect. Please contact the owner of access point to ask for correct SSID. 3. You have to input correct passphrase / security key to connect an access point with encryption. Please contact the owner of access point to ask for correct passphrase / security key.
-
Page 88: Glossary
4-3 Glossary 1. What is the IEEE 802.11g standard? 802.11g is the new IEEE standard for high-speed wireless LAN communications that provides for up to 54 Mbps data rate in the 2.4 GHz band. 802.11g is quickly becoming the next mainstream wireless LAN technology for the home, office and public networks. - Page 89 4. What is Ad-hoc? An Ad-hoc integrated wireless LAN is a group of computers, each has a Wireless LAN card, Connected as an independent wireless LAN. Ad hoc wireless LAN is applicable at a departmental scale for a branch or SOHO operation. 5.
- Page 90 11. Would the information be intercepted while transmitting on air? WLAN features two-fold protection in security. On the hardware side, as with Direct Sequence Spread Spectrum technology, it has the inherent security feature of scrambling. On the software side, WLAN series offer the encryption function (WEP) to enhance security and Access Control.
- Page 91 networks that improve the user experience for audio, video and voice applications. WMM is based on a subset of the IEEE 802.11e WLAN QoS draft standard. WMM adds prioritized capabilities to Wi-Fi networks and optimizes their performance when multiple concurring applications, each with different latency and throughput requirements, compete for network resources.
- Page 92 function, and WPS-compatible wireless clients and access point will establish connection by themselves. There are two types of WPS: PBC (Push-Button Configuration) and PIN code.
Need help?
Do you have a question about the Wireless 150N PCI Adapter and is the answer not in the manual?
Questions and answers