Advertisement
Quick Links
5/20/2019
Home (https://www.bluerobotics.com) / Guide (https://www.bluerobotics.com/learn/) / BlueROV2 Heavy Con guration Retro t Kit
Installation
BlueROV2 Heavy Con guration Retro t Kit Installation
Introduction
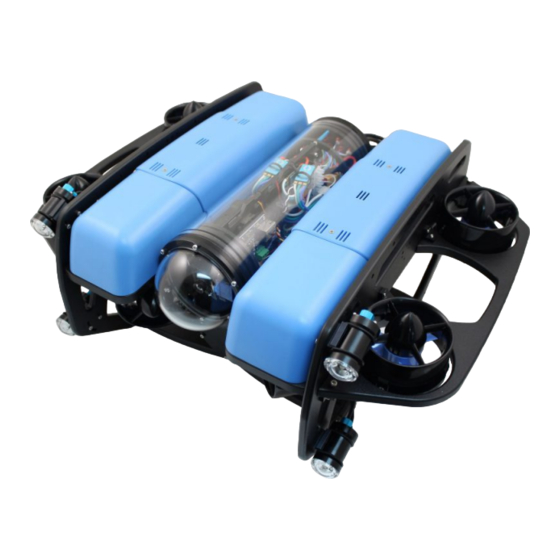
The BlueROV2 Heavy Con guration Retro t Kit provides the components needed to upgrade your ROV to have four
vertical thrusters, external thruster guards, and additional buoyancy. With that upgrade, you'll gain 6 degree-of-
freedom control and active stabilization in roll and pitch making the BlueROV2 Heavy the most stable but
maneuverable mini ROV on the market.
Parts and Tools
You Will Need
https://www.bluerobotics.com/learn/bluerov2-heavy-configuration-retrofit-kit-installation/
BlueROV2 Heavy Configuration Retrofit Kit Installation - Blue Robotics
BlueROV2 Heavy Con guration Retro t Kit
$599.00
(https://www.bluerobotics.com/store/rov/bluerov2-
upgrade-kits/brov2-heavy-retro t-r1-rp/)
Add to Cart (/learn/bluerov2-heavy-
con guration-retro t-kit-installation/?add-to-
cart=19948)
Privacy
-
Terms
1/28
Advertisement

Related Manuals for Blue Robotics BlueROV2


Summary of Contents for Blue Robotics BlueROV2
- Page 1 Introduction The BlueROV2 Heavy Con guration Retro t Kit provides the components needed to upgrade your ROV to have four vertical thrusters, external thruster guards, and additional buoyancy. With that upgrade, you’ll gain 6 degree-of- freedom control and active stabilization in roll and pitch making the BlueROV2 Heavy the most stable but maneuverable mini ROV on the market.
- Page 2 1 x Bottle of Threadlocker (not included) BlueROV2 Partial Disassembly To partially disassemble your BlueROV2, you will need the following tools: 1 x 2.5 mm hex driver 1 x #1 Phillips head screwdriver 1 x Wire cutters or scissors...
- Page 3 5/20/2019 BlueROV2 Heavy Configuration Retrofit Kit Installation - Blue Robotics (https://www.bluerobotics.com/wp-content/uploads/2019/03/heavy-tutorial-1.jpg?x62571) 2. Remove the fairings and buoyancy blocks by removing the self-tapping screws that hold the fairings to the frame. (https://www.bluerobotics.com/wp-content/uploads/2019/03/heavy-step-3.png?x62571) Privacy Terms https://www.bluerobotics.com/learn/bluerov2-heavy-configuration-retrofit-kit-installation/ 3/28...
- Page 4 5/20/2019 BlueROV2 Heavy Configuration Retrofit Kit Installation - Blue Robotics 3. Optional: In order to ensure thruster mounting is not mixed up, it is recommended to apply short strips of masking tape to the outside of the thruster ducts and labeling them 5,6,7 and 8 respectively according to the thruster diagrams.
- Page 5 5/20/2019 BlueROV2 Heavy Configuration Retrofit Kit Installation - Blue Robotics (https://www.bluerobotics.com/wp-content/uploads/2019/03/heavy-tutorial-2.jpg?x62571) 4. Remove the M3x12 screws holding Thrusters 5 and 6 to the side panels and place the screws to the side. (https://www.bluerobotics.com/wp-content/uploads/2019/03/heavy-tutorial-3.jpg?x62571) Privacy Terms https://www.bluerobotics.com/learn/bluerov2-heavy-configuration-retrofit-kit-installation/ 5/28...
- Page 6 5/20/2019 BlueROV2 Heavy Configuration Retrofit Kit Installation - Blue Robotics 5. Cut and remove any zipties holding the motor wires for Thrusters 5 and 6 to the frame. (https://www.bluerobotics.com/wp-content/uploads/2019/03/heavy-tutorial-4.jpg?x62571) 6. Remove the 4” Electronics enclosure from the ROV by removing the M3x16 screws that mount the enclosure to the ROV cradle.
- Page 7 5/20/2019 BlueROV2 Heavy Configuration Retrofit Kit Installation - Blue Robotics (https://www.bluerobotics.com/wp-content/uploads/2019/03/heavy-tutorial-5.jpg?x62571) 7. Remove the Vent Plug from the Vent Penetrator Bolt on the electronics enclosure. 8. Remove the Aluminum End Cap with 14 Holes by removing the six M3x12 screws using the M2.5 hex driver. Place the M3x12 screws, clips (small L-shaped parts) in a safe place.
- Page 8 5/20/2019 BlueROV2 Heavy Configuration Retrofit Kit Installation - Blue Robotics (https://www.bluerobotics.com/wp-content/uploads/2019/03/heavy-tutorial-6.jpg?x62571) 9. Remove the two blank penetrators as pictured from the 4” End Cap with the penetrator wrench that came with the BlueROV2 kit. (https://www.bluerobotics.com/wp-content/uploads/2019/03/end-cap-remove.jpg?x62571) Privacy Terms https://www.bluerobotics.com/learn/bluerov2-heavy-configuration-retrofit-kit-installation/ 8/28...
- Page 9 5/20/2019 BlueROV2 Heavy Configuration Retrofit Kit Installation - Blue Robotics Install New Thrusters To Install the new thrusters, you will need the following parts and tools: 1 x T200 with counter-clockwise propeller 1 x T200 with clockwise propeller 1 x Bag with 8 M3x12 screws 8 x M3x12 screws you had set aside from removing Thrusters 5 and 6 1 x Silicone Grease –...
- Page 10 5/20/2019 BlueROV2 Heavy Configuration Retrofit Kit Installation - Blue Robotics (https://www.bluerobotics.com/wp-content/uploads/2019/03/heavy-tutorial-7.jpg?x62571) 2. Reinstall the 4” Aluminum End Cap with the following steps: Clean the O-ring and make sure that it is free of any debris or damage. Clean the O-Ring Flange (4” Series) and make sure that the O-ring groove is free of any debris or damage.
- Page 11 5/20/2019 BlueROV2 Heavy Configuration Retrofit Kit Installation - Blue Robotics (https://www.bluerobotics.com/wp-content/uploads/2019/03/heavy-tutorial-9.jpg?x62571) Install New Electronics To install the new electronics, you will need the following parts and tools: 2 x Basic ESC 2 x 3 Pole Euro Terminal Block 1 x Small (~2 mm) at head screw driver 1 x Large (~#2) Phillips head screw driver 1.
- Page 12 5/20/2019 BlueROV2 Heavy Configuration Retrofit Kit Installation - Blue Robotics (/wp-content/uploads/2019/03/heavy-tutorial-10.jpg?x62571) 2. Connect the motor power wires from the thrusters 7 and 8 to the motor terminal blocks as shown, using your 2 mm at head screw driver. Privacy Terms https://www.bluerobotics.com/learn/bluerov2-heavy-configuration-retrofit-kit-installation/...
- Page 13 5/20/2019 BlueROV2 Heavy Configuration Retrofit Kit Installation - Blue Robotics (/wp-content/uploads/2019/03/heavy-tutorial-23.jpg?x62571) 3. Connect the motor power wires from the new ESCs to the motor terminal blocks as shown below, using your 2 mm at head screw driver. (/wp-content/uploads/2019/03/heavy-tutorial-11.jpg?x62571) 4. Plug ESC Signal Wires into Pixhawk with the following steps: Unplug the Lumen light signal wire from the Pixhawk Channel 7 port and replug it into Aux Channel 1 with the yellow wire oriented toward the bottom of the Pixhawk.
- Page 14 5/20/2019 BlueROV2 Heavy Configuration Retrofit Kit Installation - Blue Robotics (/wp-content/uploads/2019/03/heavy-tutorial-12.jpg?x62571) 6. Secure the ESCs to the tray using one ziptie each and lightly wrapping them around the other ESC motor power wires. Privacy Terms https://www.bluerobotics.com/learn/bluerov2-heavy-configuration-retrofit-kit-installation/ 14/28...
- Page 15 5/20/2019 BlueROV2 Heavy Configuration Retrofit Kit Installation - Blue Robotics (/wp-content/uploads/2019/03/heavy-tutorial-13.jpg?x62571) Install New Thruster Guards To install the new thruster guards, you will need the following parts and tools: 1 Bag of 12 M4x16mm screws 1 Bag of #4×0.5” Thread forming screws...
- Page 16 5/20/2019 BlueROV2 Heavy Configuration Retrofit Kit Installation - Blue Robotics (/wp-content/uploads/2019/03/heavy-tutorial-15.jpg?x62571) 4. Install four more thruster guard mounting brackets (two on each side) in the holes near the middle of the ROV using one M4x16 screw and one #4×0.5” thread forming screw per bracket.
-
Page 17: Cable Management
Reassemble BlueROV2 Electronics Enclosure To reassemble your BlueROV2 electronics Enclosure, you will need the following parts and tools: 4 x M3x16 screws that were placed o to the side during disassembly 1 x Silicone Grease – 10g Tube 1 x 2.5 mm hex driver... - Page 18 5/20/2019 BlueROV2 Heavy Configuration Retrofit Kit Installation - Blue Robotics The primary goal of Thruster and Lumen cable management is to prevent the wires from getting cut by the propellers. Make sure to check that no wire can reach a propeller after you have nished routing the cables. Below are some examples of what the cable routing should look like.
- Page 19 5/20/2019 BlueROV2 Heavy Configuration Retrofit Kit Installation - Blue Robotics (https://www.bluerobotics.com/wp-content/uploads/2019/03/heavy-step-3.png?x62571) 2. Place the new round Heavy buoyancy blocks into the open space where Thrusters 5 and 6 used to be. Ensure the at sides of the blocks are parallel to the sides of the ROV.
- Page 20 5/20/2019 BlueROV2 Heavy Configuration Retrofit Kit Installation - Blue Robotics (/wp-content/uploads/2019/03/heavy-tutorial-16.jpg?x62571) 3. Place the new plastic Heavy fairings on top of the buoyancy blocks and secure them to the old fairing blocks using the included self-tapping fairing screws. (/wp-content/uploads/2019/03/heavy-tutorial-18.jpg?x62571) Privacy Terms https://www.bluerobotics.com/learn/bluerov2-heavy-configuration-retrofit-kit-installation/...
- Page 21 5/20/2019 BlueROV2 Heavy Configuration Retrofit Kit Installation - Blue Robotics (/wp-content/uploads/2019/03/heavy-tutorial-17.jpg?x62571) (/wp-content/uploads/2019/03/heavy-tutorial-21.jpg?x62571) Privacy Terms https://www.bluerobotics.com/learn/bluerov2-heavy-configuration-retrofit-kit-installation/ 21/28...
-
Page 22: Software Setup
1. Go to the Frame tab of the Vehicle Setup page (click the gears icon) 2. Click ‘Load Vehicle Defaults’ 3. Click BlueROV2 Heavy. A green bar will move across the top of the screen indicating the progress of loading the parameters; this is usually pretty quick. - Page 23 5. Follow the respective guide for re-entering the parameter values for the Power Module (depreciated) or Power Sense Module (current). Power Sense Module (PSM) Installation (https://www.bluerobotics.com/learn/power-sense-module-psm-installation/) Learn how to install and setup a Power Sense Module on your BlueROV2 or other underwater project! Con gure Motor Directions Privacy Terms https://www.bluerobotics.com/learn/bluerov2-heavy-configuration-retrofit-kit-installation/...
- Page 24 The motor directions for the BlueROV2 must be con gured prior to operation. Be sure to keep all body parts and clothing clear of thrusters while the BlueROV2 is armed. DO NOT run thrusters for longer than 30 seconds in air.
- Page 25 5/20/2019 BlueROV2 Heavy Configuration Retrofit Kit Installation - Blue Robotics 1. Using the joystick button functions for trim_roll and trim_pitch . This function is standard with the BlueROV2 setup. Push the buttons once, or hold them down to adjust the roll and pitch angle of the vehicle.
- Page 26 5/20/2019 BlueROV2 Heavy Configuration Retrofit Kit Installation - Blue Robotics (https://www.bluerobotics.com/wp-content/uploads/2019/03/joystick-stick-mode.png?x62571) These functions can be assigned to buttons on the joystick in the Joystick tab of the Vehicle Setup menu. The roll and pitch inputs are cleared when switching to MANUAL mode. They are NOT cleared when disarmed.
- Page 27 5/20/2019 BlueROV2 Heavy Configuration Retrofit Kit Installation - Blue Robotics Software Setup Forum (https://discuss.bluerobotics.com/c/bluerov2- ardusub/bluerov2) Print Tags Assembly (https://www.bluerobotics.com/guide-tag/assembly/) BlueROV2 (https://www.bluerobotics.com/guide-tag/bluerov2/) Posted 27 Feb 2018 Last updated on 30 Mar 2019 Sign up for the latest updates! ...
- Page 28 Return Policy (/terms/#returns) Support & Community Documentation (//docs.bluerobotics.com) Forums (http://discuss.bluerobotics.com) Video Tutorials (//docs.bluerobotics.com/videos/) Contact Contact Us (/contact/) Copyright © 2019 - Blue Robotics Inc. | Contact Us (/contact/) | Terms and Conditions (/terms/#terms) | Privacy Policy (/terms/#privacy) Privacy Terms https://www.bluerobotics.com/learn/bluerov2-heavy-configuration-retrofit-kit-installation/ 28/28...
Need help?
Do you have a question about the BlueROV2 and is the answer not in the manual?
Questions and answers