Advertisement
Quick Links
10/3/2018
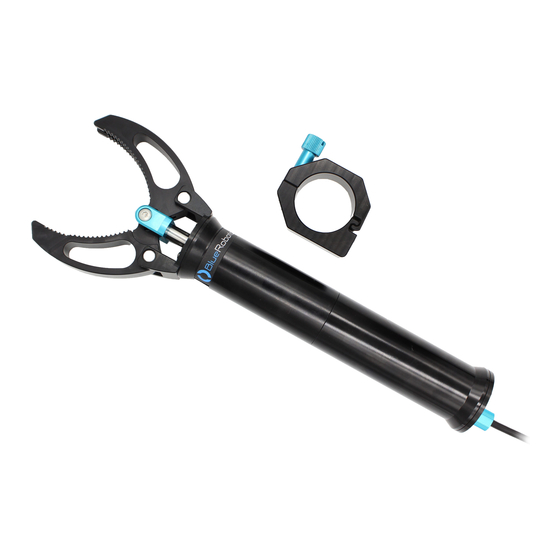
Newton Gripper
Introduction
The Newton Gripper is a sealed, single function manipulator which can operate at depths of up to 300 meters. The
Newton Gripper can be smoothly opened or closed with a servo PWM signal to provide the BlueROV2 and other subsea
vehicles with the ability to interact with the subsea environment to retrieve objects, attach recovery lines, or free a
snagged tether.
Keep ngers and other body parts away from the gripper when operating! It's strong and has the potential to do
some damage. Notify other crew members to do the same.
Quick Start (Open and Close with PWM signal source)
1. Connect the signal wire to a signal source such as the Pixhawk on the BlueROV2 or a 3.3v microcontroller.
Yellow: PWM (3.3 volts only)
2. Connect the power wires to a power source
Red: +9-18 volts
Black: Ground
3. Provide a servo PWM pulse at 1500 μs for no movement. Provide a servo PWM pulse greater than 1530 μs to open gripper.
Provide a servo PWM pulse less than 1470 μs to close gripper.
Speci cations
http://docs.bluerobotics.com/newton-gripper/#specifications
Newton Gripper
1/17
Advertisement

Related Manuals for Blue Robotics Newton Gripper


Summary of Contents for Blue Robotics Newton Gripper
- Page 1 Introduction The Newton Gripper is a sealed, single function manipulator which can operate at depths of up to 300 meters. The Newton Gripper can be smoothly opened or closed with a servo PWM signal to provide the BlueROV2 and other subsea vehicles with the ability to interact with the subsea environment to retrieve objects, attach recovery lines, or free a snagged tether.
- Page 2 10/3/2018 Newton Gripper Speci cation Table Electrical Item Value Supply Voltage (V ) 9 - 18 volts PWM Logic Voltage 3.3 volts PWM Neutral Signal 1500 μs PWM Open Signal >1530 μs-1900 μs ...
-
Page 3: Installation
NEWTON-GRIPPER-ASM-R3-PUBLIC.zip (/newton-gripper/cad/NEWTON-GRIPPER-ASM-R3-PUBLIC.zip) Newton Gripper Mount NEWTON-MOUNT-ASM-R1-PUBLIC.zip (/newton-gripper/cad/NEWTON-MOUNT-ASM-R1-PUBLIC.zip) Installation The Newton Gripper can be easily installed onto a BlueROV2 using the accompanying mount. Removing a Blank Penetrator To remove a blank penetrator from your BlueROV2, you will need the following tools: http://docs.bluerobotics.com/newton-gripper/#specifications... - Page 4 10/3/2018 Newton Gripper 1 x 2.5 mm hex driver 1 x #1 Phillips head screwdriver 1 x Penetrator wrench 1. To ensure your ROV is completely powered o , please remove the battery completely from the 3” enclosure and place to the side.
- Page 5 10/3/2018 Newton Gripper 4. Remove the Vent Plug from the Vent Penetrator Bolt on the electronics enclosure. Remove the 4” tube and forward dome assembly from the rear end cap. 5. Remove the blank penetrator as pictured from the 4” End Cap with the penetrator wrench that came with the BlueROV2 kit.
- Page 6 10/3/2018 Newton Gripper Install Newton Gripper Penetrator To install the Newton Gripper into the end cap, you will need the following parts and tools: 1 x Newton Gripper assembly 1 x Penetrator Nut (Red) 1 x Penetrator O-ring 1 x Silicone Grease – 10g Tube...
-
Page 7: Wiring Connections
Newton Gripper Wiring Connections To install the Newton Gripper wires into your BlueROV2, you will need the following tool: 1 x Large (~#2) Phillips head screw driver 1. Plug the Gripper Signal Wire (Yellow) into Aux Channel 3 (or other free AUX Channel) with the yellow wire oriented toward the bottom of the Pixhawk. - Page 8 10/3/2018 Newton Gripper 2. Connect the power wires (red and black wires) into open screw terminals on the respective positive and negative terminal blocks. Reassemble BlueROV2 Electronics Enclosure http://docs.bluerobotics.com/newton-gripper/#specifications 8/17...
- Page 9 Enclosure Cradle (4” Series) easily. Mounting the Newton Gripper to the BlueROV2 Frame To mount the Newton Gripper to the BlueROV2 Frame, you will need the following parts and tools: 1 x Newton Gripper Mount Drilling Template, included with kit or available here (/newton-gripper/cad/NEWTON-GRIPPER-W- MOUNT-DRILLING-TEMPLATE-UNIVERSAL-R1.PDF) (8.5 x 11”...
- Page 10 10/3/2018 Newton Gripper 3. Remove the 3” battery enclosure by removing the M4x14 Screws from the bottom of the frame. 4. Cut out and align one of the the provided templates onto the bottom side (with the counterbore holes) and tape in place. You have the option of mounting the gripper to the right or left side of the vehicle.
- Page 11 10/3/2018 Newton Gripper 5. With a hand powered drill and 5.50mm drill bit, drill straight holes in the indicated position markings. 6. Re-attach the 3” battery enclosure to the frame with the M4x14 Screws. 7. Re-attach the bottom frame panel to the BlueROV2 with the four M5x16 Screws.
- Page 12 10/3/2018 Newton Gripper 10. Coming from the aft end of the BlueROV2, weave the Gripper assembly into its mounting location, apply a drop of threadlocker to the included M5x16 Screwsand secure to the frame. http://docs.bluerobotics.com/newton-gripper/#specifications 12/17...
-
Page 13: Cable Management
Cable Management To clean up the external Newton Gripper cable, you will need the bag of 5 zip ties and your scissors/wire cutters. The primary goal of cable management is to prevent the wires from getting cut by the propellers. Make sure to check that no wires can reach the propellers after you have nished routing the Newton Gripper cable. - Page 14 To get the longest battery life and the best driving experience, it is important to have the ROV close to balanced from front to back in water and close to neutrally buoyant. The Newton Gripper adds a bit of weight to the ROV, so it will need to be retrimmed based on your operating conditions.
- Page 15 Newton Gripper Note that these button functions only exist for Aux Channels 1~3. Should your Newton Gripper be connected to any other output channel, you will be unable to control it with joystick buttons. You may set-up your controller buttons however you like, however the limited number of buttons means that you will have to shift the button controls around.
-
Page 16: Final Test
10/3/2018 Newton Gripper Button Function Shift Function disarm Disabled shift Disabled Disabled mount_center Disabled input_hold_set Disabled servo_3_min_momentary mount_tilt_down servo_3_max_momentary mount_tilt_up gain_inc trim_pitch_dec gain_dec trim_pitch_inc lights1_dimmer trim_roll_dec lights1_brighter trim_roll_inc Disabled Disabled Final Test That’s it! Once powered up you should be able to control the gripper with the joystick buttons. The ROV does not need to be armed for the gripper to be active. - Page 17 10/3/2018 Newton Gripper http://docs.bluerobotics.com/newton-gripper/#specifications 17/17...
Need help?
Do you have a question about the Newton Gripper and is the answer not in the manual?
Questions and answers