Table of Contents
Advertisement
Advertisement
Table of Contents

Subscribe to Our Youtube Channel
Related Manuals for Cool-Icam CIC-223


Summary of Contents for Cool-Icam CIC-223
- Page 1 AQ3100 User’s Manual...
-
Page 2: Product Overview
Product Overview 1. Flash 2. Self-timer LED 3. Viewfinder 4. Lens Front View... -
Page 3: Table Of Contents
1 Getting Started ...4 • Camera Package Contents...4 • Attaching the Hand Strap...4 • Installing the Batteries ...4 • Turning the Camera On and Off ...4 • How to Navigate the Menus...5 • Checking the Battery Level ...5 • Connecting AC Adaptor (not included) ...5 2 Camera Setting ...5 •... -
Page 4: Getting Started
The AQ 3100 camera is designed for the digital camera enthusiast. Designed as a point and shoot camera it is still loaded with fun, easy to use features. Here are a few examples of what you can do with your camera. -
Page 5: How To Navigate The Menus
Use the 4-way control to select on-screen menu items. Press menus. Press to scroll left and right. • Checking the Battery Level Check the battery level by pressing the Display button before taking pictures. 1. Turn on the camera. 2. Check the battery level that appears on the LCD screen. Batteries have adequate power. -
Page 6: Playback Mode
• Camera Mode Mode selector The camera has four working modes. You can select the mode you prefer using the Mode selector located on the top of the camera. Auto mode Under this mode, the camera will automatically judge the environment conditions for you. It will set the Exposure and White balance automatically according to the shooting environment. -
Page 7: Power Save Setting
Your camera is designed to turn off the LCD screen and the camera automatically after a period of inactivity to save battery life. You can change Power Save Setting by the following steps. 1. Turn the camera on. 2. Press Menu button, and then use the Right or Left button to select “SETUP MENU”. Press 3. -
Page 8: Turning The Information Display/Lcd Screen Off
To turn the Information display icons off, just press the Display button once, press it again will turn off the LCD screen. Press the Display button one more time will turn on the information display and the LCD screen. LCD screen on, Information display on Press the... -
Page 9: Taking Pictures In Macro Mode
• Taking Pictures in Macro Mode Use this mode to capture subjects this close to the lens: 5.9 to 11.8 inches (15 to 30 cm). 1. Turn on the camera. 2. Set the Mode selector to Auto or Manual. 3. Switch the Normal/Macro selector to 4. -
Page 10: Setting The Picture Quality
CCD array. Basically, an integrated circuit chip in the digital camera generates new data by taking the dots the digital camera actually sees, and calculating where the dots in-between would most likely fall, using an algorithm to “guess” the colour of the new dots by averaging the colour of adjacent dots. -
Page 11: Setting Exposure Compensation
You can adjust the exposure compensation value (EV) within the range of -2EV to +2EV in order to compensate for current lighting conditions. This setting can be used to obtain better result when shooting with backlighting, indirect indoor lighting, a dark background, etc. 1. -
Page 12: Recording Video Clips
• Recording Video Clips In Video mode, you can record the video clip with sound. The resolution is set to 320x240 pixels automatically. Please note that there is no zoom in and zoom out functions in Video Record mode. You can record video clip for up to approximately 3 minutes by using the internal memory. Using an optional SD (Secure Digital) card increases the video recording time. -
Page 13: Playing The Video Clips
1. Turn on the camera. 2. Set the Mode selector to Playback mode. 3. Use the Left or Right button to select a video clip you want to play. Video clips are with the icon 4. Press the OK button to start playing the video clip, you can hear the sound of the video clip from the Speaker. -
Page 14: Connecting To A Tv
When connected to a TV, the LCD screen is not active and all menu functions, pictures taken and pictures preview will be shown on the TV screen instead. The TV screen now performs as the LCD screen. 1. Use the video out cable to connect the camera to the television as illustrated. 2. -
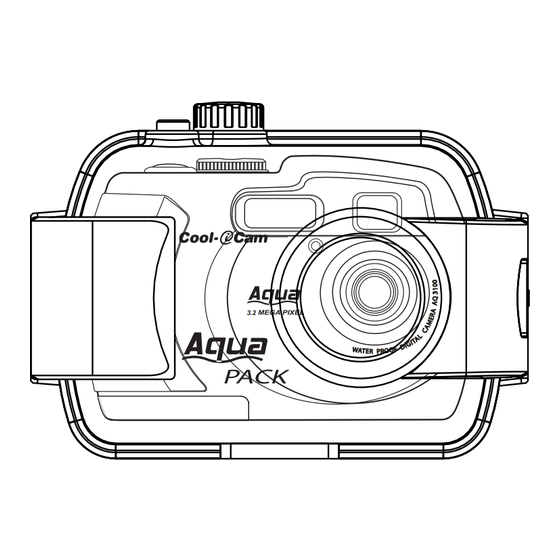
Page 15: Using The Camera Under Water
The waterproof case will allow you to use your camera in the rain, at the beach or on the ski slopes. You can also use it underwater at depths down to 30 metres (Maximum) within 30 minutes. Before you use the waterproof case, please make sure the case is functioning correctly and does not leak. -
Page 16: Assemble Waterproof Case
1. Turn the camera off. 2. Follow the steps below to unlock the waterproof case. Step 1 Unlock the waterproof case by pressing the safety lock button downward. 3. Turn the Mode selector on the waterproof case into the position as illustrated in Diagram 1 whenever you put in or take the camera out of the waterproof case;... -
Page 17: Using The Sd Card
• Using the SD (Secure Digital) Card Your camera comes with approximately 16MB of built-in flash memory for storing pictures and video clip. You can expand the camera memory using a commercially available SD card (up to 256MB). The camera senses whether a memory card is inserted, and automatically saves pictures accordingly. -
Page 18: Dpof(Digital Print Order Format)
The letters ”DPOF” stand for “Digital Print Order Format”, which is a format for recording on a memory card or other medium which digital camera images should be printed and how many copies of the image should be printed. Then you can print on a DPOF-compatible printer or at a professional print service from the memory card in accordance with the file name and number of copies settings recorded on the card. -
Page 19: Print Image Matching)
See the documentation that came with your printer for full details about PRINT Image Matching. Now your digital camera and your printer can speak the same language. PRINT Image Matching technology ensures that PRINT Image Matching-enabled digital cameras and printers work together perfectly to produce the best possible prints. -
Page 20: Installing The Software Onto A Computer
8 Installing the Software onto a Computer • Installing the Software For Windows® Users: IMPORTANT! (For Windows® 98SE) • Please backup all the necessary data before any driver/software installation. • Our CD-ROM is tested and recommended to use under English Windows OS. IMPORTANT! (For Windows®... -
Page 21: Transferring Pictures And Video Clips To Your Computer
For Macintosh® Users • PowerPC® Processor • Mac™ OS Version 9.2~X • USB Port • 64MB RAM (128MB recommended) • 150MB Free disk space • Colour monitor with high colour (16-bit) graphic capability or higher • CD-ROM drive • Standard mouse and keyboard •... -
Page 22: Troubleshooting Problems
Windows Explorer. Images are blurry Colour of images has been shifted. Please also refer to the help files & User Guides that accompany the enclosed applications. For further information and support, please visit our website: http://www.cool-icam.com/ 10 Troubleshooting Problems Problem “Digital Driver”... -
Page 23: Getting Help
• Online Services Website : http://www.cool-icam.com • ArcSoft Software Help For North America ArcSoft HQ Support Centre (Fremont California, CA) Tel: 1-800-762-8657 (toll free number) Fax: 1-510-440-1270 E-mail: support@arcsoft.com For China ArcSoft China Support Centre (Beijing) Tel: 8610-6849-1368 Fax: 8610-6849-1367 E-mail: china@arcsoft.com... -
Page 24: Appendix
• Technical Specifications • Internal Memory: 16MB NAND FLASH • External Memory: support SD card memory card up to 256MB (not included) • Still Image Resolution:(based on 16MB internal memory; the 2272X1704 resolution is interpolated by firmware.) • Fine quality 2272 x 1704 pixel - 2048 x 1536 pixel - 1600 X 1200 pixel -... -
Page 25: Capacity Of Sd Card
• USB port (Mini-B port), AC adaptor connector, Video Out (NTSC/PAL) • Power Supply • USB Port • 2 x AA Alkaline batteries (included) • +3.3V DC Adaptor (not included) • Operating System: • For Windows® Users: Microsoft® Windows® 98SE, ME, 2000 or XP •... -
Page 26: Using Your Batteries
WARNINGS! • Batteries should be replaced by an adult. • Do not mix different types of batteries or new and used batteries. • Use recommended or equivalent type of batteries only. • Insert the batteries with the correct polarity. • Remove exhausted batteries from the camera immediately. •... -
Page 27: Uninstalling Aq 3100 Driver
• Uninstalling AQ 3100 Driver For Windows® 98SE Users NOTE: The following driver “Uninstall” procedure is for Windows® 98SE users only. 1. Open Add/Removable Program Properties in Control Panel and select Digital Cam program, then click Add/Remove . 2. The following dialog box appears, and click Yes to confirm removing camera driver. 3.
Need help?
Do you have a question about the CIC-223 and is the answer not in the manual?
Questions and answers