Table of Contents
Advertisement
Available languages
Available languages
Quick Links
Advertisement
Chapters
Table of Contents

Related Manuals for TechniSat DIGITRADIO UP 1


Summary of Contents for TechniSat DIGITRADIO UP 1
- Page 1 Bedienungsanleitung DIGITRADIO UP 1 DAB+/UKW-Unterputzradio mit Bluetooth...
-
Page 2: Table Of Contents
Inhaltsverzeichnis Vorwort ........................4 Die Zielgruppe dieser Bedienungsanleitung ..............4 1.1.1 Bestimmungsgemäßer Gebrauch ..................4 Wichtige Hinweise ........................4 1.2.1 Sicherheit ............................5 1.2.2 Entsorgung ............................. 6 1.2.3 Rechtliche Hinweise ........................8 1.2.4 Servicehinweise..........................8 Abbildung und Tasten ....................9 Anschluss und Montage des DIGITRADIO UP1 ..........10 Beschreibung des DIGITRADIO UP1 .............. - Page 3 UKW-Sender auf einem Speicherplatz ablegen ............17 UKW-Sender von einem Speicherplatz abrufen ............17 Überschreiben/Löschen einer Programmplatz-Speicherung........17 Bluetooth ........................17 Gerät koppeln ..........................18 Bluetooth-Wiedergabe ......................18 Erweiterte Funktionen ................... 19 10.1 Sleeptimer ............................ 19 10.2 Wecker ............................19 10.2.1 Weckzeit einstellen ........................19 10.2.2 Wecker nach Alarm ausschalten ..................
-
Page 4: Vorwort
1 Vorwort Diese Bedienungsanleitung hilft Ihnen beim bestimmungsgemäßen und sicheren Gebrauch Ihres Radio-Gerätes, im folgenden DIGITRADIO oder Gerät genannt. 1.1 Die Zielgruppe dieser Bedienungsanleitung Die Bedienungsanleitung richtet sich an jede Person, die das Gerät aufstellt, bedient, reinigt oder entsorgt. 1.1.1 Bestimmungsgemäßer Gebrauch Bitte lesen Sie diese Bedienungsanleitung sorgfältig durch. -
Page 5: Sicherheit
1.2.1 Sicherheit Zu Ihrem Schutz müssen Sie die Sicherheitsvorkehrungen sorgfältig durchlesen, bevor Sie Ihr DIGITRADIO UP1 in Betrieb nehmen. Der Hersteller übernimmt keine Haftung für Schäden, die durch unsachgemäße Handhabung und durch Nichteinhaltung der Sicherheitsvorkehrungen entstanden sind. Dieses Gerät ist nur für den Einbau bestimmt. Nur ausgebildetes Fachpersonal darf Geräte ohne Stecker anschließen. -
Page 6: Entsorgung
Nehmen Sie das Gerät nicht in der Nähe von Badewannen, Duschen, Swimmingpools oder fließendem/spritzendem Wasser in Betrieb (Schutzklasse IP20). Es besteht die Gefahr eines elektrischen Schlages und/ oder Gerätedefekten. Badinstallationen dürfen nur durch ausgebildetes Fachpersonal unter Einhaltung der gültigen Normen und Vorschriften durchgeführt werden. - Page 7 Mit der Wiederverwendung, der stofflichen Verwertung oder anderen Formen der Verwertung von Altgeräten leisten Sie einen wichtigen Beitrag zum Schutze unserer Umwelt. Bitte erfragen Sie bei der Gemeindeverwaltung die zuständige Entsorgungsstelle. Achten Sie darauf, dass die leeren Batterien/Akkus sowie Elektronikschrott nicht in den Hausmüll gelangen, sondern sachgerecht entsorgt werden (Rücknahme durch den Fachhandel, Sondermüll).
-
Page 8: Rechtliche Hinweise
Richtlinie 2014/53/EU entspricht. Der vollständige Text der EU- Konformitätserklärung ist unter der folgenden Internetadresse verfügbar: http://konf.tsat.de/?ID=11471 TechniSat ist nicht für Produktschäden auf Grund von äußeren Einflüssen, Verschleiß oder unsachgemäßer Handhabung, unbefugter Instandsetzung, Modifikationen oder Unfällen haftbar. Änderungen und Druckfehler vorbehalten. Stand 01/19. -
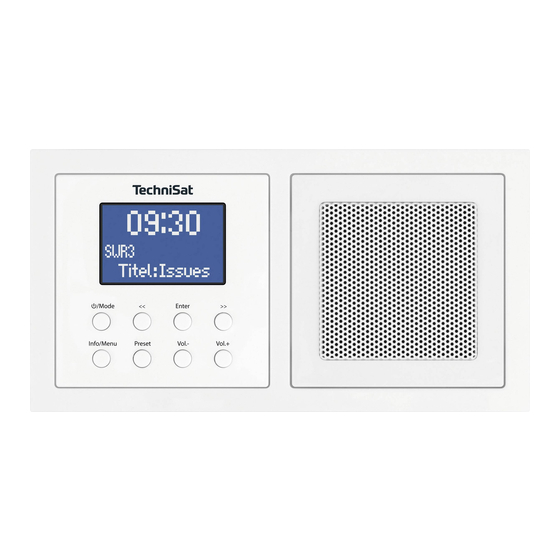
Page 9: Abbildung Und Tasten
Für eine eventuell erforderliche Einsendung des Gerätes verwenden Sie bitte ausschließlich folgende Anschrift: TechniSat Digital GmbH Service-Center Nordstr. 4a 39418 Staßfurt Namen der erwähnten Firmen, Institutionen oder Marken sind Warenzeichen oder eingetragene Warenzeichen der jeweiligen Inhaber. 2 Abbildung und Tasten... -
Page 10: Anschluss Und Montage Des Digitradio Up1
3 Anschluss und Montage des DIGITRADIO UP1 Achtung!: > Dieses Gerät ist nur für den Einbau bestimmt. Arbeiten am 230 V-Netz dürfen nur durch Elektrofachpersonal ausgeführt werden! Lebensgefahr und Brandgefahr durch elektrische Spannung in Höhe von 230 V. Vor Montage / Demontage Netzspannung freischalten! Bei Schäden durch falschen Anschluss besteht kein Anspruch auf Garantie oder Haftung. -
Page 11: Beschreibung Des Digitradio Up1
4 Beschreibung des DIGITRADIO UP1 4.1 Der Lieferumfang Bitte überprüfen sie vor Inbetriebnahme, ob der Lieferumfang vollständig ist: 1x DIGITRADIO UP1 1x Bedienungsanleitung 1x Doppel-Einbaurahmen 1x Antenne Befestigungsmaterial 4.2 Die besonderen Eigenschaften des DIGITRADIO UP1 Das DIGITRADIO UP1 besteht aus einem DAB+/UKW-Empfänger, mit folgend aufgeführten Funktionen: Sie können bis zu 10 DAB+ und 10 UKW-Sender speichern. -
Page 12: Displayanzeigen Aufrufen
5.5 Displayanzeigen aufrufen > Drücken Sie die Taste Info/Menu mehrmals, um die zur Verfügung stehenden Infos durchzuschalten. Sie haben die Wahl, sich folgende Infos anzeigen zu lassen: Im DAB+ -Betrieb (gewählte Funktion wird mit einem “*” gekennzeichnet): [Lauftext] (durchlaufender Text mit zusätzlichen Informationen, die die Sender u. -
Page 13: Die Dab+ (Digital Radio)-Funktion
7 Die DAB+ (Digital Radio)-Funktion 7.1 Was ist DAB+ DAB+ ist ein neues digitales Format, durch welches Sie kristallklaren Sound ohne Rauschen hören können. Anders als bei herkömmlichen Analogradiosendern werden bei DAB+ mehrere Sender auf ein und derselben Frequenz ausgestrahlt. Dies nennt man Ensemble oder Multiplex. -
Page 14: Sender Wählen
> Um einen vollständigen Suchlauf durchzuführen, öffnen Sie das Menü durch gedrückt halten der Taste Info/Menu und wählen Sie mit den Tasten <<, >> und Enter den Menüpunkt [Vollständiger Suchlauf] an. > Im Display erscheint [Suchlauf...]. Während des Suchlaufs wird ein Fortschrittsbalken und die Anzahl an gefundenen Sendern angezeigt. -
Page 15: Signalstärke
7.2.6 Signalstärke > Drücken Sie kurz mehrmals die Taste Info/Menu, bis im Display wird die Signalstärke anhand eines Balkendiagrammes dargestellt wird. Aktuelle Signalstärke Mindestsignalstärke Sender, deren Signalstärke unterhalb der erforderlichen Mindestsignalstärke liegt, senden kein ausreichendes Signal. 7.2.7 Manuell einstellen Dieser Menüpunkt dient der Überprüfung der Empfangskanäle und kann zur Ausrichtung der Antenne dienen. -
Page 16: Fm (Ukw)-Betrieb
8 FM (UKW)-Betrieb 8.1 UKW-Radiobetrieb einschalten > Drücken Sie kurz die Taste /Mode bis [FM] im Display angezeigt wird. Beim erstmaligen Einschalten ist die Frequenz 87,50 MHz eingestellt. Haben Sie bereits einen Sender eingestellt oder gespeichert, spielt das Radio den zuletzt eingestellten Sender. Bei RDS-Sendern erscheint der Sendername. -
Page 17: Audio-Einstellung
8.6 Audio-Einstellung > Halten Sie die Taste Info/Menu gedrückt und wählen Sie mit den Tasten << oder >> den Eintrag [Audio-Einstellung]. > Drücken Sie die Taste Enter. > Wählen Sie mit << oder >> den Eintrag [Stereo möglich] oder [Nur Mono]. >... -
Page 18: Gerät Koppeln
> Starten Sie die Suche nach verfügbaren Bluetooth-Geräten. > Wählen Sie in der Liste der gefunden Bluetooth-Geräte den Eintrag DIGITRADIO UP 1. > Nach erfolgreicher Koppelung erscheint im Display [Bluetooth Verbunden]. Wie man die Bluetooth-Funktion an Ihrem Smartphone/Tablet nutzt, entnehmen Sie bitte der Bedienungsanleitung Ihres Smartphone/Tablets. -
Page 19: Erweiterte Funktionen
10 Erweiterte Funktionen 10.1 Sleeptimer Möchten Sie, dass sich das DIGITRADIO UP1 nach einer bestimmten Zeit automatisch in Standby schaltet, können Sie den Sleeptimer aktivieren. > Halten Sie die Taste Info/Menu gedrückt und wählen Sie mit den Tasten << oder >> den Eintrag [Sleep]. >... -
Page 20: Wecker Nach Alarm Ausschalten
[Wiederholung] > Wählen Sie hier, an welchen Tagen der Wecker aktiv sein soll. Sie haben die Auswahl zwischen Täglich, Einmal, Wochenende (Sa u. So.), Werktage (Mo. - Fr.). Drücken Sie anschließend die Taste Enter. Haben Sie Einmal gewählt, müssen Sie anschließend das Datum eingeben, an dem der Wecker aktiv sein soll. -
Page 21: Systemeinstellungen
11 Systemeinstellungen Alle unter diesem Punkt erläuterten Einstellungen gelten sowohl im DAB+/FM, als auch im Bluetooth-Betrieb gleichermaßen. 11.1 Uhrzeit- und Datumseinstellungen 11.1.1 Zeit/Datum manuell einstellen Je nach Einstellung der Zeitaktualisierung (Punkt 11.1.2), müssen Sie Uhrzeit und das Datum manuell einstellen. >... -
Page 22: Uhrzeitformat Einstellen
11.1.3 Uhrzeitformat einstellen Im Untermenü Format einstellen können Sie das 12 oder 24 Stunden Format aktivieren. > Halten Sie die Taste Info/Menu gedrückt und wählen Sie mit den Tasten << oder >> den Eintrag [Uhrzeit]. > Drücken Sie die Taste Enter. >... -
Page 23: Sprache
[Standby] regelt die Helligkeit im Standby-Modus. Sie können hier zwischen den Helligkeitsstufen [Hoch], [Mittel], [Niedrig] und [Aus] wählen. Wählen Sie mit den Tasten << oder >> eine Helligkeitsstufe und drücken Sie zum Speichern die Taste Enter. Wird die Option [Aus] gewählt, wird die Displaybeleuchtung im Standby nach ca. -
Page 24: Reinigen
12 Reinigen Um die Gefahr eines elektrischen Schlags zu vermeiden, dürfen Sie das Gerät nicht mit einem nassen Tuch oder unter fließendem Wasser reinigen. Sie dürfen keine Scheuerschwämme, Scheuerpulver und Lösungsmittel wie Alkohol oder Benzin verwenden. Keine der folgenden Substanzen verwenden: Salzwasser, Insektenvernichtungsmittel, chlor- oder säurehaltige Lösungsmittel (Salmiak). -
Page 25: Technische Daten
14 Technische Daten Stromversorgung: AC 100 - 240V, 50/60Hz Stromverbrauch Betrieb: max. 5W Stromverbrauch Standby: < 1W Schutzklasse: IP20 Empfangsfrequenzen: DAB/DAB+ 174.928 - 239.200 MHz FM: 87.5 - 108 MHz Musikleistung: 2W RMS Umgebungsbedingungen Relative Luftfeuchtigkeit: Betrieb: 5% ~ 90% nicht kondensierend Lagerung: <... - Page 26 Das DIGITRADIO UP1 kann sowohl Horizontal, als auch Vertikal montiert werden. Achten Sie bei den Unterputzdosen auf den richtigen Abstand gemäß nachfolgender Abbildung: Anschluss der Lautsprecher Kabel: Schließen Sie das blaue Kabel (+) des Lautsprechers an den mit (+) gekennzeichneten Lautsprecheranschluss der Radioeinheit an und ziehen Sie es mit einem passenden Kreuzschlitzschraubendreher fest.
- Page 27 Anstatt der mitgelieferten Antenne, kann auch das Erdungskabel (falls vorhanden) als Antenne genutzt werden. Beachten Sie, dass nur ausgebildetes Fachpersonal den Stromanschluss an Hausinstallationen vornehmen darf. TechniSat übernimmt keine Haftung bei Schäden oder Verletzungen aufgrund falscher Installation. Achten Sie darauf, vor dem Anschluss der Radioeinheit an das Stromnetz bzw.
- Page 28 Anschließend werden beide Einheiten (Lautsprecher und Radioeinheit) in die vorhandenen Unterputzdosen gesteckt und festgeschraubt. Achten Sie dabei, je nachdem ob die Einheiten horizontal oder vertikal verbaut werden, auf die Position der Steckkontaktleiste der Radioeinheit für die Displayeinheit. Erst nachdem der Rahmen und die Displayeinheit montiert wurden, darf das Gerät mit Strom versorgt werden.
- Page 29 Vertikale Anordnung: Steckkontaktleiste...
- Page 30 Nach erfolgter Installation der Radioeinheit und des Lautsprechers, wird der Rahmen mit Hilfe der Lautsprecherabdeckung fixiert (Abbildung 1 - 2). Stecken Sie dabei die Lautsprecherabdeckung vorsichtig mit leichtem Druck auf den Lautsprecher, bis sie einrastet. Anschließend wird die Displayeinheit, unter Berücksichtigung der Ausrichtung der Steckkontaktleiste, vorsichtig auf die Radioeinheit gedrückt, bis sie einrastet (Abbildung 3).
- Page 31 Vertikale Anordnung...
- Page 32 23012019ORV4...
- Page 33 DIGITRADIO UP 1 DAB+/FM recessed radio with Bluetooth...
- Page 34 CONTENTS ENGLISH ................... 3-34 FRANÇAIS ..................35-66 ITALIANO ..................67-98...
- Page 35 Instruction Manual DIGITRADIO UP 1 DAB+/FM recessed radio with Bluetooth...
- Page 36 Contents Foreword ........................6 Target group for this instruction manual ................. 6 1.1.1 Intended use ..........................6 Important information ......................6 1.2.1 Safety ..............................7 1.2.2 Disposal ............................8 1.2.3 Legal notices ..........................10 1.2.4 Service instructions ........................10 Illustration and buttons ..................11 Connection and assembly of the DIGITRADIO UP1 ........
- Page 37 Saving FM stations to a memory slot ................19 Retrieving FM stations from a memory slot ..............19 Overwriting/deleting a station memory slot ..............19 Bluetooth ........................19 Pairing a device ........................20 Bluetooth playback ......................... 20 Other functions ......................21 10.1 Sleep timer ...........................
-
Page 38: Foreword
1 Foreword This instruction manual will help you to use your radio device, hereinafter referred to as DIGITRADIO or device, as intended and safely. 1.1 Target group for this instruction manual The instruction manual is intended for anyone who is installing, operating, cleaning or disposing of the device. -
Page 39: Safety
1.2.1 Safety For your own safety, you should read through the safety precautions carefully before you put your DIGITRADIO UP1 into operation. The manufacturer accepts no liability for damage caused by inappropriate handling, or by non-compliance with the safety precautions. This device is only intended for installation. -
Page 40: Disposal
Do not put the device into operation in the vicinity of baths, swimming pools or splashing water. Never try to repair a faulty device yourself. Always contact one of our customer service locations. Foreign bodies, e.g. nails, coins, etc. must not be allowed to fall inside the device. - Page 41 Please ask local authorities for the location of the relevant disposal point. Ensure that used batteries/rechargeable batteries as well as electronic waste are not disposed of with domestic waste, but are properly disposed of (returned to the specialist shop, hazardous waste). Disposal instructions: Disposal of packaging: Your new device was protected by packaging on its way to you.
-
Page 42: Legal Notices
Directive 2014/53/EU. The complete text of the EU declaration of conformity is available at the following website: http://konf.tsat.de/?ID=11471 TechniSat accepts no liability for product damage as a result of external influences, wear or improper handling, unauthorised repairs, modifications or accidents. -
Page 43: Illustration And Buttons
If the device needs to be sent back, please use the following address only: TechniSat Digital GmbH Service-Center Nordstr. 4a 39418 Staßfurt, Germany The names of the companies, institutions or makes referred to are trademarks or registered trademarks of the respective owners. -
Page 44: Connection And Assembly Of The Digitradio Up1
3 Connection and assembly of the DIGITRADIO UP1 Caution! > This device is only intended for installation. Work on the 230 V network may only be performed by qualified electricians. Life-threatening hazard and fire hazard from electric voltage of 230 V. Disconnect the mains power supply prior to assembly / disassembly. -
Page 45: Description Of The Digitradio Up1
4 Description of the DIGITRADIO UP1 4.1 Scope of delivery Before start-up, please check whether everything has been delivered. 1 x DIGITRADIO UP1 1 x instruction manual 1 x Dual Installation Frame 1 x Antenna Attachment materials 4.2 The special features of the DIGITRADIO UP1 The DIGITRADIO UP1 is comprised of a DAB+/FM receiver with the following functions: You can store up to 10 DAB+ and 10 FM stations. -
Page 46: Retrieving Displays
5.5 Retrieving displays > Press the Info/Menu button repeatedly to scroll through the information available. You have the choice of viewing the following information: In DAB+ mode (the selected function is identified with an “*”): [Running text] (continuous text with additional information provided by broadcasters etc.), [Signal intensity], [Channel type], [Ensemble], [Frequency], [Signal quality], [Bit rate and Codec], [Time] and [Date]. -
Page 47: Dab+ (Digital Radio) Function
7 DAB+ (digital radio) function 7.1 What is DAB+? DAB+ is a new digital format through which crystal clear sound with no noise can be heard. In contrast to conventional analogue radio stations, DAB+ can be used to broadcast multiple stations on one and the same frequency. This is referred to as an ensemble or multiplex. -
Page 48: Selecting Stations
> In order to perform a complete scan, open the menu by keeping the Info/ Menu button depressed and use the <<, >> and Enter buttons to select the menu item [Complete Scan]. > [Scan...] appears on the display. During the scan a progress bar and the number of stations found is displayed. 7.2.2 Selecting stations >... -
Page 49: Signal Intensity
7.2.6 Signal intensity > Briefly press the Info/Menu button repeatedly until the signal intensity is shown on the display by way of a bar chart. Current signal intensity Minimum signal intensity Stations with a signal intensity below the required minimum signal intensity are not transmitting a strong enough signal. -
Page 50: Fm Mode
8 FM mode 8.1 Switching on FM radio mode > Briefly press the /Mode button until [FM] appears on the display. When switching on for the first time, the frequency 87.50 MHz is set. If you have already set or saved a station, the radio plays the last station set. In the case of RDS stations, the station name appears. -
Page 51: Audio Settings
8.6 Audio settings > Keep the Info/Menu button depressed and use the << or >> buttons to select the [Audio Setting] item. > Press the Enter button. > Using the << or >> buttons, select the item [Stereo possible] or [Mono only]. >... -
Page 52: Pairing A Device
> Launch the search for available Bluetooth devices. > From the list of detected Bluetooth devices, select the DIGITRADIO UP 1 item. > Once successfully paired, [Bluetooth Connected] appears on the display. Please refer to the instruction manual for your smartphone/tablet as to how to use the Bluetooth function on your smartphone/tablet. -
Page 53: Other Functions
10 Other functions 10.1 Sleep timer You can activate the sleep timer if you want the DIGITRADIO UP1 to switch to standby automatically after a specific time. > Keep the Info/Menu button depressed and use the << or >> buttons to select the [Sleep] item. -
Page 54: Switching Off The Alarm After Being Woken
[Repeat] > In this case select the days on which the alarm should be active. You can choose between daily, once, weekends (Sat. and Sun.) and working days (Mon. - Fri.). Then press Enter. If you have selected Once, you must then enter the date on which the alarm should be active. -
Page 55: System Settings
11 System settings All the settings referred to in this section apply equally to DAB+/FM, as well as to Bluetooth mode. 11.1 Time and date settings 11.1.1 Manually setting the time/date Depending on the setting for time updates (section 11.1.2), the time and date have to be set manually. -
Page 56: Setting The Time Format
11.1.3 Setting the time format In the Set Format submenu, you can activate the 12 or 24 hour clock format. > Keep the Info/Menu button depressed and use the << or >> buttons to select the [Time] item. > Press the Enter button. >... -
Page 57: Language
[Standby] regulates the brightness in standby mode. You can choose from the [High], [Middle], [Low] brightness intensities and [Off]. Using the << or >> buttons, select a brightness intensity and press the Enter button to save. If the [Off] option is selected, the display lighting will be switched off completely on standby after approx. -
Page 58: Cleaning
12 Cleaning To prevent the risk of an electric shock, you may not clean the device using a wet cloth or under running water. You may not use scouring pads, scouring powder and solvents such as alcohol or petrol. Do not use any of the following substances: saltwater, insecticide, chlorine- based or acidic solvents (ammonium chloride). -
Page 59: Technical Data
14 Technical data Power supply AC 100-240V, 50~60Hz Power consumption during normal operation: max. 5W Power consumption when on standby: < 1W Reception frequencies: DAB/DAB+ 174.928-239.200 MHz FM: 87.5-108 MHz Music output 2W RMS Environmental conditions: Relative humidity: 5% ~ 90% Temperature: 0 - 40°C Dimensions:... - Page 60 The DIGITRADIO UP1 can be mounted both horizontally and vertically. With recessed sockets, ensure that the distance is correct according to the following illustration: Speaker cable connection: connect the blue speaker cable (+) to the speaker connection marked (+) on the radio unit and tighten using a suitable Phillips screwdriver.
- Page 61 Ensure that only trained specialists are permitted to perform the power connection to domestic wiring. TechniSat accepts no liability for damage or injuries as a result of incorrect installation. Ensure that, prior to connecting the radio unit to the mains network or the...
- Page 62 Both units (speakers and radio unit) can then be attached to the existing recessed sockets and tightened. In doing so, depending on whether the units have been installed horizontally or vertically, ensure that the position of the plug contact strip on the radio unit for the display unit is correct.
- Page 63 Vertical layout: Plug contact strip...
- Page 64 After successfully installing the radio unit and the speaker, the frame is attached by way of the speaker cover (Figure 1 - 2). In doing so, fit the speaker cover carefully by pressing gently on the speaker until it engages. The display unit is then pressed carefully onto the radio unit, taking into account the alignment of the plug contact strip, until it engages (Figure 3).
- Page 65 Vertical layout:...
- Page 67 Mode d'emploi DIGITRADIO UP 1 Radio FM/DAB+ avec Bluetooth à encastrer...
- Page 68 Sommaire Avant-propos ......................38 Groupe cible de ce mode d’emploi ..................38 1.1.1 Utilisation conforme.........................38 Consignes importantes ......................38 1.2.1 Sécurité ............................39 1.2.2 Élimination ........................... 40 1.2.3 Mentions légales ........................42 1.2.4 Consignes d'entretien ......................42 Illustrations et touches ..................43 Branchement et montage de la DIGITRADIO UP1 ........44 Description de la DIGITRADIO UP1 ..............45 Contenu de la livraison ......................45 Caractéristiques spécifiques de la DIGITRADIO UP1 ..........45...
- Page 69 Mémorisation d'une station FM sur un emplacement mémoire......51 Accès à une station FM à partir d’un emplacement mémoire ......51 Écrasement/suppression d'un programme mémorisé ..........51 Bluetooth ........................51 Couplage de l'appareil ......................52 Lecture Bluetooth ........................52 Fonctions étendues ....................53 10.1 Mise en veille ..........................53 10.2 Réveil...............................53 10.2.1 Réglage de l'alarme .........................53...
-
Page 70: Avant-Propos
1 Avant-propos Ce mode d’emploi vous aide à utiliser votre poste de radio, ci-après nommé DIGITRADIO ou appareil, de manière sûre et conforme à sa destination. 1.1 Groupe cible de ce mode d’emploi Ce mode d’emploi s’adresse à toutes les personnes qui installent, utilisent, nettoient ou mettent l’appareil au rebut. -
Page 71: Sécurité
1.2.1 Sécurité Pour votre sécurité, vous devez lire attentivement les consignes de sécurité avant de mettre en service votre DIGITRADIO UP1. Le fabricant décline toute responsabilité pour les dommages résultant d’une utilisation inappropriée de l’appareil et du non- respect des dispositions de sécurité. Cet appareil est uniquement destiné... -
Page 72: Élimination
Ne mettez pas l’appareil en marche à proximité d’une baignoire, d'une piscine ou de projections d’eau. N’essayez jamais de réparer vous-même un appareil défectueux. Adressez- vous toujours à l'un de nos centres de service après-vente. Aucun corps étranger, p. ex. des aiguilles, pièces de monnaie, etc., ne doit tomber à... - Page 73 Veuillez contacter votre municipalité pour connaître le lieu de mise au rebut adapté. Veillez à ce que les piles/batteries vides ainsi que les déchets électroniques ne soient pas jetés avec les ordures ménagères, mais qu’ils soient éliminés de façon adaptée (reprise par les détaillants spécialisés, déchets spéciaux).
-
Page 74: Mentions Légales
à l’adresse suivante : http://konf.tsat.de/?ID=11471 La société TechniSat ne peut être tenue pour responsable des dommages causés au produit dans le cas d’influences extérieures, d’une usure, d’une utilisation inappropriée, d’une réparation non autorisée, de modifications ou d’accidents. -
Page 75: Illustrations Et Touches
En cas d'éventuel retour de l'appareil, merci d'adresser votre colis uniquement à l'adresse suivante : TechniSat Digital GmbH Service-Center Nordstr. 4a 39418 Stassfurt, Allemagne Les noms de sociétés, institutions ou marques citées sont des marques ou des marques déposées de leurs propriétaires respectifs. -
Page 76: Branchement Et Montage De La Digitradio Up1
3 Branchement et montage de la DIGITRADIO UP1 Attention ! : > Cet appareil est uniquement destiné pour le montage. Seuls des électriciens qualifiés sont autorisés à travailler sur le réseau de 230 V ! Danger de mort et d'incendie en raison de la tension électrique de 230 V. Avant le montage/ démontage, mettre le dispositif hors tension ! En cas de dommages causés par un mauvais branchement, aucune réclamation au titre de la garantie ou de la responsabilité... -
Page 77: Description De La Digitradio Up1
4 Description de la DIGITRADIO UP1 4.1 Contenu de la livraison Avant la mise en service, veuillez contrôler si le contenu de la livraison est complet : 1 x DIGITRADIO UP1 1 x mode d’emploi 1 x double cadre de montage 1 x antenne Matériel de fixation 4.2 Caractéristiques spécifiques de la DIGITRADIO UP1... -
Page 78: Ouverture De L'affichage À L'écran
5.5 Ouverture de l’affichage à l’écran > Appuyez plusieurs fois sur la touche Info/Menu pour parcourir les informations mises à disposition. Vous avez le choix entre l’affichage des informations suivantes : En mode DAB+ (la fonction sélectionnée est marquée d’un « * ») : [Défilement de texte] (défilement de texte avec des informations supplémentaires mises à... -
Page 79: Fonction Dab+ (Radiodiffusion Numérique)
7 Fonction DAB+ (radiodiffusion numérique) 7.1 Qu'est-ce que le DAB+ ? Le DAB+ est un nouveau format numérique, qui permet d’écouter un son cristallin sans aucun grésillement. Contrairement aux stations de radio analogiques, avec le DAB+ plusieurs stations sont diffusées sur une seule et même fréquence. C'est ce que l'on appelle un ensemble ou un multiplexe. -
Page 80: Choix De La Station
> Afin d’effectuer une recherche complète, ouvrez le menu en maintenant enfoncée la touche Info/Menu et sélectionnez à l’aide des touches <<, >> et Entrée l'option de menu [Recherche complète]. > [Recherche...] s'affiche à l'écran. Durant la recherche, des barres de progression ainsi que le nombre de stations trouvées s’affichent. -
Page 81: Puissance Du Signal
7.2.6 Puissance du signal > Appuyez brièvement plusieurs fois sur la touche Info/Menu jusqu'à l'affichage à l'écran de la puissance du signal sous la forme d'un diagramme à barres. Puissance actuelle du signal Puissance minimale du signal Les stations dont la puissance du signal se situe en dessous de la puissance de signal minimale n’émettent pas un signal suffisant. -
Page 82: Mode Fm
8 Mode FM 8.1 Mise en marche du mode radio FM > Appuyez brièvement sur la touche /Mode jusqu'à l'affichage à l'écran de [FM]. Lors de la première mise en marche, la fréquence est réglée sur 87,50 MHz. Si vous avez déjà mémorisé ou réglé une station, la radio diffusera la dernière station réglée. -
Page 83: Réglage Audio
8.6 Réglage audio > Maintenez la touche Info/Menu enfoncée et sélectionnez à l’aide des touches << ou >> l’entrée [Réglage audio]. > Appuyez sur la touche Entrée. > Sélectionnez avec << ou >> l'entrée [Stéréo possible] ou [Uniquement mono]. > Confirmez en appuyant sur la touche Entrée. -
Page 84: Couplage De L'appareil
DIGITRADIO UP1. > Lancez la recherche d'appareils Bluetooth disponibles. > Sélectionnez l'entrée DIGITRADIO UP 1 dans la liste des appareils Bluetooth détectés. > Une fois le couplage réussi, [Connexion Bluetooth] s'affiche à l'écran. Consultez le mode d'emploi de votre smartphone/tablette pour savoir comment utiliser la fonction Bluetooth de votre appareil. -
Page 85: Fonctions Étendues
10 Fonctions étendues 10.1 Mise en veille Si vous souhaitez mettre en veille automatiquement la DIGITRADIO UP1 après un certain temps, vous pouvez activer la mise en veille. > Maintenez la touche Info/Menu enfoncée et sélectionnez à l’aide des touches <<... -
Page 86: Arrêt Du Réveil Après L'alarme
[Répétition] > Sélectionnez ici à quelle fréquence le réveil doit être actif. Vous avez le choix entre tous les jours, une fois, le week-end (samedi et dimanche), les jours ouvrables (du lundi au vendredi). Appuyez ensuite sur la touche Entrée. Si vous avez appuyé... -
Page 87: 11 Réglages Système
11 Réglages système Tous les réglages expliqués sous ce point sont valables pour le mode FM/DAB+ mais aussi pour le Bluetooth. 11.1 Réglages de l’heure et de la date 11.1.1 Réglage manuel de l'heure et de la date En fonction de l’actualisation de l’heure (point 11.1.2), vous devez régler l’heure et la date manuellement. -
Page 88: Réglage Du Format De L'heure
11.1.3 Réglage du format de l’heure Dans le sous-menu Réglage du format, vous pouvez activer le format 12 ou 24 heures. > Maintenez la touche Info/Menu enfoncée et sélectionnez à l’aide des touches << ou >> l’entrée [Heure]. > Appuyez sur la touche Entrée. >... -
Page 89: Langue
[Veille] règle la luminosité en mode veille. Vous pouvez choisir ici entre les niveaux de luminosité [Élevé], [Moyen] et [Bas] et [Off]. À l’aide de la touche << ou >>, sélectionnez un niveau de luminosité et appuyez sur la touche Entrée pour l’enregistrer. -
Page 90: Nettoyage
12 Nettoyage Afin d’éviter le risque de décharge électrique, vous ne devez pas nettoyer l’appareil avec un chiffon humide, ni sous l’eau courante. Vous ne devez pas utiliser de tampons à récurer, de poudre à récurer et de solvants, tels que de l’alcool ou de l’essence. N’utilisez aucune des substances suivantes : eau salée, insecticides, solvant contenant du chlore ou de l’acide (chlorure d’ammonium). -
Page 91: Données Techniques
14 Données techniques Alimentation électrique 100 - 240 V CA, 50 ~ 60 Hz Consommation électrique en fonctionnement : 5 W max. Consommation électrique en veille : < 1 W Fréquences de réception : DAB/DAB+ 174,928 - 239,200 MHz FM : 87,5 - 108 MHz Puissance de la musique 2 W RMS Conditions ambiantes :... - Page 92 La DIGITRADIO UP1 s'installe aussi bien horizontalement que verticalement. Veillez à ce que les prises encastrées présente la bonne distance conformément à l'illustration suivante : Branchement du câble du haut-parleur : branchez le câble bleu (+) du haut-parleur au connecteur du haut-parleur désigné par un (+) de l'unité...
- Page 93 Au lieu de l'antenne fournie, le câble de terre (si présent) peut également être utilisé comme antenne. Veuillez noter que seul du personnel qualifié est autorisé à entreprendre les raccordements électriques dans des installations domestiques. TechniSat décline toute responsabilité en cas de dommages ou de blessures résultant d'une mauvaise installation.
- Page 94 Les deux unités (haut-parleur et unité de radio) sont ensuite enfoncées dans les prises à encastrer disponibles, puis vissées. Selon le montage horizontal ou vertical des unités, veillez au positionnement correct du contact à fiche de l'unité de radio pour l'unité d'affichage. Disposition horizontale : Bande de contacts à...
- Page 95 Disposition verticale : Bande de contacts à fiche...
- Page 96 Après l'installation réussie de l'unité de radio et du haut-parleur, le cadre est fixé à l'aide du cache du haut-parleur (illustration 1 - 2). Enfoncez le cache du haut-parleur sur le haut-parleur avec précaution en exerçant une légère pression jusqu'à ce qu'il s'enclenche.
- Page 97 Disposition verticale...
- Page 99 Istruzioni per l'uso DIGITRADIO UP 1 Radio da incasso DAB+/FM con Bluetooth...
- Page 100 Indice Introduzione ......................70 A chi si rivolgono le presenti istruzioni per l’uso ............70 1.1.1 Uso conforme alle disposizioni ...................70 Note importanti .........................70 1.2.1 Sicurezza ............................71 1.2.2 Smaltimento ..........................72 1.2.3 Avvertenze legali ........................74 1.2.4 Note per l'assistenza ........................ 74 Illustrazione e tasti ....................75 Collegamento e montaggio della DIGITRADIO UP1 ........
- Page 101 Salvare l’emittente FM su uno slot di memoria............83 Apertura dell’emittente FM da uno slot di memoria ..........83 Sovrascrittura/Cancellazione di uno slot di memoria ..........83 Bluetooth ........................83 Collegare l'apparecchio ......................84 Riproduzione Bluetooth ......................84 Funzioni avanzate ....................85 10.1 Sleep timer ...........................85 10.2 Sveglia ............................85 10.2.1 Impostare la sveglia .........................85...
-
Page 102: Introduzione
1 Introduzione Le presenti istruzioni per l’uso illustrano all’utente l’utilizzo conforme e sicuro dell’apparecchio radio, di seguito denominato DIGITRADIO o apparecchio. 1.1 A chi si rivolgono le presenti istruzioni per l’uso Le istruzioni per l’uso sono rivolte a tutti coloro che collocano, utilizzano, puliscono o smaltiscono l'apparecchio. -
Page 103: Sicurezza
1.2.1 Sicurezza Per la propria sicurezza, leggere attentamente le norme di sicurezza prima di mettere in funzione DIGITRADIO UP1. Il produttore declina ogni responsabilità per danni derivanti da un uso non conforme e dalla mancata osservanza delle misure di sicurezza. Questo apparecchio è... -
Page 104: Smaltimento
Non mettere in funzione l’apparecchio in prossimità di vasche, piscine o spruzzi d’acqua. Non provare mai a riparare da soli un apparecchio difettoso. Rivolgersi sempre a uno dei nostri centri di assistenza clienti. Corpi estranei, come ad es. spilli, monete, ecc., non devono cadere all'interno dell'apparecchio. - Page 105 Si prega di informarsi sul centro di smaltimento competente presso l'amministrazione comunale. Evitare che le batterie e le pile scariche e i rottami elettronici vengano gettati tra i rifiuti domestici, provvedere invece a smaltirli correttamente (ritiro a cura di un'azienda specializzata, rifiuti speciali). Note per lo smaltimento: Smaltimento dell'imballaggio: Nel trasporto verso l'utente, il nuovo apparecchio è...
-
Page 106: Avvertenze Legali
DIGITRADIO UP1 è conforme alla direttiva 2014/53/UE. Il testo completo della dichiarazione di conformità UE è disponibile al seguente indirizzo Internet: http://konf.tsat.de/?ID=11471 TechniSat non è responsabile dei danni del prodotto causati da azioni esterne, usura o utilizzo inappropriato, riparazioni non autorizzate, modifiche o incidenti. -
Page 107: Illustrazione E Tasti
Per un'eventuale spedizione dell'apparecchio utilizzare esclusivamente il seguente indirizzo: TechniSat Digital GmbH Service-Center Nordstr. 4a 39418 Staßfurt I nomi delle aziende, delle istituzioni o dei marchi menzionati sono marchi di fabbrica o marchi registrati appartenenti ai rispettivi proprietari. 2 Illustrazione e tasti... -
Page 108: Collegamento E Montaggio Della Digitradio Up1
3 Collegamento e montaggio della DIGITRADIO UP1 Attenzione! > Questo apparecchio è pensato solo per l'installazione a incasso. I lavori alla rete 230 V possono essere eseguiti solo da personale elettricista specializzato. Pericolo di morte e di incendio a causa di tensione elettrica di 230 V. Prima del montaggio / dello smontaggio, disinserire la tensione di rete! In caso di danni derivanti da un collegamento errato non vi è... -
Page 109: Descrizione Della Digitradio Up1
4 Descrizione della DIGITRADIO UP1 4.1 Entità della fornitura Prima della messa in funzione verificare se la confezione è completa in tutte le sue parti: 1 DIGITRADIO UP1 1 manuale di istruzioni per l’uso 1 telaio di incasso doppio 1 antenna Materiale di fissaggio 4.2 Le funzionalità... -
Page 110: Aprire Le Visualizzazioni Del Display
5.5 Aprire le visualizzazioni del display > Premere più volte il tasto Info/Menu per selezionare le informazioni disponibili. È possibile selezionare la visualizzazione delle seguenti informazioni: In modalità DAB+ (la funzione selezionata viene contrassegnata con “*”): [Testo scorrevole] (testo di scorrimento con informazioni fornite in determinati casi dalle emittenti), [Potenza segnale], [Tipo di canale], [Ensemble], [Frequenza], [Qualità... -
Page 111: La Funzione Dab+ (Digital Radio)
7 La funzione DAB+ (Digital Radio) 7.1 Cos'è DAB+ DAB+ è un nuovo formato digitale che consente di ascoltare suoni cristallini senza alcun rumore di fondo. A differenza delle emittenti radio analogiche tradizionali, con il DAB+ più emittenti trasmettono ad un’unica frequenza che non cambia. Questo sistema è... -
Page 112: Selezionare Emittente
> Per svolgere una ricerca completa, aprire il menu tenendo premuto il tasto Info/Menu e selezionare con i tasti <<, >> e Invio la voce di menu [Ricerca completa]. > Sul display compare [Ricerca...]. Durante la ricerca compariranno una barra di progresso e il numero di emittenti trovate. -
Page 113: Intensità Del Segnale
7.2.6 Intensità del segnale > Premere brevemente più volte il tasto Info/Menu fin quando sul display viene rappresentata l'intensità del segnale mediante un diagramma a barre. Attuale intensità del segnale Intensità minima del segnale Le emittenti con un'intensità di segnale inferiore all'intensità minima richiesta non inviano un segnale sufficiente. -
Page 114: Modalità Fm
8 Modalità FM 8.1 Attivare la modalità radio FM > Premere brevemente il tasto /Mode fin quando sul display viene visualizzato [FM]. Al momento della prima accensione la frequenza è impostata su 87,50 MHz. Se si è già impostata o memorizzata un’emittente, la radio riproduce l’ultima emittente impostata. -
Page 115: Impostazione Audio
8.6 Impostazione audio > Tenere premuto il tasto Info/Menu e selezionare con i tasti << o >> la voce [Impostazione audio]. > Premere il tasto Invio. > Selezionare con << o >> la voce [Stereo possibile] o [Solo mono]. > Confermare premendo il tasto Invio. -
Page 116: Collegare L'apparecchio
9.1 Collegare l'apparecchio > Selezionare sulla DIGITRADIO UP1 la modalità Bluetooth. Sul display compare [Bluetooth visibile]. > Aprire le impostazioni Bluetooth dello smartphone/del tablet che si desidera collegare alla DIGITRADIO UP1. > Avviare la ricerca di apparecchi Bluetooth disponibili. > Nella lista degli apparecchi Bluetooth trovati selezionare la voce DIGITRADIO UP 1. -
Page 117: Funzioni Avanzate
10 Funzioni avanzate 10.1 Sleep timer Se si desidera che la DIGITRADIO UP1 dopo un determinato periodo passi automaticamente in standby, è possibile attivare lo sleep timer. > Tenere premuto il tasto Info/Menu e selezionare con i tasti << o >> la voce [Sleep]. -
Page 118: Spegnere La Sveglia Dopo L'allarme
[Ripetizione] > Scegliere qui i giorni di attivazione della sveglia. Si può scegliere tra Giornaliera, Una volta, Fine settimana (sab. e dom.), Giorni feriali (lun. - ven.). Premere quindi il tasto Invio. Se si è scelto Una volta si deve successivamente inserire la data in cui dovrà attivarsi la sveglia. -
Page 119: Impostazioni Di Sistema
11 Impostazioni di sistema Tutte le impostazioni spiegate in questo punto sono valide nelle modalità sia DAB+ che FM ed anche nella modalità Bluetooth. 11.1 Impostazione di data e ora 11.1.1 Impostare manualmente data/ora A seconda dell’impostazione dell’aggiornamento dell’ora (punto 11.1.2), l’ora e la data devono essere impostate manualmente. -
Page 120: Impostazione Del Formato Dell'ora
11.1.3 Impostazione del formato dell’ora Nel sottomenu Impostare formato è possibile attivare il formato a 12 o 24 ore. > Tenere premuto il tasto Info/Menu e con i tasti << o >> selezionare la voce [Ora]. > Premere il tasto Invio. >... -
Page 121: Lingua
[Standby] regola la luminosità nella modalità di standby. È possibile scegliere tra i livelli di luminosità [Alto], [Medio], [Basso] e [Off]. Con i tasti << o >> selezionare un livello di luminosità e premere il tasto Invio per salvare. Scegliendo l'opzione [Off], in modalità di standby l'illuminazione del display si spegne completamente dopo ca. -
Page 122: Pulizia
12 Pulizia Al fine di evitare il rischio di scossa elettrica, non è consentito pulire l'apparecchio con un panno bagnato o sotto l'acqua corrente. Non utilizzare spugne abrasive, polveri abrasive e solventi come alcool o benzina. Non utilizzare le seguenti sostanze: acqua salina, insetticidi, solventi in cloro o acidi (clorammonio). -
Page 123: Dati Tecnici
14 Dati tecnici Alimentazione di corrente AC 100-240 V, 50~60 Hz Consumo elettrico in funzionamento: max. 5W Consumo elettrico in standby: < 1W Frequenze di ricezione: DAB/DAB+ 174.928-239.200 MHz FM: 87.5-108 MHz Qualità musicale RMS 2W Condizioni ambientali: Umidità relativa dell'aria: 5% ~ 90% Temperatura: 0 - 40°C... - Page 124 La DIGITRADIO UP1 può essere montata sia in orizzontale che in verticale. Nel caso di prese da incasso rispettare la giusta distanza in conformità con la seguente illustrazione: Collegamento dei cavi degli altoparlanti: collegare il cavo blu (+) dell'altoparlante al collegamento degli altoparlanti dell'unità radio contrassegnato con (+) e avvitarlo con un opportuno cacciavite a croce.
- Page 125 (se disponibile). Tenere presente che solo al personale specializzato è consentito realizzare il collegamento di corrente agli impianti domestici. TechniSat non si assume alcuna responsabilità nel caso di danni o lesioni causati da installazioni errate. Prima del collegamento dell'unità radio alla rete di corrente o dell'impianto domestico provvedere a staccare la corrente e ad assicurarsi che non si possa riaccendere.
- Page 126 Successivamente entrambe le unità (altoparlanti e unità radio) vengono inserite nelle prese da incasso presenti e avvitate. A seconda del bloccaggio delle unità, che potrà essere orizzontale o verticale, badare alla posizione del listello di contatto della spina dell'unità radio per l'unità display. Disposizione orizzontale: Listello di contatto della...
- Page 127 Disposizione verticale: Listello di contatto della spina...
- Page 128 Ad installazione dell'unità radio e degli altoparlanti avvenuta, viene fissato il telaio con l'aiuto della copertura degli altoparlanti (illustrazione 1 - 2). Inserire con cautela la copertura degli altoparlanti esercitando una leggera pressione sugli altoparlanti fin quando la copertura si innesta. Successivamente, prestando attenzione all'allineamento del listello di contatto della spina, premere con cautela l'unità...
- Page 129 Disposizione verticale...
Need help?
Do you have a question about the DIGITRADIO UP 1 and is the answer not in the manual?
Questions and answers