Table of Contents
Advertisement
Quick Links
CONGRATULATIONS
Congratulations on the purchase of your new
camera. Your camera has been carefully
engineered and manufactured to give you
dependable operation. Read this manual
before operating the unit to become more
familiar with it and obtain the performance
that will bring you continued enjoyment for
many years.
This manual has been written and formatted
with such depth and detail so you can
maximize the features of your camera, yet
easily follow the instructions.
1 1
Advertisement
Table of Contents

Related Manuals for Concord Camera Eye-Q 3X


Summary of Contents for Concord Camera Eye-Q 3X
- Page 1 CONGRATULATIONS Congratulations on the purchase of your new camera. Your camera has been carefully engineered and manufactured to give you dependable operation. Read this manual before operating the unit to become more familiar with it and obtain the performance that will bring you continued enjoyment for many years.
-
Page 2: Table Of Contents
Table of Contents...2 Important Information...3 FCC Information ...3 User Information...3 Precautions...4 Location of Controls...5 Front/Top...5 Bottom/Rear...6 Display ...6 Getting Started...7 Loading the Battery...7 Turning the Camera On and Off ...7 Checking the Battery ...8 Setting the Time and Date ...8 Setting the Flash ...11 Setting the Image Quality ...11 Taking Pictures ...12... -
Page 3: Important Information
IMPORTANT INFORMATION FCC INFORMATION FCC WARNING: This equipment meets the limits for a class B digital device, pursuant to Part 15 of FCC rules. Only the cable supplied with the camera should be used. Operation with other cables is likely to result in interference to radio and TV reception and could void the user’s authorization to operate this equipment. -
Page 4: Precautions
IMPORTANT INFORMATION Be sure to observe the following precautions when using the camera: • Never try to take pictures or use the built-in display when operating a motor vehicle or while walking. • Never try to open the case of the camera or attempt your own repairs. -
Page 5: Location Of Controls
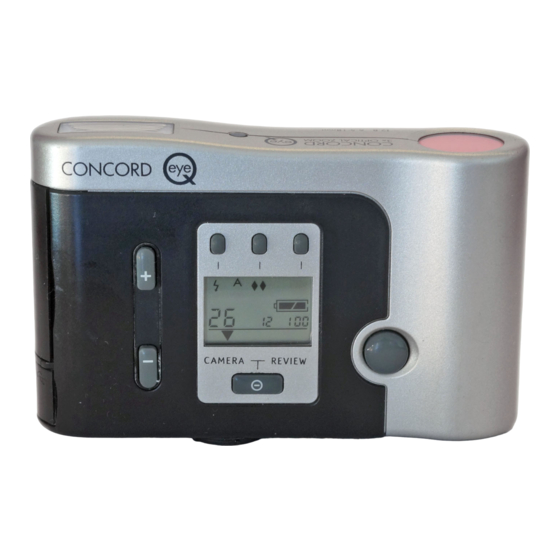
LOCATION OF CONTROLS FRONT/TOP 1. Flash 2. Self-Timer LED Indicator 3. Image Quality Button 4. Flash/Infinity Focus Button 5. Zoom In/Up (+) Button 6. Zoom Out/Down (–) Button 7. CAMERA/REVIEW/Power Button 8. Shutter/OK Button 9. Liquid Crystal Display 10. Self Timer Button 11. -
Page 6: Bottom/Rear
LOCATION OF CONTROLS (CONTINUED) BOTTOM/REAR 12. Viewfinder Sharpness Adjustment Ring 13. Viewfinder DISPLAY 14. Battery Compartment 15. USB Port Connection (To A. Flash Mode Indicators B. Pictures Remaining Indicator C. Mode Indicators D. Time/Date Indicator E. Battery Indicator F. Self-Timer Indicator G. -
Page 7: Getting Started
LOADING THE BATTERY Before taking pictures, insert a CR 123 A 3 V lithium battery (supplied) into your camera's battery compartment, as follows: 1. Using your fingernail, open the battery compartment. 2. Insert the 3 V lithium battery into the battery compartment, observing the polarity marks (+ / –... -
Page 8: Checking The Battery
GETTING STARTED (CONTINUED) CHECKING THE BATTERY The camera has a battery indicator that shows the current battery level, regardless of the mode the camera is in. FULL Battery has full power and is ready to use. Do not attempt to use the camera once the “Empty” battery indicator appears in the display. - Page 9 GETTING STARTED (CONTINUED) – CAMERA REVIEW Press the Self-Timer button ❶ and the minutes will blink. Press the Zoom In/Up + + or Zoom Out/Down – – button ❷ to adjust the minute setting until the present minute appears. – CAMERA REVIEW Press the Self-Timer button ❶...
- Page 10 GETTING STARTED (CONTINUED) – CAMERA REVIEW Press the Self-Timer button ❶ and the months will blink. Press the Zoom In/Up + + or Zoom Out/Down – – button ❷ to set the present month. Repeat this procedure to set the present day. NOTES: •...
-
Page 11: Setting The Flash
GETTING STARTED (CONTINUED) SETTING THE FLASH Your camera is equipped with an automatic sensor flash, which eliminates the need of turning it on or off depending on light conditions. The flash range is approximately 18 inches to 6 feet (50cm to 2m). The shooting range is approximately 18 inches to infinity (50cm to infinity). -
Page 12: Taking Pictures
– CAMERA REVIEW Turn your camera on and make sure it is in the CAMERA mode (mode arrow will appear over the word CAMERA). If it is not, press the CAMERA/REVIEW/Power button ❶ again so the mode arrow appears over the word CAMERA. For added convenience, your camera is equipped with a diopter (Viewfinder Sharpness Adjustment Ring). - Page 13 TAKING PICTURES (CONTINUED) While looking into the viewfinder, observe the red LED ❶ status. The red LED indicates the following: LED IS OFF: OK to proceed. LED IS BLINKING: Indicates that Flash is Charging. Wait until LED turns completely off (approx. 4 seconds) before taking your picture Note: (The Flash Icon on the LCD Display will also be blinking while the flash is being charged).
-
Page 14: Using The Self-Timer
TAKING PICTURES (CONTINUED) USING THE SELF-TIMER – CAMERA REVIEW Turn your camera on and make sure it is in the CAMERA mode (mode arrow will point to the word CAMERA). If it is not, press the CAMERA/REVIEW/Power button ❶ again so the mode arrow points to the word CAMERA. -
Page 15: Pictures Remaining
TAKING PICTURES (CONTINUED) PICTURES REMAINING The leftmost number in the display indicates how many pictures are available in the selected Image Quality mode. As pictures are taken, this number decreases. If “0” is blinking, it indicates that the memory is full and there is no more space for additional pictures (at any image quality mode). -
Page 16: Reviewing/Deleting Pictures
REVIEWING/DELETING PICTURES REVIEWING PICTURES – CAMERA REVIEW Turn the unit on and press the CAMERA/REVIEW/Power button ❶ so the mode arrow points to the word REVIEW. DELETING INDIVIDUAL PICTURES FROM MEMORY – CAMERA REVIEW Repeat the "Reviewing Pictures" steps 1 and 2 above . Once you have found the picture you want to delete, press the Shutter/OK button ❶... - Page 17 REVIEWING/DELETING PICTURES (CONTINUED) FILE INFO DELETE DELETE ALL DONE 34 KB SVI_0007 Select DELETE: Erases the frame shown in the bottom right of the screen. FILE INFO DELETE DELETE ALL DONE 34 KB SVI_0007 Once the picture is erased, the previous menu will appear.
-
Page 18: Deleting All Pictures From Memory
REVIEWING/DELETING PICTURES DELETING ALL PICTURES FROM MEMORY – CAMERA REVIEW On Picture Review mode, press the Shutter/OK button ❶ once and the File Info menu will appear. While looking into the viewfinder, select a picture to delete using the Zoom In/Up + + or Zoom Out/Down –... -
Page 19: Computer Connection
Eye-Q 3x Software on your computer (see “Installing Your Eye-Q 3X Camera Software” section above). Once you have taken a few pictures with your Eye-Q 3X camera or as soon as the camera’s memory is full, you can download the pictures into your computer to print, e-mail, store or to manipulate them in creative and fun ways, utilizing the bonus imaging software that accompanies your Eye-Q 3x. - Page 20 COMPUTER CONNECTION (CONTINUED) 5. Launch ArcSoft PhotoImpression software by clicking on Start–Programs and choose PhotoImpression from the application list on your screen. 6. Follow these steps to retrieve your pictures from the camera: A- Click on GET PHOTOS icon. B- Click on the CAMERA/ SCANNER button C- Click on drop-down list under SELECT...
-
Page 21: Downloading Your Pictures Directly To Windows Using The "My Camera" Device
N N O O T T E E : : Downloading the pictures from “MY CAMERA” does not erase the pictures from your camera's memory! (If the Eye-Q 3X ’s memory is full, now it would be a good time to clear the memory by erasing some or all pictures.) For instructions on how to erase images, please refer to “REVIEWING/DELETING... -
Page 22: Troubleshooting Guide
TROUBLESHOOTING GUIDE SYMPTOM POSSIBLE CAUSE POWER Power is off. Display not on. Battery dead or weak. Battery not installed correctly. TAKING PICTURES Poor lighting. Picture taken is poor quality. Lens is dirty. Subject too close. Subject or camera moved as picture was taken. - Page 23 TROUBLESHOOTING GUIDE (CONTINUED) SYMPTOM POSSIBLE CAUSE Subject is too far away. Flash picture taken is too dark. Flash is not on. Daylight picture The subject is in front of taken is too dark. bright light. Can’t take Memory is full. picture.
-
Page 24: Care And Maintenance
TROUBLESHOOTING GUIDE (CONTINUED) SYMPTOM POSSIBLE CAUSE Something was blocking Part of the pict- the lens. ure is missing. Image not centered when taking picture. Zoom set too close. GENERAL Image Quality setting Picture number did not take up sufficient does not decrease space to decrease the after taking a remaining number. -
Page 25: Software Customer Care
Monday – Friday 8:30AM - 5:30PM (PST) Tel: 510-440-9901 Fax: 510-440-1270 E-Mail: support@arcsoft.com Web: www.arcsoft.com www.photoisland.com Copyright 2000 Concord Camera IN EUROPE: ArcSoft, Inc. Unit 14, Shannon Industrial Estate Shannnon, Co. Clare, Ireland Tel: +353 (0) 61-702087 Fax: +353 (0) 61-702001 E- Mail: europe@arcsoft.com... - Page 26 Technical Support Hot Line: Toll Free In the USA & Canada 1-866-522-6372 Toll Free In Europe UK: 0800-169-6482 BELGIUM: 0800-787-57 FRANCE: 0800-917-599 GERMANY: 0800-1800-563 SPAIN: 900-973-195 ITALY: 800-781-883 All Other Countries - Toll 31-53-482-9779...
Need help?
Do you have a question about the Eye-Q 3X and is the answer not in the manual?
Questions and answers