Table of Contents
Advertisement
Available languages
Available languages
Quick Links
Dealer / Installer:
Provide a copy of these instructions to the end user of this product. These
instructions provide important operating and safety information for proper usage of
this product. Demonstrate the proper use of the product with the end user. Have the
end user demonstrate that they understand the proper use of the product.
End User:
Read and follow all instructions included in this manual. Ask your Dealer / Installer
for assistance if you do not understand the proper use of the product. Never remove
WARNING
any decals from the product. Failure to follow these instructions can result in injury
or death.
WARNING
Never exceed the
towing capacity of the tow vehicle.
APPLICATION:
GM 2500/3500– vehicle must have OEM 5
32998 (HUSKY 16KW/26W CROSSMEMBER KIT), 32998 REQUIRES THE PURCHASE OF 31569 (16KW) OR 33157 (26KW)
32999 (HUSKY 16KS CROSSMEMBER KIT), 32999 REQUIRES THE PURCHASE OF 31453
If the truck is raised, be sure that the truck is properly blocked and restrained to prevent the truck from
falling. Failure to do so may result in the truck suddenly falling, causing death or serious injury.
These instructions are guidelines only. Actual installation is the responsibility of the installer and the
owner. Always measure truck and trailer before installing hitch to be sure that there is clearance at the
Husky recommends to always drive the king pin into the hitch throat and not drop the king pin from above into the
hitch head to avoid incorrect hook-ups. Please read Operating Instruction to understand how this important Safety
Refer to instructions: 32998 & 32999 for proper installation of those products.
All Products limited to Vehicle Tow Rating, see Vehicle Owners Manual. Visit www.huskytow.com for Warranty Information /
Tech Support / Product Updates. 2021 Keystone Automotive Operations Inc. All Rights Reserved. 05/17/2021-Rev1
Assembly, Installation, Operation and
Maintenance Instructions
GM UPRIGHTS
Use only the supplied bolts, nuts, and washers to install this kit. All
th
wheel/Gooseneck Hitch Prep Package
This kit is to be used
cab and at the bumper to allow for turns.
Feature operates.
nuts and bolts are Grade 5 unless specified otherwise.
ONLY
with Husky kits:
WARNING
CAUTION:
NOTICE
P/N: 33221
60-90 minutes
Page-1
Advertisement
Table of Contents

Subscribe to Our Youtube Channel
Related Manuals for Husky GM UPRIGHTS


Summary of Contents for Husky GM UPRIGHTS
- Page 1 NOTICE Husky recommends to always drive the king pin into the hitch throat and not drop the king pin from above into the hitch head to avoid incorrect hook-ups. Please read Operating Instruction to understand how this important Safety Feature operates.
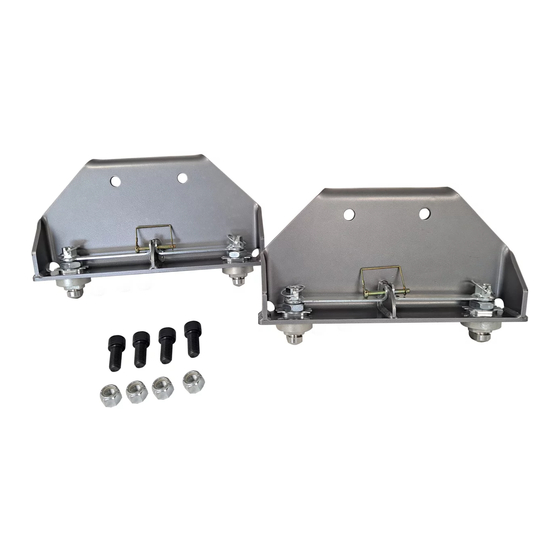
- Page 2 PARTS LIST ITEM NO. DESCRIPTION QTY. UPRIGHT ADAPTOR T-BOLT HANDLE ASSEMBLY TAB WASHER 1”-14 JAM NUT 3/16” LOCK PIN ¾”-10 X 1-3/4” SOCKET HEAD CAP SCREW ¾”-10 NYLOCK HEX NUT 5/16" LOCK PIN SPACER INSTRUCTIONS Parts Diagram All Products limited to Vehicle Tow Rating, see Vehicle Owners Manual. Visit www.huskytow.com for Warranty Information / Tech Support / Product Updates.
- Page 3 1. Place both uprights into GM 5 Wheel adaptor installed in your truck from the factory. The handles and T-bolts must be rotated into the Un-locked position. Handles and T-Bolts are shown in the Un-Locked Position Truck bed NOT shown for clarification purposes Handles and T-Bolts are shown Handles and T-Bolts are...
- Page 4 2. Once uprights are installed; turn handles into the locked position. Adjust the T-bolts for a looser or tighter fit by rotating them in the handles. Handles and T-Bolts are shown in the Locked Position 3. Install the cross member from kit 32998 or 32999 to uprights (#1) using the ¾”-10 bolts (#8) and ¾”-10 nylock nuts (#9). Kit 32998 shown below as an example;...
- Page 5 4. Once the crossmember is installed; make sure the adaptor sits FLAT with the 5 Wheel Adaptor at ALL 4 contact locations. Torque all four ¾”-10 bolts and ¾”-10 nylock nuts to 250 ft.lbs. APPLY TORQUE WRENCH TO THE NUTS NOT THE BOLTS. Handles and T-Bolts are shown in the Locked Position Adaptor...
- Page 6 9. Finally, install the 5/16” D-Lock pins through the handles and the uprights. WARNING NEVER TOW WITHOUT LOCKING THE 5 WHEEL HITCH HANDLES WITH EITHER THE PROVIDED 5/16" LOCKPINS OR A PAD LOCK. NEVER TOW WITHOUT LOCKING THE HANDLES WITH THE PROVIDED 3/16" LOCKPINS. 5/16"...
-
Page 7: Preparing For First Use
Preparing For First Use 1. Verify that the cross member is set at the proper height to provide a minimum of 6" clearance between the bottom of the trailer nose and the top of the truck bed sides and allows for a level-towing attitude of the 5th Wheel Trailer (See Figure 1 below). - Page 8 7. Open the handle to your 5 wheel according to the instructions provided to that specific product. 8. Slowly back the truck so that the bottom plate of the king pin box slides onto the 5th wheel plate & the king pin slides fully into the throat of the hitch head.
-
Page 9: Maintenance
5. Periodically inspect your product for wear or damage. If excessive wear or damage is found, contact your installing dealer or send proof of purchase and photo of wear and damage to HUSKY technical support staff at www.huskytow.com or 1-877-544-4449. -
Page 10: Towing Tips
Follow all state, local and provincial driving and towing laws in the location you are driving in. Not following your tow vehicle, trailer, and Husky instructions/manuals can result in a fatal accident. Check Your Equipment Please refer to the MAINTENANCE section. Periodically check the condition of all your towing equipment and keep it in top condition. -
Page 11: Warranty Terms
Husky Towing Products and Keystone Automotive Operations Inc. with proof of purchase by the original purchaser. The original purchaser shall pay all transportation and shipping costs associated with the return of the defective product and the defective product shall become the property of Keystone Automotive Operations Inc. - Page 12 REMARQUE Husky recommande de toujours enfoncer le pivot d'attelage dans la gorge de l'attelage et de ne pas introduire le pivot d'attelage par le haut dans la tête d'attelage afin d'éviter des accrochages mal réalisés. Veuillez lire les instructions d'utilisation pour comprendre le fonctionnement de cet important dispositif de sécurité.
-
Page 13: Liste Des Pièces
LISTE DES PIÈCES N° PIÈCE DESCRIPTION QTÉ. SUPPORT ADAPTATEUR BOULON EN T ASSEMBLAGE DE LA POIGNÉE RONDELLE-FREIN ÉCROU DE SERRAGE 1”-14 GOUPILLE DE VERROUILLAGE 3/16” VIS À TÊTE CYLINDRIQUE À SIX PANS CREUX ¾”-10 X 1-3/4 ÉCROU HEXAGONAL NYLOC ¾”-10 GOUPILLE DE VERROUILLAGE 5/16"... - Page 14 Placez les deux montants dans l'adaptateur de la sellette GM installée en usine sur votre véhicule. Les poignées et les boulons en T doivent être tournés en position déverrouillée. Les poignées et les boulons en T sont représentés en position déverrouillée.
- Page 15 Une fois les montants installés, placez les poignées en position verrouillée. Réglez les boulons en T pour un ajustement plus ou moins serré en les tournant dans les poignées. Les poignées et les boulons en T sont représentés en position verrouillée 3.
- Page 16 4. Une fois la traverse installée, assurez-vous que l'adaptateur repose À PLAT sur l'adaptateur de la sellette AUX 4 POINTS DE CONTACT. Couplez les quatre boulons ¾"-10 et les écrous nyloc ¾"-10 à 250 ft.lbs. UTILISEZ LA CLÉ DYNAMOMÉTRIQUE SUR LES ÉCROUS ET NON SUR LES BOULONS. Les poignées et les boulons en T sont représentés en position verrouillée...
- Page 17 9. Enfin, installez les goupilles de verrouillage 5/16” à travers les poignées et les montants. AVERTISSEMENT NE REMORQUEZ JAMAIS SANS VERROUILLER LES POIGNÉES DE L'ATTELAGE DE LA SELLETTE À L'AIDE DES GOUPILLES DE VERROUILLAGE 5/16" FOURNIES OU D'UN CADENAS. NE JAMAIS REMORQUER SANS VERROUILLER LES POIGNÉES À L'AIDE DES GOUPILLES DE BLOCAGE 3/16"...
- Page 18 Préparation pour la première utilisation 1. Vérifiez que la traverse est réglée à la hauteur appropriée pour assurer un dégagement d'au moins 6" entre le bas du nez de la remorque et le haut des côtés de la caisse du véhicule, et que sa hauteur permet un attelage avec la remorque à sellette (voir la figure 1 ci-dessous).
- Page 19 7. Ouvrez la poignée de votre sellette en suivant les instructions fournies pour ce produit spécifique. 8. Reculez lentement avec le véhicule de façon à ce que la plaque inférieure du boîtier du pivot d'attelage glisse sur la plaque de la sellette et que le pivot d'attelage glisse complètement dans la gorge de la tête d'attelage. Serrez le frein de stationnement du véhicule et mettez la transmission au point mort.
- Page 20 Inspectez périodiquement votre produit pour détecter toute usure ou tout dommage. Si vous constatez une usure ou un dommage excessif, contactez votre revendeur ou envoyez une preuve d'achat et une photo de l'usure et du dommage au personnel de l'assistance technique HUSKY à l'adresse suivante www.huskytow.com ou 1-877-544-4449.
- Page 21 Respectez toutes les lois nationales, locales et provinciales relatives à la conduite et au remorquage dans la région où vous conduisez. Le non-respect des instructions/manuels de Husky relatifs au véhicule tracteur et à la remorque peut entraîner un accident mortel.
-
Page 22: Conditions De Garantie
Si un produit présente un défaut de fabrication ou de matériau, il sera remplacé ou réparé au choix de Husky Towing Products et de Keystone Automotive Operations Inc. avec une preuve d'achat par l'acheteur d'origine. L'acheteur d'origine doit payer tous les frais de transport et d'expédition liés au retour du produit défectueux et le produit défectueux devient la propriété...
Need help?
Do you have a question about the GM UPRIGHTS and is the answer not in the manual?
Questions and answers