Table of Contents
Advertisement
Available languages
Available languages
Quick Links
Dealer / Installer:
End User:
DO NOT EXCEED Recommended towing limits. SEE VEHICLE'S OWNER'S MANUAL.
▪ Warning, by towing a trailer, you change the handling characteristics
of the tow vehicle.
▪ Warning, Short wheelbase vehicles may induce sway when towing a
trailer. USE EXTREME CAUTION.
▪ Any welding should be done by a qualified welding shop.
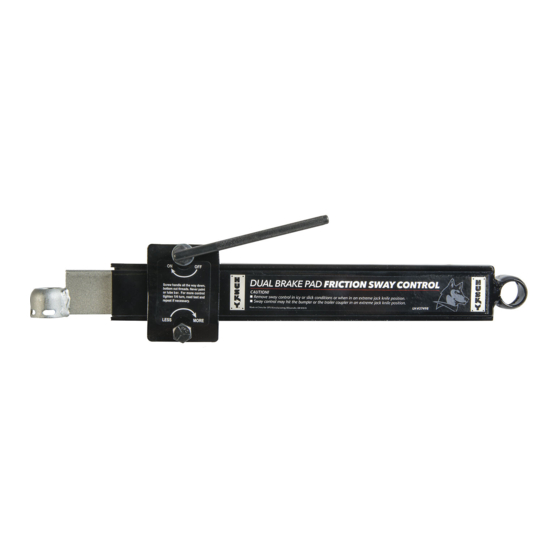
Installation instructions:
Most weight distributing ball mounts come equipped with a sway control
ball mount attached. If so, attach the sway control ball to the ball mount
using the hole provided. Tighten the sway control ball to 135 ft-lb torque.
If no sway control ball mount is provided, then use the optional ball mount
bar (Item #34845 included with LH 37498) and weld to the ball mount as
shown in fig. 1 (Right hand setup is shown).
You will want to position the ball mount bar (item #34845) on the side of
the draw bar where you intend on attaching the friction sway unit to the
side of the trailer.
Note which side of the draw bar the ball mount is on as this will be the
side of the trailer you will attach the trailer frame sway ball plate on.
Measure 24" from the center of the coupler ball socket down the side of
the frame and mark this position. Place the trailer ball plate against the
side of the frame (level). Then transfer the punch holes from the trailer
tongue ball plate assy. to the trailer frame and drill 11/32" holes. Attach
the trailer tongue ball plate assy. to the trailer frame using the self-tapping
screws provided and torque to 25 ft.-lbs. See Fig. 2.
Warning! The sway control CAN NOT be used on trailers with surge
brakes! DO NOT speed up if sway occurs. Sway increases with
speed. If sway continues, stop the vehicle and inspect all equipment
and trailer loading until the cause has been determined and
corrected. Trailers should be loaded with heavy items on the floor,
in front of the axle. The load should be balanced side to side.
Tongue weight should be 10-15% of gross trailer weight for most
trailers. Insufficient tongue weight or tail-heavy trailers can cause
sway. When towing in slippery conditions, such as wet, icy, gravel
or snow-covered roads, the sway control must be removed. Never
paint or lubricate the slide bar. If the trailer is 24' or longer, the use
of both a right hand (item #34715) and left-hand sway control (item
#37498) is recommended.
Warning!
Check all mounting bolts and attachment points for the sway control, hitch and related
components every 500 miles, or per the manufacturer's instructions, whichever is more frequent.
All Products limited to Vehicle Tow Rating, see Vehicle Owners Manual. Visit www.huskytow.com for Warranty Information / Tech Support /
Product Updates. 2020 Keystone Automotive Operations Inc. All Rights Reserved. 09/21/2020-Rev7
Assembly, Installation, Operation and
Maintenance Instructions
RH/LH Friction Sway Control Part #
34715/37498
Provide a copy of these instructions to the end user of this product. These
instructions provide important operating and safety information for proper usage of
this product. Demonstrate the proper use of the product with the end user. Have the
end user demonstrate that they understand the proper use of the product.
Read and follow all instructions included in this manual. Ask your Dealer / Installer for
assistance if you do not understand the proper use of the product. Never remove any
decals from the product.
P/N:
37415/37498
10-20 minutes
Page-1
Advertisement
Table of Contents

Subscribe to Our Youtube Channel
Related Manuals for Husky 37415


Summary of Contents for Husky 37415
- Page 1 P/N: Assembly, Installation, Operation and 37415/37498 Maintenance Instructions RH/LH Friction Sway Control Part # 10-20 minutes 34715/37498 Dealer / Installer: Provide a copy of these instructions to the end user of this product. These instructions provide important operating and safety information for proper usage of this product.
- Page 2 Use: Hook up the trailer to the tow vehicle. Lubricate the threads on the handle with a drop of oil and apply grease to the inside of the sockets at each end of the sway unit. Attach the socket on the slide bar to the sway control ball on the ball mount.
-
Page 3: Warranty Terms
Husky Towing Products and Keystone Automotive Operations Inc. with proof of purchase by the original purchaser. The original purchaser shall pay all transportation and shipping costs associated with the return of the defective product and the defective product shall become the property of Keystone Automotive Operations Inc. -
Page 4: Instructions D'installation
pièce : Instructions d’assemblage, d’installation, de 34715/37498 fonctionnement et d’entretien Commande antiroulis à friction CD-CG 10-20 minutes Veuillez fournir une copie de ces instructions à l’utilisateur de ce produit. Ces instructions Commerçant/ fournissent des renseignements importants relatifs au fonctionnement et à la sécurité pour assurer l’utilisation appropriée du produit. - Page 5 jusqu'à ce que les filets ressortent vers le bas et que la manivelle soit parallèle au corps principal (tourner la manivelle dans le sens contraire des aiguilles d'une montre, au besoin). Avec l'aide d'une autre personne pour surveiller la commande antiroulis et la remorque, reculer lentement la remorque dans les deux directions en position de charnière et s'assurer que la commande antiroulis ne frappe pas le pare-chocs ni le châssis de la remorque, qu'elle ne se comprime pas complètement ou qu'elle ne se détache pas.
-
Page 6: Modalités De La Garantie
Tout produit qui fait l’objet d’un défaut de fabrication ou de matériau sera remplacé ou réparé à la discrétion de Husky Towing Products et de Keystone Automotive Operations Inc. avec une preuve d’achat présentée par l’acheteur original. L’acheteur original paiera tous les coûts de transport et d’expédition liés au retour du produit défectueux et le produit défectueux deviendra la propriété... -
Page 7: Instrucciones De Instalación
Instrucciones de Ensamblaje, Instalación Núm./Prod.: Operaciones y Mantenimiento 37415/37498 RH/LG Control de Balanceo por Fricción 10-20 minutos Concesionario / Proveer una copia de estas instrucciones para el usuario final de este producto. Estas Instalador: instrucciones proveen información sobre la operación y seguridad para el uso adecuado de este producto. - Page 8 Cuando se remolca en condiciones resbaladizas, tales como caminos mojados, cubiertos de hielo, gravilla o nieve, el control de balanceo debe eliminarse. Nunca pinte o lubrique la barra deslizante. Si el remolque es de 24" o más grande, se recomienda realizar un control de balanceo tanto izquierdo (artículo #37498) como derecho (artículo #34715).
- Page 9 ARTÍC. DESCRIPCIÓN CANT. En Kit? KIT DE SERV. CUERPO PRINCIPAL SÍ MANIVELA DE ARRANQUE SÍ 34847 ARANDELA SÍ BARRA DESLIZANTE SÍ 34846 PLACA DE COMPRESIÓN SÍ TORNILLO DE AJUSTE DE TENSIÓN SÍ TORNILLO AUTORROSCANTE SÍ 71195 CHAVETA SÍ 34853 BOLA, ARANDELA Y & MONTAJE PARA TUERCAS SÍ...
-
Page 10: Términos De Garantía
Productos de Remolque Husky y Keystone Automative Operations, Inc. con un comprobante de compra por el comprador original. El comprador original deberá pagar todos los costos de transporte y envío asociados con la devolución de un producto defectuoso y el producto defectuoso se convertirá...
Need help?
Do you have a question about the 37415 and is the answer not in the manual?
Questions and answers