Table of Contents
Advertisement
Quick Links
1 to 1 NVMe/SATA Drive Duplicator and Secure Eraser
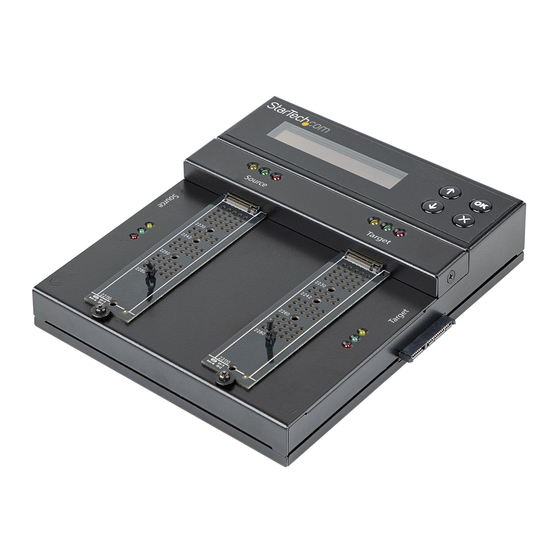
Product Diagram (SM2DUPE11)
Front View
2
3
4
5
Top Edge View
10
Component
1
LCD Display
2
2.5"/3.5" SATA Drive Connector
3
M.2 Drive Connector
4
M.2 Drive Connector
Drive-Tray Screw /Drive -Tray
5
Screw Hole
6
Rubber Drive Holder
7
2.5"/3.5" SATA Drive Connector
8
LED Indicators
9
LCD Display Buttons
10
Power Switch
11
Power Connector
To view manuals, FAQs, videos, drivers, downloads, technical drawings, and more, visit www.startech.com/support.
To view manuals, FAQs, videos, drivers, downloads, technical drawings, and more, visit www.startech.com/support.
1
9
8
7
*Product may vary from photos
6
11
*Product may vary from photos
Function
• Displays Menu options, status, and details
• Connect a source 2.5"/3.5" SATA Drive
• Connect a source M.2 SATA or NVMe Drive
• Connect a target M.2 SATA or NVMe Drive
• Secures the Drive Tray
• Secures the M.2 SATA or NVMe Drive
• Connect a target 2.5"/3.5" SATA Drive
• Indicates Drive Status
• Navigate through the LCD Display
• Toggle ON (I) or OFF (O)
• Connect the Universal Power Adapter
Package Contents
• Duplicator Dock x 1
• SATA Drive Extensions Cable x 2
• Anti-Slip/Vibration Pads x 2
• Universal Power Adapter x 1
• Regional Power Cords (NA, JP, EU, UK, ANZ) x 5
• Quick-Start Guide x 1
Product Information
For product information, technical specifications, manuals, and Declarations of
Conformance please visit:
www.startech.com/SM2DUPE11
Product Requirements
• M2 SATA/NVMe SSD x 2
• 2.5"/3.5" SATA Drive x 2
Installation
Power the Drive Duplicator and Secure Eraser
1. Connect the Universal Power Adapter to the appropriate Regional Power Cord.
2. Connect the Universal Power Adapter to the Power Connector on the Drive
Duplicator and Secure Eraser.
3. Connect the Regional Power Cord to a Power Source.
4. Toggle the Power Switch to the ON (I) position.
Connect a 2.5"/3.5" SATA Drive
Note: Do not connect drives directly into the Hard Drive Duplicator and Secure
Eraser, as it puts undue strain on the device connectors.
1. Connect the Drive Connector Cable(s) to 2.5"/3.5" SATA Drive(s) and to the
2.5"/3.5" SATA Drive Connector(s) on the Drive Duplicator and Secure Eraser.
2. Place the Drive Duplicator and Secure Eraser on the Anti-Slip/Vibration Pads
(included).
Note: Avoid placing drives directly on a metal surface.
Connect M.2 SATA or NVMe Drive
1. Determine the size of the M2. SATA or NVMe Drive(s).
Quick-Start Guide
Manual Revision: April 26, 2021 10:15 AM
Advertisement
Table of Contents

Related Manuals for StarTech.com SM2DUPE11


Summary of Contents for StarTech.com SM2DUPE11
- Page 1 Power Connector 1. Determine the size of the M2. SATA or NVMe Drive(s). To view manuals, FAQs, videos, drivers, downloads, technical drawings, and more, visit www.startech.com/support. To view manuals, FAQs, videos, drivers, downloads, technical drawings, and more, visit www.startech.com/support. Manual Revision: April 26, 2021 10:15 AM...
- Page 2 However, there is no guarantee that interference will and do not represent an endorsement of a product or service by StarTech.com, or an endorsement of the product(s) to not occur in a particular installation. If this equipment does cause harmful interference to radio or television reception, which which this manual applies by the third-party company in question.
Need help?
Do you have a question about the SM2DUPE11 and is the answer not in the manual?
Questions and answers