Table of Contents
Advertisement
Quick Links
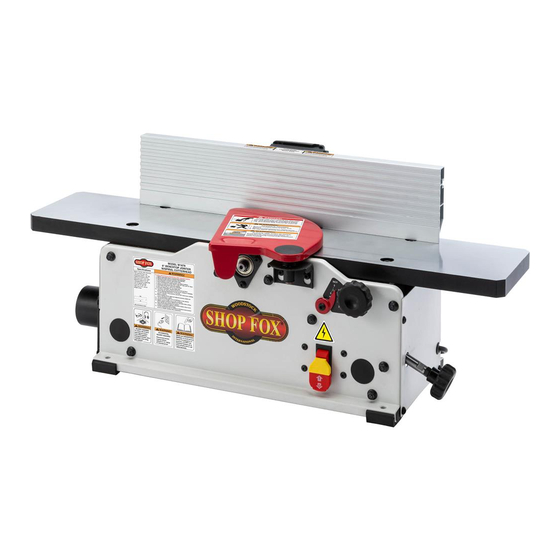
MODEL W1876/W1879
6" BENCHTOP JOINTERS
OWNER'S MANUAL
(FOR MODELS MANUFACTURED SINCE 7/20)
262149
W1876 Only
Phone: (360) 734-3482 • Online Technical Support: techsupport@woodstockint.com
COPYRIGHT © AUGUST, 2020 BY WOODSTOCK INTERNATIONAL, INC., REVISED MAY, 2021 (KS)
WARNING: NO PORTION OF THIS MANUAL MAY BE REPRODUCED IN ANY SHAPE OR FORM WITHOUT
THE WRITTEN APPROVAL OF WOODSTOCK INTERNATIONAL, INC.
#21199KS Printed in Taiwan
V2.05.21
Advertisement
Table of Contents

Related Manuals for Woodstock W1876


Summary of Contents for Woodstock W1876
- Page 1 W1876 Only Phone: (360) 734-3482 • Online Technical Support: techsupport@woodstockint.com COPYRIGHT © AUGUST, 2020 BY WOODSTOCK INTERNATIONAL, INC., REVISED MAY, 2021 (KS) WARNING: NO PORTION OF THIS MANUAL MAY BE REPRODUCED IN ANY SHAPE OR FORM WITHOUT THE WRITTEN APPROVAL OF WOODSTOCK INTERNATIONAL, INC.
- Page 2 This manual provides critical safety instructions on the proper setup, operation, maintenance, and service of this machine/tool. Save this document, refer to it often, and use it to instruct other operators. Failure to read, understand and follow the instructions in this manual may result in fire or serious personal injury—including amputation, electrocution, or death.
-
Page 3: Table Of Contents
Contents INTRODUCTION ........2 ACCESSORIES ........29 Woodstock Technical Support ....2 MAINTENANCE ........31 W1876 Machine Specifications ....3 General .......... 31 W1879 Machine Specifications ....5 Cleaning & Protecting ......31 Identification ........7 Lubrication ........32 Controls & Components ......8 SERVICE .......... -
Page 4: Introduction
Woodstock International, Inc. is committed to customer satisfaction. Our intent with this manual is to include the basic information for safety, setup, operation, maintenance, and service of this product. -
Page 5: W1876 Machine Specifications
Bevel Jointing..................0 ‐ 45 deg. Maximum Width of Cut................... 6 in. Maximum Depth of Cut................1/8 in. Minimum Workpiece Length................10 in. Minimum Workpiece Thickness............... 1/2 in. Number of Cuts Per Minute................72,000 Model W1876 Machine Specifications, Page 1 of 2... - Page 6 Spiral Cutterhead with 12 Indexable HSS Inserts 2‐1/2" Dust Port Cast Aluminum Infeed and Outfeed Tables Infeed Table Height Adjustment Lock Two Safety Push Blocks Torx T‐25 T‐Handle Driver Hex Wrenches 2.5, 4mm Model W1876 Machine Specifications, Page 2 of 2...
-
Page 7: W1879 Machine Specifications
Model W1876/W1879 (For Machines Mfd. Since 7/20) MODEL W1879 6" BENCHTOP JOINTER Product Dimensions Weight......................43 lbs. Width (side‐to‐side) x Depth (front‐to‐back) x Height........30 x 17‐1/2 x 13 in. Footprint (Length x Width)................19 x 9‐1/2 in. Shipping Dimensions Type.................... - Page 8 Model W1876/W1879 (For Machines Mfd. Since 7/20) Fence Information Fence Length..................19‐3/4 in. Fence Width..................... 7/8 in. Fence Height..................4‐5/16 in. Cutterhead Information Cutterhead Type................Straight Knife Cutterhead Diameter................1‐7/8 in. Cutterhead Speed................. 12,000 RPM Knife Information Number of Knives....................2 Knife Type................
-
Page 9: Identification
Model W1876/W1879 (For Machines Mfd. Since 7/20) Identification Become familiar with the names and locations of the controls and features shown below to better understand the instructions in this manual. Cutterhead Guard Table Leveling Fence Adjuster (1 of 8) Infeed... -
Page 10: Controls & Components
Model W1876/W1879 (For Machines Mfd. Since 7/20) Controls & Components Refer to Figures 1 & 2 and the following descriptions to become familiar with the basic controls and components of this machine. Understanding these items and how they work will help you understand the rest of the manual and stay safe when operating this machine. -
Page 11: Safety
Model W1876/W1879 (For Machines Mfd. Since 7/20) SAFETY SAFETY For Your Own Safety, Read Manual Before Operating Machine The purpose of safety symbols is to attract your attention to possible hazardous conditions. This manual uses a series of symbols and signal words intended to convey the level of importance of the safety messages. - Page 12 Model W1876/W1879 (For Machines Mfd. Since 7/20) WEARING PROPER APPAREL. Do not wear FORCING MACHINERY. Do not force machine. It clothing, apparel, or jewelry that can become will do the job safer and better at the rate for entangled in moving parts. Always tie back which it was designed.
-
Page 13: Additional Safety For Jointers
Model W1876/W1879 (For Machines Mfd. Since 7/20) Additional Safety for Jointers Serious cuts, amputation, entanglement, or death can occur from contact with rotating cutterhead or other moving components! Flying chips from cutting operations can cause eye injuries or blindness. Workpieces or inserts/knives thrown by cutterhead (kickback) can strike nearby operator or bystanders with deadly force. -
Page 14: Electrical
Model W1876/W1879 (For Machines Mfd. Since 7/20) ELECTRICAL Circuit Requirements This machine must be connected to the correct size and type of power supply circuit, or fire or electrical damage may occur. Read through this section to determine if an The machine must be properly set up adequate power supply circuit is available. -
Page 15: Grounding Requirements
Model W1876/W1879 (For Machines Mfd. Since 7/20) Grounding Requirements This machine MUST be grounded. In the event of certain types of malfunctions or breakdowns, grounding provides GROUNDED 120V 5-15 RECEPTACLE a path of least resistance for electric current to travel—in order to reduce the risk of electric shock. -
Page 16: Setup
Model W1876/W1879 (For Machines Mfd. Since 7/20) SETUP Unpacking This machine has been carefully packaged for safe This machine presents transportation. If you notice the machine has been serious injury hazards damaged during shipping, please contact your authorized to untrained users. Read Shop Fox dealer immediately. -
Page 17: Inventory
Model W1876/W1879 (For Machines Mfd. Since 7/20) Inventory The following is a list of items shipped with your machine. Before beginning setup, lay these items out and inventory them. Note: If you cannot find an item on this list, carefully check around/inside the machine and packaging materials. -
Page 18: Machine Placement
Model W1876/W1879 (For Machines Mfd. Since 7/20) Machine Placement Cleaning Machine Workbench Load The unpainted surfaces of your machine are coated with a heavy-duty rust preventative that Refer to the Machine Specifications for the prevents corrosion during shipment and storage. -
Page 19: Bench Mounting
Model W1876/W1879 (For Machines Mfd. Since 7/20) Bench Mounting Number of Mounting Holes ........4 Diameter of Mounting Hardware Needed ....⁄ " The base of this machine has mounting holes that allow it to be fastened to a workbench or other mounting surface to prevent it from moving during operation and causing accidental injury or damage. -
Page 20: Assembly
Model W1876/W1879 (For Machines Mfd. Since 7/20) Assembly Before beginning the assembly process, refer to Items Needed for Setup and gather everything you need. Button Head Ensure all parts have been properly cleaned of any Cap Screw heavy-duty rust-preventative applied at the factory (if (1 of 4) applicable). - Page 21 Model W1876/W1879 (For Machines Mfd. Since 7/20) 4. Align fence cutout with center of fence slide Button Head Cap Screws bracket, and tighten (2) button head cap screws installed in Step 2 (see Figure 12). Fence Support Fence Bracket Center Cutout Figure 12.
-
Page 22: Dust Collection
Model W1876/W1879 (For Machines Mfd. Since 7/20) Dust Collection Recommended CFM at Dust Port: ....150 CFM Do not confuse this CFM recommendation with the rating To help prevent material build-up from of the dust collector. To determine the CFM at the dust... -
Page 23: Test Run
Model W1876/W1879 (For Machines Mfd. Since 7/20) Test Run Once assembly is complete, test run the machine to ensure it is properly connected to power and safety components are functioning properly. Serious injury or death can result from using this machine BEFORE... -
Page 24: Operations
Model W1876/W1879 (For Machines Mfd. Since 7/20) OPERATIONS General This machine will perform many types of operations that are beyond the scope of this manual. Many of these operations can be dangerous or deadly if performed incorrectly. The instructions in this section are written with the understanding that the operator has the necessary knowledge and skills to operate this machine. -
Page 25: Stock Inspection
Model W1876/W1879 (For Machines Mfd. Since 7/20) Stock Inspection Follow these rules when choosing and jointing stock: CORRECT FEED DIRECTION DO NOT joint or surface plane stock that contains • ROTATION large or loose knots. Injury to the operator or... -
Page 26: Setting Depth Of Cut
Model W1876/W1879 (For Machines Mfd. Since 7/20) Setting Depth of Cut The depth of cut on a jointer affects the amount of material removed from the bottom of the workpiece as it passes over the cutterhead. DO NOT exceed ⁄... -
Page 27: Squaring Stock
Model W1876/W1879 (For Machines Mfd. Since 7/20) Squaring Stock Squaring stock means making it flat and parallel along both length and width, and making the length and width perpendicular to one another. The purpose of squaring stock is to prepare it for accurate cuts and construction later on. -
Page 28: Surface Planing
Model W1876/W1879 (For Machines Mfd. Since 7/20) Surface Planing The purpose of surface planing (see Figure 22) on the jointer is to make one flat face on a piece of stock to prepare it for thickness planing on a planer. -
Page 29: Edge Jointing
Model W1876/W1879 (For Machines Mfd. Since 7/20) Edge Jointing Edge jointing (see Figure 23) produces a flat and true surface along the side of a workpiece by removing uneven areas. It is an essential step for squaring up warped or rough stock and when preparing a workpiece for joinery or finishing. -
Page 30: Bevel Cutting
Model W1876/W1879 (For Machines Mfd. Since 7/20) Bevel Cutting Bevel cuts (see Figure 24) can be made by setting the fence at the desired angle and feeding the workpiece firmly along the fence face, with the bottom inside corner firmly against the table. The cutting process typically requires multiple passes or cuts to bevel the entire edge of a workpiece. -
Page 31: Accessories
Dealer. If you do not have a dealer in your area, these products are also available through online dealers. Please call or e-mail Woodstock International Inc. Customer Service to get a current listing of dealers at: 1-800-840-8420 or at sales@woodstockint.com. - Page 32 W1041 These reducers will allow you to connect the 2 ⁄ " dust port on the W1876 and W1879 Jointers to an existing dust collection system with standard 3" or 4" fittings. W1044 W1844—Wall-Mount Dust Collector with Canister Filter This convenient wall-mounted Dust Collector has a large surface area, pleated filter with internal paddle brushes.
-
Page 33: Maintenance
Model W1876/W1879 (For Machines Mfd. Since 7/20) MAINTENANCE General For optimum performance from this machine, this maintenance schedule must be strictly followed. Ongoing To minimize your risk of injury and maintain proper machine operation, shut down the machine immediately if you ever observe any of the items below, and fix the problem before continuing operations: •... -
Page 34: Lubrication
Model W1876/W1879 (For Machines Mfd. Since 7/20) Lubrication Since all bearings are sealed and permanently lubricated, simply leave them alone until they need to be replaced. DO NOT lubricate them. It is essential to clean components before lubricating them because dust and chips build up on lubricated components and make them hard to move. -
Page 35: Service
Model W1876/W1879 (For Machines Mfd. Since 7/20) SERVICE General This section covers the most common service adjustments or procedures that may need to be made during the life of your machine. If you require additional machine service not included in this section, please contact Woodstock International Technical Support at (360) 734-3482 or send e-mail to: techsupport@woodstockint.com. - Page 36 Model W1876/W1879 (For Machines Mfd. Since 7/20) 4. Insert included Torx driver in the cutterhead rotation guide on front of jointer, and rotate cutterhead as needed to make inserts accessible for rotation/ removal. 5. Carefully clean away all sawdust or debris from top of insert, Torx screw, and surrounding area (see Figure 27).
-
Page 37: Checking/Setting Knives (W1879)
Model W1876/W1879 (For Machines Mfd. Since 7/20) Checking/Setting Knives (W1879) Cutterhead knives are very sharp and can easily cut your hands. ALWAYS use Setting the knives correctly is crucial to the proper caution when handling these parts to operation of the jointer, and it plays an important role reduce risk of personal injury. - Page 38 Model W1876/W1879 (For Machines Mfd. Since 7/20) 4. Rotate cutterhead until knife clamp is on top, then Cutterhead engage cutterhead lock (see Figure 31) by moving lock up and over end of cutterhead. Lock Engaged Cutterhead Lock Figure 31. Cutterhead lock engaged.
-
Page 39: Checking/Adjusting Table Parallelism
Model W1876/W1879 (For Machines Mfd. Since 7/20) Checking/Adjusting Table Parallelism If the infeed and outfeed tables are not parallel with the cutterhead and each other, then poor cutting results and kickback can occur. The knives/indexable inserts are very sharp and can easily cut your hands. - Page 40 Model W1876/W1879 (For Machines Mfd. Since 7/20) Checking Infeed Table 1. Follow all steps for checking outfeed table parallelism to first make sure that outfeed table is The knives/indexable inserts are very parallel with cutterhead. sharp and can easily cut your hands.
- Page 41 Model W1876/W1879 (For Machines Mfd. Since 7/20) Adjusting Table Parallelism For safe and proper cutting results, the tables must be parallel to the cutterhead. Adjusting them to be parallel The knives/indexable inserts are very is a task of precision and patience, and may take up to sharp and can easily cut your hands.
- Page 42 Model W1876/W1879 (For Machines Mfd. Since 7/20) 3. Place straightedge in one of the positions shown in Black Lines Represent Figure 41. Straightedge Positions from Overhead View Figure 41. Straightedge positions for checking outfeed table parallelism. 4. Use a flat head screwdriver to rotate leveling...
-
Page 43: Checking/Adjusting Fence Positive Stops
Model W1876/W1879 (For Machines Mfd. Since 7/20) Checking/Adjusting Fence Positive Stops The fence has adjustable positive stops at the 90º and 45º outward (135º) positions for quickly and accurately setting the desired fence angle. Note: To ensure accurate results when jointing, check the accuracy of these settings frequently (monthly at a minimum) and adjust them if necessary. - Page 44 Model W1876/W1879 (For Machines Mfd. Since 7/20) 6. Loosen fence tilt lock handle and adjust fence to 45º outward position (see Figure 47), then tighten handle. 7. Place combination square on jointer table with 45º outward side against fence (see Figure 47).
-
Page 45: Replacing/Tensioning Belt
Model W1876/W1879 (For Machines Mfd. Since 7/20) Replacing/Tensioning Belt To ensure optimum power transmission from the motor to the cutterhead, the belt must be in good condition (free from cracks, fraying, and wear) and properly tensioned. Belts and pulleys will be hot after operation. -
Page 46: Replacing Motor Brushes
Model W1876/W1879 (For Machines Mfd. Since 7/20) Replacing Motor Brushes This jointer is equipped with a universal motor that uses two carbon brushes to transmit electrical current inside the motor. These brushes are considered to be regular Replace both carbon brushes (part "wear items"... -
Page 47: Troubleshooting
Model W1876/W1879 (For Machines Mfd. Since 7/20) Troubleshooting The following troubleshooting tables cover common problems that may occur with this machine. If you need replacement parts or additional troubleshooting help, contact our Technical Support. Note: Before contacting Tech Support, find the machine serial number and manufacture date, and if available, your original purchase receipt. - Page 48 Model W1876/W1879 (For Machines Mfd. Since 7/20) Operation PROBLEM POSSIBLE CAUSE CORRECTIVE ACTION Table is hard 1. Table lock engaged/partially engaged. 1. Completely loosen table lock. to adjust. Excessive snipe 1. Outfeed table is set too low, or knives 1. Align outfeed table with cutterhead knives/inserts (gouge in end at top dead center (Page 37).
- Page 49 Model W1876/W1879 (For Machines Mfd. Since 7/20) Operation PROBLEM POSSIBLE CAUSE CORRECTIVE ACTION Uneven cutter 1. Feeding workpiece too fast. 1. Reduce feed rate. marks, wavy 2. Knives/insert(s) not adjusted at even heights 2. Adjust knives so they are set up evenly in cutterhead surface, or in cutterhead.
-
Page 50: Electrical Safety Instructions
Model W1876/W1879 (For Machines Mfd. Since 7/20) Electrical Safety Instructions These pages are current at the time of printing. However, in the spirit of improvement, we may make changes to the electrical systems of future machines. Compare the manufacture date of your machine to the one stated in this manual, and study this section carefully. -
Page 51: Wiring Diagram
Model W1876/W1879 (For Machines Mfd. Since 7/20) Wiring Diagram Neutral Read Page 48 STOP MOTOR 120V 120 VAC Before Wiring 5-15 Plug PADDLE SWITCH Ground (viewed from behind) SHOCK HAZARD! PADDLE SWITCH Disconnect power KEDU HY18 20A before working on... -
Page 52: Parts
Model W1876/W1879 (For Machines Mfd. Since 7/20) PARTS Main (W1876) (W1879) (W1879) 160-3 43-1 160-4 43-2 36-1 160-5 36-2 160-6 160-7 160-8 (W1876) 160-9 160-1 160-2 160-3 (W1876) 300-1 300-2 300-3 14-1 14-2 57 56 (W1879) 323-2 323-3 323-1 -50-... - Page 53 REAR BEARING RETAINER ASSEMBLY 160-1 X1876160-1 SPIRAL CUTTERHEAD 6" (W1876) 36-1 X1876036-1 REAR BEARING RETAINER 160-2 X1876160-2 CARBIDE INSERT 14 X 14 X 2 (W1876) 36-2 X1876036-2 BALL BEARING 6201ZZ 160-3 X1876160-3 FLAT HD TORX SCR M5-.8 X 16 (W1876)
-
Page 54: Labels & Cosmetics
Model W1876/W1879 (For Machines Mfd. Since 7/20) Labels & Cosmetics PART # DESCRIPTION PART # DESCRIPTION X1876400 MACHINE ID LABEL (W1876) X1876404 DISCONNECT 110V LABEL X1879400 MACHINE ID LABEL (W1879) X1876405 COMBO WARNING LABEL X1876401 CUTTERHEAD EXPOSURE LABEL X1876406 CUTTERHEAD WARNING LABEL... -
Page 55: Warranty
Woodstock International, Inc. will repair, replace, or arrange for a dealer refund, at its expense and option, the Shop Fox machine or machine part proven to be defective for its designed and intended...
Need help?
Do you have a question about the W1876 and is the answer not in the manual?
Questions and answers