CAVS DVD-105G USB Instructions Manual
Cavs dvd-105g: users manual
Hide thumbs
Also See for DVD-105G USB:
- Supplementary manual (3 pages) ,
- Upgrade instructions (2 pages)
Table of Contents
Advertisement
DVD PLAYER
105G USB
105G USB
DVD, MPEG-4
INX, INX2, Super CD+G
CD+Graphics
Digital Direct Progressive Scan
Enter below the Model No. and Serial
No. which are located on the rear,
bottom or side of the cabinet. Retain
this information for future reference.
Model No.
Serial No.
2
5
7
10
13
15
17
20
24
Advertisement
Table of Contents

Related Manuals for CAVS DVD-105G USB


Summary of Contents for CAVS DVD-105G USB
-
Page 1: Table Of Contents
DVD PLAYER DVD, MPEG-4 INX, INX2, Super CD+G CD+Graphics Digital Direct Progressive Scan INSTRUCTIONS Before operation Preparations Basic operations Advanced operations Karaoke operations Audio/Video files playback USB memory device operations Changing the initial settings Additional information For Customer Use: Enter below the Model No. and Serial No. - Page 2 Warnings, Cautions and Others Mises en garde, precautions et indications diverses CAUTION CAUTION RISK OF ELECTRIC SHOCK RISK OF ELECTRIC SHOCK DO NOT OPEN DO NOT OPEN CAUTION: TO REDUCE THE RISK OF ELECTRIC SHOCK. DO NOT REMOVE COVER (OR BACK) NO USER SERVICEABLE PARTS INSIDE.
-
Page 3: Instructions
Important Product Safety Instruction Electrical energy can perform many useful functions. But improper use can result in potential electrical shock or fire hazards. This product has been engineered and manufactured to assure your personal safety. In order not to defeat the built-in safeguards, observe the following basic rules for its installation, use and servicing. - Page 4 1. Accessories Do not place this product on an unstable cart, stand, tripod, bracket, or table. It may fall, causing serious injury to a child or adult, and serious damage to the product. Use only with a cart, stand, tripod, bracket, or table recommended by the manufacturer or sold with the product.
- Page 5 Supplied accessories Check that you have all the following accessories supplied to you. If anything is missing, consult your dealer immediately. * Audio/video cable (Yellow/White/Red) * Remote control unit * R6(SUM-3)/AA(15F) battery x 2 * AC power plug adaptor * USB cable * User’s Manual About this manual The display window information and OSD (On Screen...
-
Page 6: Before Operation
Before operation About playable media About playable media Optical discs Disc types: DVD, MPEG-4, Video CD, Super CD+G, INX, INX2, CD+Graphics, Audio CD, HDCD File types: AVI, MP3, JPEG Media types: DVD R, DVD R DL, DVD-RW, CD-R, CD-RW USB memory devices File types: AVI, CD+G (MP3+MCG), CD+G (MP3G), MP3, JPEG Media types:... -
Page 7: Display Window
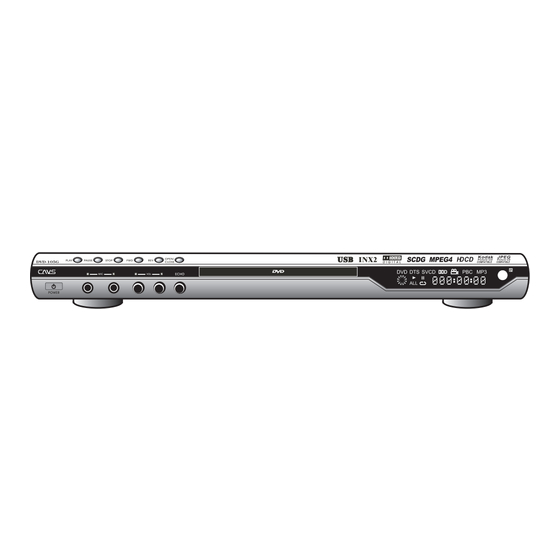
Names of parts and controls Names of parts and controls Front panel Power button MIC 1 Input Jack MIC 2 Input Jack MIC 1 Volume Control Back panel Analog 5.1 Channel Dolby Audio Outputs Component Video Outputs Composite Video Output 2 Channel Downmix Audio Outputs Coaxial Digital Audio Output Display window... - Page 8 Before operation Remote control unit POWER REPEAT SUBTITLE Numeric buttons MULTI ANGLE LANGUAGE (AUDIO) TITLE SETUP LEFT MENU DOWN PLAY PAUSE FAST BACKWARD FAST FORWARD MUTE NTSC/PAL SLOW STEP RETURN LOWER KEY (PITCH) RESET KEY (PITCH) A-B LOOP OPEN/CLOSE DISC/USB PROGRAM ENTER RIGHT...
-
Page 9: Preparations
Connections Connections Before using the player, connect the player to a TV and/or amplifier. Before making connections Do not connect the AC power cord until all other connections have been made. Connect VIDEO OUT of the player directly to the video input of your TV. -
Page 10: Connecting The Power Cord
Preparations Connecting the power cord When all the audio/video connections have been made, connect the AC power plug first to the player and then to the wall outlet. Make sure that the plugs are inserted firmly. Warning * Disconnect the power cord: if you are not going to use the player for a long time. -
Page 11: Basic Operations
POWER button on the front panel is pressed ON. INITIALIZING message will first appear on the TV screen, followed by the opening display with CAVS logo. The duration of INITIALIZING will depend on the media inserted in the player. -
Page 12: Basic Playback
Basic operations Select a desired Audio Output Select an Audio Output according to your audio connection. Enter AUDIO SETUP from the SETUP MENU. For COAXIAL or OPTICAL connection to digital amplifier or receiver, set the SPDIF OUTPUT to SPDIF/RAW or SPDIF/PCM. -
Page 13: Slow Motion
To check the playback status Press DISPLAY button on the remote control to see the current selection number (the title/chapter number for DVD VIDEO or track number for Video CD/Audio CD), time information (the time elapsed, or time remaining) on the TV screen. -
Page 14: Advanced Operations
Advanced operations Playing from a specific Playing from a specific position position To locate a desired scene from the DVD menu D V D VIDEO DVD VIDEO discs generally have their own menus which show the disc contents. These menus contain various items such as titles of movies, names of songs, or artist information, and display them on the TV screen. -
Page 15: Changing The Playback Order
Changing the playback order Changing the playback order To playback in a specific order (Program play) Video Audio Graphics By programming tracks, you can play up to 99 tracks in any order. You may program the same track more than once. In stop mode, press PROG. -
Page 16: Special Picture/Sound Effect
Advanced operations To change the audio language or sound (LANGUAGE) D V D Video VIDEO The audio selection setting allows you to change the audio language of a movie. Hint At the beginning of the part where the multiple audio tracks are recorded, appears on the TV screen. -
Page 17: Karaoke Operations
Karaoke Operations Karaoke Operations Super D V D Video INX2 C D + G VIDEO Press MIC ON to set KARAOKE MODE ON. This enables the key control and voice cancel (MPX) features in the player. The SPEAKER SETUP is also automatically changed to DOWNMIX: STEREO. - Page 18 Press ENTER or PLAY to start the song. Press STOP or CLEAR to return to the initial CAVS INX (or SDK) display. To search by singer, use the 4-way direction buttons to spell the singer’s name at the Search by Singer display.
-
Page 19: Audio/Video Files Playback
Outline Outline The player can play AVI / MP3 / JPEG files on a personally recorded media as follows: CD-R/RW, DVD R, DVD R DL, DVD-RW Some discs mastered as multi border (multi-session) may not be compatible with the player. You can select and play back files using the SMART NAVI display on the TV screen. -
Page 20: Basic Operations
Audio/Video files playback Basic operations Basic operations When you insert a disc with folders and files, the player will automatically begin playback of the AVI, MP3, JPEG contents. Press STOP and the SMART NAVI display that shows the folders and files will appear on the TV screen. You can specify and play back the desired folder/file from the SMART NAVI display using the following procedure. -
Page 21: Usb Memory Device Operations
CD+G (MP3G). Both types of files can be downloaded from www.cavsusa.com/cinet_home. The CD+G (MP3+CDG) karaoke song files, also compatible to many of CAVS professional models, consist of MP3 and MCG components. The CD+G(MP3G) files, newly introduced, combines the two components to a single composite MP3 file. -
Page 22: Basic Operations
Follow the instruction to select and play a song. See INX, INX2 operation in Chapter: Karaoke Operations. To exit the CAVS INX menu and go to another folder, press D/U, and press ENTER. When the folder contains CD+G (MP3+MCG) or CD+G... - Page 23 USB memory device operations Press to select the desired file, then press ENTER. You can also press to move by page-up or page-down in the list. When you press ENTER, the selected file will begin playing. During play, press to change to the next or previous file.
-
Page 24: Changing The Initial Settings
Changing the initial settings Selecting PREFERENCES Selecting PREFERENCES This section refers to the settings which are already made when you purchase the player. Read this section when you want to change settings according to your preferences and viewing environment. Press SETUP. Press to select PREFERENCES. -
Page 25: Selecting General Setup
Changing the initial settings PARENTAL You can select the level of restriction on DVD VIDEO playback that contains violent (and other) scenes. For example, if movie which includes violent scenes supports the parental rating, such scenes will be cut or replaced with other scenes. Setting options G, PG, PG-13, PG-R, NC-17, ADULT, NO PARENTAL Some of the options are blank in expectation of new ratings... -
Page 26: Selecting Speaker Setup
Changing the initial settings Selecting SPEAKER SETUP Selecting SPEAKER SETUP This section refers to the settings which are already made when you purchase the player. Read this section when you want to change settings according to your preferences and viewing environment. Press SETUP. -
Page 27: Selecting Karaoke Setup
Changing the initial settings OP MODE You can select between a direct connection or a connection through RF Remodulator (or VCR player) to TV. Setting options LINE OUT Direct connection to TV. RF REMOD Connection through RF Remodulator to TV. DUAL MONO You can select the mode of analog outputs (DOWNMIX). -
Page 28: Additional Information
Additional information Troubleshooting Troubleshooting Power Power does not come on. Power plug is not inserted securely. Plug in securely. Operation "REGION CODE ERROR!" is shown on the TV screen. Region code of the inserted disc does not match the player. Check the region code of the disc printed on the disc jacket. -
Page 29: For Customer Use
If service is not available locally, box the product carefully, preferably in the original carton, and ship, insured, with a copy of your bill of sale plus a letter of explanation of the problem to the nearest CAVS Factory Service Center, the name and location of which will be given to you by the phone. -
Page 30: Authorized Service Centers
In order to receive the most satisfaction from your purchase, please read the instruction booklet before operating the unit. In the event that repairs are necessary, please call 1 (562) 777-1846 for your nearest authorized service or visit our website www.cavs.com. Remember to retain your Bill of Sale for Warranty Service. - Page 31 CAVS USA INC. CAVS USA INC. 10707 Fulton Wells Ave Santa Fe Springs, CA 90670 TEL: 1 (562) 777-1846 http://www.cavsusa.com...
Need help?
Do you have a question about the DVD-105G USB and is the answer not in the manual?
Questions and answers