Table of Contents
Advertisement
Quick Links
Advertisement
Table of Contents

Related Manuals for CAVS 205G USB


Summary of Contents for CAVS 205G USB
- Page 1 Multi-Format Karaoke Player CAVS 205G USB USER MANUAL...
-
Page 2: Table Of Contents
Table of Contents Safety Warnings--------------------------------------------------------------------------------------------2 Precautions--------------------------------------------------------------------------------------------------3 Description Front panel and Rear Panel-------------------------------------------------------------------------------4 Remote Controller-----------------------------------------------------------------------------------------5 Remote Control Operating Range------------------------------------------------------------------------6 Battery of Remote Controller-----------------------------------------------------------------------------6 Extension of IR Input--------------------------------------------------------------------------------------6 Connections Connecting to the Power Supply-------------------------------------------------------------------------7 Connecting the Audio Out to Amplifier ----------------------------------------------------------------7 Connecting the Video Out to TV/ Monitor -------------------------------------------------------------7 Connecting with a Coin Machine------------------------------------------------------------------------8 Connecting with a Flash Drive or Card-----------------------------------------------------------------8... -
Page 3: Safety Warnings
Safety Warnings CLASS 1 LASER PRODUCT CLASS 1 LASER PRODUCT KLASSE 1 LASER PRODUKT This player is classified as a CLASS 1 LASER product. LUOKAN 1 LASER LAITE KLASS 1 LASER APRARAT Use of controls, adjustments or performance of procedures PRODUCTO LASER CLASE1 other than those specified herein may result in hazardous radiation exposure. -
Page 4: Precautions
Precautions Ensure that the POWER supply in your house complies with the identification sticker located on the back of your player. Install your player horizontally, on a suitable base (furniture), with enough space around it for ventilation (7.5~10cm). Make sure the ventilation slots are not covered. Do not stack anything on top of the player. Do not place the player on amplifiers or other equipment which may become hot. -
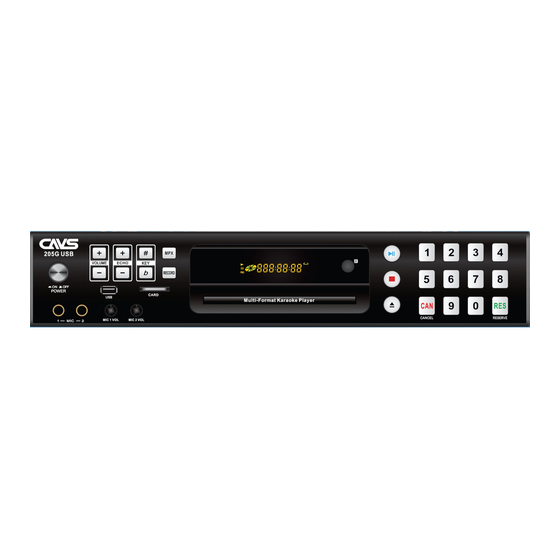
Page 5: Description
Description Front Panel POWER SWITCH: Turn On/Off the Power 11. NUMBER (0-9): Input song or track number VOLUME -/+: Adjust the Audio Volume 12. RESERVE: Program song or track number ECHO -/+: Adjust Echo Level 13. CANCEL: Delete wrong letter or number input KEY b/#: Adjust Key Level 14. -
Page 6: Remote Controller
Description Remote Controller BUTTONS FUNCTION POWER Turn On/Off the Power EJECT Open/Close the Disc Tray MODE Switch between DISC, USB or CARD mode AUDIO Select different audio layer of Disc or AVI files Change EQ settings for Audio SETUP Enter/Exit Setup Mode NUMBER(0-9) -Input Song or Track Numbers at Number Input mode -Input Letter of Title or Singer Name on the SONG LIST... -
Page 7: Remote Control Operating Range
Description Remote Controller BUTTONS FUNCTION SLOW Play in slow forward/ reverse motion ZOOM Enlarge a particular area of the displayed image at 2X, 3X, 4X, 1/2, 1/3, 1/4, OFF INFO Display the playback time and disc information SUBTITLE Select different subtitle language GOTO Jump to a chosen time position of Disc or file. -
Page 8: Connections
Connections Connecting your System to the Power Supply Plug the AC lead of the Power Adapter to a wall outlet and the DC lead to the player Press the POWER button on the front of the player to turn it on. The present product can be used under the AC 100~240V~. -
Page 9: Connecting With A Coin Machine
Connections Connecting with a COIN MACHINE If you want to use a Coin Machine with this Player, connect a cable between the Coin Machine and COIN port of this player. Connecting with a Flash Drive or Card Connect a Flash Drive or Card to its slot on the player. ... -
Page 10: Basic Operation
Basic Operation Basic Operation POWER Press POWER to turn On or Off the Power. EJECT Press EJECT to open and close the disc tray. Press NUMERIC (0-9) buttons to select a file/track number to play. NUMERIC(0~9) NOTE: When playing CD or CD+G disc, press 05 to select the track 5, or press 5 and wait for the -5 OSD (On Screen Display) to change to 05. - Page 11 Basic Operation Basic Operation Press RETURN to return to the Menu or previous step. RETURN MENU Press MENU button to go to the DISC MENU in video discs. Press ▲▼◀▶ buttons or NUMBER (0~9) buttons to select an option and press to confirm.
-
Page 12: Karaoke Operation
Karaoke Operation Karaoke Operation Connect Microphones to MIC 1 and MIC 2 Input jacks on the Front Panel. MICROPHONE Adjust Microphone Volume with MIC 1 and MIC 2 VOLUME Knobs on the Front Panel. SETTING Adjust ECHO Level of Microphones with ECHO -/+ buttons on the Remote Controller. VOLUME -/+ Adjust AUDIO VOLUME with VOL -/+ buttons on the remote control. - Page 13 Karaoke Operation Karaoke Operation SCDG SCDG Discs can be copied onto a Flash Drive/CARD using a PC/ Laptop. ① Insert a Flash Drive/CARD into the PC/laptop. Disc Copying ② Insert a SCDG Disc into the DVD Disc drive of the PC/laptop. Be sure the Flash Drive/CARD has sufficient memory space to copy the SCDG disc which can be approximately 5GB when single sided and 8GB when double sided.
- Page 14 Karaoke Operation Karaoke Operation SONG LIST You can create the song list of SCDG/MP3+G discs or SCDG/MP3+G Flash Drive/CARD. The CREATING resulting SONG LIST.TXT file will be saved in a Flash Drive/CARD. ① Insert the SCDG/MP3+G Disc or the SCDG/MP3+G Flash Drive/CARD to the player. If it (SCDG/MP3+G) is a disc, connect a Flash Drive/Card to the player.
-
Page 15: Setup
Setup System Setup Press SETUP to enter SYSTEM SETUP. Press SETUP again to exit. Switch between different TV systems (NTSC, PAL60, PAL and AUTO). TV System *If not known, select AUTO. Turn the screen saver ON or OFF. SCREEN SAVER HD OUTPUT If the TV is HD, select the corresponding HD resolution (HD OFF / 720P / 1080i / 1080P). -
Page 16: Audio Setup
Setup Audio Setup Press SETUP to enter SYSTEM SETUP. Use ◀▶ buttons to select AUDIO SETUP. AUDIO OUT Select an Audio Output according to the audio connection. To cancel COAXIAL connection, use SPDIF/OFF. SPDIF/OFF: Analog audio output through the jacks on back panel (Audio L, Audio R). ... -
Page 17: Digital Setup
Setup Digital Setup Press SETUP to enter SYSTEM SETUP. Use ◀▶ buttons to select DIGITAL SETUP. Switch between Line Out (encode signal) and RF REMOD (raw signal) OP MODE Set the scale of dynamic range between OFF, 1/8, 2/8. …7/8, 1. DYNAMIC RANGE DUAL... -
Page 18: Trouble Shooting
Trouble Shooting Symptom Remedy Insert the Power plug securely into the power outlet and press “Power” button No power on the front panel. Play fails to start even when PLAY button is Condensation has formed: wait about 1 to 2 hours to allow the player to dry pressed. -
Page 19: Specification
Specification Super CD+G, MP3+G, CD+G, AVI, MPG and JPG Supported Format Supported Video Resolution: 720 * 480p PAL/NTSC/Multi System TV System Composite, HDMI VIDEO AUDIO Output Video Output Progressive Scan up to 720P, 1080i, 1080P ...
Need help?
Do you have a question about the 205G USB and is the answer not in the manual?
Questions and answers