Table of Contents
Advertisement
Advertisement
Table of Contents
Troubleshooting

Subscribe to Our Youtube Channel
Related Manuals for Phoenix Contact THERMOMARK GO.K


Summary of Contents for Phoenix Contact THERMOMARK GO.K
- Page 1 Operating the THERMOMARK GO.K thermal transfer printer User manual...
- Page 3 Operating the THERMOMARK GO.K thermal transfer printer UM EN THERMOMARK GO.K, Revision 00 2021-05-18 This user manual is valid for: Designation Version Order No. THERMOMARK GO.K 1184146 THERMOMARK GO.K SET 1184148 PHOENIX CONTACT GmbH & Co. KG • Flachsmarktstraße 8 • 32825 Blomberg • Germany phoenixcontact.com...
-
Page 4: Table Of Contents
THERMOMARK GO.K Table of contents For your safety ..................5 Identification of warning notes..............5 Qualification of users ................5 Field of application ................... 5 Safety notes ..................... 6 Starting up the printer ................7 Checking the scope of supply ..............7 Overview of the device................ -
Page 5: For Your Safety
This user manual is aimed at those persons who are familiar with the relevant safety concepts for handling electrical machines. Only those persons who can identify hazards may start up, operate, and maintain the device. 5 / 50 109432_en_00 PHOENIX CONTACT... -
Page 6: Safety Notes
Pay attention to the correct polarity when inserting the batteries. – Only charge the battery in the THERMOMARK GO.K or in the provided char- ger (THERMOFOX/CHARGER, 0805012). Do not use any other chargers, e.g., cigarette lighter socket in the car. -
Page 7: Starting Up The Printer
Starting up the printer Checking the scope of supply THERMOMARK GO.K – Printer – Brief instructions THERMOMARK GO.K SET – Printer – Rechargeable battery (THERMOFOX/ACCU, 0805009) – Wide range power supply unit with power cable and four adapters for different sockets (THERMOFOX/ADAPTER, 0805010) –... -
Page 8: Overview Of The Device
THERMOMARK GO.K Overview of the device Figure 2-1 Overview Socket for USB connection Socket for power supply unit Lever for cutting continuous material Compartment for material cartridge Battery compartment 8 / 50 PHOENIX CONTACT 109432_en_00... -
Page 9: Connecting The Power Supply
AC wide range power supply unit (THERMOFOX/ADAPTER, 0805010) – Battery (THERMOFOX/ACCU, 0805009) If the THERMOMARK GO.K is connected to the power supply via the power supply unit, the battery in the THERMOMARK GO.K is automatically charged. The battery can also be charged using an external charger (THERMOFOX/CHARGER, 0805012). - Page 10 THERMOMARK GO.K Inserting the battery Figure 2-3 Opening the battery compartment WARNING: Explosion hazard Only use batteries of the stated type. Using incorrect types may disable pro- tective measures. WARNING: Risk of fire Only operate the device if the battery cover is closed correctly. Combustible material close to the battery compartment may ignite.
-
Page 11: Inserting The Material Cartridge
If the printer is not going to be used for a prolonged period of time, remove the material cartridge from the printer. Switching on the device • Switch on the printer using the green key. ON/OFF • Press the green key until the display lights up. ON/OFF 11 / 50 109432_en_00 PHOENIX CONTACT... -
Page 12: Operating Elements
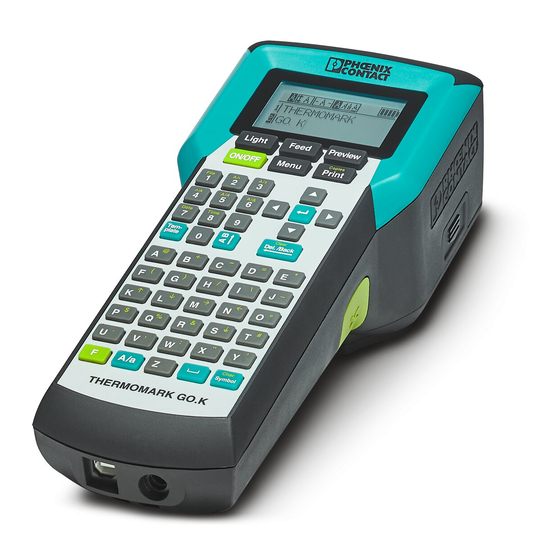
THERMOMARK GO.K Operating elements Figure 3-1 Operating elements Light Feed Preview Copies ON/OFF Menu Print File A A / Date Time Light Preview Feed Copies ON/OFF Menu Clear Tem- Print File A A / Del./Back plate Date Time Tem- Clear plate Del./Back... - Page 13 4 = Bold 5 = Italic 6 = Underline 7 = Date 8 = Time Letters Letters A - Z Selection of the assignment la- beled green Arrow Line change, navigating in the menu keys 13 / 50 109432_en_00 PHOENIX CONTACT...
-
Page 14: Display
THERMOMARK GO.K Display The first line in the display shows the settings selected. Examples of the first line in the display “F” indicates that the green function key has been pressed. The function key is used to switch to the assignment labeled green when pressing a key (e.g., @... -
Page 15: Menu
Auto Size Font is adjusted according to space available 2 mm ... 22 mm Font size in mm 2. Style 1. Bold Bold 2. Italic Italic 3. Narrow Narrow Underline 4. Underline 5. Mirror Mirrored 15 / 50 109432_en_00 PHOENIX CONTACT... - Page 16 THERMOMARK GO.K Table 3-1 Menu [...] Level 1 Level 2 Level 3 Level 4 Description 3. Symbol Punctuation Punctuation marks ! " # General symbols General symbols § © ® Units Units $ £ ¢ Electr. General Electrical symbols 8 6 ...
- Page 17 (1 mm ... 400 mm) 8. Length 1. Auto Length The length of the printed text de- pends on the marking and the set margin Set fixed length (4 mm ... 400 mm) 2. User Set 17 / 50 109432_en_00 PHOENIX CONTACT...
- Page 18 THERMOMARK GO.K Table 3-1 Menu [...] Level 1 Level 2 Level 3 Level 4 Description 9. Template 1. Normal Empty template 2. Barcode Barcode Code 39, You can implement Micro QR Code, DataMatrix, and PDF417 via Type Code 128, Interleaved...
- Page 19 User-defined length of the cable marking (4 mm ... 400 mm) Vertical Diameter Diameter of the cable (4 mm ... 100 mm) Cross Cross-section of the cable section (0.25 mm²/AWG 22 ... 50 mm²/AWG 0) 19 / 50 109432_en_00 PHOENIX CONTACT...
- Page 20 THERMOMARK GO.K Table 3-1 Menu [...] Level 1 Level 2 Level 3 Level 4 Description 9. Template 6. Cable Flag Orient. Hor., Ver. Text alignment of the cable flag Wrap Diameter Diameter of the cable Length (4 mm ... 100 mm)
- Page 21 Maximum 60 min Min. Minimum 1 min 6. Information Model Device type Firmware Firmware version status Serial Number Serial number Cartridge Type Type of the inserted material car- tridge Remain Length Remaining material length (esti- mated) 21 / 50 109432_en_00 PHOENIX CONTACT...
- Page 22 THERMOMARK GO.K Table 3-1 Menu [...] Level 1 Level 2 Level 3 Level 4 Description A. Setup 7. Date Year Specify the current date Month Date Format Format for day (dd), month (mm), and year (yyyy) Example: dd/mm/yyyy 23/06/1977 yyyy-mm-dd ...
-
Page 23: Creating The Marking
Figure 4-3 Changing the text direction -W1 . 3 -W1 . 3 -W1 . 3 -W1 . 3 -W1 . 3 -W1 . 3 -W1 . 3 -W1 . 3 Copies Copies Print Print 23 / 50 109432_en_00 PHOENIX CONTACT... - Page 24 THERMOMARK GO.K Example 4 Figure 4-4 Changing font sizeExample 5 -W1 . 3 -W1 . 3 -W1 . 3 -W1 . 3 Copies Print Figure 4-5 Adding a frame around the text Menu -W1 . 3 -W1 . 3 6. Frame -W1 .
- Page 25 Once you have selected a symbol, press the black key. Menu The symbol is accepted and you are returned to the input screen. An overview of all the available symbols can be found under “Overview of the sym- bols” on page 25 / 50 109432_en_00 PHOENIX CONTACT...
- Page 26 THERMOMARK GO.K 4.1.3 Inserting a bar code You can arrange for labels to be marked with a bar code. Move the cursor to the position at which the sequence is to be located. When you select this template, the entered marking is deleted. First create a template and then enter the marking.
- Page 27 A10X A11X A12X auto auto auto Pitch A width can be specified for each number se- -F10 -F12 -F14 quence 230V 230V 230V 17 mm 17 mm 17 mm 27 / 50 109432_en_00 PHOENIX CONTACT...
- Page 28 THERMOMARK GO.K Setting the number sequence Selection B Possible entry Example StaVal Start value [1 ... 99, aa ... zz, 9 = 9, 10, 11 ... 99 AA ... ZZ] IncVal Increment [1 ... x] 2 = 2, 4, 6, 8 ... 98...
- Page 29 400 V 230 V Total Pitch + Factor 3 x 17.5 mm 17.5 mm 17.5 mm SepLine Medium Orient. Horizontal Example 2 Total Pitch + Factor 1 x 8.5 mm SepLine Thick Orient. Vertical 29 / 50 109432_en_00 PHOENIX CONTACT...
- Page 30 THERMOMARK GO.K Selection Possible entry Example Total Number of modules [1 ... 64] one line, 12 = 12 modules [1 ... 32] two lines next to each other Pitch Width for each mod- [3 mm ... 100 mm in 10.1 = 10.1 mm wide 0.1 mm increments,...
- Page 31 When using horizontal text alignment, the optimum width of the label can be de- termined automatically or you can specify a fixed width. When using vertical text alignment, enter the diameter or the cross-section of the cable. The printer then determines the optimum length. 31 / 50 109432_en_00 PHOENIX CONTACT...
- Page 32 THERMOMARK GO.K 4.1.7 Creating cable flags Cable flags can be used for the large-surface marking of cables or lines. To do so, enter the marking for the front side. The back side is printed automatically with the same marking. Figure 4-7 Example of a cable flag -W1.3...
-
Page 33: Creating The Marking On The Pc
PROJECT complete marking can be used to create markings on a PC, which are tailored to the Phoenix Contact marking material. Select the THERMOMARK GO.K as the printer. You will be provided with a tem- plate list of materials that are suitable for this printer. -
Page 34: Printing
THERMOMARK GO.K Printing • Press the key to print the marking once. Copies Print • To print multiple copies, press the key and the green function key at Copies Print the same time. • If printing multiple labels, you can choose to cut the labels right away or later. -
Page 35: Maintenance And Troubleshooting
Do not use abrasive cleaners or aggressive solvents to clean the outer sur- faces. • Remove dust and paper fluff in the printing area with a soft brush. • Clean the outer surfaces with a damp cloth. Use an all-purpose cleaner for higher levels of contamination. 35 / 50 109432_en_00 PHOENIX CONTACT... - Page 36 THERMOMARK GO.K 5.1.2 Cleaning the print head and pressure roller During printing, substances may be deposited on the print head or pressure roller. It is important to clean the print head and pressure roller regularly. This ensures consistent printing quality and extends the service life of the printer.
-
Page 37: Troubleshooting
Printer prints slowly Printing speed is automati- When the battery state of cally adjusted charge is below a certain level, the printing speed is reduced. This ensures con- sistently high printing quality. 37 / 50 109432_en_00 PHOENIX CONTACT... - Page 38 THERMOMARK GO.K Table 5-1 Troubleshooting Problem Possible cause Remedy The printer cannot be Batteries are dead Change batteries switched on Batteries are inserted incor- Insert batteries correctly rectly Rechargeable battery is Recharge battery dead Rechargeable battery is in- Insert rechargeable battery...
- Page 39 Re- move batteries. Insert new ones. Cutter is stiff Type of material being used Some materials have a higher material thickness. These materials need more cutting force than other ma- terials. 39 / 50 109432_en_00 PHOENIX CONTACT...
- Page 40 THERMOMARK GO.K 5.2.1 Error messages Table 5-2 Error messages Error message Possible cause Remedy “Please Cut” Printer is waiting for the material Press the cutter lever to be cut “Input Too Long” The limit on the number of char- Reduce number of characters or...
-
Page 41: Repairs
Incorrect operation or modifications to the device can endanger your safety or damage the printer. Do not repair the device yourself. If the device is de- fective, please contact Phoenix Contact. Firmware update To benefit from improvements and function extensions, you can download a firm- ware update and a firmware update tool at phoenixcontact.net/qr/1184146. -
Page 42: Appendix
THERMOMARK GO.K Appendix Technical data Technical data Resolution 203 dpi Print mode Thermal transfer Print speed 12 mm/s Print length 7 mm ... 2200 mm Print width, maximum 24 mm Interfaces Display and operation 2.5'' LCD display, ABC keyboard Voltage 100 V AC ... -
Page 43: Ordering Data For Accessories
Transport case, for transporting the THERMOMARK GO CASE 0805002 THERMOMARK GO.K Bag, for transporting the THERMOMARK GO.K/BAG 0805003 THERMOMARK GO.K Belt clip, for fastening to belt THERMOFOX/BELT CLIP 0805004 Magnet, e.g., for attaching to the control THERMOMARK GO.K... -
Page 44: Overview Of The Symbols
THERMOMARK GO.K Overview of the symbols Table 6-1 Overview of the symbols Category Symbols Punctua- tion General symbols Units Electr. Gen- eral Electr. Comp. Home Elec- trics 44 / 50 PHOENIX CONTACT 109432_en_00... - Page 45 Operating elements Table 6-1 Overview of the symbols Category Symbols Safety Signs Superscript Subscript Arrows 45 / 50 109432_en_00 PHOENIX CONTACT...
- Page 46 THERMOMARK GO.K Table 6-1 Overview of the symbols Category Symbols Greek Upper Case Greek Lower Case Mathemati- cal Charac- 46 / 50 PHOENIX CONTACT 109432_en_00...
-
Page 47: Approvals
Connect the equipment into an outlet on a circuit different from that to which the receiver is connected. – Consult the dealer or an experienced radio/TV technician for help. 6.4.2 ICES Industry Canada ICES-003: CAN ICES—3 (B)/NMB-3(B) 47 / 50 109432_en_00 PHOENIX CONTACT... - Page 48 THERMOMARK GO.K 6.4.3 WARNING: Hazardous moving parts Keep fingers and other body parts away. This equipment is not suitable for use in locations where children are likely to be present. Inserting the battery WARNING: Explosion hazard Only use batteries of the stated type. Risk of explosion if the battery or rechargeable batteries are replaced by an incorrect type.
- Page 49 The receipt of technical documentation (in particular user documentation) does not constitute any further duty on the part of Phoenix Contact to furnish information on modifications to products and/or technical documentation. You are responsible to verify the suitability and intended use of the products in your specific application, in particular with regard to observing the applicable standards and regulations.
- Page 50 How to contact us Internet Up-to-date information on Phoenix Contact products and our Terms and Condi- tions can be found on the Internet at: phoenixcontact.com Make sure you always use the latest documentation. It can be downloaded at: phoenixcontact.net/products Subsidiaries If there are any problems that cannot be solved using the documentation, please contact your Phoenix Contact subsidiary.
- Page 52 PHOENIX CONTACT GmbH & Co. KG Flachsmarktstraße 8 32825 Blomberg, Germany Phone: +49 5235 3-00 Fax: +49 5235 3-41200 E-mail: info@phoenixcontact.com phoenixcontact.com...
Need help?
Do you have a question about the THERMOMARK GO.K and is the answer not in the manual?
Questions and answers