Table of Contents
Advertisement
Advertisement
Table of Contents

Related Manuals for Phoenix Contact THERMOFOX


Summary of Contents for Phoenix Contact THERMOFOX
- Page 1 Operating the THERMOFOX thermal transfer printer User manual...
-
Page 3: User Manual
User manual Operating the THERMOFOX thermal transfer printer 2016-08-05 Designation: UM EN THERMOFOX Revision: Order No.: – This user manual is valid for: Designation Version Order No. THERMOFOX 0803984 THERMOFOX SET 0803986 PHOENIX CONTACT 106986_en_01... - Page 4 How to contact us Internet Up-to-date information on Phoenix Contact products and our General Terms and Conditions can be found on the Internet at: phoenixcontact.com Make sure you always use the latest documentation. It can be downloaded at: phoenixcontact.net/products...
- Page 5 The receipt of technical documentation (in particular user documentation) does not constitute any further duty on the part of Phoenix Contact to furnish information on modifications to products and/or technical documentation. You are responsible for verifying the suitability and intended use of the products in your specific application, in particular with regard to observing the applicable standards and regulations.
-
Page 6: Table Of Contents
THERMOFOX Table of contents For your safety ......................7 Field of application...............7 Safety notes.................7 Starting up the printer ....................8 Checking the scope of supply............8 Overview of the device ..............9 Connecting the power supply ............10 Inserting the material cartridge ..........11 Switching on the device .............11 Operating elements ....................12... -
Page 7: For Your Safety
For your safety For your safety Field of application The THERMOFOX is a portable thermal transfer printer for industrial use. The thermal transfer printer prints self-adhesive and non-adhesive labels and heat- shrinkable tubes for marking electrical components. The THERMOFOX uses spe- cial material cartridges that contain the material as well as the corresponding ink ribbon. -
Page 8: Starting Up The Printer
Only connect the printer to systems that have a protective extra low voltage. – To operate the printer with connection to a mains power supply, only use the provided wide range power supply unit (THERMOFOX/ADAPTER, 0805010). Starting up the printer Checking the scope of supply THERMOFOX –... -
Page 9: Overview Of The Device
Starting up the printer Overview of the device Figure 2-1 Overview Socket for USB connection Socket for power supply unit Cutter for continuous media Compartment for material cartridge Battery compartment 106986_en_01 PHOENIX CONTACT... -
Page 10: Connecting The Power Supply
AC wide range power supply unit (THERMOFOX/ADAPTER, 0805010) – Battery (THERMOFOX/ACCU, 0805009) If the THERMOFOX is connected to the power supply via the power supply unit, the battery in the THERMOFOX is automatically charged. The battery can also be charged using an external charger (THERMOFOX/CHARGER, 0805012). -
Page 11: Inserting The Material Cartridge
If the printer is not going to be used for a prolonged period of time, remove the material cartridge from the printer. Switching on the device • Switch on the printer using the green key. ON/OFF • Press the green key until the display lights up. ON/OFF 106986_en_01 PHOENIX CONTACT... -
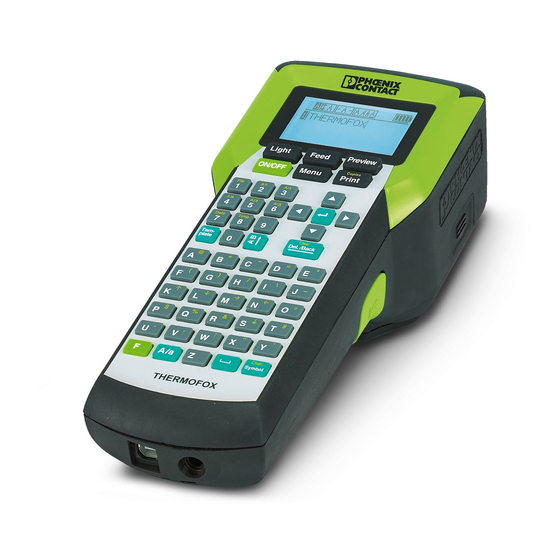
Page 12: Operating Elements
THERMOFOX Operating elements Light Preview Feed Copies ON/OFF Menu Print File A A / Date Time Light Feed Preview Copies Clear ON/OFF Menu Print Tem- File A A / Del./Back plate Date Time Clear Tem- Del./Back plate ° & “... - Page 13 2 = font size 3 = narrow 4 = bold 5 = italic 6 = underline 7 = date 8 = time Letters Letters A - Z Selects the assignment labeled green Arrow Line change, navigating in the menu keys 106986_en_01 PHOENIX CONTACT...
-
Page 14: Display
THERMOFOX Display The first line in the display shows the settings selected. Examples of the first line in the display “F” indicates that the green function key has been pressed. The function key is used to switch to the assignment labeled green when pressing a key (e.g., @... - Page 15 Print layouts for specific requirements (e.g., for terminal blocks or cables) – Rows of labels with a fixed width (“Mod”, see Section 4.1.5) – Cable marking (“CWr”, see Section 4.1.6) – Cable flags (“CFL”, see Section 4.1.7) State of power supply 106986_en_01 PHOENIX CONTACT...
-
Page 16: Menu
THERMOFOX Menu Use the arrow keys to navigate through the menu. Press the key to select an entry Clear to go back. Del./Back Changing the language The menu is set to English by default. To change the language, proceed as follows: •... - Page 17 Greek lower case letters Mathematical Mathematical symbols 4. Orienta- 1. Horizontal Horizontal text alignment tion 2. Vertical Vertical text alignment 5. Align- 1. Left Left-aligned text ment 2. Center Centered text 3. Right Right-aligned text 106986_en_01 PHOENIX CONTACT...
- Page 18 THERMOFOX Table 3-1 Menu [...] Level 1 Level 2 Level 3 Level 4 Description 6. Frame 1. No Frame No frame 2. Dotted Frame, dashed line 3. Thin Frame, thin line 4. Medium Frame, standard line 5. Thick Frame, thick line 7.
- Page 19 (5 = ... 3, 4, 5) Prefix Prefix of a sequence of numbers (-X = -X1, -X2...) Suffix Suffix of a sequence of numbers (-X = 1-X, 2-X...) Copies Repetitions (2 = 1, 1, 2, 2...) 106986_en_01 PHOENIX CONTACT...
- Page 20 THERMOFOX Table 3-1 Menu [...] Level 1 Level 2 Level 3 Level 4 Description 9. Template 4. Module Total Number of modules, [1 ... 64] one line, [1 ... 32] two lines Pitch Width for each module, pitch Factor Factor for the width...
- Page 21 4 mm ... 400 mm User Set Center Off, Dotted, Center line as folding guide Line Thin, Me- dium, Thick A. Setup 1. Language English Languages for the menu German French Spanish Italian Czech Dutch Hungarian Polish Portuguese Turkish Korean Japanese 106986_en_01 PHOENIX CONTACT...
- Page 22 THERMOFOX Table 3-1 Menu [...] Level 1 Level 2 Level 3 Level 4 Description A. Setup 2. Unit mm, inch Units in millimeters or inches 3. Feed Length Cur. Feed length. Default: 10 mm Max. Maximum 400 mm Min. Minimum 4 mm 4.
- Page 23 23/06/1977 yyyy-mm-dd 1977-06-23 8. Time Hour Specify the current time. Minute Second 24 hour format: hh:mm:ss Time Format 13:24:59 12 hour format: hh:mm:ss am/pm 01:24:59 pm 9. Reset All Reset to default values 106986_en_01 PHOENIX CONTACT...
-
Page 24: Creating The Marking On The Display
THERMOFOX Creating the marking Creating the marking on the display 4.1.1 Entering and formatting text Example 1 Figure 4-1 Switching between upper case and lower case letters Example 2 Figure 4-2 Using the alternative key assignment Example 3 -W1 . 3 -W1 . - Page 25 You can set fixed values, e.g., a fixed width for the margin or a fixed length for the label. To ensure dimension accuracy the printer transports a little piece of mate- rial before printing. The printer requests that you cut off this piece before printing. 106986_en_01 PHOENIX CONTACT...
-
Page 26: Inserting Symbols
THERMOFOX 4.1.2 Inserting symbols Char. • Press the turquoise key. Symbol • Select a category using the arrow keys. Punctuation marks General symbols Units Electrical general Electrical components Home electrics Safety symbols Superscript characters Subscript characters Arrows Greek upper case letters... - Page 27 [Small, Medium, Large] Display Text The text encrypted in [No, Yes] the barcode is dis- played below the barcode Check Code A check digit is [No, Yes] added, if required “Bar.” is displayed on the input screen. 106986_en_01 PHOENIX CONTACT...
- Page 28 THERMOFOX 4.1.4 Numbering labels automatically You can arrange for labels to be marked with continuous numbers or letters. Move the cursor to the position at which the sequence is to be located. Tem- • Press the turquoise key. plate •...
- Page 29 F2-4 230 V 400 V 230 V Total Pitch + Factor 3 x 17.5 mm 17.5 mm 17.5 mm SepLine Medium Orient. Horizontal Example 2 Total Pitch + Factor 1 x 8.5 mm SepLine Thick Orient. Vertical 106986_en_01 PHOENIX CONTACT...
- Page 30 THERMOFOX Selection Possible entry Example Total Number of modules [1 ... 64] one line, 12 = 12 modules [1 ... 32] two lines next to each other Pitch Width for each mod- [4 ... 1000.0 in steps 10.1 = 10.1 mm wide of 0.1 mm, mm or...
- Page 31 When using horizontal text alignment, the optimum width of the label can be de- termined automatically or you can specify a fixed width. When using vertical text alignment, enter the diameter or the cross section of the cable. The printer then determines the optimum length. 106986_en_01 PHOENIX CONTACT...
- Page 32 THERMOFOX 4.1.7 Creating cable flags For large-area marking of cables, cable flags can be used. To do so, enter the marking for the front side. The back side is printed automatically with the same marking. -W1.3 -W1.3 -W1.3 Figure 4-7 Example of a cable flag If you select this template, the entered marking will be deleted.
-
Page 33: Creating The Marking On The Pc
CLIP PROJECT Marking can be used to create markings on a PC which are tai- lored to the Phoenix Contact marking material. Select the THERMOFOX as the printer. You will be provided with a template list of materials that are suitable for this printer. -
Page 34: Cleaning
THERMOFOX Maintenance and troubleshooting Cleaning 5.1.1 Cleaning the printer NOTE: Damage to the printer due to abrasive cleaning agents Do not use abrasive cleaners or aggressive solvents for cleaning the outer sur- faces. • Remove dust and paper fluff in the printing area with a soft brush. - Page 35 Open the cover of the material cartridge and remove the material cartridge. • Clean the print head line and print roller with a felt stick (e.g., CLEANING STICK, 5146697) soaked in isopropyl alcohol. • Allow the print head to dry for two to three minutes. 106986_en_01 PHOENIX CONTACT...
-
Page 36: Troubleshooting
THERMOFOX Troubleshooting Table 5-1 Troubleshooting Problem Possible cause Remedy Print image is blurred or Print head or print roller is Clean the print head and missing in places dirty print roller (see 5.1.2) The tension of the ink ribbon To increase the tension of... - Page 37 Setup, 5. Auto Off”) Battery is not charged Battery is inserted incorrectly Insert battery correctly No power supply Connect the power supply unit Rechargeable battery is de- Dispose of battery properly fective and insert new battery 106986_en_01 PHOENIX CONTACT...
- Page 38 THERMOFOX Table 5-1 Troubleshooting Problem Possible cause Remedy Display lighting switches off Auto off function of the dis- Check menu entry (see “A. automatically play lighting activated Setup, 4. Display Light”) No input possible General system error Switch device off and on.
-
Page 39: Error Messages
Material cartridge not found Insert new material cartridge “Please Cut” Printer is waiting for the material Activate the cutter. Press any key to be cut to continue “Press Any Key” Printer is awaiting input Press any key (except ON/OFF Light 106986_en_01 PHOENIX CONTACT... -
Page 40: Repairs
Incorrect operation or modifications to the device can endanger your safety or damage the printer. Do not repair the product yourself. If the device is defective, please contact Phoenix Contact. Firmware update To benefit from updates or extended functions, a firmware update and a firmware update tool can be downloaded at phoenixcontact.net/qr/0803984. -
Page 41: Technical Data
Transport 5 % ... 95 % Approvals CE, UL, FCC-B, ICES Approval for Canada as per ICES-003 CAN ICES-3 (B)/NMB-3(B) Dimensions (H x D x W) 230 mm x 98 mm x 69 mm Weight 656 g 106986_en_01 PHOENIX CONTACT... -
Page 42: Ordering Data For Accessories
THERMOFOX Ordering data for accessories Accessories Description Type Order No. Pcs./Pkt. Battery, to supply the THERMOFOX THERMOFOX/ACCU 0805009 with power Charger, for charging the THERMOFOX/CHARGER 0805012 THERMOFOX/ACCU Wide range power supply unit, with THERMOFOX/ADAPTER 0805010 four socket adapters Transport case, for transporting the... -
Page 43: Overview Of The Symbols
Operating elements Overview of the symbols Table 6-1 Overview of the symbols Category Symbols Punctua- tion General symbols Units Electr. Gen- eral Electr. Comp. Home Elec- trics 106986_en_01 PHOENIX CONTACT... - Page 44 THERMOFOX Table 6-1 Overview of the symbols Category Symbols Safety Signs Superscript Subscript Arrows PHOENIX CONTACT 106986_en_01...
- Page 45 Operating elements Table 6-1 Overview of the symbols Category Symbols Greek Upper Case Greek Lower Case Mathemati- 106986_en_01 PHOENIX CONTACT...
-
Page 46: Approvals
THERMOFOX Approvals 6.4.1 The printer complies with the requirements of FCC Part 15 (B) Rules. Operation is subject to the following two conditions: (1) This device may not cause harmful interference, and (2) This device must accept any interference received, including interference that may cause undesired operation.
Need help?
Do you have a question about the THERMOFOX and is the answer not in the manual?
Questions and answers