
Related Manuals for Hioki MEMORY HiCORDER MR8870-20


Summary of Contents for Hioki MEMORY HiCORDER MR8870-20
- Page 1 Measurement Guide (Memory Recorder) MR8870-20 MEMORY HiCORDER May 2014 Edition 1 MR8870B980-00 14-05H...
- Page 3 Introduction Introduction Thank you for purchasing the HIOKI "Model MR8870-20 Memory HiCorder." This Measurement Guide Memory Recorder Edition consists of some basic applica- tion examples. Before using the instrument, be sure to read the Instruction Manual carefully. Operation and Screen...
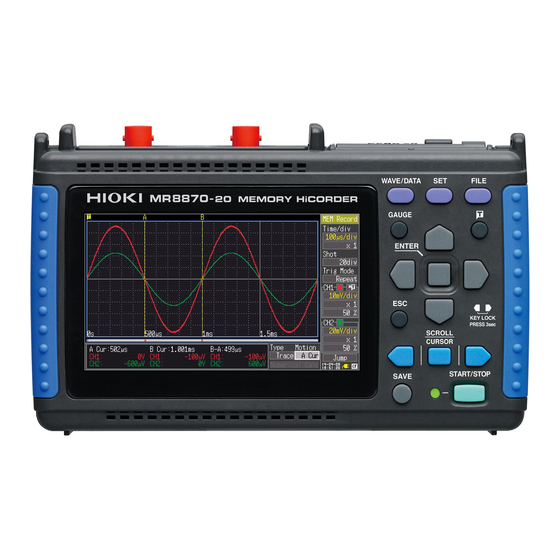
- Page 4 Operation and Screen Types Operation and Screen Types CF Card Slot Changing screen contents USB Port Operating Keys BNC Terminals Select the item to change. Show available setting options. (Rear) Select the desired Battery setting. Compartment POWER Switch Logic Connector Apply the new set- ting, AC Adapter...
- Page 5 Operation and Screen Types The screen switches each time you press the key. Operational information is dis- played along the bottom of the screen. Waveform/Numerical Screens Waveform Screen Numerical Screen Settings Screens Setting Screen Calc/Save Screen Press the left/right Comment Screen System Screen cursor keys to se- lect between the...
-
Page 6: Measurement Procedure
Measurement Procedure Measurement Procedure Before measuring, be sure to read the "Usage Notes" in the Instruction Manual. Install the battery pack (option) Rear View We recommend using the battery pack to provide backup during power outages, and to preserve measurement data. Connect the power cord Top View Connect the measurement cable... - Page 7 Measurement Procedure Connect to the measurement object Configure settings for measurement Timebase setting Select the Setting screen. Settings for CH1 • Horizontal axis (Timebase) • Recording length [Shot] • Vertical axis (Voltage range) Settings for CH2 [Rng/div] Make other settings as Settings for logic necessary.
- Page 8 Commercial Power Mains Measurement Commercial Power Mains Measurement This procedure records the voltage waveform of 220 V AC Trigger level (50/60 Hz) commercial power. The procedure for saving data after measurement is also described. In this case, the measurement criterion is specified by a Level trigger setting.
- Page 9 Commercial Power Mains Measurement Start and stop measurement Trigger level Waiting for trigger Trigger slope [ ] Press the START/STOP key. “Waiting for trigger” is displayed until the signal rises above zero volts. In this case, measurement data is When the measurement criteria are met, trigger- recorded until you press the START/ ing occurs and the waveform is recorded for the...
- Page 10 To Monitor for Abnormal Phenomena To Monitor for Abnormal Phenomena This procedure is a method for recording occurrences of volt- Trigger Level age drop-out phenomena such as occur in a power outage. During continuous monitoring, measurement data is saved automatically. This is an example to record power outage by using voltage drop trigger.
- Page 11 To Monitor for Abnormal Phenomena Set Auto-save Make the following settings on the Calc/Save screen. Select Apply Verify that there is enough space on the CF Card, and that it is inserted correctly. Start and stop measurement Trigger Level 280 V Waiting for -280 V trigger...
- Page 12 To Measure Current To Measure Current Measure current using a clamp sensor. The Scaling function to convert the voltage input values from the current sensor into their corresponding current values to be displayed on screen. Trigger Level Prepare the following before measuring Connect to CH1 CF card Items to prepare...
- Page 13 Measuring RMS Waveforms Start and stop measurement Trigger Level Waiting for trigger Trigger slope [ ] Press the START/STOP key. In this case, measurement data is A trigger event occurs when the signal rises recorded until you press the START/ to the trigger level (5 A), and recording STOP key again.
- Page 14 Analysis Analysis Viewing a Measurement Waveform Scrolling the waveform Earlier Later Currently Displayed Portion The portion of a waveform that is currently Whole Waveform displayed can be confirmed by the position of the scroll bar. Zooming the Waveform View Changes the magnification. When the A/B cursors are displayed, you can use them to zoom in on and out from the waveform.
- Page 15 Analysis View Measurement Values The values at the cursors are displayed. Cursor selected to move Cursor B values Cursor A values (recording time and Cursor type voltage) Press these keys to move the cursor on the displayed wave- form. Cursor A moves. When displaying only voltage values Selecting the cursor to move or recording time...
- Page 16 Analysis Calculate Measurement Data Up to four types of calculations can be applied at the same time. Calculation types: Average, RMS, P-P, maximum, minimum, period and frequency The following procedure describes how to apply calculations to measured data. Make the following settings on the Calc/Save screen. Select Apply Numerical Calculation...
- Page 17 Analysis View CF Card Contents Data saved by the MR8870-20 can be confirmed on the File screen. It is stored on the CF Card as follows. The numbers in the file names are automatically generated sequentially. HIOKI8870 CONFIG CONFIG0001.SET (Settings data folder) CONFIG0002.SET LIST0001.BDL LIST0002.BDL...
- Page 18 Analysis Copy the MR8870-20 data to a computer When the CF Card in the MR8870-20 is accessed from a computer, screens oth- er than the File screen can be displayed while not measuring. While measuring or viewing the File screen on the MR8870-20, it cannot be recognized by the computer.
Need help?
Do you have a question about the MEMORY HiCORDER MR8870-20 and is the answer not in the manual?
Questions and answers