
Related Manuals for Numatic CRG 8055/100T


Summary of Contents for Numatic CRG 8055/100T
- Page 1 CRG 8055/ 100T & 120T CRG 8072/ 100T & 120T R I D E - O N S C R U B B E R D R Y E R CRG 8055 Owner Instructions CRG 8072 Warning! Read instructions before using the machine www.numatic.co.uk...
-
Page 2: Table Of Contents
R I D E O N S C R U B B E R D R Y E R CRG 8055/8072 Index Machine Overview .........Pages 2-3 Control Panel Overview .........Page 4 Machine Set up Guide .........Page 5 PLEASE READ Hose U Bend Clip .........Page 6 Fitting the Floor tool .........Page 6... -
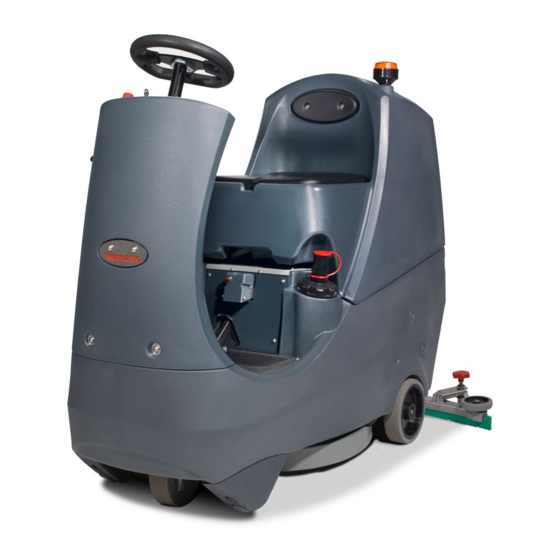
Page 3: Machine Overview
Machine Overview... -
Page 4: Control Panel Overview
R I D E O N S C R U B B E R D R Y E R CRG 8055/8072 Control Panel Overview... -
Page 5: Machine Set Up Guide
Note: Wear suitable gloves when inserting fuses. Less Battery Models - Numatic International Ltd recommends using MK or Sonnenschein Batteries for the 8055 & 8072 machines mentioned in this manual. For full battery specifications see page 22. ENSURE THAT NO METAL OBJECTS COME INTO CONTACT WITH BATTERY TERMINALS WHILE THE BATTERIES ARE EXPOSED. -
Page 6: Hose U Bend Clip
Make sure you do not over tighten the retaining knobs. Lower the floor tool. Slide floor tool onto bracket. Tighten retaining knobs to finger tight and Raise the floor tool. attach hose. www.numatic.co.uk... -
Page 7: Raise / Lower Brush Deck
Machine Set-up Guide Always ensure that the machine is switched off before making any adjustments. Raise Brush Deck / Fitting the Brush / Lower Brush Deck CRG 8072 Twin Brush Raise brush deck. Brush deck raised position. Slide brush under machine. Brush in place. -
Page 8: Filling The Clean Water Tank
When filling the clean water tank, do not fill above the clean water tank emptying hose retaining clip. This can be found at the rear of the machine. If you need to access the batteries, make sure that the waste water tank is empty before lifting. www.numatic.co.uk... -
Page 9: Setting The Cleaning Controls
Machine Operation IMPORTANT Do not operate machine unless the operator manual has been read and fully understood. Drive the machine to the cleaning site (read set-up guide again if necessary - page 5). Before cleaning operation, place out appropriate warning signs and sweep or dust-mop the floor. When ready for cleaning lower the floor tool (page 6) and the brush deck (page 7). -
Page 10: Emergency Stop Button And Horn
The buffers at the front are designed to prevent the machine tipping in the event of the operator turning sharply. The buffers are designed to be replaceable when worn. www.numatic.co.uk... -
Page 11: Machine In Use
Machine Operation Do not operate the machine on inclines that exceed 11%. Machine in Use To operate, select forward and depress the accelerator pedal. Note: The machine will not operate in reverse with the floor tool lowered. Vacuum pick-up and water flow will turn on if selected, and providing the brush and floor tool are in the lowered position, the machine will move forward. -
Page 12: Machine Cleaning
Note: The separator can be hung from either side of the top tank while you maintain the machine using the clip on the front of the lid. When refitting the separator make sure you engage the front of the separator BEFORE pushing the separator down. Refit the vacuum hose. www.numatic.co.uk... -
Page 13: Free-Wheel Function
Machine Cleaning Always ensure that the machine is switched off prior to any maintenance. Located in your waste water top tank is a vacuum shut off system, this prevents suction when the waste water tank is full. It also prevents foam created by high-foaming detergents from entering the motor. Sometimes the float vents get clogged and blocked, clean to ensure correct operation. -
Page 14: Changing Floor Tool Blades
Replacement is a reversal of the removal process. Floor Tool Overview 1. Retaining pins x 4 2. Rear blade 3. Blade carrier 4. Front blade (slotted) 5. Floor tool main body Note: The blades are designed to be reversible, thus extending their useful working life. www.numatic.co.uk... -
Page 15: Machine Charging
Machine Charging Always ensure that the machine is switched off prior to charging. 1. The battery meter displays the charge level of the batteries; 2. As the machine is used and the batteries are discharged, when fully charged, all meter lights are illuminated. the meter lights will go out from right to left. -
Page 16: Battery Care
If the machine will be standing unused for a period of 30 days or more, then batteries must be fully charged and battery fuse removed using the maxi fuse-puller provided, prior to this period. Batteries should be re-charged every three months. Charge fully the day before you start using the machine again. www.numatic.co.uk... - Page 17 Contact Service Agent T 01460 68600...
-
Page 18: Specifications
Handle safety fuse blown Replace fuse - No 19 (page 2 / 3) (or contact service engineer) Failure to rectify the problem or in the event of a breakdown contact your Numatic dealer or Numatic Technical helpline +44 (0)1460 269268... -
Page 19: Rating Label / Personal Protective Equipment / Recycling
Note: A risk assessment should be conducted to determine which PPE should be worn. CAUTION Safety Critical Component: No HOT drinks Charging Leads: Ho5VV-F x 1.0 mm x 3 Core Transaxle: 205190 when operating Battery Charger: (230V), (115V) this machine. www.numatic.co.uk... -
Page 20: Safety Precautions
Children should be supervised to ensure that they do not play with the appliance. If this product does not have a factory installed Numatic battery charger and batteries then it is the responsibility of the owner and user of the product to ensure that the charging system and battery combination are compatible, fit for purpose and safe to use. - Page 21 Disconnect hoses from separator and tanks, undo battery terminals and remove batteries. Only use genuine Numatic replacement batteries. Do not allow the batteries to become fully discharged, it may not be possible to recharge them.
-
Page 22: Recommended Spare Parts
Front Wheel 208938 Bottom Tank Dump Hose 901209 Rear Wheels Top Tank Dump Hose c/w Adjustable Cuff 902468 237609 Splash Skirt CRG 8055 Deck Buffer Wheel CRG8072 903696 Filler Stretch Hose 204068 903437 Splash Skirt CRG 8072 Schematic Diagram www.numatic.co.uk... -
Page 23: Battery Wiring
Battery Wiring Diagram CRG 8055 / 8072 Less Battery x5 Red Wires x5 Black Wires For optimum performance Numatic International Ltd recommend the use of the following batteries in the Twintec machines. Numatic Machine Numatic Recommended Battery Number MK Battery - 98A/h Stud Terminal Gel Type - Suppliers Ref: E31 SLD G ST... -
Page 24: Eu Declaration Document
EU Declaration of Conformity T 01460 68600... -
Page 25: Warranty
Warranty T 01460 68600... - Page 26 Notes: T 01460 68600...
- Page 27 Notes: T 01460 68600...
-
Page 28: Company Address
Numatic International GmbH. Fränkische Straße 15–19 D-30455 Hannover, DEUTSCHLAND Tel: 05 11 98 42 16 0 www.numatic.de Numatic International SAS. EAE La Tuilerie – 13 / 17 rue du Valengelier 77500 CHELLES, FRANCE Tel: 01 64 72 61 61 www.numatic.fr...
Need help?
Do you have a question about the CRG 8055/100T and is the answer not in the manual?
Questions and answers