
Related Manuals for Fukuda FRE-205 DUO


Summary of Contents for Fukuda FRE-205 DUO
- Page 1 Laser Levels Online Generation Fukuda FRE-205 DUO User Guide REVISION 1.1 © 2021 Laser Levels Online...
-
Page 2: Key Information
KEY INFORMATION Specifi cation Brand Fukuda Product Type Rotating Laser Level Levelling Type Fully Self Levelling Detector Range Up to 500m Diameter (250m either side of Laser) Accuracy ±3mm at 30m (100ft) Beam Colour Red Beam Beam Type Rotating Dot... - Page 3 INTRODUCTION Thank you for purchasing the Fukuda FRE-205 DUO rotary laser kit. These instructions are intended to explain the general basics of operating this equipment. Please read them carefully. For any more information, or if the laser requires calibration or repair; then please contact our Service Department by Telephone: 08000 869 769 or Email: sales@laser-level.co.uk...
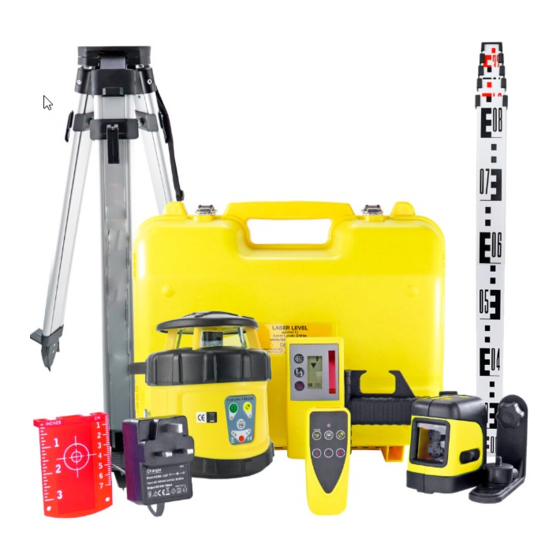
- Page 4 WHAT’S INCLUDED IN THE KIT The Fukuda FRE-205 Kit includes the following items. Your contents may vary if the kit was customised at point-of-purchase to upgrade or remove items. Fukuda FRE-205 FRD300R-205 Detector RC205 Remote Control Horizontal & Dual Grade...
-
Page 5: Laser Overview
LASER OVERVIEW Protective Lighthouse Carrying Handle Rotating Laser Prism Battery Compartment Key Pad (Expanded On Page 6) Locking Screw 5/8” x 11 Thread Rechargeable For Horizontal Battery Charging Port Tripod Mounting (Located On Side Wall) (Located Underneath) -
Page 6: Keypad Overview
KEY PAD OVERVIEW ON/OFF Button This Button will turn the Laser On and Off . When turned on, the Laser will auto self level within 15-20 seconds and start spinning a level datum. No other button needs to be pressed for the laser to self level. -
Page 7: Remote Control Overview
REMOTE CONTROL OVERVIEW The Fukuda RC205 Infrared Remote Control enables the user to remotely (up to 20m), adjust the following settings: Rotational speed, Manual Override (for single or dual-axis grade/slope control) and Automatic Drift System (ADS). It cannot be used to turn the Laser ON or OFF (a feature not available on any Fukuda laser level system). - Page 8 LASER DETECTOR OVERVIEW The FRE-205 Kit is available with either the standard FRD300R-205 Detector or the upgraded FRD800R Detector with mm/inch display. The overview below shows the standard FRD300R-205. 47mm Reception Pick-up Window FRONT Front LCD Display Screen FMB-01 Staff Mounting Bracket Speaker ON/OFF Button...
-
Page 9: Using The Detector
LASER DETECTOR OVERVIEW (CONTINUED) REAR FMB-01 Staff Mounting Rear LCD Display Screen Battery Compartment Using The Detector Press the ON/OFF button once and the FRD300R-205 will power on. ● Clamp the Detector onto the front face of the measuring staff and face towards the Laser. ●... -
Page 10: Charging & Batteries
CHARGING & BATTERIES The FRE-205 is supplied with 4 x type AA high capacity (2,600mAh) Ni-MH rechargeable batteries and a 5.6 Volt UK Plug, 700mA charger. Although the FRE-205 is designed to use AA rechargeable batteries, it is also possible to use 4 x type AA Alkaline batteries instead. Mains Charger The 5.6 Volt UK Plug, 700mA charger (Input 100-240V AC 50/60Hz Output DC 5.6V 700mA, centre pin + polarity) is for indoor use only. - Page 11 INSTRUCTIONS Horizontal Levelling WARNING Never operate Laser in front of glazing or any shiny surfaces! See page 24 for further details. Position Laser Place the FRE-205 on a fi rm, generally level surface or screw onto the 5/8” thread of the surveying tripod. You do not need to independently level the surface or tripod, but is does need to be within ±5 deg of true horizontal.
-
Page 12: Using The Laser
USING THE LASER Power On Press the ON/OFF button once and the FRE-205 will power on and begin automatically self- ● levelling. This process takes around 15-20 seconds. When the levelling process is complete, the laser will start spinning at 600rpm, indicating a level datum. No other button needs to be pressed for the laser to self level. - Page 13 USING THE LASER (CONTINUED) Plus & Minus Buttons (Using Remote Only) When the FRE-205 is in manual mode (Self levelling system has been turned off ), the Plus & ● Minus buttons are used to increase or decrease the slope angle of the laser prism in either the X or Y axis to set a progressive fall or gradient.
- Page 14 USING THE LASER (CONTINUED 2) Setting Y Axis Slope This example sets a grade in the Y axis. ● Press the ON/OFF button once and the FRE-205 will power on and begin automatically self- ● levelling. Press the Manual Override button on the remote once and the self levelling system will be ●...
- Page 15 HOW TO SET-OUT A SITE Working Example The following description in this guide, explains the general principles of how to set-out a site using a rotary laser level like the FRE-205. Equipment Outdoors you will need the FRE-205 rotary laser level, a detector (receiver), a surveying tripod and a measuring staff...
- Page 16 HOW TO SET-OUT A SITE Working Example (Continued) Basic Indoor Procedure The FRE-205 needs to be positioned in a convenient, safe place and onto a fi rm, horizontal surface within +/-5 degrees. Diff erent types of accessories are available to suit all Trades, namely wall brackets, interior elevator tripods or fl...
- Page 17 HOW TO SET SLOPES (FALLS/GRADES) Working Example 1 The following description in this guide, explains the general principles of setting a Slope (Fall/ Grade) when using the FRE-205. Equipment You will need the FRE-205 laser level, a surveying tripod, measuring staff (rod) with mm scale and a laser detector/receiver and the remote control.
- Page 18 HOW TO SET SLOPES (FALLS/GRADES) Working Example 1 (Continued) Note: The Y axis is in line with the laser’s keypad & in the direction of the gradient to be set. On the remote control, press & hold the PLUS button to move the laser beam down the staff , until a continuous tone is heard again at the new detector position.
- Page 19 HOW TO SET SLOPES (FALLS/GRADES) Working Example 2 (when you do NOT know the grade to set) Use diagrams in conjunction with written example on page 20. Diagram 1 Diagram 2 Diagram 3...
- Page 20 HOW TO SET SLOPES (FALLS/GRADES) Working Example 2 (when you do NOT know the grade to set) The following description explains the general principles of setting a Slope (Fall/Grade) using the FRE-205, when you do NOT know the grade to set. Equipment You will need the FRE-205 laser level, its remote control, a surveying tripod, measuring staff...
- Page 21 HOW TO SET SLOPES (FALLS/GRADES) Working Example 2 (when you do NOT know the grade to set) To make the next adjustment, use the remote control if distance “D” is less than 20m; or a colleague closer to the laser with the remote control, if “D” is more than 20m. (Please note that the remote control range outdoors is a maximum of 20m).
-
Page 22: Checking The Calibration
CHECKING THE CALIBRATION Controlled Test If you believe the FRE-205 is not giving accurate datums (after ensuring you have completely ruled out refraction of the laser beam explained on page 24), please carry out the following controlled test in your offi ce, or another indoor location. Position the FRE-205 laser on it’s tripod in the middle of your offi... -
Page 23: Factory Reset Procedure
FACTORY RESET PROCEDURE Fukuda FRE-205 Factory Reset Procedure The following procedure is a possible cure for the following fault: “Laser Prism tilted over to one side and it will not rotate” Prior to starting, please ensure that the batteries in the FRE-205 are fully charged and the Remote Control is operating (the red LED will illuminate when of any of its six buttons are pressed). - Page 24 REFRACTION ISSUES Product types: All Rotary and Cross line laser levels Although there will always be the 0.1% of products that develop a fault, 99.9% of the technical enquiries we receive relating to “incorrect levels”, “random positions”, “out-of-level” or “Detector not picking up the beam correctly”...
-
Page 25: Troubleshooting
TROUBLE SHOOTING Error Cause & Solution Check Batteries Often lasers are sent to Service Centres with the following User battery mistakes: Standard batteries that are dead / Rechargeable batteries that are fl at and need charging and Polarity errors i.e. batteries of ei- ther type that have been fi... - Page 26 TROUBLE SHOOTING (CONTINUED) Error Cause & Solution Outside Levelling Range Or Impact Damage If the FRE-205 is positioned outside of it’s self levelling range of ±5 degrees the rotating laser prism will tilt over to one side (to try and locate a level position) and then time-out. Re-position the FRE-205 so that is is within ±5 degrees of level and try again.
-
Page 27: Care And Maintenance
● to do so may void warranty. NEVER store the Fukuda FRE-205 Kit in a van, car or an unheated location (workshop / shed ● / garage / lockup etc.) overnight. The Fukuda FRE-205 Kit is designed to work in cold and wet conditions but it’s the storage of the product when not in use that is critical. - Page 28 MAGNETIC MACHINE DETECTORS Check Out Our Range Of Magnetic Detectors Put a Magnetic Detector / Receiver on your machine and extend the benefi ts of any red beam rotary laser. They are reliable, simple to attach, extremely robust and easy to use. www.laser-level.co.uk/magnetic Laser Levels Online Unit 35, Bridge Business Centre, Beresford Way, Dunston Road,...
Need help?
Do you have a question about the FRE-205 DUO and is the answer not in the manual?
Questions and answers