
Related Manuals for Viavito TX1000


Summary of Contents for Viavito TX1000
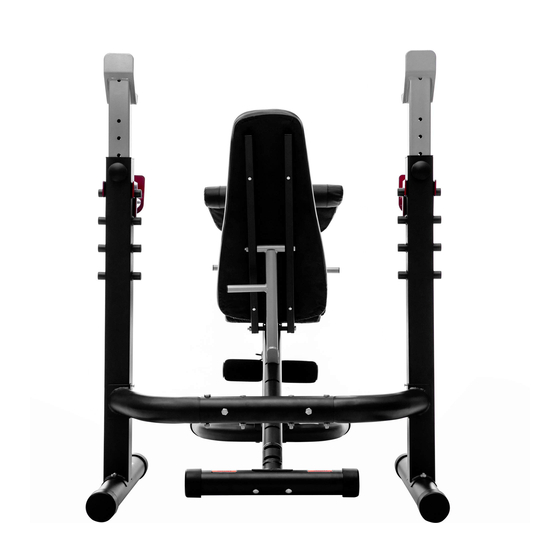
- Page 1 Owner’s Manual. TX1000 GT 2 Piece Olympic Barbell Weight Bench www.viavito.com Manual version 1.1...
-
Page 2: Table Of Contents
Congratulations Manual Contents on purchasing your Safety Information 03/05 very own TX1000 Assembly 06/25 GT 2 Piece Olympic Product Overview Barbell Weight Bench. Parts Identification Chart Before You Begin Assembly Instructions 09/22 Adjustment 23/25 You have chosen a high-quality, safe and... -
Page 3: Safety Information
Use only spare 01 It is the responsibility of the owner parts supplied by Viavito. to ensure that all users of the weight bench are adequately informed of all 11 Unauthorized repairs or altering the precautions. - Page 4 260kg. Do not place more than 140kg, including a barbell, Viavito assumes no responsibility for on the weight rest. Do not place more than personal injury and/or property damage sustained by or through the use of this 50kg on the leg lever.
- Page 5 Warning Decal Placement 120 kg 140 kg 50 kg www.viavito.com...
-
Page 6: Assembly
Assembly Product Overview Thank you for selecting the Viavito TX1000 GT 2 Piece Olympic barbell weight bench. This manual will guide you through the assembly process. ASSEMBLED DIMENSIONS: Weight Rest Height: 5 ft. 5 in. (165 cm) Width: 4 ft. 2 in. (127 cm) Depth: 6 ft. -
Page 7: Parts Identification Chart
M8 Washer (49) M6 x 80mm Screw (48) M10 x 85mm Bolt (44) M6 Washer (32) M10 x 90mm Carriage Bolt (43) M10 Locknut (42) M10 x 90mm Bolt (45) M8 Locknut (36) M10 x 77mm Bolt Set (47) www.viavito.com... -
Page 8: Before You Begin
Assembly may be more convenient if you have a socket set, a set of open-end or • For help identifying small parts, use the closed-end wrenches, or a set of ratchet PART IDENTIFICATION CHART on page 7. wrenches. • Assembly requires the included hex key(s) www.viavito.com... -
Page 9: Assembly Instructions
01 Orient the Front Stabilizer (2) so that the square holes are facing the floor. Attach the Front Stabilizer to the Front Leg (4) with two M10 x 90mm Carriage Bolts (43) and two M10 Locknuts (42). Do not tighten the Locknuts yet. Square Holes www.viavito.com... - Page 10 01 Orient the Rear Stabilizer (3) so that the square holes are on the side shown. Attach the Rear Stabilizer to the Frame (1) with two M10 x 90mm Carriage Bolts (43) and two M10 Locknuts (42). Do not tighten the Locknuts yet. Square Holes www.viavito.com...
- Page 11 Step Three. 01 Attach the Seat (18) and the Seat Bracket (38) to the Frame (1) with two M6 x 80mm Screws (48) and two M6 Washers (32). www.viavito.com...
- Page 12 Step Four. 02 See steps 1 and 2. Tighten the M10 01 Attach the Front Leg (4) to the Frame (1) with two M10 x 85mm Bolts (44), Locknuts (42). two M10 Washers (55) and an M10 Locknut (42). www.viavito.com...
- Page 13 (51) and four M6 Washers (32). Do not the Backrest Post (15) to the Backrest tighten the Screws yet. Frames (16) with the Bolt, two M10 Washers (55) and an M10 Locknut (42). Do not tighten the Locknut yet. Grease www.viavito.com...
- Page 14 Backrest Post (15) must pivot Washers (55) and an M10 Locknut (42). Set the end of the Backrest Post(15) in easily. one of the slots in the Frame. Do not overtighten the Locknut; the Backrest Frames must pivot easily. Grease Slot www.viavito.com...
- Page 15 Make sure that the barrel of the Bolt Washers (49) and an M8 Locknut (36). Then, press a 25mm Round Outer Cap Set is inserted through both sides of (29) onto the Weight Tube. the bracket on the Front Leg. Bracket Grease 36 49 www.viavito.com...
- Page 16 01 Insert the Long Pad Tube (56) into the Tubes (21) and the Leg Lever (5). bracket on the Front Leg (4). Slide Foam Pad (22) onto the Pad Tube on each side and then press Pad Caps (23) into the Foam Pad on each side. Bracket www.viavito.com...
- Page 17 01 Attach the Bumper (39) to the Curl Bar 02 Attach the Curl Bar (17) to the Leg (17) with an M4 x 19mm Screw (54). Lever (5) with the Pin/Tether (35). Then, attach the Tether to the Leg Lever with an M4 x 19mm Screw (54). www.viavito.com...
- Page 18 Step Ten. 01 Attach the Curl Pad (20) to the Curl Post (6) with two M6 x 20mm Screws (53). www.viavito.com...
- Page 19 Upright (10) in the same way. marked with an “L” sticker. Orient one of the Bases (9) as shown. Attach the Base to the Left Upright with two M10 x 90mm Carriage Bolts (43) and two M10 Locknuts (42). Warning Decals www.viavito.com...
- Page 20 01 Attach a Connector (28) to the Left the Right Upright (10) in the same Upright (11) with two M5 x 19mm way. Screws (52), two M10 x 90mm Bolts (45) and two M10 Washers (55). Do not tighten the Screws yet. www.viavito.com...
- Page 21 04 See step 12. Tighten the M5 x 19mm 02 Attach the Olympic Extension (8) or Screws (52). the Standard Extension (7) to the Connector (28) on the Left Upright (11) with three M10 x 90mm Bolts (45), four M10 Washers (55) and three M10 Locknuts (42). www.viavito.com...
- Page 22 The use of the other Safety Spotter on a set of pegs remaining parts will be explained on the Right Upright (10). in ADJUSTMENT, beginning on the following page. 02 Make sure that both Safety Spotters are at the same height. www.viavito.com...
-
Page 23: Adjustment
Post (15). Raise or lower the Backrest, and insert the tab on the lower end of the Backrest Post into one of the slots in the Frame (1). Make sure that the tab is fully inserted into one of the slots. Slot www.viavito.com... - Page 24 Curl Bar (17), pull the Pin (35) out of the Leg Lever (5) and remove the Curl Bar. To attach the Curl Bar (17), insert the Pin (35) completely through the Leg Lever (5) and the Curl Bar. www.viavito.com...
- Page 25 Knobs are fully tightened into the Uprights. To adjust the position of the Safety Spotters (13), move the Safety Spotters to a different set of pegs on the Uprights (10, 11). Make sure that the Safety Spotters are at the same height. www.viavito.com...
-
Page 26: Conditioning Guidelines
• Control appetite injuries, joint problems, obesity and • Boost self-image asthma. • Improve muscle tone and strength • Improve flexibility • Lower blood pressure • Relieve insomnia www.viavito.com... -
Page 27: Beginner's Guide To Exercise
• Start slowly and build up your time, speed and resistance gradually; doing too much too soon can lead to injuries. • If you are sore or tired, give yourself a few extra days to recover. www.viavito.com... - Page 28 • Stretch at least three times a week to perature, which greatly reduces the risk of maintain flexibility. injury. Stretching develops flexibility and reduces muscles soreness. Stretches should be held for 15 to 30 seconds. www.viavito.com...
-
Page 29: Stretching Guide
The purpose of cooling down is to return the body to its normal or near normal, resting state at the end of each exercise session. A proper cool-down slowly lowers your heart rate, allows blood to return to the heart and helps prevent muscle soreness caused by the build-up of lactic acid in the muscles. www.viavito.com... -
Page 30: Customer Support
• Precise description of the issue or defect. IMPORTANT! Please retain your sales receipt. Viavito Customer Care may request proof of purchase to validate eligibility for warranty service. Warranty cover starts from the date shown on the proof of purchase. -
Page 31: Manufacturer's Warranty
Manufacturer's Warranty Viavito warrants this product to be free Viavito is not responsible or liable for of defects of material and workmanship, direct, indirect, or consequential losses under normal use and conditions, for a arising out of or in connection with the use... -
Page 32: Technical Information
Technical Information Exploded Diagram www.viavito.com... - Page 33 Exploded Diagram www.viavito.com...
-
Page 34: Parts List
M10 Washer 76mm Round Outer Cap Long Pad Tube 70mm Square Inner Cap Weight Clip 57mm Round Inner Cap Olympic Adapter Connector 2” Spring Clip 25mm Round Outer Cap M8 x 10mm Set Screw 25mm Round Inner Cap Curl Bushing www.viavito.com... -
Page 35: Space Required
Appendix: Space Required For safety reasons, minimum clearance for the equipment is 0.6m in all directions. 1260 www.viavito.com...
Need help?
Do you have a question about the TX1000 and is the answer not in the manual?
Questions and answers