
Related Manuals for Trox Technik EK2-EU


Summary of Contents for Trox Technik EK2-EU
- Page 1 Installation and operating manual GB/en Smoke control damper Type EK2-EU according to EN12101-8 Declaration of Performance DoP / EK2-EU / 001 Read the instructions prior to performing any task!
- Page 2 TROX GmbH Heinrich-Trox-Platz 47504 Neukirchen-Vluyn, Germany Germany Phone: +49 (0) 2845 2020 Telefax: +49(0)2845 202 265 E-mail: trox@trox.de Internet: http://www.troxtechnik.com Translation of the original A00000085701, 1, GB/en 02/2021 Valid from 12/2020 Smoke control damper Type EK2-EU...
- Page 3 To ensure that your request is processed as quickly as possible, please keep the following information ready: Product name TROX order number Delivery date Brief description of the fault Online www.troxtechnik.com Phone +49 2845 202-400 Smoke control damper Type EK2-EU...
- Page 4 Warning – danger zone. NOTICE! Potentially hazardous situation which, if not avoided, may result in property damage. ENVIRONMENT! Environmental pollution hazard. Tips and recommendations Useful tips and recommendations as well as informa- tion for efficient and fault-free operation. Smoke control damper Type EK2-EU...
-
Page 5: Table Of Contents
Smoke extract duct and cover grille .... 40 6.1 Smoke extract ducts ........ 40 6.2 Cover grilles ..........41 6.3 Inspection access ........41 Electrical connection ........7.1 General safety notes ....... 7.2 Wiring and connection to the central BMS ..............42 Smoke control damper Type EK2-EU... -
Page 6: Safety
Danger of injury due to insufficiently qualified 1.2 Correct use individuals! Type EK2-EU smoke control dampers are used in heat Incorrect use may cause considerable injury or and exhaust systems to remove smoke or heat and to damage to property. -
Page 7: Technical Data
The last two digits of the year in which the CE Regulated characteristics; the fire resistance class marking was affixed depends on the application and may vary Order code Notified body Order number Year of manufacture Smoke control damper Type EK2-EU... -
Page 8: Dimensions And Weight
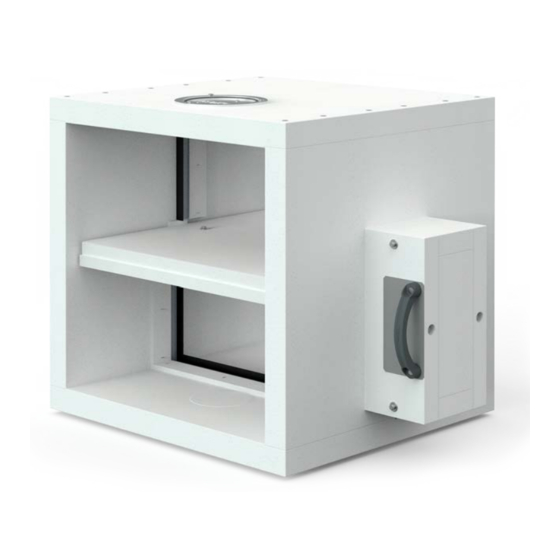
Technical data Dimensions and weight 2.2 Dimensions and weight Fig. 2: EK2-EU size S ④ Operating side Seal ⑤ Installation side Keep clear to provide access to the actuator ① EK2-EU encasing Fig. 4 ② ⑥ Connecting subframe (optional) Actuator encasing ③... - Page 9 Technical data Dimensions and weight Fig. 3: EK2-EU size M and L ③ Operating side Fixing screw ④ Installation side Seal ⑤ For size L, the actuator/module encasing is sup- Keep clear to provide access to the actuator plied in two versions, depending on the drive encasing Fig.
- Page 10 Technical data Dimensions and weight Weights [kg] (standard lengths) Size B [mm] [mm] [mm] 900 1000 1100 1200 1300 1400 1500 Smoke control damper Type EK2-EU...
-
Page 11: Transport And Storage
If possible, take the product in its transport packaging up to the installation location. Transport protection devices The EK2-EU is delivered with cardboard transport pro- tection that stabilises the casing during transport and installation. Only remove the transport protection after... -
Page 12: Parts And Function
54 . Fig. 5: Smoke extract system ① EK2-EU in a solid shaft wall ② EK2-EU in a solid wall and a duct ③ EK-JZ on a vertical solid shaft wall ④ On a vertical smoke extract duct (shaft) ⑤... -
Page 13: Installation
The overview of all possible installation types of the concrete, aerated concrete or bricks, gross density smoke control damper EK2-EU are listed in the declara- ≥ 500 kg/m³. tion of performance; they can be downloaded from the Wall thickness W ≥ 100 mm. -
Page 14: Installation Position
1200 °C) can be ordered as an accessory. 5.3.1 Installation position The smoke control damper can be installed so that the Fig. 8: EK2-EU side by side damper blade shaft is horizontal or vertical. The position m× dry wall screw 6 × 80 mm (by others) - Page 15 Fig. 9: EK2-EU on top of each other m × dry wall screw 6 × 80 mm (by others) B- 100 / 200 (round up if necessary) P1 B - 100 / n (≤200 mm)
-
Page 16: Installation Opening
To do so, use glue or screws ( Fig. 11 /3); screws should be at ≤200 mm from each other. Boards Thickness [mm] h [mm] Promatect MT 40 - 200 Smoke control damper Type EK2-EU... -
Page 17: Supporting Construction - Solid Walls
5.4.1 Dry mortarless installation Fig. 12: Dry mortarless installation in solid wall, installation variant b, classification index: v ① ⑥ EK2-EU, vertical or horizontal installation position Annular gap cover, 2 pieces, 12.5 x 45 mm ② ⑦ Solid wall made of brick, concrete or aerated con- Steel wire clip Wall thickness ≥... - Page 18 Before fitting the annular gap cover, seal the installation gap with fire protection acrylic on both sides of the wall. Fix the annular gap cover to the damper casing on both sides of the wall with steel wire clips. Connecting the smoke extract duct to EK2-EU Ä 6 ‘Smoke extract duct and cover grille’ on page 40 Follow the manufacturer's instructions of the smoke extract duct here as well.
-
Page 19: Wet-Dry Mortarless Installation
5.4.2 Wet-dry mortarless installation Fig. 13: Wet-dry mortarless installation in solid wall, installation variant 2a, classification index: v ① ⑥ EK2-EU, vertical or horizontal installation position Annular gap cover, 2 pieces, 12.5 x 45 mm ② ⑦ Solid wall made of brick, concrete or aerated con- Steel wire clip ⑧... - Page 20 Close off the perimeter gap "s" (2 or 3) completely with mortar depending on the installation variant. The mortar bed depth must be at least 100 mm. Connecting the smoke extract duct to EK2-EU Ä 6 ‘Smoke extract duct and cover grille’ on page 40 Follow the manufacturer's instructions of the smoke extract duct here as well.
-
Page 21: Mortar-Based Installation
5.4.3 Mortar-based installation Fig. 14: Wet-dry mortarless installation in solid wall, installation variant a, classification index: v ① ⑧ EK2-EU, vertical or horizontal installation position Mortar ② Wall thickness ≥ 100 mm Solid wall made of brick, concrete or aerated con-... - Page 22 Mortar Þ detail 8 Close off the perimeter gap »s« with mortar. The mortar bed depth must be at least 100 mm. Connecting the smoke extract duct to EK2-EU Ä 6 ‘Smoke extract duct and cover grille’ on page 40 Follow the manufacturer's instructions of the smoke extract duct here as well.
-
Page 23: Supporting Construction - Solid Ceiling Slabs
5.5 Supporting construction – solid ceiling slabs 5.5.1 Mortar-based installation Fig. 15: Mortar-based installation in solid ceiling slab, classification index: h ④ EK2-EU, actuator encasing underneath ceiling slab Wall connectors (available as accessories) ⑤ Dry wall screw Ø6 x 30 mm (by others); pre-drill EK2-EU, actuator encasing above ceiling slab Arrangement of wall connectors B ≤1200 mm... - Page 24 Close off the perimeter gap »s« with mortar. The mortar bed depth must be at least 150 mm. Connecting the smoke extract duct to EK2-EU Ä 6 ‘Smoke extract duct and cover grille’ on page 40 Follow the manufacturer's instructions of the smoke extract duct here as well.
-
Page 25: Supporting Construction - Lightweight Partition Wall
5.6 Supporting construction – lightweight partition wall 5.6.1 Dry mortarless installation Fig. 16: Dry mortarless installation in lightweight partition wall, installation variant b, classification index: v ① ⑥ EK2-EU, vertical or horizontal installation position Mineral wool, A1 ② ⑦ Metal stud system Annular gap cover, 2 pieces, 12.5 x 45 mm... - Page 26 Before fitting the annular gap cover, seal the installation gap with fire protection acrylic on both sides of the wall. Fix the annular gap cover to the damper casing on both sides of the wall with steel wire clips. Connecting the smoke extract duct to EK2-EU Ä 6 ‘Smoke extract duct and cover grille’ on page 40 Follow the manufacturer's instructions of the smoke extract duct here as well.
-
Page 27: Wet-Dry Mortarless Installation
Supporting construction – lightweight partition wall > Wet-dry mortarless installation 5.6.2 Wet-dry mortarless installation Fig. 17: Wet-dry mortarless installation in lightweight partition wall, installation variant a, classification index: v ① ⑥ EK2-EU, vertical or horizontal installation position Mineral wool, A1 ② ⑦ Metal stud system Annular gap cover, 2 pieces, 12.5 x 45 mm... - Page 28 Close off the perimeter gap "s" (s1, s3 and 2 if pertinent) completely with mortar depending on the installation variant. The mortar bed depth must be at least 100 mm. Connecting the smoke extract duct to EK2-EU Ä 6 ‘Smoke extract duct and cover grille’ on page 40 Follow the manufacturer's instructions of the smoke extract duct here as well.
-
Page 29: Mortar-Based Installation
Supporting construction – lightweight partition wall > Mortar-based installation 5.6.3 Mortar-based installation Fig. 18: Dry mortarless installation in lightweight partition wall, installation variant b, classification index: v ① ⑥ EK2-EU, vertical or horizontal installation position Mineral wool, A1 ② ⑨ Metal stud system Mortar ③... - Page 30 Close off the perimeter gap (s1, s2, s3 and s4) completely with mortar. The mortar bed depth must be at least 100 mm. Connecting the smoke extract duct to EK2-EU Ä 6 ‘Smoke extract duct and cover grille’ on page 40 Follow the manufacturer's instructions of the smoke extract duct here as well.
-
Page 31: Fire-Resistant Smoke Extract Ducts
Ä 40 Solid smoke extract duct (shaft) In addition to the use shown here in vertical, calcium silicate smoke extract ducts, the EK2-EU is also suitable for Ä use leading from vertical smoke extract ducts with a solid design (shaft). Here, installation is in the wall, as per 5.4 ‘Supporting construction –... - Page 32 ( Fig. 19 /3) between the duct and the damper. Apply glue to the angle sections at the joints, at the smoke extract duct and the smoke control damper, then link the sections with steel staples, distance ≤150 mm. Connecting the smoke extract duct to EK2-EU Ä 6 ‘Smoke extract duct and cover grille’ on page 40 Follow the manufacturer's instructions of the smoke extract duct here as well.
-
Page 33: In Horizontal Smoke Extract Ducts
39 . Suspend the fire-resistant smoke extract duct according to the manufacturer's instructions. Connecting the smoke extract duct to EK2-EU Ä 6 ‘Smoke extract duct and cover grille’ on page 40 Follow the manufacturer's instructions of the smoke extract duct here as well. -
Page 34: On Horizontal Smoke Extract Ducts
5.7.3 On horizontal smoke extract ducts Fig. 21: Installation on fire-resistant horizontal smoke extract ducts, classification index: v ③ Installation flush at the top and bottom Angle section (by others) ④ Ä 39 Suspension system Smoke control damper Type EK2-EU... - Page 35 ( Fig. 21 /3) between the duct and the damper. Apply glue to the angle sections at the joints, at the smoke extract duct and the smoke control damper, then link the sections with steel staples, distance ≤150 mm. Connecting the smoke extract duct to EK2-EU Ä 6 ‘Smoke extract duct and cover grille’ on page 40 Follow the manufacturer's instructions of the smoke extract duct here as well.
-
Page 36: On Top Of Horizontal Smoke Extract Ducts
Angle section (by others) ④ Ä 40 Connection Personnel: Specialist personnel Materials: For angle section: strips of fire-rated PROMATECT®-LS board d = 35 mm or equivalent e.g. Promat type AD40 or L500 d = 40 mm Smoke control damper Type EK2-EU... - Page 37 ( Fig. 22 /3) between the duct and the damper. Apply glue to the angle sections at the joints, at the smoke extract duct and the smoke control damper, then link the sections with steel staples, distance ≤150 mm. Connecting the smoke extract duct to EK2-EU Ä 6 ‘Smoke extract duct and cover grille’ on page 40 Follow the manufacturer's instructions of the smoke extract duct here as well.
-
Page 38: At The End Of Horizontal Smoke Extract Ducts
Suspend the smoke control damper Ä 39 . Connecting the smoke extract duct to EK2-EU Ä 6 ‘Smoke extract duct and cover grille’ on page 40 Follow the manufacturer's instructions of the smoke extract duct here as well. -
Page 39: Suspending The Smoke Control Damper
Fig. 24: Fixing to the ceiling slab Fire-rated anchor (with suitability certificate) Push through installation Use only fire-rated steel anchors with suitability certifi- cate. Instead of anchors, you can use threaded rods and secure them using nuts and washers. Smoke control damper Type EK2-EU... -
Page 40: Smoke Extract Duct And Cover Grille
Smoke extract ducts can also be connected with a national general building inspectorate licence or a national general appraisal certificate. If the smoke Fig. 26: EK2-EU connection to a calcium silicate smoke control damper is not exposed to mechanical forces, extract duct... -
Page 41: Cover Grilles
Fig. 27: EK2-EU connection to a sheet steel smoke extract duct ① EK2-EU ② Connecting subframe ③... -
Page 42: Electrical Connection
– Switch off the power supply before working on any electrical equipment. Fig. 29: EK2-EU insertion of the connecting cable 7.2 Wiring and connection to the cen- tral BMS To feed the electrical connecting cable (3) into the actuator encasing (1), a drilled hole (Ø... -
Page 43: Actuators
7.3 Actuators Torque table The actuators of the EK2-EU are designed according to the size depending on the torque and the order option (order code detail). The following tables can be used to identify the corresponding actuator. Select intermediate sizes with the next larger dimension. -
Page 44: B24
III (SELV) Protection level IP 54 Operating temperature -30...55 °C Connecting cable Actuator 1 m, 3 x 0.75 mm², halogen-free Limit switch 1 m, 6 x 0.75 mm², halogen-free CE conformity according to 2014/30/EU, 2014/35/EU Smoke control damper Type EK2-EU... -
Page 45: B230
Protection level IP 54 Operating temperature -30...55 °C -30...50 °C Connecting cable Actuator 1 m, 3 x 0.75 mm², halogen-free Limit switch 1 m, 6 x 0.75 mm², halogen-free CE conformity according to 2014/30/EU, 2014/35/EU Smoke control damper Type EK2-EU... -
Page 46: B24-Sr
III (SELV) Protection level IP 54 Operating temperature -30...55 °C Connecting cable Actuator 1 m, 4 x 0.75 mm², halogen-free Limit switch 1 m, 6 x 0.75 mm², halogen-free CE conformity according to 2014/30/EU, 2014/35/EU Smoke control damper Type EK2-EU... -
Page 47: Actuator With Control Module
If there are integral communication modules fitted inside the encasing, they can be connected to the actuator and establish the communication with the control system as well as the power supply. Smoke control damper Type EK2-EU... -
Page 48: Troxnetcom B24A, B24Am, B24As
-20 to 70 °C Storage temperature -5 to 75 °C -5 to 75 °C -20 to 75 °C Protection level IP 42 IP 42 IP 54 AS-i profile S7.A.E S7.A.E S-7.B.E (Safety at Work) and S7.A.E (motor module) Smoke control damper Type EK2-EU... -
Page 49: B24Bkne
Cable, 1 m (free of halogens, without plug) 2-wire cable Screw terminals for wires, 2 x 1.5 mm² Recommended cable JE-H (St) Bd FE180/E30-E90 IEC protection class II (protective insulation) Ambient temperature (normal operation) –30...+50 °C Storage temperature –40...+80 °C Smoke control damper Type EK2-EU... -
Page 50: Slc Technology - B24C
Quick and easy wiring Supply voltage Provided by the SLC con- trol module Disadvantages: Power consumption Only parallel control of several dampers Contact load, terminals 30 mA max. 13/14 IEC protection class III (protective extra-low voltage) Smoke control damper Type EK2-EU... -
Page 51: B24D And B230D
Multi-strand (without ferrule): 0.08 – 2.5 mm² Multi-strand (insulated ferrule): 0.25 – 1.5 mm² Multi-strand (non-insulated ferrule): 0.25 – 2.5 mm² Max. current, terminals Pre fuse MCB, 10 A, characteristic B Smoke control damper Type EK2-EU... - Page 52 Multi-strand (without ferrule): 0.2 – 1.5 mm² Multi-strand (insulated ferrule): 0.25 – 0.75 mm² Multi-strand (non-insulated ferrule): 0.25 – 1.5 mm² Ambient conditions Ambient temperature 0 to 45 °C Ambient humidity 0 – 90% Smoke control damper Type EK2-EU...
-
Page 53: Commissioning/Functional Test
③ OPEN position ④ Socket for the crank handle Requirement The smoke control damper is closed Insert the crank handle into the socket ( Fig. 39 /4) (the crank handle is clip-fixed to the connecting cable). Smoke control damper Type EK2-EU... -
Page 54: Maintenance
Maintenance The smoke control damper and the actuator are mainte- nance-free with regard to wear but smoke control dampers must still be included in the regular cleaning of the smoke extract system. Smoke control damper Type EK2-EU... - Page 55 C = As required, depending on the degree of contamination Maintenance work Item to be checked Required condition – Remedial action if necessary Smoke control damper Type EK2-EU...
-
Page 56: Decommissioning, Removal And Disposal
Incorrect disposal can harm the environment. Have electronic waste and electronic components disposed of by an approved specialist disposal com- pany. For disposal the smoke control damper must be com- pletely disassembled. Smoke control damper Type EK2-EU... -
Page 57: Index
Fire-resistant smoke extract duct 31 , 33 , 34 , Travel stop..............12 Functional test............53 Warranty claims............3 Weights............... High-temperature sealing tape........14 Wiring................ 42 Hotline................. 3 Inspection............54 , 55 Inspection access............41 Smoke control damper Type EK2-EU... - Page 58 Smoke control damper Type EK2-EU...
- Page 59 Smoke control damper Type EK2-EU...
- Page 60 Germany TROX GmbH Phone: +49 (0) 2845 2020 Heinrich-Trox-Platz Telefax: +49(0)2845 202 265 47504 Neukirchen-Vluyn, Ger- E-mail: trox@trox.de many http://www.troxtechnik.com Valid from 12/2020...
Need help?
Do you have a question about the EK2-EU and is the answer not in the manual?
Questions and answers