Table of Contents
Advertisement
Quick Links
Advertisement
Table of Contents

Related Manuals for Derksen PHOS outdoor 25


Summary of Contents for Derksen PHOS outdoor 25
- Page 1 PHOS 25 – 85 outdoor LED-projector moun�ng / comissioning / opera�ng...
- Page 2 Derksen Lich�echnik GmbH. Brand names and trademarks used: All product designa�ons men�oned in this document are trademarks of the respec�ve companies. Technical and design features may be subject to change. For any technical enquiries, please contact our customer service: info@derksen.de Derksen Lich�echnik...
-
Page 3: Table Of Contents
Table of contents 1. Safety instruc�on ........................4 1.1 General understanding of safety ....................4 1.2 Intended use ..........................4 1.3 Danger of electric shock......................4 1.4 Heat and fire hazard ......................... 4 1.5 Op�cal radia�on hazard ......................5 1.6 Assambly instruc�ons ......................5 3. -
Page 4: Safety Instruc�On
(e.g. for road users, people using stairs, etc.). Derksen Lich�echnik... -
Page 5: Op�Cal Radia�On Hazard
Safety Instruc�ons 1.6 Assambly instruc�ons • The projector’s beam of light can reach high tempera- tures at close range. Keep flammable materials at a safe distance (0.5 m) from the light exit point. This The projector must be firmly a�ached to a stable and load- distance increases the more projectors are used to il- bearing surface or structure. -
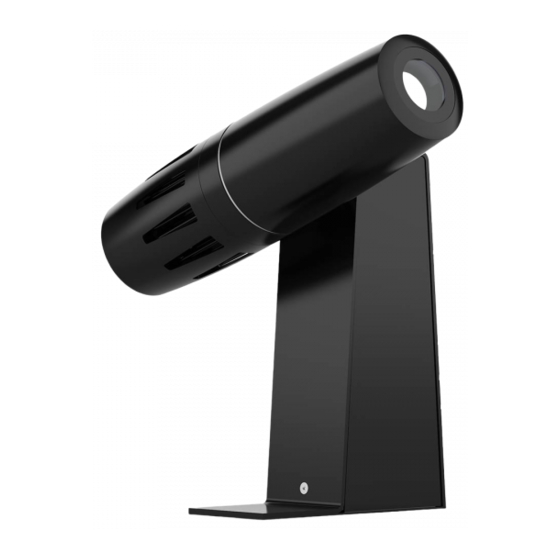
Page 6: Overview Of The Phos Outdoor
Adjustment screw for �l�ng the projector ④ • Heat sink with/without fan ⑫ head • Op�cal system holder ⑤ Sealing ring ⑬ Opening for connec�on cable ⑥ Knurled screw for gobo case ⑭ Connec�on cable ⑦ Gobo case ⑮ Cable sleeve Derksen Lich�echnik... -
Page 7: Defini�On Of Terms
Defini�on of terms 2. Defini�on of terms Term Defini�on An op�cal device that uses an internal light source (LED) to display a two-dimensional LED projector template (gobo) on an image surface. Light Emi�ng Diode Semiconductor component that emits light. Projec�on mo�f Gobo A glass template used to display logos, pa�erns, texts or images with a projector. -
Page 8: Moun�Ng And Installa�On
2. Loosen and remove the three countersunk screws on the side of the device stand. 3. Disconnect the moun�ng plate from the device stand. 4. Carefully disconnect the protec�ve conductor, which is a�ached to the moun�ng plate, from the terminal. Derksen Lich�echnik Derksen Lich�echnik... -
Page 9: Connec�Ng To The Power Supply
Installa�on Installa�on 5. Use the two curved slots to align the projector a�er as- sembly. Use the four corner holes for fixed installa�on. 6. Connect the protec�ve conductor to the terminal. 7. Use the three countersunk screws to a�ach the device stand to the moun�ng plate. - Page 10 �ve conductor via the corresponding contact on the terminal block. Lock the sleeve with the threaded sec�ons of the strain relief using the specified torque. 2,5 Nm Screw the caps onto the strain relief using the speci- fied torque. 2,5 Nm Derksen Lich�echnik...
-
Page 11: Se�Ng Up And Opera�Ng The Projector
Se�ngs 5. Se�ng up and opera�ng the projector WARNING! Risk of burns! You can burn yourself on projector parts which have become hot. ▶ Let the device cool for at least 10 minutes before any set-up work. WARNING! Op�cal radia�on hazard! Op�cal radia�on can cause temporary or permanent eye damage. - Page 12 B. Dark side: The dark part of the coa�ng can be seen through the glass. The dark side faces the projec�on lens. Insert the gobo case into the projector head. Tighten the knurled screw. Derksen Lich�echnik...
-
Page 13: Aligning The Projector Head
Se�ngs 5.2 Aligning the projector head 1. Loosen the countersunk screw. 2. Tilt the projector head into the desired posi�on. (Note: There is a mechanical stop to limit the rota�on of the projector head and prevent damage to the cable. Do not �lt the projector head without first loosening the coun- tersunk screw.) 3. -
Page 14: Locking The Projector Head
1. Ensure that the sealing ring is in the posi�on provided for it. 2. The sealing ring must not be contaminated with oil, lubricant or other agents. 3. Screw the casing onto the projector head with at least 6.0 Nm to ensure that it is leak �ght. Derksen Lich�echnik... -
Page 15: Cleaning
This direc�ve was enacted in German law with the na�onal Electrical and Electronic Equipment Act (ElektroG). In accordance with the ElektroG, Derksen Lich�echnik GmbH is registered as a manufacturer on the German EAR register (Register of Used Electronic Devices). WEEE reg. no.: DE 98055625 Our products are manufactured exclusively for the B2B (business to business) sector, and they must not be disposed of with household waste or at collec�on points at local public waste disposal facili�es. -
Page 16: Technical Specifica�Ons
Technical specifica�ons 8. Technical specifica�ons 8.1 General informa�on PHOS outdoor 25 PHOS outdoor 45 PHOS outdoor 65 PHOS outdoor 85 Housing material steel / aluminum 6.81 lbs / 6.55 lbs 6.86 lb / 6.59 lbs 7.50 lbs / 7.23 lbs 7.85 lbs / 7.58 lbs... -
Page 17: Dimensions
Technical specifica�ons 8.2 Dimensions Depending on the focal length of the projec�on lens selected, the dimensions shown above should be as follows: Projec�on lens focal length A: Total height of the projector Ultra wide-angle, f = 45 mm 16.4 in / 417 mm Wide angle, f = 63 mm 15.5 in / 394 mm Standard, f = 85 mm... -
Page 18: Photometric Data
The diagrams below provide the corresponding values as based on your projector’s output. Ultra wide-angle lens, f=45 mm, 48° Colour code for projec�on brightness = under normal interior ligh�ng, suitable for coloured pa�erns = in poorly lit rooms, for colourless pa�erns = recommended only for darkened rooms Derksen Lich�echnik... - Page 19 Technical specifica�ons Wide-angle lens, f=63 mm, 35° • The results presented here are approximate values. The result may deviate from reality. • The projec�on sizes provide the maximum diameter that can be projected with a ø 40 mm image. • The projec�on pa�ern is circular and fills the gobo’s image area.
- Page 20 Technical specifica�ons Standard lens, f=85 mm, 26° Derksen Lich�echnik...
- Page 21 Technical specifica�ons Telephoto lens, f=135 mm, 17° PHOS outdoor...
-
Page 22: Declara�On Of Conformity
Declera�on of conformity 9. Declara�on of conformity Derksen Lich�echnik Manufacturer: Derksen Lich�echnik GmbH 45889 Gelsenkirchen Johannes-Rau-Allee 4 This declara�on of conformity is issued under our sole responsibility Product: PHOS LED-Projector • PHOS 15 indoor • PHOS 45 downlight • PHOS 85 s pole mount Type: •... - Page 23 PHOS outdoor...
- Page 24 Derksen Lich�echnik GmbH Johannes-Rau-Allee 4 D-45889 Gelsenkirchen Tel: +49 (0) 2 09 / 9 80 70-0 E-Mail: info@derksen.de Web: www.derksen.de...
Need help?
Do you have a question about the PHOS outdoor 25 and is the answer not in the manual?
Questions and answers