Table of Contents

Subscribe to Our Youtube Channel
Related Manuals for Cosmetal UV Connect 28 WG


Summary of Contents for Cosmetal UV Connect 28 WG
- Page 1 Installazione, uso e manutenzione Installation, use and maintenance handbook Installation, Gebrauch und Wartung Installation, usage et entretien Instalación, uso y mantenimiento (UV) Connect 28 WG Co2708-1375 5561350 Rev.2: 0413...
- Page 2 GERÄTEKENNZEICHNUNG Modell Speisespannung Kühlgasmenge MARCATURA Klasse DELL’APPARECCHIO Gesamtaufnahme Modello Frequenz Tensione di alimentazione Matrikelnummer MANUFACTURER Quantità di gas refrigerante Konstruktionsjahr- Monat Classe WATER COOLERS PLAQUETTE SIGNALETIQUE Assorbimento totale Frequenza Modèle Mod....Numero di matricola Tension d’alimentation Anno-mese di costruzione Quantité de gaz réfrigérant ..V ..Hz ..W...
- Page 3 BEFORE USING THE APPLIANCE WARNINGS GENERAL PRECAUTIONS AND SUGGESTIONS Before carrying out any maintenance or cleaning operation, In order to use your appliance to its best, we advise reading these remove the plug from the mains socket. instructions carefully as they contain useful information. • Do not pull on the supply cable in order to remove the plug from the socket.
-
Page 4: Prima Di Usare L'apparecchio
PRIMA DI USARE L’APPARECCHIO dei nodi. l’inosservanza di una qualsiasi norma di sicurezza potrebbe • Se si notano fumo, odori insoliti o rumori strani provenire dalla macchina, causare incendi, scosse elettriche o danneggiare la macchina scollegare immediatamente la macchina dalla presa di corrente e contattare il locale rivenditore o il servizio di assistenza tecnica. L’utilizzo della macchina in queste condizioni potrebbe causare incendi o • Luogo di installazione scosse elettriche. • Non collocare la macchina nelle vicinanze di solventi infiammabili come • Periodicamente, scollegare la macchina dalla presa di corrente e, con un alcool o diluenti. panno asciutto, pulire la spina e la presa di corrente. • Non installare la macchina in luoghi eccessivamente umidi e polverosi, Se la macchina è collegata in un luogo esposto a polvere, fumo o alta esposti alla luce diretta del sole, all’esterno o nelle vicinanze di fonti di umidità, la polvere accumulatasi sulla presa assorbe umidità e potrebbe calore. -
Page 5: Avant D'utiliser L'appareil
AVANT D’UTILISER L’APPAREIL des nœuds. Le non respect de toute norme de sécurité pourrait provoquer • En cas de fumée, odeurs insolites ou bruits étranges provenant de la ma- incendies, secousses électriques ou endommager la machine chine, la débrancher immédiatement de la prise de courant et contacter le distributeur local ou le service d’assistance technique. L’utilisation de la machine dans ces conditions pourrait provoquer des • Lieu d’installation incendies et secousses électriques. • Ne pas installer la machine à proximité de dissolvants inflammables • Périodiquement, déconnecter la machine de la prise de courant et à l’aide comme alcool ou diluants. - Page 6 GF0312-030 DISIMBALLO • Ponete l’apparecchio nel punto d’installazione (cap. 4- INSTALLAZIONE). • Tagliate le reggette R e sfilate il cartone C e il sacco in plastica esterno S. • Eliminate subito i sacchi in plastica S i quali possono rappresentare pericolo per i bambini. • Una volta liberato l’apparecchio dal suo imballo eliminate il basamento B. CONSIGLI PER LA SALVAGUARDIA DELL’AMBIENTE Imballo Il materiale di imballo è riciclabile al 100%. Per lo smaltimento seguite le normative contribuisce a prevenire le potenziali conseguenze negative per l’ambiente locali. Il materiale di imballaggio (sacchetti di plastica, parti in polistirolo, ecc.) deve e la salute. essere tenuto fuori dalla portata dei bambini in quanto potenziale fonte di pericolo. Il simbolo presente sull’apparecchio o sulla documentazione indica Informazione che il prodotto non deve essere trattato come rifiuto domestico ma Questo apparecchio è senza CFC (il circuito refrigerante contiene un gas non deve essere consegnato presso un idoneo centro di raccolta per il dannoso per l’ozono). riciclaggio di apparecchiatute elettriche ed elettroniche. Per maggiori dettagli, riferitevi alla targhetta matricola posta sull’apparecchio. Lo smaltimento deve avvenire seguendo le normative locali per lo smaltimento Prodotto dei rifiuti. Per ulteriori informazioni sul trattamento, recupero e riciclaggio di...
-
Page 7: Removal Of Packaging
REMOVAL OF PACKAGING • Place the appliance in its installation site (chap. 4 - INSTALLATION). • Cut straps R and remove the box C and plastic bag S. • Immediately destroy the plastic bags S as they could be dangerous for children. • Once the appliance is free from its packaging, remove the base B. ADVICE ON HOW TO PROTECT THE ENVIRONMENT disposed of correctly, you will help prevent potential negative consequences for the Packaging environment and human health, which could otherwise be caused by inappropriate Packaging material is 100% recyclable. waste handling of this product. For its disposal follow your local regulations. The packaging material (plastic bags, polystyrene parts etc.) must be kept out of The symbol on the product, or on the documents accompanying the children’s reach as it could be dangerous. product, indicates that this appliance may not be treated as household Information waste. Instead it shall be handed over to the applicable collection point for This appliance does not contain CFCs (the cooling circuit contains a gas that is not the recycling of electrical and electronic equipment. -
Page 8: Descrizione Dell'apparecchio
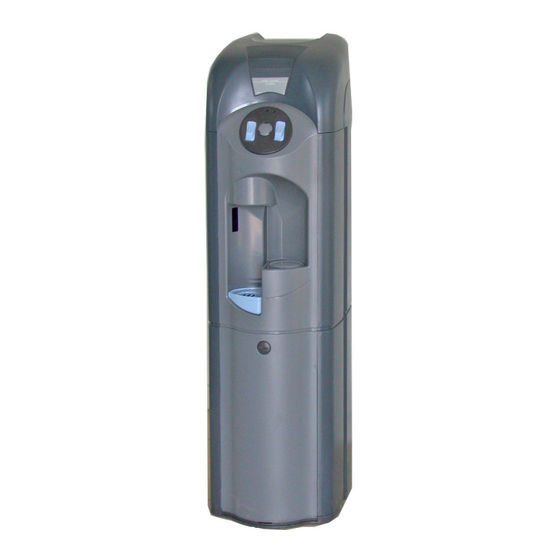
Co2708-1390 Co2708-1420b JE0404-4686 DESCRIZIONE DELL’APPARECCHIO CONNECT è stato studiato per offrire la massima igiene e funzionalità di 1 Struttura utilizzo, unite ad un design innovativo. in acciaio con involucro esterno in materiale plastico antiurto 2 Beccucci di erogazione: posizionati in zona protetta Fornisce acqua fredda e gassata in grande quantità. Gasatura regolabile. Sistema 3 Finestrella UV: un sistema di sicurezza UV, disponibile come optional, di gasatura silenzioso e di tipo professionale. protegge dai batteri la zona di erogazione dell’acqua (sistema brevettato) Devono essere sempre collegati ad una rete idrica di acqua potabile e 4 Portabicchieri: ricavato all’interno della struttura e offre maggiore prote- possono essere equipaggiati con speciali kit filtranti zione contro polveri e corpi estranei. 5 Vaschetta di raccolta acqua di sgocciolamento. È dotato di un impianto frigorifero interno, in grado di fornire acqua refrigerata a 3 ÷ 6 Pulsante erogazione acqua gassata 10°C. Utilizza un sistema di raffreddamento diretto (banco di ghiaccio) 7 Tasto erogazione acqua fredda 8 Spie segnalazione La macchina dispone di serie di una elettrovalvola con funzioni di sicurezza Verde = ON macchina accesa... -
Page 9: Description Of The Appliance
DESCRIPTION OF THE APPLIANCE CONNECT has been designed to offer maximum hygiene and function of use, 1 Steel structure with external packaging in shockproof plastic material together with an innovative design. 2 Supply nozzles placed in protected area 3 UV window. a system of UV safety, available as an optional, protects from It supply large quantities of cold and carbonated water. Adjustable water carbonation. bacteria in the water distribution zone (patented system). Silent professional water carbonation system. 4 Paper cup holder placed inside the structure to have a higher protection They must always be connected to a water mains of drinkable water and can against dust and extraneous bodies. be fitted with special filtering kits it comes with an internal cooling system, 5 Drip water collection tray. able to provide refrigerated water at 3 ÷ 10°C. 6 Button for sparkling water supply it uses a direct cooling system (ice bank). 7 Button for the supply of cold water. 8 Signal lights: The appliance is equipped with a safety solenoid valve at the inlet (anti- Green = ON Machine on flood device) Blue = ON machine producing cold and sparkling water 9 Space for C02 Cylinder The cover can be dismantled easily to facilitate access to the internal parts. - Page 10 CONNECT 28 Dimensioni Dimensions Abmessungen DImensions Dimensiones Co2708-010J (UV) Connect 28 WG Produzione acqua Lt/h Water production Trinkwasserproduktion Production d’eau Producción de agua usg/h Temp. uscita acqua °C 3 ÷ 10 Water outlet temperature Temperatur des gespendeten Wassers Temperature sortie de l’eau Temp.
-
Page 11: Installation
INSTALLAZIONE INSTALLAZIONE Ponete l’apparecchio nel punto di installazione, lontano da fonti di calore e protetto dai raggi diretti del sole. E’ sconsigliata inoltre l’installazione all’aperto e in ambienti molto umidi POSIZIONAMENTO • Per favorire l’aerazione posizionare il refrigerato r e ad una distanza di al m eno 6-7 cm dalla pare t e. INSTALLATION Place the appliance in the desired point of installation, away from heat sources and protected from direct sunrays. Installation in the open air and very damp places is not recommended. POSITIONING THE UNIT • To ensure proper ventilation, position the cooler at a distance of at least 6-7 cm from the wall. AUFSTELLUNG Stellen Sie das Gerät am Installationsort auf, und zwar fern von Wärmequellen und geschützt vor direkter Einwirkung von Sonnenstrahlen. Eine Installation im Freien und in speziell feuchten Räumen ist nicht zu empfehlen. DIE RICHTIGE POSITION • Um das Gerät möglichst gut zu belüften, stellen Sie das Kühigerät bitte mindestens 6-7 cm von der Wand entfernt auf. INSTALLATION Positionnez l’appareil à l’endroit désiré, loin de sources de chaleur et protégé contre les rayons directs du soleil. En outre, l’installation en plein air et dans des milieux très humides est déconseillée. POSITIONNEMENT • Pour permettre une aération adéquate, installez votre refroidisseur à au moins 6-7 cm de distance du mur. - Page 12 Max---- Min --- JE0404-4685 Co2708-030g Prima del collegamento idrico, verificate che la pressione di rete sia compresa 4.3.1 Collegamento idraulico fra 1 e 3 bar. • Collegate la macchina alla rete idrica utilizzando il raccordo di ingresso 2. • Se la pressione di rete é superiore a 3 bar, predisponete un riduttore di pres- È possibile usare l’attacco da 1/4F oppure l’innesto rapido in dotazione per sione in grado di abbassare il valore di quest’ultima nel campo 1÷3 bar. tubo diametro 1/4 • Predisponete un rubinetto di arresto sul tubo di ingresso dell’acqua. • Collegate un tubo T (1/4 ) (non in dotazione) al rubinetto R. Il raccordo metallico in ingresso è dotato di un filtro Spingete il tubo nell’attacco (carico vasca) esercitando la dovuta pressione. meccanico in acciaio INOX. Aprite il rubinetto R e fate entrare lentamente acqua nel banco di ghiaccio fino a quando il livello dell’acqua nel tubo verticale (P) trasparente (Fig. 4) raggiunge la 4.3.2 Svuotamento del banco di ghiaccio (per manutenzione) posizione indicata dalla targhetta “Fill” (L).
- Page 13 Water connection to the mains 4.3.1 Water connection Before making the water connection, make sure the mains water pressure is between • Connect the appliance to the water mains using the water inlet fitting 2. 1 and 3 bars. The 1/4F connector or the fast coupling provided can be used for the 1/4 diameter pipe. • If the mains water pressure exceeds 3 bars, predispose a pressure reducer capable of reducing the latter to the 1-3 range. • Predispose a stop tap R on the water inlet pipe. The metal fitting on the water inlet is fitted with a stainless • Connect a T pipe (1/4 ) (not provided) to tap R. steel mechanical filter. 4.3.2 Ice container emptying (for maintenance) Ice container filling Disconnect the power chord from the socket. To empty the ice bank, after the ice Push T pipe into attachment 1 (tank load) exerting the required pressure.
-
Page 14: Collegamento Elettrico
Co2708-1419 JE0404-4688b COLLEGAMENTO ELETTRICO • Questo distributore può essere dotato di un dispositivo antiallagamento Il collegamento alla rete elettrica avviene collegando la spina ad una presa WATER BLOCK per prevenire eventuali perdite d’acqua accidentali ® di rete (fig.6). (optional). La presa di corrente predisposta deve essere munita di efficente presa di terra Se il WATER BLOCK interviene, per riarmarlo é necessario smontare il ® e deve essere dimensionata al carico dell’apparecchio (vedi caratteristiche raccordo R e premere il pulsante S (fig.9). tecniche). Verificate che la tensione di rete corrisponda con quanto specificato nella IGIENIZZAZIONE targa dati. Assicuratevi che a monte della presa vi sia un interruttore omnipolare con • Una volta verificato il corretto funzionamento, procedete alla fase di “pulizia interna distanza minima dei contatti di 3 mm protetto da fusibili di amperaggio ed igienizzazione” come descritto nel capitolo 5. - Page 15 ELECTRICITY CONNECTION • This vending machine can be equipped with an anti-flooding device WA- TER BLOCK® to avoid any possible accidental leak of water (optional). Connection to the mains electricity supply is carried out by connecting the plug to a Should the WATER BLOCK® device intervene, to reset it, fitting R must be mains socket (fig.6). disassembled and button S pressed (fig.9). The supply socket must be equipped with an efficient earth plate and it must be sized for the load of the appliance (see technical characteristics). Make sure that the mains voltage corresponds with what is specified on the data plate. HYGIENIC CLEANING Make sure that there is an omnipolar switch above the socket with a minimum contact • Once you have checked that the appliance operates correctly, proceed with the break of 3 mm protected by fuses of suitable amperage for the absorption of the “internal cleaning and hygienic cleaning” phase as described in chap. 5. appliance itself (see technical characteristics and data plate). • Adjust cold water thermostat F depending on use and season (positions recom- mended from 4 to 7). Only after the pump has stopped should the CO cylinder be mounted, as indicated below - “4.6 CONNECTING THE CO GAS CYLINDER (CARBON DIOXIDE)”. ELEKTROANSCHLUSS • Dieser Verteiler kann mit einem Antiüberlaufsystem WATER BLOCK® ausgestattet sein, um mögliche unvorhergesehene Wasserausläufe zu Das Gerät wird durch Einstecken des Steckers in eine Steckdose an das vermeiden. (nicht serienmässig) Stromnetz angeschlossen (abb.6).
- Page 16 10.1 10.2 CO2708-1422 CO2708-1423 Co2708-1405 Per le bombole del tipo RICARICABILE (B-RIC) procedere come segue: COLLEGAMENTO DELLA BOMBOLA DEL GAS (ANIDRIDE CARBONICA) ATTENZIONE! La bombola Ricaricabile è fornita vuota. Provvedere ad effettuare la carica del gas dal più vicino rivenditore autorizzato di gas • Aprire lo sportellino (fig. 10) per accedere al vano bombola del gas CO tecnici. Richiedere la carica di gas CO (anidride carbonica) solo del tipo Per le bombole del tipo MONOUSO (O USA & GETTA) (B-UG) procedere come “per alimenti”.
-
Page 17: Connecting The Co
CONNECTING THE CO GAS CYLINDER With rechargeable cylinders (B-RIC), proceed as follows: (CARBON DIOXIDE) NOTICE! Rechargeable cylinders are empty when supplied. Have the cylinder filled with gas by the nearest authorized distributor. Ask only • Open the door (fig. 10) in order to access the compartment for the CO cylinder. With disposable cylinders (non-rechargeable), proceed as follows: for CO2 (carbon dioxide) for “food products.” • Screw the cylinder onto the pressure reducer (R-UG). • Paying special attention to the seal, screw the pipe union on the pressure reduction The cylinder is equipped with a sealing valve that will open when it is mounted onto valve (R-UG) to the connector on the cylinder, using a monkey wrench (fig. 10.1). -
Page 18: Consigli Di Utilizzo
Co2708-1375 CONSIGLI DI UTILIZZO PER GARANTIRE IL BUON FUNZIONAMENTO NEL TEMPO DELLA POMPA E’ NECESSARIO CHE LA MACCHINA FUNZIONI SEMPRE CON PRESENZA D’ACQUA NEL SERBATOIO DI RAFFREDDAMENTO. LA QUALITÀ DELLA GASATURA DIPENDE ANCHE DALLA TEMPERATURA DELL’ACQUA. PERTANTO ALL’INSTALLAZIONE È NECESSARIO ATTENDERE CHE IL REFRIGERATORE ABBIA RAFFREDDATO SUFFICENTEMENTE L’ACQUA. -
Page 19: Advice On Use
ADVICE ON USE IN ORDER TO GUARANTEE THAT THE PUMP FUNCTIONS PROPERLY FOR AN EXTENDED PERIOD OF TIME, THE UNIT MUST ALWAYS BE OPERATED WITH WATER IN THE COOLING TANK. THE QUALITY OF THE GAS-WATER MIXTURE ALSO DEPENDS UPON THE TEMPERATURE OF THE WATER. THEREFORE, WHEN THE UNIT IS INSTALLED, WAIT UNTIL THE WATER HAS BEEN COOLED SUFFICIENTLY. - Page 20 Max---- Min --- Attenzione! Se nella macchina é installato un kit Le operazioni di manutenzione devono essere compiute filtrante, questo deve essere rimosso da personale qualificato. Maintenance operations should be carried out by a Warning: If a filtering kit is fitted on the appliance, it should be excluded from the hygienic cleaning qualified professional.
- Page 21 INTERNAL CLEANING/ HYGIENIC CLEANING WARNING! Considering that the products used for the hygienic cleaning are acid and alkali corrosive substances, disposable gloves must be used as well as glasses to protect your eyes. When this hygienic cleaning is carried out, you must keep to the product reaction times, percentages of hygienic detergent and quantity of water necessary for rinsing.
- Page 22 Co2708-1396 Co2708-1397 Co2708-1383 Co2708-1384 Co2708-1405 Co2708-1406 Co2708-1407 Co2708-1408 Co2708-1409 COS2301-F442...
- Page 23 PER RIMUOVERE I FIANCHI ESTERNI a Scollegate il cavo di alimentazione dalla presa di corrente. w Smontare lo sportello frontale (fig. 17) b Chiudete il rubinetto dell’acqua. x Rimuovere le seguenti serie di viti: c Vuotare il serbatoio agendo sui comandi di erogazione - le viti posteriori che fissano la struttura esterna (fig.18) d Rimuovere la vaschetta raccogli-gocce - le viti superiori (fig.18a) e Smontare la ghiera G (fig13) per rimuovere il disco copritasti - le due viti interne poste alla base (fig.18b) f Smontare il pannello frontale (fig.14). - le due viti interne (fig.18c) g Togliere il coperchio superiore (fig.15-16) y Aprite leggermente i fianchi F (fig.18d) e sfilateli verso l’alto. HOW TO REMOVE THE EXTERNAL SIDES a Unplug the cooler from the mains electricity supply.
- Page 24 Co2708-1416 Co2708-1417 Co2708-1418 SOSTITUZIONE LAMPADA UV La lampada deve essere sostituita ogni 6000 ore (circa 8 mesi) Attenzione! l’irradiazione diretta della lampada UV è di funzionamento pericolosa per gli occhi e per la pelle. Questa operazione deve essere compiuta da personale qualificato • Indossare guanti protettivi in lattice monouso per evitare di toccare la lampada con le mani; il contatto con le sostanze della pelle possono compromettere drasticamente la durata della lampada.
- Page 25 HOW TO REPLACE THE UV LAMP Attention! direct irradiation of the UV lamp is dangerous both The lamp must be replaced every 6000 hours of working for the eyes and for the skin (about 8 months) This operation should be performed by a qualified technician.ato • Wear protection latex disposable gloves to avoid touching the lamp with your hands. The contact with the skin can prejudice the duration of the lamp...
Need help?
Do you have a question about the UV Connect 28 WG and is the answer not in the manual?
Questions and answers