
Related Manuals for SereneLife SLFTRD45


Summary of Contents for SereneLife SLFTRD45
- Page 1 SLFTRD45 Digital Smart Treadmill with Automatic Incline 15 Levels Folding Treadmill Electric Motorized Running Machine - 36 Pre-set Program...
-
Page 2: Important Safety Instructions
IMPORTANT: Read all instructions carefully before using this product. Retain this owner’s manual for future reference. The speci cations of this product may vary from this photo and are subject to change without prior notice. Turn ON Wireless BT Streaming capability on your device and make it discoverable, choose the shown device "BTMP3"... - Page 3 • This treadmill is for domestic household use only. • Only one person should use the treadmill at a time. • Wear comfortable and suitable clothing when using the treadmill. Do not use the treadmill barefoot or in socks. Always wear appropriate, enclosed athletic footwear. Never wear loose or baggy clothing as it can become caught on the treadmill and create an entrapment hazard.
-
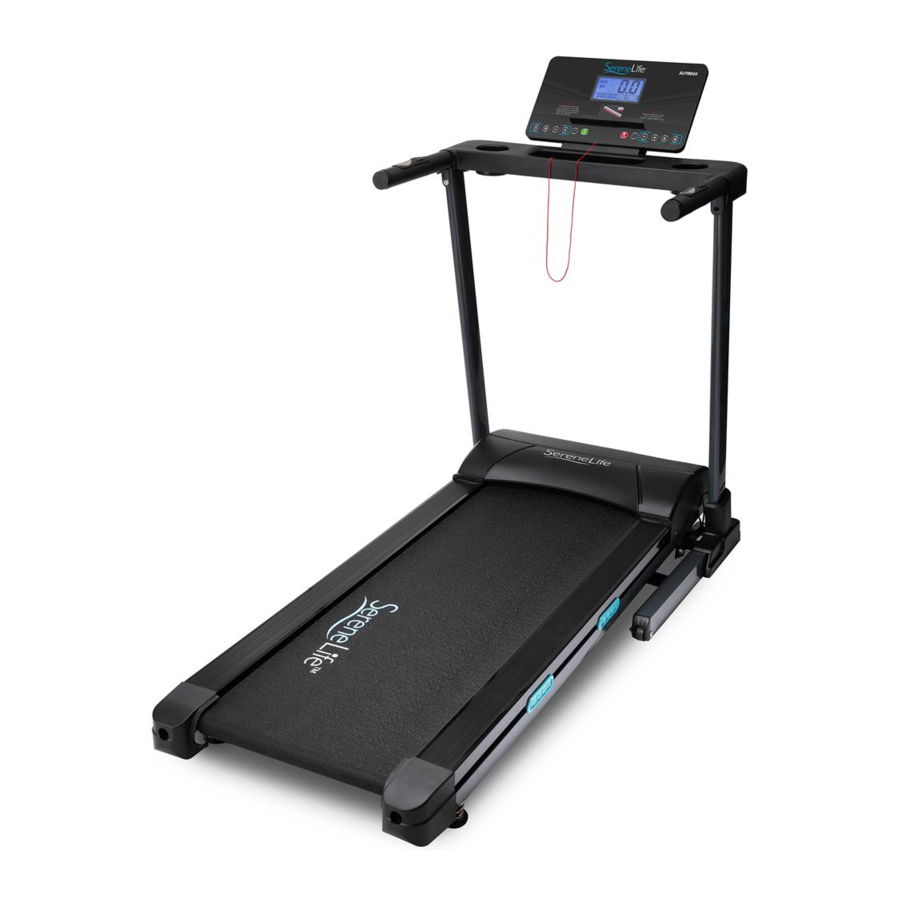
Page 4: Parts List
PARTS LIST Control Panel Emergency Stop Magnet Hand Rail Running Belt Toe Cap HARDWARE LIST & ASSEMBLY COMPONENT www.SereneLifeHome.com... - Page 5 ASSEMBLY INSTRUCTIONS STEP 1 It is recommended to have a second person assist with this step. One person should hold the Left/Right Support Tubes in place while the other person tightens the bolts. A. Use two M8x40 Hexagon Socket Oval Head Bolts (S2) and two M8 Nylon Nuts (S4) to secure both Left/ Right Support Tubes onto the Base Frame.
- Page 6 STEP 3 Turn the Computer up or down to align the bolt hole on the Handlebar. Lock the Computer in place by tightening two Locking Knobs (S5). IMPORTANT: While sliding the Handlebar onto the both Left/Right Support Tubes, make sure the cables are installed inside the Right Support Tube and pay attention not to pinch the cables.
-
Page 7: Operating The Computer
OPERATING THE COMPUTER Automatic incline Speed NOTE: Always stand on the side rails when you start the treadmill, never start the treadmill while you are standing on the running belt. QUICK START: Press the START button on the computer to begin exercising, the computer screen will countdown 5 seconds before the running belt starts moving. - Page 8 FUNCTION BUTTONS: START: Press the START button to start training on di erent training mode. STOP: Press the STOP button to stop training on di erent training mode. MODE: To select di erent function (TIME, DISTANCE, or CALORIES) for setting exercise goals in manual program mode before training.
- Page 9 The running belt starts moving with an initial speed of 0.6 MPH. You may press the SPEED + or SPEED − button on the computer console or handlebar to increase or decrease the running speed during exercise. Distance starts counting down from pre-set target distance to 0.00. When the pre-set target distance counts down to 0.00, the computer will beep to alert you and the treadmill will stop automatically.
-
Page 10: Belt Adjustment
LUBRICATION Lubricating under the running belt will ensure superior performance and extend its life expectancy. After the rst 25 hours of use (or 2-3 months) apply some lubricant, and repeat for every following 50 hours of use (or 5-8 months). How to check running belt for proper lubrication •... - Page 11 If the running belt is shifting to the right, then turn the right adjustment bolt 1/4 turn clockwise, and the belt should start to correct itself. Keep turning the adjustment bolts until the running belt is properly centered. Tool: Allen Wrench If the running belt is slipping during use, turn o and unplug the treadmill.
-
Page 12: Troubleshooting Guide
TROUBLESHOOTING GUIDE PROBLEM POTENTIAL CAUSES CORRECTIONS 1. Treadmill not plugged in. 1. Plug the power cord into a wall outlet. 2. Safety Tether Key is not 2. Reinstall the Safety Tether Key. correctly installed. 3. Reset the circuit breaker, or call an Treadmill will not 3. -
Page 13: Warm Up And Cool Down Routine
WARM UP AND COOL DOWN ROUTINE The WARM-UP is an important part of any workout. The purpose of warming up is to prepare your body for exercise and to minimize injuries. Warm up for two to ve minutes before aerobic exercising. It should begin every session to prepare your body for more strenuous exercise by heating up and stretching your muscles, increasing your circulation and pulse rate, and delivering more oxygen to your muscles. - Page 14 QUADRICEPS STRETCH With one hand against a wall for balance, reach behind you and pull your right foot up. Bring your heel as close to your buttocks as possible. Hold for 15 counts and repeat with left foot. INNER THIGH STRETCH Sit with the soles of your feet together and your knees pointing outward.
-
Page 15: Technical Specs
FEATURES: • Smart Digital Treadmill Design • Get Connected with the ‘FitShow’ and Kinomap App • Supports BT Music • Pairs to Your Device via Wireless BT Connectivity • Running & Training Data Statistics Readout • Built-in Hand Grip Sensors for Pulse Monitoring •... - Page 16 Questions? Issues? We are here to help! Phone: (1) 718-535-1800 Email: support@pyleusa.com...
Need help?
Do you have a question about the SLFTRD45 and is the answer not in the manual?
Questions and answers