Table of Contents
Advertisement
Advertisement
Table of Contents

Related Manuals for Häfele 271.97.300


Summary of Contents for Häfele 271.97.300
- Page 1 Mounting Instructions Item No.: 271.97.300 Hiddenbed...
- Page 2 Follow these steps to assemble your Hiddenbed Construct the 3 main parts Assemble them together Add a mattress. YOUR HIDDENBED IS READY!
-
Page 3: Parts List
Parts List Body Parts Part No. Name 1 Body Side L/R 2 Body Side Concealer 4 sets 3 Bottom Stretcher 4 Body Top 5 Top Stretcher 6 (*) Top Stiffener/Metal 7 Body Back 18 Bed Stop * See item No.: 940.84.253 Bed Parts Part No. Name 8 Bed head L/R 9 Slats Cover Sheet 10 Front Bed Rail 11 Rear Bed Rail 12 Bed Slats/Solid Wood 13 Slats Cleats Desk Parts... -
Page 4: Component List
Component List Mechanism Kit – Item No. 271.97.300 LOWER SUPPORT MECH ARM LOWER COTTER PLATE SUPPORT GAS SPRING TRIBEARER LINK PIVOT 2 pcs. 2 pcs. 2 pcs. 2 pcs. 2 pcs. 2 pcs. 2 sets TRUNNION BUSHING & LOCKING PIN... - Page 5 IMPORTANT POINTS FOR SAFE AND RELIABLE OPERATION Make sure that: Unit is leveled; that both side panels are parellel and level. Unit needs to be properly secured to the wall, see Häfele Item 271.98.100 safety brackets (included in assembly hardware kit #450.19.400) Stand at the middle when moving from bed to desk positions.
-
Page 6: Body Assembly
Body Assembly Arm pin outer Arm pin inner position for more position for less load on table load on table RIGHT SIDE SHOWN Do the same with left side symmetrically Attach the gas spring to mechanism arm by snapping over ball pin. - Page 7 Attach bed stops (18) to body sides (1) using 2 pcs. Confirmat screws per side (H2). Attach top stretcher (5) to body top (4) using 6 pcs #8 x 1 1/2“ wood screws. Attach metal top stiffener (6) 2035 mm long under body top, directly behind top stretcher using 6 pcs .
- Page 8 Assemble body sides (1), body top (3), body back (7), and bottom stretcher using Confirmat screws (H2, 28 pcs.).
-
Page 9: Desk Assembly
Desk Assembly Attach desk back (16) to desk top (15) using 4 pcs. Confirmat screws (H2). Attach the tribearer (A6) to desk sides (14) using 3 pcs. Flat Head & T nut (H6) and 1 pc. #8 x 3/4” (H9)on top hole of tribearer. - Page 10 Attach sides (14) to desk top (15) using 8 pcs. Confirmat screws (H2). Attach metal top stiffener (17) 1909 mm long under desk top approximately 6" from front edge using 6 pcs. re-packaged screws #8 x 5/8” long pan head screws. Additional holes may have to be drilled in the aluminum profile to accept screws.
-
Page 11: Bed Assembly
Bed Assembly Attach front bed rail (10) and rear bed rail (11) to bed heads (8) using Confirmat screws (H2). Make sure that holes for affixing bed cleats are facing the right direction, see technical drawings indicating bottom sides. Attach slat cleats (13) to bed rails using #8 x 1 1/2” flat head screws (H14). - Page 12 Place the bed head assembly on top of desk top assembly as shown below, and align holes for link pivot - see detail 2 below. From the outside introduce the link pivot into holes as shown, slightly raising the bed assembly to align holes. HEAVY - BE CAREFUL Attach other plate onto the link pivot securely with remaining screws.
- Page 13 Place the 1/4” thick slats cover sheet (9) on top of slat cleats. Place bed slats (12) over cover sheet, align holes. Affix bed slats by driving screws through slats, through cover sheet and into bed cleats using 24 pcs. #8 x 2" flat head wood screws (H10) APPLY SLATS COVER SHEET BEFORE BED SLATS.
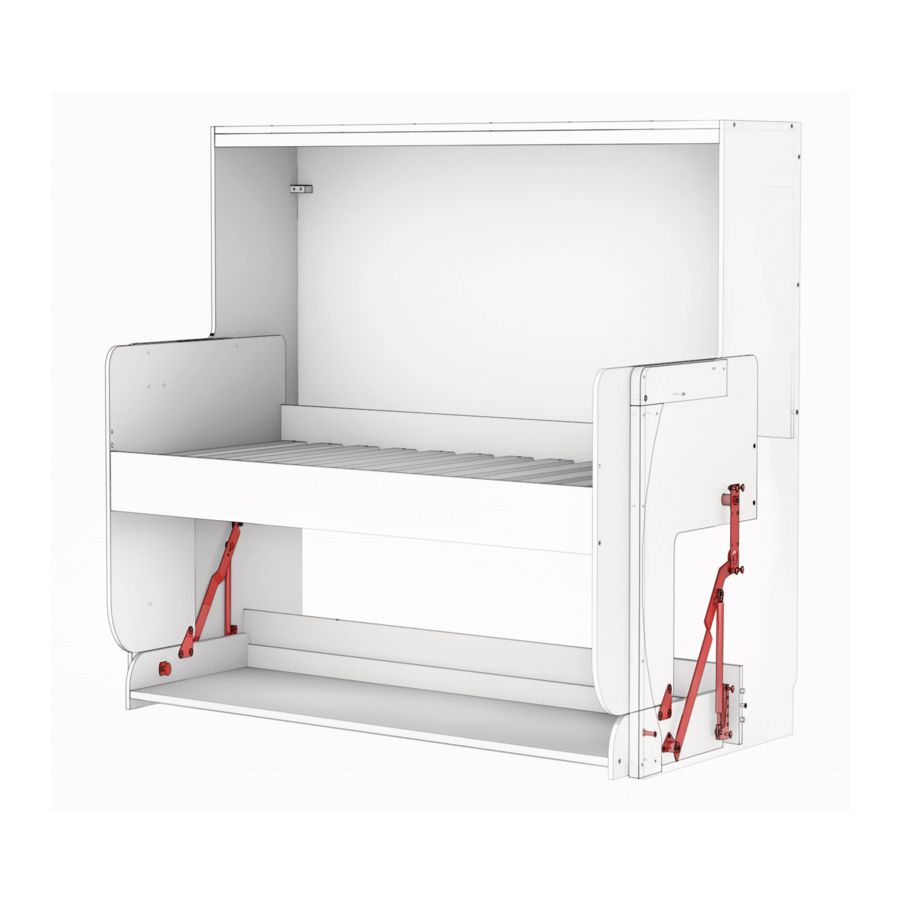
- Page 14 Carefully lift the bed slowly keeping the desk in horizontal position. Once in upper position, lock into place in both sides by pushing in the locking pins. Attach arm mechanisms to tribearer making sure it seats in the slot - see diagrams below. PUSH IN TO LOCK CAUTION!
-
Page 15: Operation
Operation Make sure unit is leveled and properly anchored to the wall. • Make sure the floor is cleared when lowering the bed. • Stand at the middle when moving from bed to desk positions. • To move from bed to desk positions, first unlock pins on both sides, then grab • front bed rail and slowly raise - be sure to keep fingers clear when reaching the top position. To move from desk to bed position, first unlock pins on both sides, then grab front • bed rail with one hand and push down the desk with the other hand, be sure to lock in position again. For convenience a handle can be placed under bed (on slats cover sheet) to • assist with moving from desk to bed. Hiddenbed system is based on a desk to bed balance. An unbalaned ratio may • result in having to apply extra force when moving from bed to desk and vice versa. Pin arm position on arm (A,B,C) may have to be adjusted to properly assist load. • 3901 Cheyenne Drive P.O. Box 4000 Archdale, NC 27263 1-800-423-3531 www.hafele.com...
Need help?
Do you have a question about the 271.97.300 and is the answer not in the manual?
Questions and answers