Table of Contents
Advertisement
Quick Links
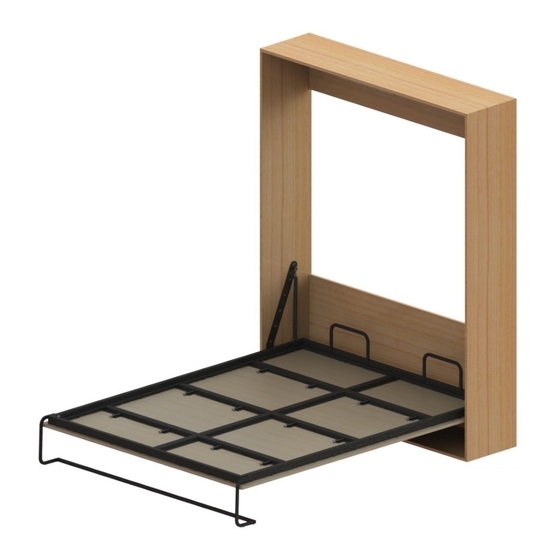
Installation Instructions: Vertical Queen Wall Bed Kit
Item Number: 271.92.200
Page 1
1-800-423-3531 • www.hafele.com
TIP-OVER HAZARD
Serious or fatal crushing
injuries can occur from
furniture tip-over. To
prevent, furniture MUST
be permanently xed to
the wall.
* Professional installation recommended.
Advertisement
Table of Contents

Related Manuals for Häfele 271.92.200


Summary of Contents for Häfele 271.92.200
- Page 1 Installation Instructions: Vertical Queen Wall Bed Kit Item Number: 271.92.200 TIP-OVER HAZARD Serious or fatal crushing injuries can occur from furniture tip-over. To prevent, furniture MUST be permanently xed to the wall. * Professional installation recommended. Page 1 1-800-423-3531 • www.hafele.com...
-
Page 2: General Safety Warnings
GENERAL SAFETY WARNINGS To avoid serious risk of injury and ensure the proper functioning of the wall bed mechanism, the following safety measures MUST to be followed: CHOICE OF LOCATION WARNINGS 1. Cabinet for the vertical queen wall bed MUST be secured to 3 wooden wall studs with the included hardware. 2. - Page 3 HARDWARE FOR QUEEN WALL BED MECHANISM Left and right frame structure (Pair) Head and foot frame structure (Pair) Middle horizontal frame support Head and foot center frame support Middle vertical frame support Mounting plate set (left and right) 1900N Non-locking pistons Mattress support M6 x 15mm Bolt Saddle locking plate...
- Page 4 Through bolt (Female part) only Wrench Hex Key #4 Hex Key #5 #10 x 35mm screw x142 #8 x 15mm screw M5 x 15mm bolt M5 Locking nut (for saddle lock) M8 Locking nut 1/4 x 20 Hex head screw fully threaded #12 x 5/8 washer head screw (20 additional screws are provided with FF &...
- Page 5 Overall Cabinet Dimensions Outside Measurements [mm (in)] Inside Measurements [mm (in)] Width Depth Height Width Depth Height Queen 1697 (66-13/16’’) 2196 (86-7/16’’) Queen 1659 (65-5/16’’) 368 (14-1/2’’) 2158 (84-15/16’’) 406 (16’’) *All measurements are for 19mm (3/4” ) board The internal dimensions MUST be consistent with the instructions to maintain safety &...
- Page 6 DRILLING GUIDE FOR ‘’F’’ BRACKET * Please note that dimensions shown are for the side panels prior to cabinet assembly. Do not install bracket F with wood screws. It is very important to install all with provided through bolts as well as using the correct boring bit size for the hole.
-
Page 7: Installing The Mounting Brackets
INSTALLING THE MOUNTING BRACKETS: This installation is drilled through the cabinet sides. Wood M + N Do not install bracket F with wood screws. It is very important to install all with provided through bolts **See the previous page for drilling guide. as well as using the correct boring bit size for the hole. -
Page 8: Securing To The Wall
SECURING TO THE WALL Professional installation recommended. Cabinet needs to be secured into at least 3 wood. Do NOT use nylon or other wall anchors. between the components. TIP-OVER HAZARD Serious or fatal crushing injuries can occur from furniture tip-over. To prevent, furniture MUST X goes through the be permanently xed to... - Page 9 Insert A onto B and attach them together with I. Attach C to A with I. Insert the second A onto B and attach them together with I. Attach C to A with I. Page 9...
- Page 10 ATTACHING THE PISTONS TO THE FRAME Follow the arrows on the piston indicating which side is ‘’up’’ in order to install the piston properly and ensure the longevity and proper operation of the piston. Do NOT unscrew the cabinet from the wall once the mechanism or pistons are in place.
- Page 11 197mm 197mm 3/4” INSTALLING THE DOOR BRACKETS 3/4” The door brackets must point downward. Install the door 413mm brackets in alignment with the support bars on the bed 1/4” frame. Height adjustable screw x2 doors 600mm Measurements for the right side 5/8”...
- Page 12 VALIDATING THE DOOR & BRACKET PLACEMENT With the help of another person, hook on 1 door to vali- date the depth placement of the door. See graphics below for expected results. See next step for how to adjust according to the results. For this step The door is too much The door is too much...
- Page 13 VALIDATING THE DOOR & BRACKET PLACEMENT With the help of another person, lightly loosen the N screws installed on step 1 and reposition the brackets by shifting lightly towards the back of the front to get a door that is alligned with the cabinet. Once the door is aligned, tighen the N screws and add the S wood screws.
- Page 14 INSTALLING THE PISTONS TO THE CABINET Tilt the frame inside past the edge of the cabinet to install the pistons on the mounting brackets. The pistons are now installed, therefore, do NOT operate the bed without the help of another person. Do NOT let go of the mechanism.
-
Page 15: Installing The Legs
INSTALLING THE LEGS 13.1 With bed closed on temporary stoppers, attach legs to bed frame with V. Do not over tighten. 13.2 Install tube between both legs. Page 15... -
Page 16: Installing The Doors
INSTALLING THE DOORS 14.1 Close the bed back onto the temporary stoppers EE. Hook the door brackets the doors on the frame and adjust with bracket screws if needed. Once the doors are hooked on, if necessary, you can adjust the angles and height of each door with bracket ‘’K’’... - Page 17 INSTALLING REMAINING FRAME SUPPORTS x 16 For this step Attach the two remaining frame supports to the doors. Keep weight on the frame during this step. The pistons are now installed, therefore, the bed will NOT stay down without the weight of the mattress. You MUST have another person hold down or sit on the bed to avoid the risk of serious injury or death from the bed...
- Page 18 Did you purchase the comfort slat option? If yes, please refer to the instructions included in the comfort slat kit. Optional 5-ply poplar slats to support the mattress: - Easy to install; - Can be purchased later on; - Added comfort; - Extends the life of the mattress;...
- Page 19 USING THE WALL BED The wall bed is Pivot the leg towards assembled and the inside of the unit. shown in lowered Make sure that the position. leg is fully retracted. Before operating the Pull up gently to close. wall bed, ensure that The leg serves as a no object or people are mattress retaining...
Need help?
Do you have a question about the 271.92.200 and is the answer not in the manual?
Questions and answers