
Related Manuals for ResMed VS III


Summary of Contents for ResMed VS III
- Page 1 VS III™ User Manual English Respiratory Care solutions Making quality of care easy...
- Page 2 Respiratory Care solutions Making quality of care easy...
-
Page 3: Table Of Contents
Contents 1 Introduction ........1 1.1 Definitions 1.2 User/Owner responsibility 1.3 Medical information... -
Page 5: Introduction
HME provider. The VS III is designed to provide ventilation to all patients, whether or not they are ventilator-dependent. It can deliver invasive ventilation (via a tracheostomy tube, for example) or non-invasive ventilation (via a mask or mouthpiece, for example);... -
Page 6: Medical Information
1.3 Medical information Purpose of your ventilation device The VS III is intended to ventilate both adults and children. Patients may use it at home and/or in a hospital. The device is used with either a single or double respiratory circuit. -
Page 7: Description Of The Device
• There is an adequate distance between the ventilator and other electrical devices in your home. • In accordance with Directive 2002/96/EC concerning waste electrical and electronic equipment, this ventilator must be sorted and disposed of separately from other types of rubbish. It must not be disposed of with ordinary municipal waste. -
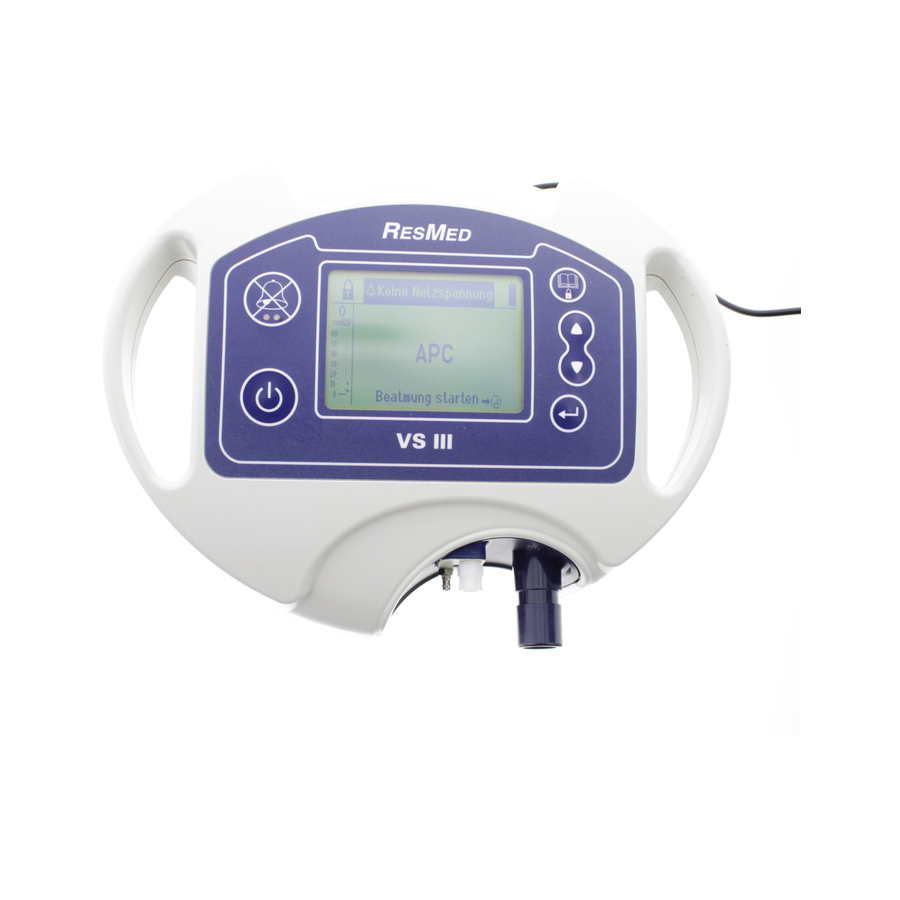
Page 8: Your Device
2.2 Your device Front view Control panel (screen and keypad) Air outlet Respiratory circuit connection area Single circuit support with exhalation and pressure line connection Figure 2: Front view of the device (single circuit) There is a different type of circuit support for double circuits (see next figure). - Page 9 LCD screen buttons On/Off Enter button button VS III Figure 5: Detailed view of the control panel The keypad consists of buttons and LED indicator lights. The buttons on the keypad are listed in the table below. Description of the device...
- Page 10 Table 1: Buttons on the device control panel Button Function On/Off button Turns the device on. Stops the device by displaying an options screen. The user can choose to stop ventilation (if ventilation is being delivered) or turn off the device (if ventilation is not being delivered).
-
Page 11: Respiratory Circuit
Screen appearance while device operating Date displayed as Shows that the device is Day/Month/Year in the Patient menu Time 27/06/2008 16:48 (closed padlock) Displays the Charge level of instantaneous PS.Vs internal battery pressure measurement (in a bar graph) Stop Current ventilation program Message to help you navigate Figure 6: Appearance of the screen while the device is operating 2.3 Respiratory circuit... -
Page 12: Connecting To A Power Supply
3.1 Connecting to a power supply To connect the ventilator to mains power: 1. Plug the power supply connector into the rear of the ventilator (into the socket marked , see next figure) 2. Plug the power cord into the power supply box and fasten to prevent accidental disconnection 3. -
Page 13: Connecting The Respiratory Circuit
3.2 Connecting the respiratory circuit CAUTION Only the circuit supplied by your HME provider may be used with your device. Using a different type of circuit may reduce the effectiveness of your treatment. Option 1 – Single circuit 1. Connect one end of the corrugated tube firmly to the air outlet, as shown in the next figure Symbol identifying air outlet Corrugated tube... - Page 14 Expiratory valve tube Expiratory valve control Pressure line tube Pressure line (Prox. P .) Figure 9: Connecting a single circuit with expiratory valve and pressure line Once your circuit is connected to the device, you can connect the mask to the other end of the circuit. Option 3 –...
-
Page 15: Connecting The Mask
Once your circuit is connected to the device, you can connect the mask to the other end of the circuit. Note: These three circuit configurations may not be exactly as shown in this illustration. It may also include a humidification system, antibacterial filter or water traps. -
Page 16: How To Use
Set the date and time. • 4.1 Starting ventilation Regardless of whether the device is running on battery or mains power, press VS III The device performs its self test. VS III Software version: x.xx Autotest in progress ... 1500h The main screen is displayed. -
Page 17: Switching Programs (During Ventilation)
4.2 Switching programs (during ventilation) While the device is delivering 27/09/2008 17:50 ventilation under “Prog1” , press Prog1: PS.Vs Prog2: PS.Vt Stop On the program change confirmation Confirmation screen, use to select “Yes” , then Program change? press to confirm. Confirm The device is now delivering ventilation 27/09/2008 17:50... -
Page 18: Viewing Data (During Ventilation)
4.3 Viewing data (during ventilation) With the main screen displayed, press 27/08/2008 17:20 to access the “Menu” screen. PS.Vs Stop to select the option you wish to PS.Vs Menu display: View settings/alarms • the ventilation settings and alarm View Monitoring Technical information thresholds;... -
Page 19: Setting The Date And Time (While Ventilation Is Stopped)
4.4 Setting the date and time (while ventilation is stopped) Press to access the “Menu” screen. 24/08/2008 16:48 PS.Vs Start ventilation to select “Date and Time Setting” , PS.Vs Menu then press View settings/alarms Technical information Date and Time Setting Events/Alarms Log Back The “Day”... -
Page 20: Turning Off The Device
4.5 Turning off the device Stopping ventilation 1 program 2 programs Press 27/09/2008 16:48 27/09/2008 17:50 Prog1: PS.Vs PS.Vs Prog2: PS.Vt Stop Stop Press again and hold Confirmation for 1 second, or confirm “Stop ventilation” by Stop ventilation Turn off ventilator pressing Cancel The message “Wait a few... -
Page 21: Cleaning And Maintenance
Shutting down the device While ventilation is During ventilation stopped Press 27/09/2008 19:17 27/09/2008 19:18 PS.Vs PS.Vs Stop Start ventilation Press again and hold Confirmation Confirmation for 1 second (left-hand Stop ventilation screen), or confirm “Turn Turn off ventilator Turn off ventilator off ventilator”... - Page 22 CAUTION Do not use bleach-, chlorine-, alcohol-, or aromatic-based solutions (including all scented oils), or moisturising or antibacterial soaps. These solutions may cause hardening and reduce the life of the plastic components. Table 2: Frequency of maintenance Component Frequency Maintenance Respiratory circuit Follow specific recommendations from your HME provider.
-
Page 23: Troubleshooting
6 Troubleshooting Alarms will alert you to any problems with your device. The instructions in this section will help you to identify the cause of the problem. If the fault persists or cannot be identified, do not try to open the device. Instead, contact your HME provider. - Page 24 Alarm name Cause Solution The connected circuit is Connect the correct different from the one for circuit. Change Circuit which the device is configured. The pressure line is Reconnect the pressure disconnected (see Figure line. Prox. P . Lost 9 on page 10). This alarm also indicates Reconnect the patient a wrongly connected or...
-
Page 25: Technical Specifications
7 Technical specifications 7.1 Dimensions 275 mm 145 mm 221 mm 7.2 Weight (without external power supply) 2.9 kg 7.3 Power supply Mains power Input: 100–240 V AC, 50/60 Hz, Max. 1.8 A. Output: 30 V DC; 2.33 A. CAUTION Use only the power supply unit provided with the device. -
Page 26: Transport
External battery life (ResMed Power Station) At least four times longer than the life of the internal battery (when the internal battery is fully charged). 7.4 Transport Storage and transport temperature -10 to +50°C. Relative humidity 10 to 90%. CAUTION This device is fragile and must be kept dry. -
Page 27: Symbols Displayed On The Screen
9 Symbols displayed on the screen Symbol Meaning External power supply (mains) External battery Internal battery (the device is detecting whether the battery is charging or discharging) Up arrow indicates the internal battery is charging (coloured black or white depending on the charge level) Down arrow indicates the internal battery is discharging... -
Page 29: Index
Index air outlet 10 respiratory circuit 9 air return 4 Alarm Silence button 6 screen 5 single circuit 2 battery life 8 standby 8 circuit support (for double circuit) 4 troubleshooting 19 control panel 5 corrugated tube 9 warnings 2 double circuit 2 dust filter 7 Event and alarm log 14... - Page 31 Respiratory Care solutions Making quality of care easy...
- Page 32 ResMed Paris, 240 rue de la Motte 77550 Moissy-Cramayel, France. See www.resmed.com for other ResMed locations worldwide. Protected by the following patents: FR 2839893, US 7891353. VS III is a registered trademark of ResMed Paris. The technical specifications may be changed without notice. © 2012 ResMed Paris. 0123 Global leaders in sleep and respiratory medicine www.resmed.com...
Need help?
Do you have a question about the VS III and is the answer not in the manual?
Questions and answers