Table of Contents
Advertisement
Available languages
Available languages
Quick Links
LED-STRAHLER 20 W / 20 W LED
SPOTLIGHT / PROJECTEUR À LED 20 W
LED-STRAHLER 20 W
Montage-, Bedienungs- und Sicherheitshinweise
PROJECTEUR À LED 20 W
Instructions de montage, d'utilisation et
consignes de sécurité
LED REFLEKTOR 20 W
Pokyny k montáži, obsluze a bezpečnostní pokyny
REFLETOR LED 20 W
Indicações de montagem, utilização e segurança
IAN 286860
20 W LED SPOTLIGHT
Assembly, operating and safety instructions
LED-SPOT 20 W
Montage-, bedienings- en veiligheidsinstructies
FOCO LED 20 W
Instrucciones de montaje, de uso y de seguridad
Advertisement
Chapters
Table of Contents

Related Manuals for LIVARNO LUX 286860


Summary of Contents for LIVARNO LUX 286860
- Page 1 Montage-, bedienings- en veiligheidsinstructies consignes de sécurité LED REFLEKTOR 20 W FOCO LED 20 W Pokyny k montáži, obsluze a bezpečnostní pokyny Instrucciones de montaje, de uso y de seguridad REFLETOR LED 20 W Indicações de montagem, utilização e segurança IAN 286860...
- Page 2 DE / AT / CH Montage-, Bedienungs- und Sicherheitshinweise Seite GB / IE Assembly, operating and safety instructions Page FR / BE Instructions de montage, d‘utilisation et consignes de sécurité Page NL / BE Montage-, bedienings- en veiligheidsinstructies Pagina 53 Pokyny k montáži, obsluze a bezpečnostní...
-
Page 5: Table Of Contents
Legende der verwendeten Piktogramme ..Seite Einleitung ...................Seite Bestimmungsgemäße Verwendung ..........Seite Teilebeschreibung .................Seite Technische Daten ................Seite Lieferumfang ..................Seite Allgemeine Sicherheitshinweise ......Seite Sicherheitshinweise für Batterien / Akkus ........Seite 10 Vor der Montage ..............Seite 12 Montage ..................Seite 12 Inbetriebnahme ..............Seite 14 Mode-Tasten ..................Seite 15 Sensitivity-Tasten ................Seite 16 Time-Tasten ..................Seite 17 Batterie wechseln... -
Page 6: Legende Der Verwendeten Piktogramme
Legende der verwendeten Piktogramme Taste für fortlaufendes Gleichstrom Licht: Das Licht ist dau- erhaft eingeschaltet. Tag-Taste: Das Licht signalisiert Bewegungen Wechselstrom sowohl bei Tageslicht als auch im Dunkeln. Staubdicht / Schutz Fotozelle-Taste: Das gegen Wasserstrahl Licht leuchtet bei (IP65) Dunkelheit dauerhaft. Erfassungswinkel des Nacht-Taste: Das Licht Bewegungsmelders:... -
Page 7: Bestimmungsgemäße Verwendung
Gebrauch und Entsorgung. Machen Sie sich vor der Benutzung des Produkts mit allen Bedien- und Sicherheitshinweisen vertraut. Benutzen Sie das Produkt nur wie beschrieben und für die angegebenen Einsatzbereiche. Händigen Sie alle Unterlagen bei Weitergabe des Produkts an Dritte mit aus. Bestimmungsgemäße Verwendung Dieses Produkt ist zur Ausleuchtung von Innen- und Außenbereichen vorge- sehen. -
Page 8: Technische Daten
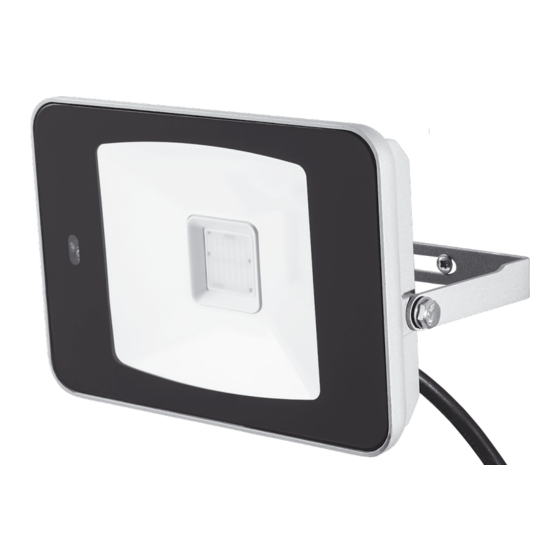
Technische Daten Betriebsspannung: 230 V∼ 50 Hz Leistungsaufnahme: 20 W Leuchtmittel (COB LED): 20 W (nicht austauschbar) Bewegungssensor: Reichweite: max. 8 m (einstellbar), Erfassungswinkel: ca. 160 ° horizontal Schutzklasse: Schutzgrad: IP65 (staubdicht / Schutz gegen Wasserstrahl) Gewicht: ca. 640 g Gesamtabmessungen: 18 x 12,5 x 9,2 cm Projektionsfläche:... -
Page 9: Allgemeine Sicherheitshinweise
1 Fernbedienung 1 Bedienungs anleitung 1 Lithium-Batterie, Typ CR2025 (bereits eingelegt) Allgemeine Sicherheitshinweise MACHEN SIE SICH VOR DER ERSTEN BENUTZUNG DES PRODUKTS MIT ALLEN BEDIEN- UND SICHERHEITSHINWEISEN VERTRAUT! HÄNDIGEN SIE ALLE UNTERLAGEN BEI WEITERGABE DES PRODUKTS AN DRITTE EBENFALLS MIT AUS! LEBENS- UND UNFALLGEFAHR FÜR KLEINKINDER UND KINDER! Lassen Sie Kinder niemals unbeaufsichtigt mit dem Verpackungsmaterial. -
Page 10: Sicherheitshinweise Für Batterien / Akkus
Montieren Sie das Produkt außerhalb der Armreichweite. Die Lüsterklemme ist nicht im Lieferumfang enthalten. Eine Beratung durch eine qualifizierte Person kann während der Montage erforderlich sein. Lebensgefahr durch elektrischen Schlag Überprüfen Sie vor jedem Netzanschluss das Produkt auf etwaige Beschädigungen. Benutzen Sie das Produkt niemals, wenn Sie irgend- welche Beschädigungen feststellen. - Page 11 EXPLOSIONSGEFAHR! Laden Sie nicht aufladbare Batterien niemals wieder auf. Schließen Sie Batterien / Akkus nicht kurz und / oder öffnen Sie diese nicht. Überhit- zung, Brandgefahr oder Platzen können die Folge sein. Werfen Sie Batterien / Akkus niemals in Feuer oder Wasser. Setzen Sie Batterien / Akkus keiner mechanischen Belastung aus.
-
Page 12: Vor Der Montage
Vor der Montage Hinweis: Entfernen Sie sämtliches Verpackungsmaterial vom Produkt. Wichtig: Der elektrische Anschluss muss durch einen ausgebildeten Elekt- riker oder eine für Elektroinstallationen eingewiesene Person erfolgen. Diese muss Kenntnis über die Eigenschaften des Produkts und Anschluss- bestimmungen haben. Stellen Sie vor der Installation sicher, dass an der Leitung, an der das Produkt angeschlossen werden soll, keine Spannung vorliegt. - Page 13 Montieren Sie das Produkt nur in eine Richtung. Das „UP“-Label auf dem Produkt bzw. der Pfeil sollte nach oben zeigen (siehe Abb. D). Stellen Sie sicher, dass der LED-Spot den gewünschten Bereich ausleuchtet. Sie können das Produkt zur Einstellung des Winkels senkrecht bewegen.
-
Page 14: Inbetriebnahme
Der verwendete Anschluss sollte zumindest mit folgenden Angaben übereinstimmen: Anschlusstyp: mit Schrauben Anzahl der Kontakte: 3 Betriebsspannung: > 230 V ~ Nennstrom: >1 A Der Anschluss muss den Anforderungen der DIN EN 60998-2-1 oder DIN EN 60995-2-2 entsprechen. Die Art der Verbindung muss die lokalen und nationalen Anforderungen erfüllen. -
Page 15: Mode-Tasten
Mode-Tasten Sie können die Mode-Tasten verwenden, um - das Produkt einzuschalten, - den Lichttyp auszuwählen, - einzustellen, bei welcher Lichtintensität das Produkt aktiviert wird, - das Produkt auszuschalten. Halten Sie die Fernbedienung vor das Produkt und drücken Sie eine der Mode-Tasten mit der gewünschten Funktion. -
Page 16: Sensitivity-Tasten
Um das Produkt auszuschalten, drücken Sie kurz die OFF-Taste Das Produkt leuchtet kurz auf und schaltet sich dann aus. Sensitivity-Tasten Verwenden Sie die Sensitivity-Tasten , um die Empfindlichkeit des Bewegungssensors einzustellen. Der Erfassungswinkel erweitert oder verringert sich automatisch mit der gewählten Empfindlichkeit. Drücken Sie die Nacht-Taste oder die Tag-Taste , um den... -
Page 17: Time-Tasten
Time-Tasten Verwenden Sie die Time-Tasten , um die Dauer einzustellen, die das Produkt nach dem Auslösen des Bewegungssensors leuchtet. Drücken Sie die Nacht-Taste oder die Tag-Taste , um den Bewegungssensor zu aktivieren. Drücken Sie eine der Time-Tasten mit der gewünschten Leuchtdauer. Time-Tasten Leuchtdauer 5S, 10S, 30S, 60S... -
Page 18: Reinigung Und Pflege
Setzen Sie eine neue Batterie, 3 V CR2025, in das Batterieein- schubfach ein. Achten Sie dabei auf die richtige Polarität, die auf der Rückseite der Fernbedienung angezeigt wird. Schieben Sie das Batterieeinschubfach wieder in das Batteriefach Reinigung und Pflege VORSICHT! Das Produkt wird heiß, wenn es eingeschaltet wird. Lassen Sie das Produkt vollständig abkühlen, bevor Sie es reinigen. - Page 19 Beachten Sie die Kennzeichnung der Verpackungsmaterialien bei der Abfalltrennung, diese sind gekennzeichnet mit Abkür- zungen (a) und Nummern (b) mit folgender Bedeutung: 1–7: Kunststoffe / 20–22: Papier und Pappe / 80–98: Verbundstoffe. Das Produkt und die Verpackungsmaterialien sind recycelbar, entsorgen Sie diese getrennt für eine bessere Abfallbehandlung. Das Triman-Logo gilt nur für Frankreich.
-
Page 20: Garantie
Garantie Das Produkt wurde nach strengen Qualitätsrichtlinien sorgfältig produziert und vor Anlieferung gewissenhaft geprüft. Im Falle von Mängeln dieses Produkts stehen Ihnen gegen den Verkäufer des Produkts gesetzliche Rechte zu. Diese gesetzlichen Rechte werden durch unsere im Folgenden darge- stellte Garantie nicht eingeschränkt. Sie erhalten auf dieses Produkt 3 Jahre Garantie ab Kaufdatum. - Page 21 List of pictograms used ..........Page 22 Introduction ................Page 22 Intended use ..................Page 23 Parts description ................Page 23 Technical data ................Page 24 Scope of delivery ................Page 24 General safety instructions ........Page 25 Safety instructions for batteries / rechargeable batteries ...Page 26 Before installation .............Page 28 Installation...
-
Page 22: List Of Pictograms Used
List of pictograms used Continuous light Direct current button: The light is permanently on Day button: The light signals movements Alternating current both in daylight as well as in the dark Photo cell button: The Dust-tight / water jets light starts to light per- protected (IP65) manently at darkness Detection angle of... -
Page 23: Intended Use
disposal. Before using the product, please familiarise yourself with all of the safety information and instructions for use. Only use the product as described and for the specified applications. If you pass the product on to any- one else, please ensure that you also pass on all the documentation with it. Intended use The product is intended to illuminate indoor and outdoor areas. -
Page 24: Technical Data
Technical data Operating voltage: 230 V∼ 50 Hz Total power consumption: 20 W Illuminant (COB LED): 20 W (non-replaceable) Motion sensor: Range: max. 8 m (adjustable), detection angle: approx. 160 ° horizontal Protection class: Degree of protection: IP65 (dust-tight / water jets protected) Weight: approx. -
Page 25: General Safety Instructions
1 Lithium battery, type CR2025 1 Instructions for use (pre-installed) General safety instructions BEFORE USING THE PRODUCT, PLEASE FAMILIARISE YOURSELF WITH ALL OF THE SAFETY INFORMATION AND INSTRUCTIONS FOR USE! WHEN PASSING THIS PRODUCT ON TO OTHERS, PLEASE ALSO INCLUDE ALL THE DOCUMENTS! DANGER TO LIFE AND ACCIDENT HAZARD FOR TODDLERS AND SMALL CHILDREN! Never leave children unattended with the packaging material. -
Page 26: Safety Instructions For Batteries / Rechargeable Batteries
Terminal block not included. Advice from a qualified person may be required during installation. Danger to life by electric shock Always check the product for damage before connecting it to the mains. Never use the product if it shows any signs of damage. Prior to installation, verify that the mains voltage on site corresponds with the operating voltage required for the product (230 V∼... - Page 27 Never throw batteries / rechargeable batteries into fire or water. Do not exert mechanical loads to batteries / rechargeable batteries. Risk of leakage of batteries / rechargeable batteries Avoid extreme environmental conditions and temperatures, which could affect batteries / rechargeable batteries, e.g. radiators / direct sunlight.
-
Page 28: Before Installation
Before installation Note: Remove all packaging materials from the product. Important: The electrical connection must be established by a qualified electrician or a person trained to perform electrical installations. This per- son must be familiar with the properties of the product and the connection regulations. - Page 29 Make sure that the LED spotlight illuminates the desired area. You can move the product vertically to adjust the angle. Make sure the motion sensor covers the desired area. The motion sensor has a maximum coverage range of 8 m, with a coverage angle of about 160 °...
-
Page 30: Operation
The connection terminal has to fulfill the requirements of the DIN EN 60998-2-1 or DIN EN 60995-2-2. The kind of connection has to fulfill the local and national requirements. Note: The terminal block is not included in the delivery. Now attach the LED spotlight to the bracket using the included locking screws... -
Page 31: Sensitivity Buttons
Hold the remote control in front of the product and press one of the Mode buttons with the desired function. Mode button Function The light flashes SOS SOS button (3 x short, 3 x long, 3 x short). The light is permanently on. Continuous light button The light flashes. -
Page 32: Time Buttons
Press the night button or the day button to activate the motion sensor Press one of the Sensitivity buttons to adjust the sensitivity. The LED spotlight responds to Sensitivity buttons movements within a radius of 100 % Up to 8 Meter 75 % Up to 6 Meter 50 %... -
Page 33: Replacing The Battery
The product confirms the received signal from the remote control by a short flashing of the LED spotlight . The lighting duration is now set. Replacing the battery Improperly changing the battery can cause damage. Remove an empty battery from the remote control. Hold the remote control with the rear panel facing up (see Fig. -
Page 34: Disposal
To clean the remote control , remove the battery from the battery compartment (see chapter “Replacing the battery”). Clean the remote control with a soft, dry cloth. If the dirt is stubborn, use a slightly moistened cloth. Then dry the remote control well. -
Page 35: Warranty
Faulty or used batteries / rechargeable batteries must be recycled in ac- cordance with Directive 2006/66/EC and its amendments. Please return the batteries / rechargeable batteries and / or the product to the available collection points. Environmental damage through incorrect disposal of the batteries / rechargeable batteries! Batteries / rechargeable batteries may not be disposed of with the usual domestic waste. - Page 36 proof of purchase. This warranty becomes void if the product has been damaged, or used or maintained improperly. The warranty applies to defects in material or manufacture. This warranty does not cover product parts subject to normal wear, thus possibly consi- dered consumables (e.g.
- Page 37 Légende des pictogrammes utilisés ....Page 38 Introduction ................Page 39 Utilisation conforme ..............Page 39 Descriptif des pièces ..............Page 39 Données techniques ..............Page 40 Contenu de la livraison ..............Page 41 Instructions générales de sécurité .......Page 41 Consignes de sécurité relatives aux piles / aux piles rechargeables ...............Page 43 Avant le montage ..............Page 44...
-
Page 38: Légende Des Pictogrammes Utilisés
Légende des pictogrammes utilisés Touche de lumière en continu : La lumière Courant continu reste allumée en per- manence. Touche Jour : La lumière signale des mouvements Courant alternatif aussi bien dans la journée que dans l'obscurité. Imperméable à la Touche de cellule pho- poussière / protection to-électrique : La lumière... -
Page 39: Introduction
Projecteur à LED 20 W Introduction Nous vous félicitons pour l‘achat de votre nouveau produit. Vous avez opté pour un produit de grande qualité. Le mode d‘emploi fait partie intégrante de ce produit. Il contient des indications importantes pour la sécurité, l’utili- sation et la mise au rebut. -
Page 40: Données Techniques
Touche Nuit Branchement extérieur* Touche de cellule photo-électrique Domino de raccordement* Touche Jour Vis Ø 5 x 50 mm Touche de lumière continue Cheville Ø 8 mm Ressort Disque denté Logement d‘insertion de pile Rondelle Compartiment à pile Rondelle élastique * ne fait pas partie de la livraison Données techniques Tension de service :... -
Page 41: Contenu De La Livraison
Contenu de la livraison Immédiatement après le déballage du produit, veuillez toujours contrôler que le contenu de la livraison est complet et que le produit est en parfait état. 1 spot LED 2 rondelles élastiques 2 chevilles (Ø 8 mm) 2 vis de réglage 2 vis (Ø... - Page 42 sation sûre du produit et s‘ils en comprennent les risques liés à son utilisation. Les enfants ne doivent pas jouer avec le produit. Le net- toyage et l‘entretien du produit ne doivent pas être effectués par des enfants laissés sans surveillance. RISQUE D‘ASPHYXIE ! Les enfants peuvent ingérer les éléments de petite taille fournis (par ex.
-
Page 43: Consignes De Sécurité Relatives Aux Piles / Aux Piles Rechargeables
Consignes de sécurité relatives aux piles / aux piles rechargeables DANGER DE MORT ! Rangez les piles / piles rechargeables hors de la portée des enfants. En cas d’ingestion, consultez immédiatement un médecin ! RISQUE D‘EXPLOSION ! Ne rechargez jamais des piles non rechargeables. -
Page 44: Avant Le Montage
Risque d‘endommagement du produit Exclusivement utiliser le type de pile / pile rechargeable spécifié. Insérez les piles / piles rechargeables conformément à l‘indication de polarité (+) et (-) indiquée sur la pile / pile rechargeable et sur le produit. Nettoyez les contacts de la pile / pile rechargeable et du compartiment à... - Page 45 Il existe autrement un risque mortel ou un danger de blessures par électrocution. Choisir l‘emplacement de montage en fonction des critères suivants : Choisissez un mur stable et exempt de vibrations. Respectez une distance minimale d‘env. 20 cm par rapport aux autres objets afin d‘assurer une bonne ventilation.
-
Page 46: Mise En Service
Remarque : Le type de câble de raccordement doit être H05RN-F 3G 1,0 mm². Remarque : Le branchement du conducteur de protection doit être plus long que celui des autres conducteurs afin qu‘il se rompt en dernier en cas de rupture du produit. Le raccordement utilisé... -
Page 47: Touches Mode
Touches Mode Vous pouvez utiliser les touches Mode pour - allumer le produit, - sélectionner le type de lumière, - régler l‘intensité lumineuse à laquelle le produit est activé, - éteindre le produit. Tenez la télécommande devant le produit et pressez l‘une des touches Mode activant la fonction souhaitée. -
Page 48: Touches Sensitivity
Appuyez brièvement sur la touche OFF pour éteindre le produit. Le produit s‘allume brièvement et s‘éteint peu après. Touches Sensitivity Utilisez les touches Sensitivity pour régler la sensibilité du détecteur de mouvement . L‘angle de détection augmente ou diminue automatiquement avec la sensibilité choisie. Pressez la touche Nuit ou la touche Jour pour activer le... -
Page 49: Remplacement De La Pile
Pressez la touche Nuit ou la touche Jour pour activer le détecteur de mouvement Presser l‘une des touches Time activant la durée d‘éclairage souhaitée. Touches Time Durée d'éclairage 5S, 10S, 30S, 60S 5, 10, 30 ou 60 secondes 2M, 5M, 10M, 30M 2, 5, 10 ou 30 minutes 1H, 5H, 10H, 24H 1, 5, 10 ou 24 heures... -
Page 50: Nettoyage Et Entretien
Nettoyage et entretien ATTENTION ! Le produit chauffe lorsqu‘il est allumé. Laissez le produit complètement refroidir avant de le nettoyer. Avant le nettoyage dans la boîte à fusibles, retirez le fusible ou coupez le disjoncteur de boîte à fusibles. Ne plongez jamais le produit dans l‘eau ni dans d‘autres liquides. Dans le cas contraire, le produit pourrait être endommagé. - Page 51 Le produit et les matériaux d’emballage sont recyclables, mettez-les au rebut séparément pour un meilleur traitement des déchets. Le logo Triman n’est valable qu’en France. Votre mairie ou votre municipalité vous renseigneront sur les possibilités de mise au rebut des produits usagés. Afin de contribuer à...
-
Page 52: Garantie
Garantie Le produit a été fabriqué selon des critères de qualité stricts et contrôlé consciencieusement avant sa livraison. En cas de défaillance, vous êtes en droit de retourner ce produit au vendeur. La présente garantie ne constitue pas une restriction de vos droits légaux. Ce produit bénéficie d‘une garantie de 3 ans à... - Page 53 Legenda van de gebruikte pictogrammen ..............Pagina 54 Inleiding ................. Pagina 54 Correct gebruik ................. Pagina 55 Beschrijving van de onderdelen ..........Pagina 55 Technische gegevens ..............Pagina 56 Omvang van de levering ............Pagina 56 Algemene veiligheidsinstructies ......Pagina 57 Veiligheidsinstructies voor batterijen / accu‘s ......
-
Page 54: Legenda Van De Gebruikte Pictogrammen
Legenda van de gebruikte pictogrammen Knop voor continu Gelijkstroom licht: het licht is con- tinu ingeschakeld. Dag-knop: het licht stelt bewegingen vast. Wisselstroom Zowel in het licht als- ook in het donker. Stofdicht / beschermd Fotocel-knop: het licht tegen waterstralen brandt continu in het (IP65) donker. -
Page 55: Correct Gebruik
gebruik en verwijdering. Maakt U zich voor de ingebruikname van het pro- duct met alle bedienings- en veiligheidsvoorschriften vertrouwd. Gebruik het product alleen zoals beschreven en voor de aangegeven toepassingsgebie- den. Overhandig alle documenten bij doorgifte van het product aan derden. Correct gebruik Dit product is bedoeld ter verlichting van omgevingen binnens- en buitens- huis. -
Page 56: Technische Gegevens
Technische gegevens Voedingsspanning: 230 V∼ 50 Hz Opgenomen vermogen: 20 W Verlichtingsmiddel (COB LED): 20 W (niet vervangbaar) Bewegingssensor: reikwijdte: max. 8 m (instelbaar), registratiehoek: ca. 160 ° horizontaal Beschermingsklasse: Beschermingsgraad: IP65 (stofdicht / beschermd tegen waterstralen) Gewicht: ca. 640 g Totale afmetingen: 18 x 12,5 x 9,2 cm Projectie-oppervlak:... -
Page 57: Algemene Veiligheidsinstructies
1 afstandsbediening 1 gebruiks aanwijzing 1 lithium-batterij, type CR2025 (reeds geplaatst) Algemene veiligheidsinstructies MAAK U VOOR DE EERSTE INGEBRUIKNAME VAN HET PRODUCT MET ALLE BEDIENINGS- EN VEILIGHEIDSVOORSCHRIFTEN VER- TROUWD! GEEF OOK ALLE DOCUMENTEN MEE WANNEER U HET PRODUCT AAN DERDEN DOORGEEFT! LEVENSGEVAAR EN KANS OP ONGEVALLEN VOOR KLEUTERS EN KINDEREN! Laat kinderen nooit zonder toezicht bij het verpakkingsmateriaal. - Page 58 Monteer het product buiten armreikwijdte. Het kroonsteentje is niet inbegrepen. Een advies door een gekwalifi- ceerde persoon kan nodig zijn tijdens de montage. Levensgevaar door elektrische schokken Controleer het product altijd op eventuele beschadigingen voordat u het op het stroomnet aansluit. Gebruik het product nooit wanneer u beschadigingen heeft geconstateerd.
-
Page 59: Veiligheidsinstructies Voor Batterijen / Accu's
Veiligheidsinstructies voor batterijen / accu‘s LEVENSGEVAAR! Houd batterijen / accu‘s buiten het bereik van kinderen. Raadpleeg bij inslikken onmiddellijk een arts! EXPLOSIEGEVAAR! Laad niet oplaadbare batterijen nooit op. Sluit de batterijen / accu‘s niet kort en / of open deze niet. Daardoor kan de batterij oververhit raken, in brand vliegen of exploderen. -
Page 60: Voor De Montage
Risico op beschadiging van het product Gebruik uitsluitend het aangegeven type batterij / accu! Plaats de batterijen / accu‘s volgens de weergegeven polariteit (+) en (-) op batterij / accu en op product. Reinig de contacten van de batterij / accu en die in het batterijvak, voordat u deze plaatst! Verwijder verbruikte batterijen / accu‘s direct uit het product. - Page 61 neem alle veiligheidsinstructies in acht. Anders bestaat er kans op (dode- lijke) verwondingen als gevolg van een elektrische schok. Let tijdens de keuze van de montageplek op de volgende dingen: Kies een stabiele en trillingsvrije wand. Houd een minimum afstand van ca. 20 cm ten opzichte van andere voorwerpen in acht, om een goede ventilatie te waarborgen.
-
Page 62: Ingebruikname
Opmerking: de aansluiting van de aarde dient langer te zijn dan de andere kabels, zodat in geval van een breuk van het product deze als laatste los raakt. De gebruikte aansluiting dient ten minste overeen te stemmen met de volgende informatie: Type aansluiting: met schroeven Aantal contacten:... -
Page 63: Mode-Knoppen
Mode-knoppen U kunt de mode-knoppen gebruiken om - het product in te schakelen, - het type verlichting te selecteren, - in te stellen, bij welke lichtintensiteit het product wordt geactiveerd, - het product uitschakelen. Houd de afstandsbediening voor het product en druk op één van de mode-knoppen , met de gewenste functie. -
Page 64: Sensitivity-Knoppen
Om het product uit te schakelen, drukt u op de OFF-knop . Het product brandt even en wordt vervolgens uitgeschakeld. Sensitivity-knoppen Gebruik de sensitivity-knoppen om de gevoeligheid van de bewe- gingssensor in te stellen. Het registratiebereik wordt uitgebreid of verkleind, al naar gelang de gekozen gevoeligheid. Druk op de nacht-knop of de dag-knop om de bewegingssen-... -
Page 65: Batterij Vervangen
Druk op de nacht-knop of de dag-knop om de bewegingssen- te activeren. Druk op één van de time-knoppen met de gewenste verlichtingsduur. Time-knoppen Verlichtingsduur 5S, 10S, 30S, 60S 5, 10, 30 of 60 seconden 2M, 5M, 10M, 30M 2, 5, 10 of 30 minuten 1H, 5H, 10H, 24H 1, 5, 10 of 24 uur Het product bevestigt het ontvangen signaal van de afstandsbediening... -
Page 66: Reiniging En Onderhoud
Reiniging en onderhoud VOORZICHTIG! Het product wordt heet als het is ingeschakeld. Laat het product volledig afkoelen, voordat u het reinigt. Verwijder voor de reiniging de zekering of schakel de hoofdzekering in de zekeringskast uit. Dompel het product nooit onder in water of in andere vloeistoffen. Anders kan het product beschadigd raken. - Page 67 Het product en de verpakkingsmaterialen zijn recyclebaar; verwijder deze afzonderlijk voor een betere afvalbehandeling. Het Triman-logo geldt alleen voor Frankrijk. Informatie over de mogelijkheden om het uitgediende product na gebruik te verwijderen, verstrekt uw gemeentelijke overheid. Gooi het afgedankte product omwille van het milieu niet weg via het huisvuil, maar geef het af bij het daarvoor bestemde depot of het gemeentelijke milieupark.
-
Page 68: Garantie
Garantie Het product wordt volgens strenge kwaliteitsrichtlijnen zorgvuldig gepro- duceerd en voor levering grondig getest. In geval van schade aan het product kunt u rechtmatig beroep doen op de verkoper van het product. Deze wettelijke rechten worden door onze hierna vermelde garantie niet beperkt. - Page 69 Legenda použitých piktogramů ......Strana 70 Úvod ................... Strana 70 Použití ke stanovenému účelu............ Strana 71 Popis dílů ..................Strana 71 Technické údaje ................. Strana 72 Obsah dodávky ................. Strana 72 Všeobecná bezpečnostní upozornění .... Strana 73 Bezpečnostní pokyny pro baterie a akumulátory ....Strana 74 Před montáží...
-
Page 70: Legenda Použitých Piktogramů
Legenda použitých piktogramů Tlačítko trvalého sví- Stejnosměrný proud cení: svítidlo je trvale zapnuto. Tlačítko den: svítidlo Střídavý proud signalizuje pohyb za denního světla i za tmy. Prachotěsné provedení / Tlačítko fotobuňky: sví- ochrana proti vodnímu tidlo svítí za tmy trvale. proudu (IP65) Úhel dosahu pohybo- Tlačítko noc: svítidlo... -
Page 71: Použití Ke Stanovenému Účelu
výrobek jen popsaným způsobem a na uvedených místech. Při předání výrobku třetí osobě předejte i všechny podklady. Použití ke stanovenému účelu Tento výrobek je určen k osvětlení vnitřních a venkovních prostor. Výrobek je určen k soukromému použití, není určen k živnostenskému podnikání nebo pro jinou oblast využití. Popis dílů... -
Page 72: Technické Údaje
Technické údaje Provozní napětí: 230 V∼ 50 Hz Příkon: 20 W Osvětlovací prostředek (COB-LED): 20 W (nelze vyměnit) Pohybový senzor: dosah: max. 8 m (nastavitelné), úhel snímání: cca 160 ° horizontální Třída ochrany: Stupeň ochrany: IP65 (prachotěsné provedení / ochrana před vodním proudem) Hmotnost: cca 640 g Celkové... -
Page 73: Všeobecná Bezpečnostní Upozornění
2 pružné podložky 1 lithiová baterie, typ CR2025 2 upevňovací šrouby (již vložená) 1 dálkové ovládání 1 návod k obsluze Všeobecná bezpečnostní upozornění PŘED PRVNÍM POUŽITÍM VÝROBKU SE SEZNAMTE SE VŠEMI BEZ- PEČNOSTNÍMI POKYNY A POKYNY K OBSLUZE! PŘI PŘEDÁVÁNÍ VÝROBKU TŘETÍ OSOBĚ PŘEDÁVEJTE SOUČASNĚ I VŠECHNY JEHO PODKLADY! NEBEZPEČÍ... -
Page 74: Bezpečnostní Pokyny Pro Baterie A Akumulátory
Nebezpečí ohrožení života zasažením elektrickým proudem Před každým připojením k rozvodu elektrického proudu zkontrolujte výrobek, zda není poškozený. Nepoužívejte výrobek, pokud jste zjis- tili, že je poškozený. Před montáží se ujistěte, že se místní síťové napětí shoduje s provozním napětím výrobku (230 V∼ 50 Hz). Neinstalujte výrobek, jestliže se na- pětí... -
Page 75: Před Montáží
Nebezpečí vytečení baterií / akumulátorů Zabraňte extrémním podmínkám a teplotám, např. na topení anebo na slunci, které mohou negativně ovlivnit funkci baterií nebo akumulátorů. V případě vytečení baterií / akumulátorů zabraňte kontaktu chemikálií s pokožkou, očima a sliznicemi! Omyjte ihned postižená místa dosta- tečným množstvím čisté... -
Page 76: Montáž
Před instalací zajistěte, aby byl vodič, ke kterému má být výrobek připojen, bez napětí. Za tímto účelem vyjměte pojistku nebo vypněte jistič v pojistkové skříni (poloha 0). Zkontrolujte beznapěťový stav zkoušečkou. Přiložený montážní materiál (šrouby a hmoždinky ) je vhodný do zdiva s obvyklou pevností. Informujte se, jaký montážní materiál je vhodný pro vámi zvolený... - Page 77 Nesměrujte pohybový senzor na stromy, keře nebo místa, na kterých může snadno dojít k zachycení pohybu zvířat. Nesměrujte pohybový senzor na horkovzdušné ventilátory, klimatizace, bazény nebo jiné objekty, u kterých dochází k rychlým změnám teploty. Použijte držák jako šablonu k označení vrtaných děr na stěně. Zkon- trolujte, zda nejsou ve stěně...
-
Page 78: Uvedení Do Provozu
. Po nasměrování utáhněte opět upevňovací šrouby , tím zajistíte bezpečné upevnění. Po opětovném nasazení pojistky nebo po zapnutí jističe je výrobek připraven k použití. Uvedení do provozu Výrobek můžete ovládat pomocí dálkového ovládání Upozornění: Odstraňte z přihrádky na baterie izolační proužek dříve, než... -
Page 79: Tlačítka Sensitivity (Citlivost)
Tlačítko Mode Funkce Světlo bliká. Tlačítko FLASH Toto tlačítko je bez funkce. Tlačítko Space Světlo se za tmy rozsvítí a svítí trvale. Tlačítko Fotobuňky Světlo signalizuje pohyb pouze za tmy. Tlačítko Noc Světlo signalizuje pohyb za denního Tlačítko Den světla a za tmy. Výrobek potvrdí... -
Page 80: Tlačítka Time (Čas)
Výrobek potvrdí přijatý signál dálkového ovládání krátkým bliká- ním bodového světla LED . Nyní je nastavena citlivost pohybového senzoru Tlačítka Time (čas) Použijte tlačítka Time (čas) k nastavení doby, po kterou bude výrobek svítit po aktivaci pohybového senzoru Stisknutím tlačítka Noc nebo Den aktivujte pohybový... -
Page 81: Čistění A Ošetřování
Odstraňte baterii. Vložte novou baterii, 3 V CR2025 do zasouvací přihrádky přihrádky na baterie . Dávejte pozor na správnou polaritu, která je vyznačena na zadní straně dálkového ovládání Vložte opět zasouvací přihrádku na baterie do přihrádky na baterie Čistění a ošetřování POZOR! Zapnutý... -
Page 82: Zlikvidování
Zlikvidování Obal se skládá z ekologických materiálů, které můžete zlikvidovat prostřednictvím místních sběren recyklovatelných materiálů. Při třídění odpadu se řiďte podle označení obalových materiálů zkratkami (a) a čísly (b), s následujícím významem: 1–7: umělé hmoty / 20–22: papír a lepenka / 80–98: složené látky. Výrobek a obalové... -
Page 83: Záruka
Chemické symboly těžkých kovů: Cd = kadmium, Hg = rtuť, Pb = olovo. Proto odevzdejte opotřebované baterie / akumulátory u komunální sběrny. Záruka Výrobek byl vyroben s nejvyšší pečlivostí podle přísných kvalitativních směr- nic a před odesláním prošel výstupní kontrolou. V případě závad máte možnost uplatnění... - Page 84 Leyenda de pictogramas utilizados ....Página 85 Introducción ................ Página 85 Uso adecuado ................Página 86 Descripción de los componentes ..........Página 86 Características técnicas ............Página 87 Volumen de suministro .............. Página 87 Indicaciones generales de seguridad ... Página 88 Indicaciones de seguridad sobre las pilas / baterías .....
-
Page 85: Leyenda De Pictogramas Utilizados
Leyenda de pictogramas utilizados Botón para luz continua: Corriente continua La luz está permanen- temente encendida. Botón día: La luz señala el movimiento tanto en Corriente alterna la luz del día como en la oscuridad. A prueba de Botón fotocélula: La luz polvo / protección se ilumina permanen- contra chorros de... -
Page 86: Uso Adecuado
y eliminación. Antes de usar el producto, familiarícese con todas las indi- caciones de manejo y de seguridad. Utilice el producto únicamente como se describe a continuación y para las aplicaciones indicadas. Adjunte igual- mente toda la documentación en caso de entregar el producto a terceros. Uso adecuado Este producto ha sido diseñado para la iluminación de espacios interiores y exteriores. -
Page 87: Características Técnicas
Características técnicas Tensión de funcionamiento: 230 V∼ 50 Hz Consumo de potencia: 20 W Bombilla (COB-LED): 20 W (no reemplazable) Sensor de movimiento: Alcance: máx. 8 m (ajustable), Ángulo de alcance: aprox. 160 ° horizontal Clase de protección: Grado de protección: IP65 (a prueba de polvo / protección contra chorros de agua) Peso:... -
Page 88: Indicaciones Generales De Seguridad
1 mando a distancia 1 manual de instrucciones 1 batería de litio, tipo CR2025 (ya montada) Indicaciones generales de seguridad ¡FAMILIARÍCESE CON TODAS LAS INSTRUCCIONES DE USO Y SEGURIDAD ANTES DE UTILIZAR ESTE PRODUCTO! ¡ADJUNTE IGUALMENTE TODA LA DOCUMENTACIÓN EN CASO DE ENTRE- GAR EL PRODUCTO A TERCEROS! ¡PELIGRO DE MUERTE O ACCIDENTE PARA BEBÉS Y NIÑOS! Nunca deje a los niños sin vigilancia con el... - Page 89 Si las bombillas fallan al final de su vida útil, deberá reemplazar todo el producto. Montar el producto fuera del alcance del brazo. La regleta no está incluida en el volumen de suministro. Puede ser ne- cesaria la consulta de una persona calificada durante la instalación. Peligro de muerte por descarga eléctrica Antes de conectar el producto a la red, compruebe que no presenta...
-
Page 90: Indicaciones De Seguridad Sobre Las Pilas / Baterías
Indicaciones de seguridad sobre las pilas / baterías ¡PELIGRO DE MUERTE! Mantenga las pilas / baterías fuera del alcance de los niños. ¡En caso de ingestión, acuda inmediatamente a un médico! ¡PELIGRO DE EXPLOSIÓN! No recargue nunca pilas no recargables. No ponga las pilas / baterías en cortocir- cuito ni tampoco las abra. -
Page 91: Antes Del Montaje
Riesgo de daño del producto ¡Utilice exclusivamente el tipo de pila / batería indicado! Introduzca las pilas / baterías teniendo en cuenta la polaridad mar- cada con (+) y (-) tanto en las pilas / baterías como en el producto. ¡Limpie los contactos de las pilas / baterías y del compartimento para pilas antes de colocarlas! Retire inmediatamente las pilas / baterías agotadas del producto. -
Page 92: Montaje
Montaje Asegúrese de no acercarse a conductos de agua, gas o corriente eléc- trica cuando perfore la pared. Consulte el manual de instrucciones de su taladro. y tenga en cuenta todas las indicaciones de seguridad. De lo contrario existe peligro de lesiones o muerte por descarga eléctrica. Al elegir el lugar de montaje, tenga en cuenta lo siguiente: Elija una pared estable y libre de vibraciones. - Page 93 orificios. Fije el soporte mediante los tornillos y compruebe que esté correctamente colocado. En caso de ser necesario, aísle 6–8 mm de la conexión externa . Conectar el conductor externo el conductor neutro y el conductor de puesta a tierra a la re- gleta de una caja de conexiones montada correctamente (ver fig.
-
Page 94: Puesta En Funcionamiento
Puesta en funcionamiento Puede utilizar el producto con el mando a distancia suministrado. Nota: Retire la cinta de aislamiento del compartimento de las baterías antes de utilizar el mando a distancia por primera vez. Nota: El producto está preajustado al modo de luz permanente. Botones de modo Puede utilizar los botones de modo para... -
Page 95: Botones De Sensibilidad
Botón de modo Función La luz señala movimiento sólo en la Botón noche oscuridad. La luz señala movimiento a la luz del día Botón día y en la oscuridad. El producto confirma la señal recibida del mando a distancia parpadeando brevemente el foco LED . -
Page 96: Botones De Tiempo
El producto confirma la señal recibida del mando a distancia par- padeando brevemente el foco LED . La sensibilidad del sensor de movimiento está ahora ajustada. Botones de tiempo Utilice los botones de tiempo para ajustar el tiempo que tomará el producto para encenderse después de activar el sensor de movi- miento Pulse el botón noche... -
Page 97: Limpieza Y Conservación
Sujete el mando a distancia con la parte posterior hacia arriba (ver fig. B). Empuje el muelle hacia el compartimiento de las baterías saque el cajón de baterías del compartimiento de las baterías Retire la batería. Inserte una batería nueva, 3 V CR2025, en el cajón de baterías Asegúrese de que la polaridad mostrada en la parte posterior del mando a distancia... -
Page 98: Eliminación
Eliminación El embalaje está compuesto por materiales no contaminantes que pueden ser desechados en el centro de reciclaje local. Tenga en cuenta el distintivo del embalaje para la separación de residuos. Está compuesto por abreviaturas (a) y números (b) que significan lo siguiente: 1–7: plásticos / 20–22: papel y cartón / 80–98: materiales compuestos. -
Page 99: Garantía
Las pilas / baterías no deben eliminarse junto con los residuos domésticos. Estas pueden contener metales pesados tóxicos que deben tratarse conforme a la normativa aplicable a los residuos especiales. Los símbolos químicos de los metales pesados son: Cd = cadmio, Hg = mercurio, Pb = plomo. Las pilas / baterías deben reciclarse en un punto de recolección específico para ello. - Page 100 Legenda dos pictogramas utilizados ..Página 101 Introdução ................Página 101 Utilização correcta..............Página 102 Descrição das peças ..............Página 102 Dados técnicos ................Página 103 Material fornecido ..............Página 103 Indicações gerais de segurança ......Página 104 Indicações de segurança relativas às pilhas / baterias ..Página 106 Antes da montagem ..........Página 107 Montagem...
-
Page 101: Legenda Dos Pictogramas Utilizados
Legenda dos pictogramas utilizados Tecla para luz perma- Corrente contínua nente: A luz está per- manentemente ligada. Tecla Dia: A luz sinaliza movimentos tanto du- Corrente alternada rante a luz do dia como no escuro. Vedado contra pó / Tecla de célula solar: Protecção contra salpi- A luz acende perma- cos de água (IP65) -
Page 102: Utilização Correcta
e de segurança do produto. Utilize o produto apenas como descrito e para as áreas de aplicação indicadas. Se transmitir o artigo a terceiros, entregue também os respectivos documentos. Utilização correcta O produto é concebido para a iluminação de áreas interiores e exteriores. O produto é... -
Page 103: Dados Técnicos
Dados técnicos Tensão de serviço: 230 V∼ 50 Hz Consumo de energia: 20 W Lâmpada (COB LED): 20 W (não substituível) Sensor de movimento: Alcance: máx. 8 m (ajustável), Ângulo de detecção: cerca de 160 ° hori- zontal Classe de protecção: Grau de proteção: IP65 (Vedado contra pó... -
Page 104: Indicações Gerais De Segurança
2 Molas de disco 1 Pilha de lítio, tipo CR2025 2 Parafusos de fixação (já montada) 1 Telecomando 1 Manual de instruções Indicações gerais de segurança FAMILIARIZE-SE COM TODAS AS INDICAÇÕES DE UTILIZAÇÃO E DE SEGURANÇA DO PRODUTO! SE ENTREGAR O PRODUTO A TERCEIROS, ENTREGUE TAMBÉM OS RESPETIVOS DOCUMENTOS! PERIGO DE MORTE E DE ACIDENTES PARA BEBÉS E CRIANÇAS! Nunca deixe as crianças sem vigilância... - Page 105 O bloco de terminais não está contido na entrega. Um aconselha- mento por uma pessoa qualificada pode ser necessário durante a montagem. Perigo de morte por choque elétrico Antes de cada ligação à rede elétrica, verifique o produto quanto a eventuais danos. Não utilize o produto se detectar a existência de quaisquer danos.
-
Page 106: Indicações De Segurança Relativas Às Pilhas / Baterias
Indicações de segurança relativas às pilhas / baterias PERIGO DE MORTE! Mantenha as pilhas e baterias fora do alcance das crianças. Se a pilha / bateria for ingerida, contacte imediatamente um médico! PERIGO DE EXPLOSÃO! Nunca carregue pilhas não recarregáveis. Não faça ligação direta de pilhas ou bate- rias e / ou abra elas. -
Page 107: Antes Da Montagem
Perigo de dano ao produto Utilize apenas o tipo de pilha ou bateria indicado! Insira as pilhas / baterias de acordo com a especificação de polaridade (+) e (-) na pilha / bateria e produto. Limpe os contactos na pilha / bateria e no compartimento de baterias antes de colocar as baterias! Retire de imediato as pilhas ou baterias gastas do produto. - Page 108 berbequim e esteja atento aos avisos de segurança. Caso contrário, existe perigo de vida devido a choque elétrico. Ao selecionar o local de montagem, tenha em consideração o seguinte: Escolha uma parede estável e livre de vibrações. Mantenha uma distância mínima de cerca de 20 cm de outros objetos para garantir uma boa ventilação.
-
Page 109: Colocação Em Funcionamento
Aviso: O tipo de cabo de conexão deve ser H05RN-F 3G 1,0 mm². Aviso: A conexão do cabo de protecção deve ser mais longa para que no caso de quebra do produto ele rompa por último. A conexão utilizada deve ter no mínimo as seguintes especificações: Tipo de conexão: com parafuso Número de contatos: 3... -
Page 110: Teclas Mode
Teclas Mode Podes usar as Teclas Mode para - ligar o produto, - selecionar o tipo de luz, - ajustar com qual intensidade luz o produto será ativado, - desligar o produto. Segure o telecomando na frente do produto e prima uma das teclas Mode com a função desejada. -
Page 111: Teclas Sensitivity
Para desligar o produto, prima brevemente a tecla OFF . O produto acende brevemente e se desliga. Teclas Sensitivity Utilize as teclas Sensitivity para ajustar a sensibilidade do sensor de movimento . O ângulo de detecção aumenta ou diminui auto- maticamente com a sensibilidade escolhida. -
Page 112: Teclas Time
Teclas Time Utilize as teclas Time para ajustar a duração que o produto acende após acionar o sensor de movimento Prima a tecla Noite ou tecla Dia para ativar o sensor de movi- mento Prima uma das teclas Time com a duração de iluminação desejada. Teclas Time Período de iluminação 5S, 10S, 30S, 60S... -
Page 113: Limpeza E Conservação
Coloque uma nova pilha, 3 V CR2025, no compartimento de inserção de pilhas . Esteja atento à polaridade correcta que é mostrada na parte de trás do telecomando Empurre o compartimento de inserção de pilhas novamente no compartimento de pilhas Limpeza e conservação CUIDADO! O produto fica quente quando é... - Page 114 Esteja atento à especificação dos materiais da embalagem para a separação de lixo. Estas são identificadas com abreviações (a) e números (b) com o seguinte significado: 1–7: Plásticos / 20–22: Papel e papelão / 80–98: Materiais compostos. O produto e materiais de embalagem são recicláveis, elimine- -os separadamente para uma melhor reciclagem.
-
Page 115: Garantia
Garantia O producto foi cuidadosamente fabricado segundo rigorosas directivas de qualidade e meticulosamente testado antes da sua distribuição. Em caso de falhas deste producto, possui direitos legais relativamente ao vendedor do producto. Os seus direitos legais não estão limitados pela garantia representada de seguida. - Page 116 5 26...
- Page 117 Version: 04 / 2017 Stand der Informationen · Last Information Update · Version des informations · Stand van de informatie · Stav informací · Estado de las informaciones · Estado das informações: 12 / 2017 · Ident.-No.: HG02408122017-8 IAN 286860...
Need help?
Do you have a question about the 286860 and is the answer not in the manual?
Questions and answers