Table of Contents
Advertisement
Available languages
Available languages
Quick Links
LED-SOLARSTRAHLER / LED SOLAR
SPOTLIGHT / PROJECTEUR SOLAIRE LED
LED-SOLARSTRAHLER
Montage-, Bedienungs- und
Sicherheitshinweise
PROJECTEUR SOLAIRE LED
Instructions de montage, d'utilisation et
consignes de sécurité
LED SOLÁRNÍ REFLEKTOR
Pokyny k montáži, obsluze a
bezpečnostní pokyny
PROJETOR SOLAR LED
Indicações de montagem,
utilização e segurança
IAN 293044
LED SOLAR SPOTLIGHT
Assembly, operating and
safety instructions
LED-SOLARSCHIJNWERPER
Montage-, bedienings- en
veiligheidsinstructies
FOCO LED SOLAR
Instrucciones de montaje,
de uso y de seguridad
Advertisement
Chapters
Table of Contents

Related Manuals for LIVARNO LUX 293044


Summary of Contents for LIVARNO LUX 293044
- Page 1 Instructions de montage, d‘utilisation et Montage-, bedienings- en consignes de sécurité veiligheidsinstructies LED SOLÁRNÍ REFLEKTOR FOCO LED SOLAR Pokyny k montáži, obsluze a Instrucciones de montaje, bezpečnostní pokyny de uso y de seguridad PROJETOR SOLAR LED Indicações de montagem, utilização e segurança IAN 293044...
- Page 2 Klappen Sie vor dem Lesen die beiden Seiten mit den Abbildungen aus und machen Sie sich anschließend mit allen Funktionen des Gerätes vertraut. Before reading, unfold both pages containing illustrations and familiarise yourself with all functions of the device. Avant de lire le mode d‘emploi, ouvrez les deux pages contenant les illustrations et familiarisez-vous ensuite avec toutes les fonctions de l‘appareil.
- Page 3 14129204L 100LUX 1.8-2.5m 5.0m 8.0m...
- Page 4 14129304L 100LUX 1.8-2.5m 5.0m 8.0m...
-
Page 5: Table Of Contents
Legende der verwendeten Piktogramme ............... Seite Einleitung ................. Seite Bestimmungsgemäße Verwendung ........Seite Lieferumfang ................ Seite Teilebeschreibung ............... Seite Technische Daten ..............Seite 10 Sicherheit ................. Seite 10 Sicherheitshinweise ............. Seite 10 Sicherheitshinweise für Batterien / Akkus ......Seite 13 Vorbereitung .............. -
Page 6: Legende Der Verwendeten Piktogramme
Legende der verwendeten Piktogramme Anweisungen lesen! Volt Watt (Wirkleistung) Schutzklasse III LED-Lebensdauer Schaltzyklen Gleichstrom Die verwendeten Leuchtmittel sind nicht dimmbar. Warn- und Sicherheitshinweise beachten! Lebens- und Unfallgefahr für Kleinkinder und Kinder! Warnung vor elektrischem Schlag! Lebensgefahr! Vorsicht! Explosionsgefahr! DE/AT/CH... - Page 7 Schutzhandschuhe tragen! So verhalten Sie sich richtig Nicht als Raumbeleuchtung geeignet, es handelt sich bei dem Produkt um eine Außenleuchte. Die LED-Lampe ist geeignet für extreme Temperaturen unter -20 °C. -20 °C 5-8 m Reichweite des Bewegungsmelders 90° Erfassungswinkel Entsorgen Sie Verpackung und Gerät umweltgerecht! Umweltschäden durch falsche Entsorgung der Batterien / Akkus! IP44...
-
Page 8: Einleitung
LED-Solarstrahler Einleitung Wir beglückwünschen Sie zum Kauf Ihres neuen Gerätes. Sie haben sich damit für ein hochwertiges Produkt entschie- den. Bitte lesen Sie diese Bedienungsanleitung vollständig und sorgfältig durch. Diese Anleitung gehört zu diesem Produkt und enthält wichtige Hinweise zur Inbetriebnahme und Handhabung. Be- achten Sie immer alle Sicherheitshinweise. -
Page 9: Lieferumfang
Lieferumfang Kontrollieren Sie unmittelbar nach dem Auspacken immer den Liefer- umfang auf Vollständigkeit sowie den einwandfreien Zustand des Gerätes. 1 LED-Solarstrahler, Modell 14129204L oder 14129304L 1 Montageplatte 1 Halterung (für Solarpanel) (14129304L) 1 Solarpanel (14129304L) 2 Dübel (Montageplatte) 2 Schrauben (Montageplatte) 2 Dübel (Halterung) (14129304L) 2 Schrauben (Halterung) (14129304L) 1 Montage- und Bedienungsanleitung... -
Page 10: Technische Daten
Halterung (für das Solarpanel) (14129304L) Dübel (für die Halterung) (14129304L) Schrauben (für die Halterung) (14129304L) Verbindungskabel (14129304L) Stecker (14129304L) Buchse (14129304L) Technische Daten Modellnr.: 14129204L oder 14129304L Leuchtmittel: LEDs (die LEDs sind nicht austauschbar) Gesamtleistung LED: LED max. 6 x 0,5 W Betriebsspannung: 3,6 V Batterie / Akku:... - Page 11 die durch unsachgemäße Handhabung oder Nichtbeachtung der Sicherheitshinweise verursacht werden, wird keine Haftung über- nommen! LEBENS- UND UNFALLGE- FAHREN FÜR KLEINKINDER UND KINDER! Lassen Sie Kinder niemals unbeaufsichtigt mit Verpackungs- material und Gerät. Andernfalls besteht Lebensgefahr durch Er- stickung. Halten Sie Kinder stets vom Gerät fern. Das Produkt ist kein Spielzeug.
- Page 12 Die LED nicht mit einem optischen Instrument (z. B. Lupe) betrachten. Nicht als Raumbeleuchtung geeignet, es handelt sich bei dem Produkt um eine Außenleuchte. Die LED-Lampe -20 °C ist geeignet für extreme Temperaturen unter -20 °C. VORSICHT! VERLETZUNGSGEFAHR! Verwenden Sie das Gerät nicht, wenn Sie irgendwelche Beschädigungen feststellen.
-
Page 13: Sicherheitshinweise Für Batterien / Akkus
Die verwendeten Leuchtmittel sind nicht dimmbar. Sicherheitshinweise für Batterien / Akkus LEBENSGEFAHR! Halten Sie Batterien / Akkus außer Reichweite von Kindern. Suchen Sie im Falle eines Verschluckens sofort einen Arzt auf! EXPLOSIONSGEFAHR! Laden Sie nicht aufladbare Batterien niemals wieder auf. Schließen Sie Batterien / Akkus nicht kurz und / oder öffnen Sie diese nicht. -
Page 14: Vorbereitung
SCHUTZHANDSCHUHE TRAGEN! Ausgelaufene oder beschädigte Batterien / Akkus können bei Berührung mit der Haut Verätzungen verursachen. Tragen Sie deshalb in diesem Fall geeignete Schutzhandschuhe. Im Falle eines Auslaufens der Batterien / Akkus entfernen Sie diese sofort aus dem Produkt, um Beschädigungen zu vermeiden. Verwenden Sie nur Batterien / Akkus des gleichen Typs. -
Page 15: Batterien Einlegen / Wechseln
- Bleistift / Markierwerkzeug - Schraubendreher - Bohrmaschine - Bohrer - Wasserwaage Batterien einlegen / wechseln Hinweis: Die wiederaufladbaren Batterien sind vormontiert. Verwenden Sie nur Batterien wie im Kapitel „Technische Daten“ angegeben. Um die wiederaufladbaren Batterien zu entfernen, schalten Sie den Strahler mit Hilfe des EIN- / AUS-Schiebereglers aus. -
Page 16: Leuchte Montieren
Leuchte montieren Hinweis: Entfernen Sie vor der Montage sämtliches Verpackungs- material. Hinweis: Achten Sie auf die angegebene Montagehöhe (Abb. D (14129204L) bzw. F (14129304L)). Je nach Höhe variiert die Erfassungsreichweite des Sensors Hinweis: Die maximale Reichweite des Sensors beträgt zwischen ca. - Page 17 Befestigen Sie die Montageplatte mit den mitgelieferten Schrauben (Abb. B). Achten Sie darauf, dass Sie das Solarpanel in Richtung Sonne ausrichten. Setzen Sie nun den Strahler auf die Montageplatte (Abb. B). Achten Sie auf den richtigen Sitz des Strahlers Stellen Sie den Strahler am EIN- / AUS-Schieberegler Position „ON“...
-
Page 18: Inbetriebnahme
keine Gas-, Wasser- oder Stromleitungen angebohrt oder be- schädigt werden können. Führen Sie die Dübel in die Bohrlöcher ein (Abb C). Befestigen Sie die Halterung mit Hilfe der Schrauben Stecken Sie das Solarpanel in die Halterung (Abb. C). Achten Sie darauf, dass Sie das Solarpanel in Richtung Sonne ausrichten. -
Page 19: Wartung Und Reinigung
Wartung und Reinigung LEBENSGEFAHR DURCH ELEKTRISCHEN SCHLAG! Benutzen Sie keine Lösungsmittel, Benzin o. Ä. Die Leuchte würde hierbei Schaden nehmen. Stellen Sie den Strahler am EIN- / AUS-Schieberegler die Position „OFF“. Entfernen Sie die Batterien Nur 14129304L: Lösen Sie die Verbindung zwischen Stecker und Buchse Verwenden Sie zur Reinigung der Leuchte ein trockenes, fussel- freies Tuch. - Page 20 Beachten Sie die Kennzeichnung der Verpackungs- materialien bei der Abfalltrennung, diese sind gekenn- zeichnet mit Abkürzungen (a) und Nummern (b) mit fol- gender Bedeutung: 1–7: Kunststoffe / 20–22: Papier und Pappe / 80–98: Verbundstoffe. Das Produkt und die Verpackungsmaterialien sind recy- celbar, entsorgen Sie diese getrennt für eine bessere Ab- fallbehandlung.
-
Page 21: Informationen
wie folgt: Cd = Cadmium, Hg = Quecksilber, Pb = Blei. Geben Sie deshalb verbrauchte Batterien / Akkus bei einer kommunalen Sammel- stelle ab. Informationen Garantie Sie erhalten zum Zeitpunkt des Kaufs auf dieses Gerät 36 Monate Garantie. Das Gerät wurde sorgfältig produziert und einer genauen Qualitätskontrolle unterzogen. -
Page 22: Serviceadresse
Fax: +49 (0) 29 61 / 97 12–199 E-Mail: kundenservice@briloner.com www.briloner.com IAN 293044 Bitte halten Sie für alle Anfragen den Kassenbon und die Artikel- nummer (z. B. IAN 12345) als Nachweis für den Kauf bereit. Konformitätserklärung Dieses Produkt erfüllt die Anforderungen der geltenden europäischen und nationalen Richtlinien. - Page 23 List of Pictograms Used ........Page 24 Introduction ..............Page 26 Intended use ................ Page 26 Scope of delivery ..............Page 26 Description of Parts ............. Page 27 Technical Data ..............Page 28 Safety ................. Page 28 Safety notices ..............Page 28 Safety instructions for batteries / rechargeable batteries ..
-
Page 24: List Of Pictograms Used
List of Pictograms Used Read the instructions! Volt Watt (effective power) Safety class III LED operating life Switching cycles Direct current The light bulbs used are not dimmable. Observe the warnings and safety notices! Danger to life and accident hazard for toddlers and small children! Electric shock warning! Danger to life! - Page 25 Wear safety gloves! For your safety Not suitable as room lighting. This product is an outdoor light. The LED lamp is suitable for extreme temperatures below -20°C. -20 °C 5-8 m Motion detector range 90° Detection angle Dispose of the packaging and device in an environmentally friendly manner! Environmental damage due to incorrect disposal of the batteries/rechargeable batteries!
-
Page 26: Introduction
LED Solar Spotlight Introduction Congratulations on your new product. You have selected a high quality product. Please be sure to carefully read the complete operating instructions. These instructions are part of the product and contain important information on setup and handling. -
Page 27: Description Of Parts
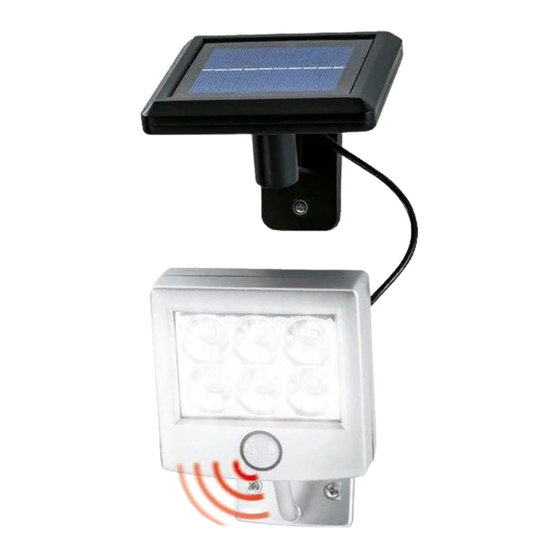
1 LED solar powered spotlight, model 14129204L or 14129304L 1 Mounting plate 1 Mounting bracket (for solar panel) (14129304L) 1 Solar panel (14129304L) 2 Dowels (mounting plate) 2 Screws (mounting plate) 2 Dowels (mounting bracket) (14129304L) 2 Screws (mounting bracket) (14129304L) 1 Set of assembly instructions and instructions for use Description of Parts Solar panel... -
Page 28: Technical Data
Technical Data Model no.: 14129204L or 14129304L Light bulbs: LEDs (the LEDs are non-replaceable) LED total output: LED max. 6 x 0.5 W Operating voltage: 3.6 V Battery / rechargeable battery: 3 x Ni-MH AAA 600 mAh 1.2 V Output current Solar panel: 120 mA Protection class:... - Page 29 the device. Otherwise there is a risk to life from suffocation. Always keep children away from the device. This product is not a toy. This device may be used by children age 8 years and up, as well as by persons with reduced physical, sensory or mental capaci- ties, or lacking experience and / or knowledge, so long as they are supervised or instructed in the safe use of the device and un- derstand the associated risks.
-
Page 30: Safety Instructions For Batteries / Rechargeable Batteries
For your safety Do not leave the product or packaging material lying unattended. The packaging material presents a suffocation hazard and there is a risk of loss of life from strangulation. Install the light so that it is protected from dirt and excessive heat. - Page 31 Never throw batteries / rechargeable batteries into fire or water. Do not exert mechanical loads to batteries / rechargeable bat- teries. Risk of leakage of batteries / rechargeable batteries Avoid extreme environmental conditions and temperatures, which could affect batteries / rechargeable batteries, e.g. radiators / direct sunlight.
-
Page 32: Preparation
Remove exhausted batteries / rechargeable batteries from the product immediately. Preparation Required tools and material The tools and materials specified are not included. This information and these values are non-binding and are only provided as a reference. The nature of the material is determined by the individual local con- ditions. -
Page 33: Installing The Light
Remove the old rechargeable batteries Insert the batteries . Use only batteries of the specified type (see “Technical Data”). Note: When inserting the battery ensure the correct polarity! This is indicated in the battery compartment Close the battery compartment again with the battery cover and fix the cover by screwing on the screws clockwise. - Page 34 14129204L: Use the slotted holes of the mounting plate intended for the screws to mark the drill holes. Now drill the fixing holes (Ø 6 mm, depth approx. 40 mm). Be- fore drilling the fixing holes, ensure there are no gas, water or electrical lines that could be drilled into or damaged in the area where you will be drilling.
-
Page 35: Start-Up
Now use the slots in the mounting bracket intended for the screws to mark the drill holes (Ø 6 mm, depth approx. 40 mm). Ensure that you can connect the spotlight using the connec- tion cable to the solar panel Now drill the fixing holes. -
Page 36: Maintenance And Cleaning
To switch off the spotlight the ON / OFF slider must be set to the „OFF“ position. The rechargeable batteries will no longer be charged. Maintenance and Cleaning DANGER TO LIFE BY ELECTRIC SHOCK! Do not use solvents, petrol, etc. Otherwise the light will be damaged. -
Page 37: Disposal
Disposal The packaging is made entirely of recyclable materials, which you may dispose of at local recycling facilities. Observe the marking of the packaging materials for waste separation, which are marked with abbreviations (a) and numbers (b) with following meaning: 1–7: plastics / 20– 22: paper and fibreboard / 80–98: composite materials. -
Page 38: Information
Batteries / rechargeable batteries may not be disposed of with the usual domestic waste. They may contain toxic heavy metals and are subject to hazardous waste treatment rules and regulations. The chemical symbols for heavy metals are as follows: Cd = cadmium, Hg = mercury, Pb = lead. -
Page 39: Service Address
Fax: +49 (0) 29 61 / 97 12–199 E-mail: kundenservice@briloner.com www.briloner.com IAN 293044 Please have your receipt and the item number (e.g. IAN 12345) ready as your proof of purchase when enquiring about your product. Declaration of conformity This product fulfils the requirements of the applicable European and national directives. - Page 41 Légende des pictogrammes utilisés ..Page 42 Introduction ..............Page 44 Utilisation conforme ............Page 44 Contenu de la livraison ............Page 45 Descriptif des pièces ............Page 45 Caractéristiques techniques ..........Page 46 Sécurité ................Page 46 Indications de sécurité ............Page 46 Consignes de sécurité...
-
Page 42: Légende Des Pictogrammes Utilisés
Légende des pictogrammes utilisés Lisez les instructions ! Volt Watt (puissance active) Classe de protection III Durée de vie des LED Cycles de commutation Courant continu Les ampoules utilisées ne sont pas variables. Respecter les avertissements et consignes de sécurité ! Danger de mort et risque de blessures pour les enfants en bas âge et les enfants ! Attention au risque d'électrocution ! - Page 43 Porter des gants de protection ! Conduite à tenir Ne convient pas à l'éclairage des pièces. Ce produit est un éclairage d'extérieur. L'ampoule LED est appropriée aux températures extrêmes inférieures à -20°C. -20 °C 5-8 m Portée du détecteur de mouvement 90°...
-
Page 44: Introduction
Projecteur solaire LED Introduction Nous vous félicitons pour l‘achat de votre nouvel appareil. Vous avez opté pour un produit de grande qualité. Veuil- lez lire ce mode d‘emploi intégralement et attentivement. Ce mode d‘emploi fait partie du produit et contient des instructions essentielles pour sa mise en service et sa manipulation. -
Page 45: Contenu De La Livraison
Contenu de la livraison Contrôlez toujours immédiatement après le déballage du produit que le contenu de la livraison est complet et que l’appareil se trouve en parfait état. 1 projecteur solaire LED, modèle 14129204L ou 14129304L 1 plaque de montage 1 support (pour panneau solaire) (14129304L) 1 panneau solaire (14129304L) 2 chevilles (plaque de montage) -
Page 46: Caractéristiques Techniques
support (pour le panneau solaire) (14129304L) cheville (pour le support) (14129304L) vis (pour le support) (14129304L) câble de connexion (14129304L) fiche (14129304L) douille (14129304L) Caractéristiques techniques N° de modèle : 14129204L ou 14129304L Ampoules : LED (les ampoules LED ne peuvent pas être remplacées) Puissance totale des LED : LED max. - Page 47 décline toute responsabilité pour les dommages consécutifs ! Toute responsabilité est déclinée pour les dommages matériels ou corporels causés par une manipulation incorrecte ou par le non-respect des consignes de sécurité ! DANGER DE MORT ET D‘ACCIDENT POUR LES BÉBÉS ET LES ENFANTS ! Ne jamais laisser les enfants manipuler sans surveillance le ma- tériel d’emballage et l’appareil.
- Page 48 Ne pas regarder les LED à l‘aide d‘un instrument optique (par exemple une loupe). Ne convient pas à l‘éclairage des pièces. Ce produit est un un éclairage d‘extérieur. L‘ampoule LED est ap- -20 °C propriée aux températures extrêmes inférieures à -20°C. ATTENTION ! RISQUE DE BLESSURES ! Ne pas utiliser cet appareil si vous constatez le moindre endom- magement.
-
Page 49: Consignes De Sécurité Relatives Aux Piles / Aux Piles Rechargeables
Les ampoules utilisées ne sont pas variables. Consignes de sécurité relatives aux piles / aux piles rechargeables DANGER DE MORT ! Rangez les piles / piles rechargeables hors de la portée des en- fants. En cas d’ingestion, consultez immédiatement un médecin ! RISQUE D‘EXPLOSION ! Ne rechargez jamais des piles non rechargeables. -
Page 50: Préparation
PORTER DES GANTS DE PROTECTION ! Les piles / piles rechargeables endommagées ou sujettes à des fuites peuvent provoquer des brûlures au contact de la peau. Vous devez donc porter des gants adéquats pour les manipuler. En cas de fuite des piles / piles rechargeables, retirez-les aussitôt du produit pour éviter tout endommagement. -
Page 51: Insérer / Remplacer Les Piles
permettant de vous orienter. Les caractéristiques du matériel dé- pendent des conditions spécifiques sur place. - Crayon / outil marqueur - Tournevis - Perceuse - Foret - Niveau à bulle Insérer / remplacer les piles Remarque : Les piles rechargeables sont prémontées. Un rempla- cement n‘est pas prévu. -
Page 52: Montage De La Lampe
Refermez le compartiment à piles avec le couvercle du com- partiment à piles puis vissez celui-ci à l‘aide des vis tournant dans le sens horaire. Montage de la lampe Remarque : Avant le montage, veuillez retirer l‘ensemble des matériaux composant l‘emballage. Remarque : Veuillez respecter la hauteur de montage indiquée (Fig. - Page 53 Percez à présent les trous de fixation (Ø env. 6 mm, profondeur env. 40 mm). Avant de percer, vérifiez qu‘aucune conduite de gaz, d‘eau ou d‘électricité ne peut être transpercée ou abîmée. Insérez les chevilles dans les trous de perçage (Fig. B). Fixez la plaque de montage avec les vis fournies (voir...
-
Page 54: Mise En Service
Percez alors les trous de fixation. Avant de percer, vérifiez qu‘aucune conduite de gaz, d‘eau ou d‘électricité ne peut être transpercée ou abîmée. Insérez les chevilles dans les trous de perçage (Fig. C). Fixez le support à l‘aide des vis Emboîtez le panneau solaire dans le support (Fig. -
Page 55: Entretien Et Nettoyage
Entretien et nettoyage DANGER DE MORT PAR ÉLECTRO- CUTION ! N‘utilisez aucun solvant, benzine ou produit similaire. La lampe pourrait en être endommagée. Placez le projecteur en position „OFF“ à l‘aide du curseur MARCHE / ARRÊT Retirez les piles Uniquement 14129304L : Débranchez la fiche de la douille Pour le nettoyage de la lampe, utilisez un chiffon sec ne peluchant... - Page 56 Veuillez respecter l‘identification des matériaux d‘embal- lage pour le tri sélectif, ils sont identifiés avec des abbré- viations (a) et des chiffres (b) ayant la signification suivante : 1–7 : plastiques / 20–22 : papiers et cartons / 80–98 : matériaux composite.
-
Page 57: Informations
lourds toxiques et doivent être considérées comme des déchets spéci- aux. Les symboles chimiques des métaux lourds sont les suivants : Cd = cadmium, Hg = mercure, Pb = plomb. Pour cette raison, veuillez toujours déposer les piles / piles rechargeables usagées dans les conteneurs de recyclage communaux. -
Page 58: Adresse Du Service Après-Vente
Fax : +49 (0) 29 61 / 97 12–199 E-mail : kundenservice@briloner.com www.briloner.com IAN 293044 Veuillez conserver le ticket de caisse et la référence de l’article (par ex. IAN 12345) à titre de preuve d’achat pour toute demande. Déclaration de conformité... - Page 59 Legenda van de gebruikte pictogrammen ............Pagina 60 Inleiding ................Pagina 62 Correct gebruik ..............Pagina 62 Omvang van de levering ..........Pagina 62 Beschrijving van de onderdelen ........Pagina 63 Technische gegevens ............Pagina 64 Veiligheid ..............Pagina 64 Veiligheidsinstructies ............Pagina 64 Veiligheidsinstructies voor batterijen / accu‘s ....Pagina 66 Voorbereiding ............Pagina 68 Benodigd gereedschap en materiaal ......Pagina 68...
-
Page 60: Legenda Van De Gebruikte Pictogrammen
Legenda van de gebruikte pictogrammen Instructies lezen! Volt Watt (nuttig vermogen) Beschermingsklasse III Led-levensduur Schakelcyclus Gelijkstroom De gebruikte lichtbron is niet dimbaar. Waarschuwingen en veiligheidsinstructies in acht nemen! Levensgevaar en kans op ongevallen voor kleuters en kinderen! Waarschuwing voor elektrische schokken! Levensgevaar! Voorzichtig! Explosiegevaar! 60 NL/BE... - Page 61 Veiligheidshandschoenen dragen! Zo handelt u correct Niet geschikt voor verlichting van vertrekken, het product is bedoeld als buitenlamp. De led-lamp is geschikt voor extreme temperaturen tot onder -20 °C. -20 °C 5-8 m Reikwijdte van de bewegingssensor 90° Detectiehoek Voer de verpakking en het apparaat op een milieuvriendelijke manier af! Milieuschade door onjuiste afvoer van de batterijen / accu's!
-
Page 62: Inleiding
LED-solarschijnwerper Inleiding Gefeliciteerd met de aankoop van uw nieuwe apparaat. U heeft voor een hoogwaardig product gekozen. Lees deze gebruiksaanwijzing volledig en zorgvuldig door. Deze gebruiksaanwijzing hoort bij dit product en bevat belangrijke aanwijzingen voor de ingebruikname en bediening. Neem altijd alle veiligheidsinstructies in acht. -
Page 63: Beschrijving Van De Onderdelen
1 LED-solarlamp, model 14129204L of 14129304L 1 montageplaat 1 houder (voor zonnepaneel) (14129304L) 1 zonnepaneel (14129304L) 2 pluggen (montageplaat) 2 schroeven (montageplaat) 2 pluggen (houder) (14129304L) 2 schroeven (houder) (14129304L) 1 montage- en gebruiksaanwijzing Beschrijving van de onderdelen Zonnepaneel AAN- / UIT-schuifregelaar Schijnwerper Sensor Pluggen (montageplaat) -
Page 64: Technische Gegevens
Technische gegevens Modelnr.: 14129204L of 14129304L Lichtbron: LED‘s (de led‘s kunnen niet worden vervangen) Totale vermogen led‘s: LED max. 6 x 0,5 W Voedingsspanning: 3,6 V Batterij / accu: 3 x Ni-MH AAA 600 mAh 1,2 V Uitgangsstroom Zonnepaneel: 120 mA Beschermingsklasse: Beschermingsgraad: IP44... - Page 65 Laat kinderen nooit zonder toezicht bij het verpakkingsmateriaal en het apparaat. Anders bestaat levensgevaar door verstikking. Houd kinderen steeds uit de buurt van het apparaat. Het pro- duct is geen speelgoed. Dit apparaat kan door kinderen vanaf 8 jaar alsmede door per- sonen met verminderde fysieke, sensorische of mentale vaardig- heden of een gebrek aan ervaring en kennis worden gebruikt, als zij onder toezicht staan of geïnstrueerd werden met betrekking tot...
-
Page 66: Veiligheidsinstructies Voor Batterijen / Accu's
Open nooit een van de elektrische delen en steek er geen voor- werpen in. Zo handelt u correct Laat het product of de verpakking niet onbeheerd liggen. Er bestaat kans op verstikking door verpakkingsmateriaal en levensgevaar door strangulatie. Monteer de lamp zo, dat hij wordt beschermd tegen vuil en een hoge opwarming. - Page 67 EXPLOSIEGEVAAR! Laad niet oplaadbare batterijen nooit op. Sluit de batterijen / ac- cu‘s niet kort en / of open deze niet. Daardoor kan de batterij oververhit raken, in brand vliegen of exploderen. Gooi batterijen / accu‘s nooit in het vuur of water. Stel batterijen / accu‘s nooit bloot aan mechanische belastingen.
-
Page 68: Voorbereiding
Plaats de batterijen / accu‘s volgens de weergegeven polariteit (+) en (-) op batterij / accu en op product. Reinig de contacten van de batterij / accu en die in het batterijvak, voordat u deze plaatst! Verwijder verbruikte batterijen / accu‘s direct uit het product. Voorbereiding Benodigd gereedschap en materiaal Het genoemde gereedschap en materiaal wordt niet meegeleverd. -
Page 69: Lamp Monteren
Open het batterijvak aan de achterkant van de lamp door de schroeven linksom los te draaien (afb. C (14129204L) of afb. E (14129304L)). Verwijder de afdekking van het batterijvak. Verwijder de oude oplaadbare batterijen Plaats de batterijen . Gebruik alleen batterijen van het ver- melde type (zie „Technische gegevens“). - Page 70 bevinden, aangezien de led’s anders niet automatisch kunnen worden ingeschakeld. Alleen 14129204L: Klap voorzichtig het zonnepaneel omhoog. 14129204L: Markeer de boorgaten met behulp van de in de montageplaat voor de schroeven bestemde gaten. Boor vervolgens de bevestigingsgaten (Ø 6 mm, diepte ca. 40 mm).
-
Page 71: Ingebruikname
Plaats de pluggen in de boorgaten (afb. B). Bevestig de montageplaat met behulp van de meegeleverde schroeven (afb. B). Plaats vervolgens de lamp op de montageplaat . Let erop dat de lamp goed in de houder valt (afb. B). Markeer nu de boorgaten met behulp van de houder voor de schroeven (Ø... -
Page 72: Onderhoud En Reiniging
De lamp gaat in het donker automatisch aan zodra de sensor een beweging detecteert. Het licht gaat automatisch na ca. 30 seconden uit als er geen beweging meer wordt waargenomen. Als na het uitschakelen van de lamp er opnieuw een beweging wordt gedetecteerd, gaat het licht automatisch weer gedurende ca. -
Page 73: Afvoer
Alleen 14129304L: Steek de stekker in de bus Zet de lamp met de AAN- / UIT-schuifregelaar op positie „ON“. Uw lamp is nu gereed voor gebruik. Afvoer De verpakking bestaat uit milieuvriendelijke grondstoffen die u via de plaatselijke recyclingcontainers kunt afvoeren. Neem de aanduiding van de verpakkingsmaterialen voor de afvalscheiding in acht. -
Page 74: Informatie
afgifteplaatsen en hun openingstijden kunt u zich bij uw aangewezen instantie informeren. Defecte of verbruikte batterijen / accu‘s moeten volgens de richtlijn 2006/66/EG en veranderingen daarop worden gerecycled. Geef batterijen / accu‘s en / of het product af bij de daarvoor bestemde verzamelstations. -
Page 75: Serviceadres
Fax: +49 (0) 29 61 / 97 12–199 E-mail: kundenservice@briloner.com www.briloner.com IAN 293044 Houd bij alle vragen alstublieft de kassabon en het artikelnummer (bijv. IAN 12345) als bewijs van aankoop bij de hand. Conformiteitsverklaring Dit product voldoet aan de eisen van de van toepassing zijnde Europese en nationale richtlijnen. -
Page 76: Fabrikant
Fabrikant Briloner Leuchten GmbH Im Kissen 2 DE-59929 Brilon DUITSLAND 76 NL/BE... - Page 77 Legenda použitých piktogramů ....Strana 78 Úvod ................. Strana 80 Použití ke stanovenému účelu.......... Strana 80 Obsah dodávky ............... Strana 80 Popis dílů ................Strana 81 Technické údaje ............... Strana 82 Bezpečnost ..............Strana 82 Bezpečnostní pokyny ............Strana 82 Bezpečnostní...
-
Page 78: Legenda Použitých Piktogramů
Legenda použitých piktogramů Přečtěte si pokyny! Volt Watt (činný výkon) Ochranná třída III Životnost LED Spínací cykly Stejnosměrný proud Použité osvětlovací prostředky nelze tlumit. Dbejte na výstrahy a řiďte se bezpečnostními pokyny! Nebezpečí ohrožení života a nehody pro malé i velké... - Page 79 Noste ochranné rukavice! Takto postupujete správně Výrobek není vhodný k osvětlení místností, jedná se o venkovní osvětlení. LED lampa je vhodná pro extrémní teploty nižší než -20 °C. -20 °C 5-8 m Dosah pohybového senzoru 90° Úhel dosahu Obal i výrobek likvidujte ekologicky! Ekologické...
-
Page 80: Úvod
LED solární reflektor Úvod Blahopřejeme vám ke koupi nového výrobku. Rozhodli jste se pro vysoce kvalitní výrobek. Přečtěte si laskavě kom- pletně a pečlivě tento návod k obsluze. Tento návod je součástí tohoto výrobku a obsahuje důležité informace o uvedení za- řízení... -
Page 81: Popis Dílů
1 solární svítidlo LED, model 14129204L nebo 14129304L 1 montážní deska 1 držák (solárního panelu) (14129304L) 1 solární panel (14129304L) 2 hmoždinky (montážní deska) 2 šrouby (montážní deska) 2 hmoždinky (držák) (14129304L) 2 šrouby (držák) (14129304L) 1 návod k montáži a obsluze Popis dílů... -
Page 82: Technické Údaje
Technické údaje Č. modelu: 14129204L nebo 14129304L Žárovky: LED (LED nelze vyměnit) Celkový příkon LED: LED max. 6 x 0,5 W Provozní napětí: 3,6 V Baterie / akumulátor: 3x Ni-MH AAA 600 mAh 1,2 V Výstupní proud Solární panel: 120 mA Třída ochrany: Druh ochrany: IP44... - Page 83 Tento přístroj mohou používat děti starší osmi let, osoby se sní- ženými fyzickými, smyslovými nebo duševními schopnosti nebo s nedostatečnými zkušenostmi a znalostmi, jestliže budou pod dohledem nebo byly poučeny o bezpečném používání přístroje a chápou nebezpečí, která z jeho používání vyplývají. S přístrojem si nesmějí...
-
Page 84: Bezpečnostní Pokyny Pro Baterie A Akumulátory
Takto postupujete správně Nenechávejte ležet výrobek nebo obalový materiál bez dohledu. Hrozí nebezpečí udušení obalovým materiálem a ohrožení života uškrcením. Namontujte svítidlo tak, abyste je chránili před znečištěním a přílišným zahříváním. Buďte vždy pozorní! Dbejte vždy na to, co děláte, a postupujte s rozumem. - Page 85 Nikdy neházejte baterie nebo akumulátory do ohně ani do vody. Nevystavujte baterie nebo akumulátory mechanickému zatížení. Nebezpečí vytečení baterií / akumulátorů Zabraňte extrémním podmínkám a teplotám, např. na topení anebo na slunci, které mohou negativně ovlivnit funkci baterií nebo akumulátorů. Vyhýbejte se kontaktu s pokožkou, očima a sliznicemi! Po kon- taktu s kyselinou baterií...
-
Page 86: Příprava
Příprava Potřebné nářadí a materiál Uvedené nářadí a materiály nejsou součástí dodávky. Jedná se zde o nezávazné údaje a orientační hodnoty. Vlastnosti materiálu jsou závislé na individuálních podmínkách v místě. - tužka / nástroj k označení - šroubovák - vrtačka - vrták - vodováha Vložení... -
Page 87: Montáž Svítilny
Uzavřete zase přihrádku na baterie víkem a přišroubujte ho šrouby Montáž svítilny Upozornění: Před montáží odstraňte veškerý obalový materiál. Upozornění: Dbejte na uvedenou výšku montáže (obr. D (14129204L) nebo F (14129304L)). V závislosti na výšce se mění pracovní dosah senzoru Upozornění: Maximální dosah pohybového senzoru činí... - Page 88 Nasaďte hmoždinky do otvorů (obr. B). Přišroubujte montážní desku dodanými šrouby (viz obr. B). Dbejte, abyste solární panel nasměrovali ke slunci. Nyní nasaďte svítidlo na montážní desku (obr. B). Pama- tujte na správné upevnění svítidla Zapněte svítidlo přepnutím posuvného vypínače do po- lohy „ON“...
-
Page 89: Uvedení Do Provozu
Nasaďte solární panel do držáku (obr. C). Dbejte, abyste solární panel nasměrovali ke slunci. Zapojte zástrčku do zdířky (obr. D). Zapněte svítidlo přepnutím posuvného vypínače polohy „ON“ (obr. A). Při dostatečném slunečním svitu se nyní akumulátory dobíjejí. Vaše svítidlo je nyní připraveno k provozu. Uvedení... -
Page 90: Zlikvidování
Vypněte svítidlo přepnutím posuvného vypínače polohy „OFF“. Vyjměte baterie Pouze 14129304L: Odpojte zástrčku od zdířky Používejte k čištění svítidla suchou utěrku, která nepouští vlákna. Vložte opět nové baterie Pouze 14129304L: Zapojte zástrčku do zdířky Zapněte svítidlo přepnutím posuvného vypínače polohy „ON“. Vaše svítidlo je nyní... - Page 91 Výrobek a obalové materiály jsou recyklovatelné, zlikvi- dujte je odděleně pro lepší odstranění odpadu. Logo Triman platí jen pro Francii. O možnostech likvidace vysloužilých zařízení se infor- mujte u správy vaší obce nebo města. V zájmu ochrany životního prostředí vysloužilý výrobek nevyhazujte do domovního odpadu, ale předejte k od- borné...
-
Page 92: Informace
Záručním výkonem se záruční doba neprodlouží ani neobnoví. Adresa servisu Briloner Leuchten GmbH Im Kissen 2 DE-59929 Brilon NĚMECKO Tel.: +49 (0) 29 61 / 97 12–800 Fax: +49 (0) 29 61 / 97 12–199 E-Mail: kundenservice@briloner.com www.briloner.com IAN 293044 92 CZ... -
Page 93: Prohlášení O Shodě
Pro všechny požadavky si připravte pokladní blok a číslo výrobku (např. IAN 12345) jako doklad o nákupu. Prohlášení o shodě Tento výrobek splňuje požadavky platných evropských a národních směrnic. Shoda byla prokázána. Příslušná prohlášení a dokumen- tace jsou uloženy u výrobce. Výrobce Briloner Leuchten GmbH Im Kissen 2... - Page 95 Leyenda de pictogramas utilizados ..Página 96 Introducción .............Página 98 Uso adecuado ...............Página 98 Contenido ...............Página 99 Descripción de los componentes ........Página 99 Características técnicas ..........Página 100 Seguridad ..............Página 100 Aviso sobre seguridad ...........Página 100 Indicaciones de seguridad sobre las pilas / baterías ..Página 103 Preparativos ............Página 104 Herramientas y materiales necesarios ......Página 104...
-
Page 96: Leyenda De Pictogramas Utilizados
Leyenda de pictogramas utilizados ¡Lea las instrucciones! Voltio Vatio (potencia efectiva) Clase de protección III Vida útil del LED Ciclos de funcionamiento Corriente continua Las bombillas utilizadas no son regulables. ¡Respete las advertencias e indicaciones de seguridad! ¡Peligro de muerte y de accidente para bebés y niños! ¡Precaución con las descargas eléctricas! ¡Peligro de muerte! - Page 97 ¡Use guantes de seguridad! Cómo proceder de forma segura No adecuado para iluminación de habitaciones ya que se trata de un producto de iluminación exterior. La lámpara LED está diseñada para soportar -20 °C temperaturas extremas por debajo de los -20°C. 5-8 m Alcance del sensor de movimiento 90°...
-
Page 98: Introducción
Foco LED solar Introducción Le damos la enhorabuena por haber adquirido este nuevo aparato. Ha elegido un producto de alta calidad. Lea atenta y completamente las siguientes instrucciones de uso. Estas instrucciones pertenecen a este producto y contienen in- dicaciones importantes sobre la puesta en funcionamiento y el ma- nejo. -
Page 99: Contenido
Contenido Compruebe siempre inmediatamente después de desembalar la integridad del contenido y el perfecto estado del aparato. 1 foco solar LED, modelo 14129204L o 14129304L 1 placa de montaje 1 soporte (para el panel solar) (14129304L) 1 panel solar (14129304L) 2 tacos (placa de montaje) 2 tornillos (placa de montaje) 2 tacos (soporte) (14129304L) -
Page 100: Características Técnicas
Taco (para el soporte) (14129304L) Tornillo (para el soporte) (14129304L) Cable de conexión (14129304L) Enchufe (14129304L) Clavija (14129304L) Características técnicas N.º de modelo: 14129204L o 14129304L Tipo de iluminación: bombilla LED (no reemplazables) Potencia total LED: LED máx. 6 x 0,5 W Tensión de servicio: 3,6 V Pila/batería:... - Page 101 indicaciones de seguridad provoquen daños materiales o persona- les, ¡no se asumirá ninguna responsabilidad! ¡PELIGRO DE MUERTE Y ACCIDENTE PARA BEBÉS Y NIÑOS! Nunca deje a los niños sin supervisión con el material de em- balaje ni el aparato. De lo contrario existe riesgo de muerte por asfixia.
- Page 102 No adecuado para iluminación de habitaciones ya que se trata de un producto de iluminación exterior. La -20 °C lámpara LED está diseñada para soportar temperaturas extremas por debajo de los -20°C. ¡CUIDADO! ¡PELIGRO DE LESIONES! No utilice el aparato si detecta algún tipo de daño. Este artículo no contiene piezas que requieran mantenimiento por parte del usuario.
-
Page 103: Indicaciones De Seguridad Sobre Las Pilas / Baterías
Indicaciones de seguridad sobre las pilas / baterías ¡PELIGRO DE MUERTE! Mantenga las pilas / baterías fuera del alcance de los niños. ¡En caso de ingestión, acuda inmediatamente a un médico! ¡PELIGRO DE EXPLOSIÓN! No recargue nunca pilas no recargables. No ponga las pilas / baterías en cortocircuito ni tampoco las abra. -
Page 104: Preparativos
En caso de sulfatación de las pilas / baterías, retírelas inmedia- tamente del producto para evitar daños. Utilice únicamente pilas / baterías del mismo tipo. ¡No mezcle pilas / baterías usadas con nuevas! Riesgo de daño del producto ¡Utilice exclusivamente el tipo de pila / batería indicado! Introduzca las pilas / baterías teniendo en cuenta la polaridad marcada con (+) y (-) tanto en las pilas / baterías como en el producto. -
Page 105: Colocar / Cambiar Las Pilas
Colocar / cambiar las pilas Nota: Las pilas recargables ya están colocadas. Utilice pilas solo como se indica en el capítulo „Características técnicas“. Para retirar las pilas recargables, apague el foco con el regulador deslizante ON/OFF Abra el compartimento para pilas de la parte posterior del foco retirando los tornillos... - Page 106 Puede cambiar la orientación del foco elevando o bajando la posición. Cuando cambia la posición del foco también cambia el alcance del sensor (ver fig D (14129204L o F (14129304L)). Nota: la lámpara solar no debe situarse cerca de otras fuentes luminosas, por ej.
- Page 107 Taladre ahora los orificios de fijación (Ø 6 mm, profundidad aprox. 40 mm). Asegúrese antes de perforar los orificios de que en el lugar ele- gido no haya tuberías de gas, agua o cables de corriente que pueda taladrar o dañar. Introduzca los tacos en los orificios taladrados (fig.
-
Page 108: Puesta En Funcionamiento
Puesta en funcionamiento El sensor de movimiento se activa si la intensidad de la luz es de aprox. <100 lúmenes. El foco se enciende automáticamente al anochecer siempre que el sensor detecte algún movimiento. La luz se apaga automáticamente después de 30 segundos aprox. -
Page 109: Eliminación
Solo 14129304L: Conecte el enchufe en la clavija Ponga el interruptor deslizante ON / OFF del foco posición „ON“. La lámpara ya está lista para usarse. Eliminación El embalaje está compuesto por materiales no contaminantes que pueden ser desechados en el centro de reciclaje local. -
Page 110: Información
Para proteger el medio ambiente no tire el producto junto con la basura doméstica cuando ya no le sea útil. Deséchelo en un contenedor de reciclaje. Diríjase a la administración competente para obtener información sobre los puntos de recogida de residuos y sus horarios. Información Garantía Este aparato cuenta con una garantía de 36 meses a partir del mo-... -
Page 111: Dirección Del Servicio Técnico
Fax: +49 (0) 29 61 / 97 12–199 Correo electrónico: kundenservice@briloner.com www.briloner.com IAN 293044 Para realizar cualquier consulta, tenga a mano el recibo y el número de artículo (por ej. IAN 12345) como justificante de compra. Declaración de conformidad Este producto cumple las exigencias de las directivas europeas y nacionales vigentes. - Page 113 Legenda dos pictogramas utilizados ..Página 114 Introdução ..............Página 116 Utilização adequada .............Página 116 Material fornecido ............Página 117 Descrição das peças .............Página 117 Dados técnicos ...............Página 118 Segurança ..............Página 118 Indicações de segurança ..........Página 118 Indicações de segurança relativas às pilhas / baterias ...Página 121 Preparação ...............Página 122 Ferramentas e material necessário .......Página 122...
-
Page 114: Legenda Dos Pictogramas Utilizados
Legenda dos pictogramas utilizados Ler as instruções! Volt Watt (Potência efetiva) Classe de protecção III Durabilidade LED Ciclos de ligação Corrente contínua As lâmpadas utilizadas não podem ser ajustadas quanto a intensidade de iluminação. Considerar as indicações de aviso e de segurança! Perigo de morte e de acidente para bebés e crianças! Cuidado com os choques elétricos! Perigo de morte! - Page 115 Utilizar luvas de proteção! Procedimento correto Não apropriado como iluminação de quartos, se trata de um produto que é um candeeiro exterior. Lâmpada LED é apropriada para temperaturas -20 °C extremas abaixo de -20 °C. 5-8 m Alcance do detector de movimentos 90°...
-
Page 116: Introdução
Projetor solar LED Introdução Congratulamo-lo pela aquisição do seu novo aparelho. Decidiu-se, assim, por um produto de elevada qualidade. Por favor, leia atentamente todo o manual de instruções. Este manual pertence a este produto e contém informações impor- tantes relativas à colocação em funcionamento e ao manuseamento. Siga sempre todas as indicações de segurança. -
Page 117: Material Fornecido
Material fornecido Após desembalar o aparelho, verifique sempre o material fornecido quanto à integridade, bem como o estado do aparelho. 1 Candeeiro solar LED, Modelo 14129204L ou 14129304L 1 Placa de montagem 1 Suporte (para painel solar) (14129304L) 1 Painel solar (14129304L) 2 Buchas (placa de montagem) 2 Parafusos (placa de montagem) 2 Buchas (suporte) (14129304L) -
Page 118: Dados Técnicos
Bucha (para o suporte) (14129304L) Parafusos (para o suporte) (14129304L) Cabo de conexão (14129304L) Ficha (14129304L) Tomada (14129304L) Dados técnicos Modelo n°.: 14129204L ou 14129304L Lâmpada: LEDs (os LED não são substituíveis) Potência total LED: LED máx. 6 x 0,5 W Tensão de serviço: 3,6 V Pilha:... - Page 119 por danos materiais e pessoais, causados por um manuseamento in- correto ou pela inobservância das indicações de segurança! PERIGO DE MORTE E DE ACIDEN- TES PARA BEBÉS E CRIANÇAS! Nunca deixe crianças sem vigilância com o material da embala- gem ou aparelho. Caso contrário, existe perigo de morte por asfixia.
- Page 120 Não apropriado como iluminação de quartos, se trata de um produto que é um candeeiro exterior. Lâmpada -20 °C LED é apropriada para temperaturas extremas abaixo de -20 °C. CUIDADO! PERIGO DE FERIMENTOS! Caso detecte algum dano, não utilize o aparelho. Este artigo não possui quaisquer peças que necessitem de manutenção por parte do consumidor.
-
Page 121: Indicações De Segurança Relativas Às Pilhas / Baterias
Indicações de segurança relativas às pilhas / baterias PERIGO DE MORTE! Mantenha as pilhas e baterias fora do alcance das crianças. Se a pilha / bateria for ingerida, contacte imediatamente um médico! PERIGO DE EXPLOSÃO! Nunca carregue pilhas não recarregáveis. Não faça ligação direta de pilhas ou baterias e / ou abra elas. -
Page 122: Preparação
UTILIZAR LUVAS DE PROTECÇÃO! As pilhas ou baterias gastas ou danificadas podem provocar queimaduras ao entrarem em contacto com a pele. Por isso, nestes casos use sempre luvas adequadas. Caso a pilha / bateria vaze, remova ela imediatamente do pro- duto para evitar danos. -
Page 123: Inserir / Substituir As Pilhas
- Lápis / marcador - Chave de parafuso - Berbequim - Broca - Nível de bolha de ar Inserir / Substituir as pilhas Aviso: As pilhas recarregáveis são pré-montadas. Utilize apenas as pilhas indicadas no capítulo “Dados técnicos“. Para remover as pilhas recarregáveis, desligue o candeeiro com a ajuda do regulador de deslocamento de LIGAR/DESLIGAR... -
Page 124: Montar O Candeeiro
Montar o candeeiro Aviso: Remova antes da montagem todo o material da embalagem do produto. Aviso: Esteja atento à altura de montagem indicada (Fig. D (14129204L) e F (14129304L)). O alcance de detecção varia de acordo com a altura do sensor Aviso: O alcance máximo do sensor é... - Page 125 Fixe a placa de montagem com os parafusos fornecidos (Fig. B). Esteja atento para que o painel solar seja direcionado para o sol. Agora, coloque o candeeiro na placa de montagem (Fig. B). Esteja atento ao posicionamento correto do candeeiro Coloque o candeeiro com o interruptor de deslocamento de LIGAR / DESLIGAR...
-
Page 126: Colocação Em Funcionamento
Esteja atento para que o candeeiro possa ser conectado com a ajuda do cabo de conexão ao painel solar Perfure então os orifícios de fixação. Antes de furar os orifícios de fixação, certifique-se de que no local da perfuração não se encontrem tubos de gás, água ou energia que possam ser per- furados ou danificados. -
Page 127: Manutenção E Limpeza
Para desligar o candeeiro , o interruptor de deslocamento de LIGAR / DESLIGAR precisa ser colocado na posição “OFF”. As pilhas não são mais carregadas. Manutenção e limpeza PERIGO DE MORTE POR CHOQUE ELÉTRICO! Não use solventes, gasolina ou semelhantes. Tal iria danificar o candeeiro. -
Page 128: Eliminação
Eliminação A embalagem é feita de materiais não poluentes que po- dem ser eliminados nos contentores de reciclagem locais. Esteja atento à especificação dos materiais da embala- gem para a separação de lixo. Estas são identificadas com abreviações (a) e números (b) com o seguinte significado: 1–7: Plásticos / 20–22: Papel e papelão / 80–98: Materiais compostos. -
Page 129: Informações
Danos ambientais devido à eliminação incorreta das pilhas / baterias! As pilhas / baterias não podem ser eliminadas no lixo doméstico. Podem conter metais pesados nocivos e estão sujeitas à regulação de lixos tóxicos. Os símbolos químicos dos metais pesados são os seguintes: Cd = cádmio, Hg = mercúrio, Pb = chumbo. -
Page 130: Endereço Da Assistência
+49 (0) 29 61 / 97 12–800 mFax: +49 (0) 29 61 / 97 12–199 e-mail: kundenservice@briloner.com www.briloner.com IAN 293044 Para qualquer questão, guarde o talão de compra e o número de artigo (por ex.º IAN 12345) como comprovativo da mesma. Declaração de conformidade Este produto cumpre os requisitos das diretivas em vigor a nível euro-... - Page 133 DE-59929 Brilon GERMANY Stand der Informationen · Last Information Update · Version des informations · Stand van de informatie · Stav informací · Estado de las informaciones · Estado das informações: 09 / 2017 Ident.-No.: 14129204L / 14129304L092017-8 IAN 293044...
Need help?
Do you have a question about the 293044 and is the answer not in the manual?
Questions and answers