Table of Contents

Related Manuals for Capelec CAP2500

Summary of Contents for Capelec CAP2500
- Page 1 Rev A USER MANUAL CAP2500 / CAP2300 Universal automatic headlight tester Passenger cars & Trucks 1130, rue des Marels 34 000 MONTPELLIER France Tél : (33) 04-67-156-156 Fax : (33) 04-67-224-224 e-mail :contact@capelec.fr www.capelec.fr...
-
Page 3: Table Of Contents
SOMMAIRE I. Introduction ..........................2 II. General description ....................... 3 2.1 Visualization screen ......................3 2.2 User interface ........................3 2.3 Main functions ........................4 2.4 Tester power supply ......................4 III Headlight tester positioning ....................6 3.1 Vehicle preparation ......................6 3.2 Vehicle longitudinal axis positioning with laser ............ -
Page 4: Introduction
I. Introduction We thank you for acquiring the headlight tester CAP2500 or CAP2300. This tester takes advantage of the most advanced technologies, designed and patented by CAPELEC. The CAP2500 or CAP2300 is a standalone device for controlling and adjusting any type of headlamp. -
Page 5: General Description
2.2 User interface The battery light indicates, when blinking, that the battery level is low. On CAP2500, when the rechargeable batteries are in charge, the light remains on. On CAP2300, when the non-rechargeable battery is low, please replace it. The key « On/Off » enables to switch on the tester. To switch it off, press the key 3 seconds. -
Page 6: Main Functions
Menu 5: Configuration This menu gives access to several sub-menus enabling to parameter the various functionalities of the CAP2500 and CAP2300, such as the print-out mode choice, the date and time setting, the contrast adjustment, etc. 2.4 Tester power supply CAP2300 The CAP2300 is provided with R14 C-type non-rechargeable batteries. - Page 7 Remark about the charger: Disconnection device is the adapter block. Therefore, it must remain accessible. You must not use in any case another charger than the one supplied by Capelec. CAP2500 & CAP2300 Remark on the batteries: Battery replacement must be done with original parts.
-
Page 8: Headlight Tester Positioning
III Headlight tester positioning 3.1 Vehicle preparation First of all, control the tyre pressure. If it is not correct, reinflation or deflation will be done to reach the recommended pressure within – 0 bar and + 0.3 bar limits. In every case, this pressure must be balanced. Move forward the vehicle at low speed, let it stop smoothly (without using the parking brake) on a levelled and horizontal surface, front wheels in a straight line. -
Page 9: Vehicle Longitudinal Axis Positioning With Laser
3.2 Vehicle longitudinal axis positioning with laser 1- Move forward the headlight tester in front of the centre of the vehicle so that the headlight tester lens is within 20 and 50 cm from each headlamp (optimal distance being 35cm). 2- Identify on the vehicle 2 fixed marks, symetrically spread out with regard to its central axis (examples : right and left upper... -
Page 10: Vehicle Longitudinal Axis Positioning With Mirror
3.3 Vehicle longitudinal axis positioning with mirror 1- Move forward the headlight tester in front of the centre of the vehicle so that the headlight tester lens is within 20 and 50 cm from each headlamp (optimal distance being 35cm). 2- Identify on the vehicle 2 fixed marks, symetrically spread out with regard to its central axis (examples : right and left upper... -
Page 11: Optical Head Positioning In Front Of The Headlamp
3.4 Optical head positioning in front of the headlamp. Electronic positioning assistance (only available on CAP2500) allows you to be guided when positioning the optical head in front of the headlamp. It activates itself before each cut-off measurement for dipped headlamps. Indications displayed on the screen tell you in what direction to move the head. - Page 12 ATTENTION: During this operation, you must be sure that the front side of the tester is not exposed to external light interference (sun, spot light), which could change the positioning. Visual positioning for CAP2300 or CAP2500: If the positioning assistance is not available on your tester, manual positioning is done by placing face-to-face the lens centre and the headlamp centre as well.
-
Page 13: Vehicle Inspection
IV. Vehicle inspection In the menu 1 « Vehicle Inspection », the headlight tester will assist you along the vehicle headlamp control. All the steps proposed by the tester will be described in the hereafter chapter. Vehicle selection GIEGNET Mode : vehicle number plate selection. - Page 14 position the tester, then successively control, right and left beam. The tester tells you the headlamp to be controlled, the high beam hot spot position with arrows and light intensity in lux or kcd. 125kcd High beam Right Hot spot too much right and down Light intensity HR >>OK<<...
-
Page 15: Adjustment Functions
V. Adjustment functions 5.1 Dipped headlight adjustment function This function allows the operator to carry out a lateral and vertical adjustment of dipped headlights. This operation is done in the following way: Positioning First of all, you must position the headlight tester in the front of the headlamp to be adjusted (See chapter “Headlight tester positioning”). -
Page 16: High Beam Adjustment Function
This function allows the operator to make both lateral and vertical adjustment of high beam. First of all, you must carry out positioning of the CAP2500 in front of the headlamp to be adjusted (See chapter IV). Adjust laterally and then vertically the headlamp by following the indications of the arrows on the screen. - Page 17 Vertical adjustment The fog light adjustment function gives you the beam cut-off on the screen. Only vertical adjustment has to be done. The fog lights must be adjusted 1% below dipped headlights. Cut : -2,51% For example, dipped headlights adjusted at -1.5% imply a fog light adjustment at -2.5%. Light intensity diagnostics 125kcd Light intensity in kcd or Lux...
-
Page 18: Configuration
VI. Configuration This menu gives access to different sub-menus enabling to parameter the tester. 5 Config… 51 Print-out 511 Data output 512 Destination 513 Printer parameter 52 Language 53 Back light 54 Date & time 55 Way of control Right - Left Left - Right 56 Stand by 57 Buzzer (not available on CAP2300) - Page 19 6.1 Print-out sub-menu This menu gives access to 3 sub-menus: Data output, Destination parameter, and Printer parameter. These sub-menus give access to different parameters according to your headlight tester type CAP2500 Bluetooth, CAP2500 WIFI, CAP2500 RS232, or CAP2300 RS232. CAP2500 (Bluetooth version):...
- Page 20 Printer parameter sub-menu Printer address : This menu allows you to acquire the Bluetooth printer address on which you want to print out your results. Com. port : This menu allows you to choose on which type of printer you want to print out your results, RS232 or Bluetooth.
- Page 21 CAP2500-WIFI : 51 Print-out 511 Data output GIEGNET Export Printer 512 Destination parameter SSID WEP1 WEP2 Num. port Network WIFI Module 513 Printer parameter Speed Data output sub-menu This menu allows the operator to choose between GIEGNET Export, and Printer. Selection between one of these modes will affect succession of the steps in the vehicle inspection procedure.
- Page 22 Printer: Enables to print out vehicle inspection data on RS232 printer. Destination parameter menu This menu gives you access to the various network parameters in order to configure the connection at the Wifi access point. Printer parameter sub-menu This menu allows you to parameter the communication speed with an RS232 printer (by default 9600 Baud).
- Page 23 CAP2500-RS232 and CAP2300-RS232 51 Print-out 511 Data output GIEGNET Export Printer 512 Destination Speed 513 Printer parameter Speed Data output sub-menu This menu allows the operator to choose between GIEGNET Export, and Printer. Selection between one of these modes will affect succession of the steps in the vehicle inspection procedure.
- Page 24 6.2 Language sub-menu This menu gives you access to setting language. 6.3 Back light sub-menu This menu allow you to activate or to deactivate LCD screen back light. 6.4 Date & time sub-menu This menu gives you access to setting of date and time. 6.5 Way of control sub-menu This menu allows you to choose the headlamp way of control in the vehicle inspection procedure.
-
Page 25: Tester Maintenance
VII. Tester maintenance Maintenance of the lens: Avoid to put the fingers on the lens to prevent dirtiness Clean it if necessary (with soapy water or with a windscreen washer product) If your lens is cracked or scratched too heavily you have to replace it through a service company. -
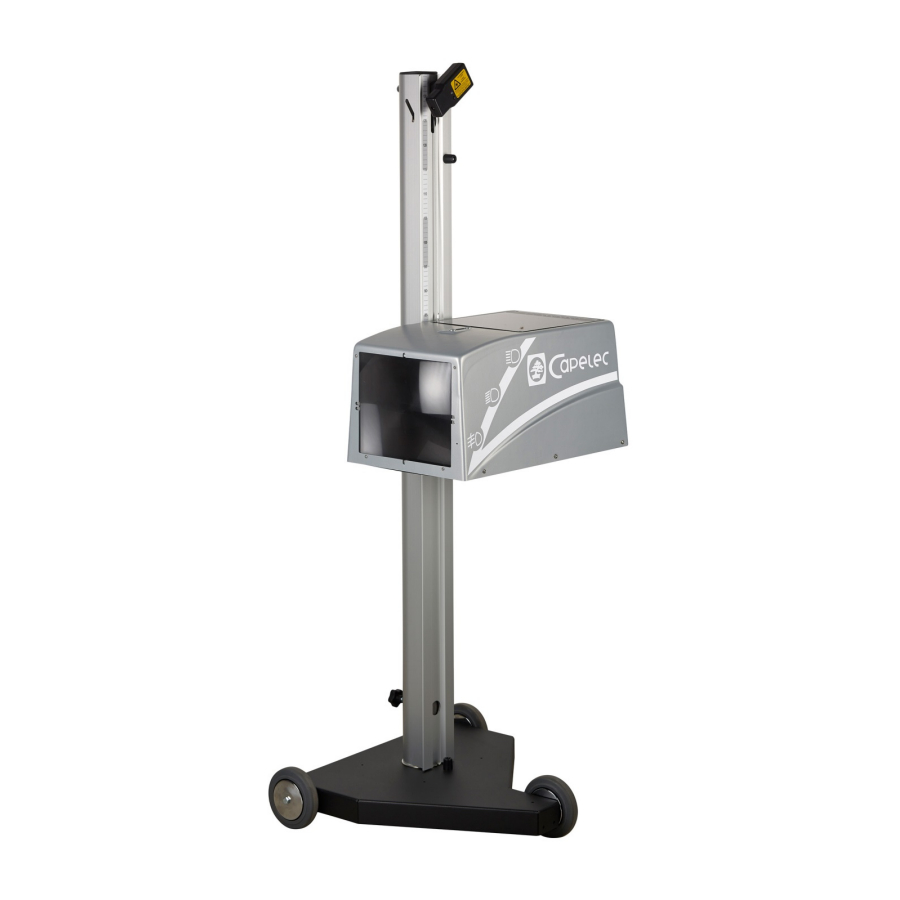
Page 26: Technical Characteristics
L x W x H : 590 x 670 x 1550 m Autonomy 15h on rechargeable battery in continuous operating Quick recharge in 3h30 with automatic stop (only with CAP2500) Operating conditions: CAP2500 rechargeable batteries: 4 x rechargeable accumulator R14 C-Type ... - Page 27 This symbol indicates that, in accordance with DEEE directive (2002/96/CE) and with the regulation of your country, this product should not be thrown with the household refuse. You must deposit it in a place of collecting envisaged to this end, fro example, an official site of collection of the electric components and electronics (EEE) for their recycling or a terminal point of products authorized which is accessible when you acquire of a new product of...