
Related Manuals for Kramer VS-88HD


Summary of Contents for Kramer VS-88HD
- Page 1 Kramer Electronics, Ltd. Preliminary USER MANUAL Model: VS-88HD 8x8 HD-SDI Matrix Switcher...
-
Page 2: Table Of Contents
Your VS-88HD 8x8 HD-SDI Matrix Switcher Using the IR Transmitter Installing the VS-88HD in a Rack Connecting the VS-88HD Connecting the VS-88HD in the Single Link Mode Connecting the VS-88HD in the Dual Link Mode Setting the Working Mode Connecting the RS-232 Port 6.4.1... - Page 3 Figure 1: VS-88HD 8x8 HD-SDI Matrix Switcher Figure 2: Connecting the VS-88HD 8x8 HD-SDI Matrix Switcher Figure 3: VS-88HD Dual-Link Inputs and Outputs Figure 4: Connecting the Dual-Link VS-88HD 8x8 HD-SDI Matrix Switcher Figure 5: DIP-Switch Settings Figure 6: Local Area Connection Properties Window...
- Page 4 Contents Tables Table 1: Front Panel VS-88HD 8x8 HD-SDI Matrix Switcher Table 2: Rear Panel VS-88HD 8x8 HD-SDI Matrix Switcher Table 3: Machine # DIP-Switch Settings Table 4: DIP-Switch Settings Table 5: Genlock Settings Table 6: VS-88HD Technical Specifications Table 7: Communication Parameters...
-
Page 5: Introduction
2 We recommend that you use only the power cord supplied with this device 3 Download up-to-date Kramer user manuals from our Web site at http://www.kramerelectronics.com 4 The complete list of Kramer cables is on our Web site at http://www.kramerelectronics.com... -
Page 6: Quick Start
Getting Started Quick Start This quick start chart summarizes the basic setup and operation: KRAMER: SIMPLE CREATIVE TECHNOLOGY... -
Page 7: Overview
SMPTE RP-168 The VS-88HD is housed in a 19" 1U rack-mountable enclosure, and is fed from a 100-240 VAC universal switching power supply. The unit can be controlled via the front panel buttons or via: ... -
Page 8: Your Vs-88Hd 8X8 Hd-Sdi Matrix Switcher
VS-88HD away from moisture, excessive sunlight and dust Your VS-88HD 8x8 HD-SDI Matrix Switcher Figure Table 1, and Table 2 define the VS-88HD 8x8 HD-SDI Matrix Switcher. 1 Available from Kramer Electronics on our Web site at http://www.kramerelectronics.com KRAMER: SIMPLE CREATIVE TECHNOLOGY... -
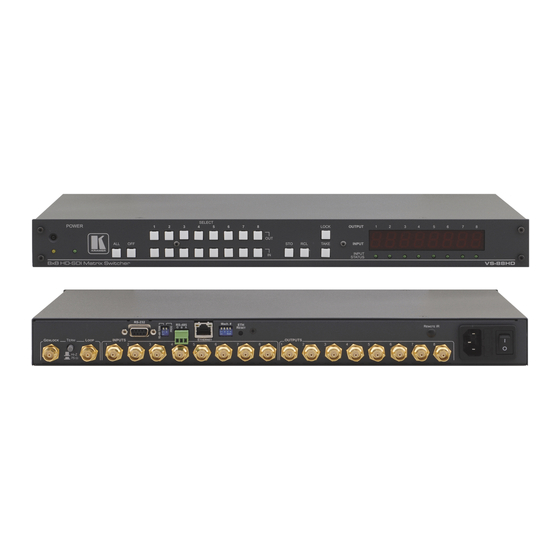
Page 9: Figure 1: Vs-88Hd 8X8 Hd-Sdi Matrix Switcher
Your VS-88HD 8x8 HD-SDI Matrix Switcher Figure 1: VS-88HD 8x8 HD-SDI Matrix Switcher... -
Page 10: Table 1: Front Panel Vs-88Hd 8X8 Hd-Sdi Matrix Switcher
2 Optional. Can be used instead of the front panel (built-in) IR receiver to remotely control the VS-88HD (only if the internal IR connection cable has been installed) (See section 4.1) -
Page 11: Using The Ir Transmitter
This distance can be extended to up to 60 meters when used with three extension cables Before using the external IR receiver, be sure to arrange for your Kramer dealer to insert the internal IR connection cable with the 3.5mm connector that fits into the REMOTE IR opening on the rear panel. -
Page 12: Installing The Vs-88Hd In A Rack
Installing the VS-88HD in a Rack Installing the VS-88HD in a Rack This section provides instructions for rack mounting the unit. KRAMER: SIMPLE CREATIVE TECHNOLOGY... -
Page 13: Connecting The Vs-88Hd
ETHERNET connector (see section 6.7) 6. Connect the power cord 1 Switch OFF the power on each device before connecting it to your VS-88HD. After connecting your VS-88HD, switch on its power and then switch on the power on each device... -
Page 14: Figure 2: Connecting The Vs-88Hd 8X8 Hd-Sdi Matrix Switcher
Connecting the VS-88HD Figure 2: Connecting the VS-88HD 8x8 HD-SDI Matrix Switcher KRAMER: SIMPLE CREATIVE TECHNOLOGY... -
Page 15: Connecting The Vs-88Hd In The Dual Link Mode
1 The graphic on the rear panel does not indicate the dual link connections 2 Switch OFF the power on each device before connecting it to your VS-88HD. After connecting your VS-88HD, switch on its power and then switch on the power on each device... -
Page 16: Figure 3: Vs-88Hd Dual-Link Inputs And Outputs
Connecting the VS-88HD Figure 3: VS-88HD Dual-Link Inputs and Outputs Figure 4: Connecting the Dual-Link VS-88HD 8x8 HD-SDI Matrix Switcher KRAMER: SIMPLE CREATIVE TECHNOLOGY... -
Page 17: Setting The Working Mode
Connecting the RS-232 Port You can connect to the VS-88HD via an RS-232 connection using, for example, a PC. Note that a null-modem adapter/connection is not required. To connect to the VS-88HD via RS-232: ... -
Page 18: Setting The Dip-Switches
Connecting the VS-88HD Table 3: Machine # DIP-Switch Settings DIP-SWITCH Machine # 1 (Single or master unit Note: After changing the address, the device must be reset by turning OFF and ON. 6.4.2 Setting the DIP-Switches When controlling a unit via the RS-232 or RS-485 ports set the DIP-switches on the rear of the unit. -
Page 19: Connecting A Pc Or Controller To The Rs-485 Port
OFF. Connecting a PC or Controller to the RS-485 Port You can operate the VS-88HD via the RS-485 port from a distance of up to 1200 meters (3900ft) using any device equipped with an RS-485 port (for example, a PC). -
Page 20: Switching Genlocked Video Signals
6.7.1 Connecting the ETHERNET Port Directly to a PC (Crossover Cable) You can connect the Ethernet port of the VS-88HD to the Ethernet port on your PC, via a crossover cable with RJ-45 connectors. This type of connection is recommended for identification of the factory default... -
Page 21: Figure 6: Local Area Connection Properties Window
Connecting the VS-88HD 2. Select Properties. 3. Right-click Local Area Connection Properties. 4. Select Properties. The Local Area Connection Properties window appears. 5. Select the Internet Protocol (TCP/IP) and click the Properties Button (see Figure Figure 6: Local Area Connection Properties Window 6. -
Page 22: Connecting The Ethernet Port Via A Network Hub (Straight-Through Cable)
Connecting the VS-88HD 6.7.2 Connecting the ETHERNET Port via a Network Hub (Straight- Through Cable) You can connect the Ethernet port of the VS-88HD to the Ethernet port on a network hub or network router, via a straight-through cable with RJ-45 connectors. -
Page 23: Controlling Via The Ethernet Port
4. If required, make changes and press Set. If not, click Close. Controlling via the Ethernet Port You can control the VS-88HD via RS-232/RS-485 or the Ethernet using the Kramer K-Router application. If you are controlling a standalone unit via RS-232 or the Ethernet, configure the unit as master (Mach No. -
Page 24: Operating The Vs-88Hd
The following operations are performed by using the front panel buttons. 7.1.1 Power On Display When the VS-88HD is powered on, the display briefly shows the 4-digit firmware version number, the genlock timing setting, and then the display changes to its normal operating display. -
Page 25: Toggling Between Modes
Operating the VS-88HD 1. Press an OUT SELECT button or the ALL button. The 7-segment display flashes. 2. Press an IN SELECT button1 or the OFF button The selected input switches to the selected output. The digits displayed in the 7-segment display change as appropriate. -
Page 26: Recalling An Input/Output Configuration
Note: Recalling an invalid setup gives an error indication. If you cannot remember which of the eight input/output configurations is the one that you want, set the VS-88HD to the CONFIRM mode and manually scan all the input/output configurations until you locate it. -
Page 27: Indicating Errors
Using Serial Commands To operate the VS-88HD using serial commands, Kramer offers control software that can do this. You can download free software from the Kramer Electronics Web site. For an explanation of all KRAMER 3000 commands, see section 10.2... -
Page 28: Technical Specifications
Technical Specifications Technical Specifications The VS-88HD technical specifications are shown in Table Table 6: VS-88HD Technical Specifications INPUTS: 8 SMPTE-259M, 344M, 292M and 372M (dual link) serial video, 75ΩonBNCconnectors OUTPUTS: 8 equalized and reclocked SMPTE-259M, 344M, 292M and 372M (dual link) outputs75ΩonBNCconnectors MAX. -
Page 29: Using The P3K Wizard
10.1 Changing the Device Parameters To change the device parameters do the following: 1. Connect a PC to the VS-88HD using any one of the following connections: Connect a serial cable from an RS-232 9-pin D-sub rear panel port on the PC to the VS-88HD as explained in section 6.4. -
Page 30: Figure 11: Connect Window
Using the P3K Wizard Figure 11: Connect Window 4. Choose the appropriate type of connection: Ethernet BY IP, BY NAME, or SERIAL/USB, and click OK. The Connect window disappears and the Device Properties window appears. KRAMER: SIMPLE CREATIVE TECHNOLOGY... -
Page 31: Updating The Vs-88Hd Firmware
5. Change the parameters in the white fields as required and click SET. 10.2 Updating the VS-88HD Firmware The VS-88HD uses a microcontroller that runs firmware located in FLASH memory. The latest version of firmware and installation instructions can be... -
Page 32: Kramer Protocol 3000
® Note: If you are using Kramer’s Windows -based control software operates only with Protocol 2000. If the VS-88HD is set to Protocol 3000, it automatically switches to Protocol 2000. 1 Download the latest software from our Web site at http://www.kramerelectronics.com... -
Page 33: Kramer Protocol 3000 Syntax
Kramer Protocol 3000 11.2 Kramer Protocol 3000 Syntax Protocol 3000 communicates at a data rate of 115200 baud, no parity, 8 data bits and 1 stop bit. 11.2.1 Host Message Format Start Address (optional) Body Delimiter Destination_id@ Message 11.2.2 Simple Command... -
Page 34: Command Terms
11.2.7 Entering Commands You can directly enter all commands using a terminal with ASCII communications software, such as HyperTerminal, Hercules, etc. Connect the terminal to the serial, Ethernet, or USB port on the Kramer device. To enter , press the Enter key. -
Page 35: Command Forms
Kramer Protocol 3000 11.2.8 Command Forms Some commands have short name syntax in addition to long name syntax to allow faster typing. The response is always in long syntax. 11.2.9 Command Chaining Multiple commands can be chained in the same string. Each command is delimited by a pipe character ( '|' ). -
Page 36: Kramer Protocol 3000 Commands
Kramer Protocol 3000 11.3 Kramer Protocol 3000 Commands 11.3.1 Device Initiated Messages Command Syntax Switcher actions: Video channel has switched (breakaway mode) VID IN>OUT 11.3.2 Result and Error Codes Syntax Command ran successfully, no error. COMMAND PARAMETERS OK Protocol Errors:... -
Page 37: Preset Commands
Kramer Protocol 3000 11.3.4 Preset Commands Command Syntax Response Store current connections to PRST-STO PRESET PRST-STO PRESET RESULT preset Short form: PSTO PRESET Recall saved preset PRST-RCL PRESET PRST-RCL PRESET RESULT Short form: PRCL PRESET Delete saved preset PRST-DEL PRESET... -
Page 38: Identification Commands
Short form: ETHP? PROTOCOL = TCP/UDP (transport layer protocol) PORT = Ethernet port that accepts Protocol 3000 commands 1-65535 = User defined port 0 - Reset port to factory default (50000 for UDP, 5000 for TCP) KRAMER: SIMPLE CREATIVE TECHNOLOGY... -
Page 39: Hex Table (Protocol 2000)
Hex Table (Protocol 2000) Hex Table (Protocol 2000) Table 8 lists the Hex values for a single machine (MACHINE # 1): Table 8: VS-88HD Hex Codes for Switching via RS-232/RS-485 OUT 1 OUT 2 OUT 3 OUT 4 OUT 5... -
Page 40: Kramer Protocol 2000
Kramer Protocol 2000 Kramer Protocol 2000 The VS-88HD is compatible with Kramer’s Protocol 2000 , version 0.50. This RS-232/RS-485 communication protocol uses four bytes of information as defined below. The default data rate is 9600 baud, with no parity, 8 data bits, and 1 stop bit. -
Page 41: Table 10: Instruction Codes For Protocol 2000
Kramer Protocol 2000 For a single machine controlled via the serial port, always set M4…M0 = 1, and make sure that the machine itself is configured as MACHINE NUMBER = 1. Table 10: Instruction Codes for Protocol 2000 Note: All values in the table are decimal, unless otherwise stated. - Page 42 (in real-time). For example, if input 3 is detected as invalid, the unit will send the HEX codes If input 7 is detected as valid, then the unit will send HEX codes KRAMER: SIMPLE CREATIVE TECHNOLOGY...
- Page 43 39 39...
- Page 44 For the latest information on our products and a list of Kramer www.kramerelectronics.com distributors, visit our Web site: where updates to this user manual may be found. We welcome your questions, comments and feedback. Safety Warning: Disconnect the unit from the power supply before opening/servicing.
Need help?
Do you have a question about the VS-88HD and is the answer not in the manual?
Questions and answers