
Related Manuals for Invacare Leo


Summary of Contents for Invacare Leo
- Page 1 Invacare® Leo en Scooter User Manual This manual MUST be given to the user of the product. BEFORE using this product, this manual MUST be read and saved for future reference.
- Page 2 All rights reserved. Republication, duplication or modification in whole or in part is prohibited without prior written permission from Invacare. Trademarks are identified by ™ and ®. All trademarks are owned by or licensed to Invacare Corporation or its subsidiaries unless otherwise noted.
-
Page 3: Table Of Contents
Contents 4.2 Rollator bracket....... . 24 4.2.1 Attaching the rollator ......24 4.2.2 Removing the rollator bracket . - Page 4 7.2.3 How to charge the batteries....39 13 Service ......... 60 7.2.4 How to disconnect the batteries after charging.
-
Page 5: General
For more information about the product, for example 1.3 Compliance product safety notices and product recalls, contact your Invacare distributor. See addresses at the end of this Quality is fundamental to the company’s operation, working document. within the disciplines of ISO 13485. -
Page 6: Product-Specific Standards
We are continuously working towards ensuring that the company’s impact on the environment, locally and globally, You should immediately contact an authorised Invacare is reduced to a minimum. provider if the usability of your mobility device is restricted We only use REACH compliant materials and components. -
Page 7: Service Life
The effective service life can vary according to frequency and intensity of use. 1.7 Limitation of Liability Invacare accepts no liability for damage arising from: • Non-compliance with the user manual •... -
Page 8: Safety
Invacare® Leo 2 Safety WARNING! Risk of Serious Injury or Damage Improper use of this product may cause injury 2.1 General safety notes or damage. – If you are unable to understand the warnings, DANGER! cautions or instructions, contact a health care... - Page 9 Safety WARNING! WARNING! Risk of damage or injury if mobility device is Risk of falling out of the mobility device accidentally set into motion – If a posture belt is installed, it should be – Switch off the mobility device before you get correctly adjusted and used each time you use in, get out or handle unwieldy objects.
-
Page 10: Safety Information On The Electrical System
Invacare for this purpose. Have all electrical the batteries. Be sure at all times to adopt the installations done by your authorized Invacare correct lifting posture and ask for assistance provider. - Page 11 Safety WARNING! WARNING! Risk of death, serious injury or damage when Risk of death, serious injury, or damage carrying along oxygen systems Corroded electrical components due to water or Textiles and other materials that normally would liquid exposure can result in death, serious injury, not burn are easily ignited and burn with great or damage.
-
Page 12: Safety Information On Electromagnetic Interference
Invacare® Leo WARNING! Risk of damage to the mobility device Risk of death or serious injury A failure in the electric system can lead to Failure to observe these warnings can cause an unusual behavior such as continuous light, no electrical short resulting in death, serious injury, light, or noises from the magnetic brakes. -
Page 13: Safety Information On Driving And Freewheel Mode
Safety 2.4 Safety information on driving and freewheel WARNING! mode Risk of malfunction due to electromagnetic interference WARNING! – Do not switch on or operate portable Risk of injury if the mobility device tips over transceivers or communication devices (such as –... - Page 14 Invacare® Leo WARNING! WARNING! Risk of injury if the mobility device tips over The center of gravity of the scooter is higher (continued) than that of a power wheelchair. – Never use the mobility device to transport There is an increased tipping risk when more than one person.
-
Page 15: Safety Information With Regard To Care And Maintenance
– DO NOT attempt to carry out maintenance work that is not described in this user manual. Such repair and/or service MUST be performed by a qualified technician. Contact a provider or Invacare technician. 1506942-S... -
Page 16: Safety Information Regarding Changes And Modifications To The Mobility Device
– Only use seating systems that have been approved by Invacare for this mobility device. Electrical and electronic components which have not been approved by Invacare for use with this mobility device can cause fire hazards and lead to electromagnetic damage. - Page 17 – The CE marking is invalidated if components or accessories are replaced or added that have not been approved for this product by Invacare. – In this case, the company that adds or replaces the components or accessories is responsible...
-
Page 18: Product Overview
Invacare® Leo 3.4 Labels on Product 3 Product Overview 3.1 Intended Use This mobility device was designed for persons whose ability to walk is impaired, but who are still in terms of their eyesight and physically and mentally able to operate an electric mobility device. - Page 19 Product Overview Identification of the Warning that the position of the coupling mobility device may lever for driving and not be used as a push operation. vehicle seat. For details see below. This mobility device does not satisfy the requirements of ISO 7176-19.
- Page 20 Invacare® Leo Explanation of Symbols on Labels Medical device This symbol indicates the “Drive” position The product needs to be of the coupling lever. tied down at indicated In this position the tie-down points with a motor is engaged and...
-
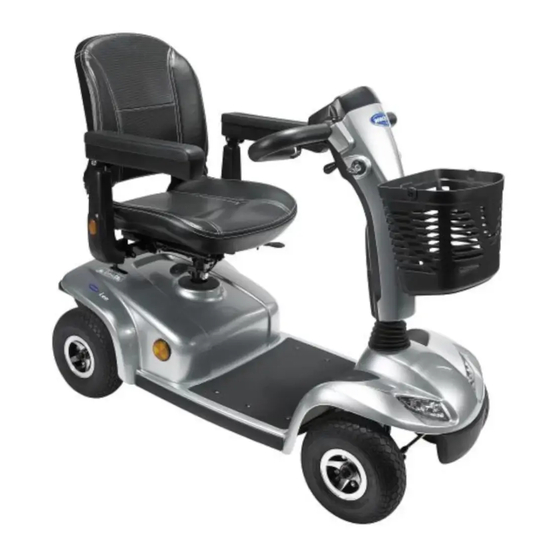
Page 21: Main Parts Of The Scooter
Product Overview 3.5 Main parts of the scooter Disengaging lever Brake lever (right-hand lever) 3.6 Operating console arrangement Battery charge display Operating console Speed controller Lever for adjusting tiller inclination Horn Keyswitch (ON/OFF) Left-hand direction indicator (switches itself off Unlocking lever for swivelling and removing seat automatically after 30 seconds) (left below seat) Lighting... -
Page 22: Status Display
Invacare® Leo Right-hand direction indicator (switches itself off Overdischarge protection: after a certain drive time on reserve battery power the electronics system automatically after 30 seconds) switches the drive off automatically and brings the Drive lever Scooter to a standstill. If you do not drive your Scooter for a while the batteries will "recuperate"... -
Page 23: Accessories
Belt with metal buckle, adjustable one side Invacare. 4.1.3 Installing Posture Belt • 12 mm wrench •... -
Page 24: Rollator Bracket
Risk of damaging rollator bracket Transporting anything but a rollator can damage the rollator bracket. – Transport only rollators and nothing else. Only the following rollators have been approved by Invacare to be transported using this rollator bracket: • Dolomite Jazz 600... -
Page 25: Removing The Rollator Bracket
Accessories 4.2.2 Removing the rollator bracket Dolomite Legacy 600 Invacare Banjo P452E/3 1. Loosen the screws (1). 2. Pull the rollator bracket out of the fixtures. 4.2.3 Positioning the rear reflector CAUTION! Risk of accident due to poor visibility If you wish to use your mobility device on public... - Page 26 Invacare® Leo 1. Position the rear reflector as shown in the drawing. 1506942-S...
-
Page 27: Setup
Setup 5 Setup 5.1 Adjusting the armrest width WARNING! Serious injury If one of the armrests is adjusted to a width which exceeds the permissible value the armrest falls out of its brackets which could lead to serious injury. – The width adjustment is fitted with small stickers with markings and the word “STOP”. -
Page 28: Replacing Armrest Pad
Invacare® Leo 3. Use the mounting screw and washer to install the new armrest pad. Securely tighten. 4. If necessary, repeat STEPS 1-3 to replace the other armrest pad. 5.4 Adjusting the Seat Position Forward/Rearward 1. Lift up the armrest. -
Page 29: Removing/Installing The Seat
Setup 5.5 Removing/Installing the seat 3. Turn the seat so it faces forward and locks into position. 4. Lift up on seat assembly to ensure the seat is secure. WARNING! Risk of falling from the scooter 5.6 Adjusting 90° Seat Swivel –... -
Page 30: Adjusting The Tiller Angle
Invacare® Leo 1. Pull up the seat lock lever A to unlock the seat B. 2. Rotate the seat to the desired position. 3. Release the seat lock lever to lock the seat in the desired position. Ensure that the seat is locked in the forward facing position before operating the scooter. -
Page 31: Adjusting The Headrest
Setup 5.9 Adjusting the headrest 1. To raise headrest, push the release button A and lift Take note of position and orientation of mounting headrest up to desired position. hardware before removing. 2. To lower headrest, push the release button and lower headrest to the desired position. - Page 32 Invacare® Leo Audible Signal AUDIBLE KEYSTROKE CONDI- SIGNAL COMBINATION LEDS TION 1 2 3 4 5 6 7 Deacti- Lighting C + Left vated Battery Direction Indicator D Capacity 1 + 2 Activated Deacti- Direction Lighting C + Right vated...
-
Page 33: Usage
Usage 6 Usage 6.1 Getting in and out Lift the detent lever A up. The armrests can be swivelled upwards to assist getting in and out. The seat can also be rotated to assist getting in and out. Turn the seat to the side. Information on turning the seat –... -
Page 34: Taking Obstacles
Invacare® Leo operating elements. Take your time to test all functions 6.3.3 The correct way to overcome obstacles and driving modes. If installed, make sure to properly adjust and use the posture belt each time you use the mobility device. -
Page 35: Parking And Stationary
Usage 6.5 Parking and stationary WARNING! Risk of tipping over If you park your vehicle, or leave it idle or unattended for – Only ever drive downhill at a maximum of 2/3 a longer period: of the top speed. – If your scooter is fitted with an adjustable 1. -
Page 36: Use On Public Roads
Invacare® Leo Activating Parking Brake when the power supply is turned off. When pushing the scooter, the magnetic brakes must be disengaged. 6.8.1 Disengaging motors CAUTION! Risk of the vehicle running away – When the motors are disengaged (for push operation whilst freewheeling), the electromagnetic motor brakes are deactivated. -
Page 37: Driving The Scooter
Usage Engaging the drive The control system is programmed with standard values in the works. Your Invacare dealer can carry 1. Pull the lever to the rear. out programming tailored to fit your requirements. The drive is now engaged. 6.9 Driving the scooter... -
Page 38: Controls System
7 Controls System A defective main fuse may be replaced only after checking the entire electrical system. A specialized Invacare provider must perform the replacement. 7.1 Electronics Protection System You can find information on the fuse type in 12 Technical Data, page 56. -
Page 39: How To Charge The Batteries
Use only charging devices in Class 2. This class of – Do not use the battery charger if it has been chargers may be left unattended during charging. All dropped or damaged. charging devices which are supplied by Invacare comply with these requirements. WARNING! •... -
Page 40: How To Disconnect The Batteries After Charging
Invacare® Leo • Do not leave the batteries in a low state of charge WARNING! for an extended length of time. Charge a discharged Risk of fire and electric shock if a damaged battery as soon as possible. extension cable is used •... -
Page 41: Transporting Batteries
Controls System • Driving with blinking red LED means an extreme stress 7.2.7 Transporting Batteries for the battery and should be avoided under normal The batteries supplied with your mobility device are circumstances. not hazardous goods. This classification is based on the •... -
Page 42: Handling Damaged Batteries Correctly
Disposing of Dead or Damaged Batteries Correctly Open the battery retaining strap A. Dead or damaged batteries can be given back to your provider or directly to Invacare. 4. Unplug battery connecting plug B. 5. Remove battery. 6. Repeat procedure for other battery. -
Page 43: Transport
Transport 8.2 Transporting the Scooter 8 Transport WARNING! 8.1 Transport - General information Risk of injury or damage – After any adjustments, repair or service and WARNING! before use, make sure that all attaching Risk of severe or fatal injuries in the event hardware is tightened securely - otherwise of a traffic accident if this mobility device is injury or damage may result. -
Page 44: Removing/Installing The Batteries
Invacare® Leo 8.3 Removing/Installing the Batteries 6. Hold the seat post B with one hand. 7. With the other hand, push the release lever C to the rear of the scooter. 8. Lift the seat post to separate the front frame assembly D from the rear frame assembly E. -
Page 45: Transferring Mobility Device To Vehicle
1. Drive or push your mobility device into transport vehicle using suitable ramp. 8.5 Transporting Mobility Device Without Occupant CAUTION! Risk of injury – If you are unable to fasten your mobility device securely in a transport vehicle, Invacare recommends that you do not transport it. 1506942-S... -
Page 46: Maintenance
The following tables list inspection checks that should be performed by the user within the indicated intervals. If the mobility device fails to pass one of the inspection checks, refer to the chapter indicated or contact your authorized Invacare provider. A more comprehensive list of inspection checks and instructions for maintenance work can be found in the service manual for this device, which can be obtained from Invacare. -
Page 47: Wheels And Tyres
Maintenance Weekly Item Inspection check If inspection is not passed Armrests / side parts Check that armrests are firmly attached Tighten the screw or clamping lever that holds the in their holders and do not wobble. armrest (refer to 5.1 Adjusting the armrest width, page 27). -
Page 48: Short-Term Storage
The power module prevents your mobility device For recommended tyre pressure see inscription on tyre/rim from driving. or contact Invacare. Compare table below for conversion. When the mobility device is in such a condition and while waiting for repair: 1. -
Page 49: Cleaning And Disinfection
Maintenance Storing Mobility Device and Batteries • Have the mobility device checked by an authorised Invacare provider. • We recommend to store the mobility device at a temperature of 15 °C, avoid hot and cold extremes 9.6 Cleaning and Disinfection when storing to ensure a long service life of the product and batteries. -
Page 50: Cleaning Intervals
Invacare® Leo 9.6.2 Cleaning Intervals IMPORTANT! Wrong fluids or methods can harm or damage IMPORTANT! the product. Regular cleaning and disinfection enhances – All cleaning agents and disinfectants used must smooth operation, increases the service life and be effective, compatible with one another and prevents contamination. -
Page 51: Disinfection
Maintenance 1. Remove any installed optional equipment (only optional equipment which does not require tools). 2. Wipe down the individual parts using a cloth or soft brush, ordinary household cleaning agents (pH = 6 - 8) and warm water. 3. Rinse the parts with warm water. 4. -
Page 52: After Use
Invacare® Leo 10.2 Disposal 10 After Use WARNING! 10.1 Reconditioning Environmental Hazard Device contains batteries. This product is suitable for reuse. To recondition the product This product may contain substances that could for a new user, carry out the following actions: be harmful to the environment if disposed of •... -
Page 53: Troubleshooting
Troubleshooting If the status display is OFF: 11 Troubleshooting • Check whether the keyswitch is SWITCHED ON. 11.1 Diagnosis and fault repair • Check whether all cables are correctly connected. If the status bar indicator is FLASHING: The electronic system offers diagnostic information to support the technician during the recognition and •... -
Page 54: Error Codes And Diagnostic Codes
Switch the scooter off, wait a few minutes and then switch on again. • The electronic system has determined a motor short-circuit. Check the wiring harness for short-circuit and check the motor. • Contact your Invacare provider. 1506942-S... - Page 55 Ensure that the disengaging lever is in the engaged position. • There is a defect in the braking coil or in the cabling. Check the magnetic brake and cabling for open or short-circuited circuitry. Contact your Invacare provider. No neutral position when Stops driving •...
-
Page 56: Technical Data
Invacare® Leo 12 Technical Data 12.1 Technical specifications The technical information provided hereafter applies to a standard configuration or represents maximum achievable values. These can change if accessories are added. The precise changes to these values are detailed in the sections for the respective accessories. - Page 57 Technical Data Tyres Tyre type • 10" pneumatic or puncture-proof Tyre pressure The recommended maximum tyre pressure in bar or kpa is marked on the side wall of the tyre or the rim. If more than one value is listed, the lower one in the corresponding units applies. (Tolerance = -0.3 bar, 1 bar = 100 kpa) Driving characteristics Speed (dependent on country - please ask your provider which speed...
- Page 58 Invacare® Leo Dimensions according to ISO 7176–15 Total height • 990 mm (standard seat) • 987 – 1225 mm (seat with headrest) Seat width • 470 mm • 410 mm Seat depth Seat angle • 6° Backrest height • 475 mm (standard seat) •...
- Page 59 Technical Data Axle loads Max. front axle load • 85 kg Max. rear axle load • 160 kg IPX4 classification means that the electrical system is protected against spray water. Static stability according to ISO 7176-1 = 9° (15.8 %) Dynamic stability according to ISO 7176-2 = 6°...
-
Page 60: Service
Invacare® Leo 13 Service 13.1 Inspections Performed It is confirmed by stamp and signature that all jobs listed in the inspection schedule of the service and repair instructions have been properly performed. The list of the inspection jobs to be performed can be found in the service manual which is available through Invacare. - Page 61 Service Stamp of authorised provider / Date / Signature Stamp of authorised provider / Date / Signature 4th Annual Inspection 5th Annual Inspection Stamp of authorised provider / Date / Signature Stamp of authorised provider / Date / Signature 1506942-S...
- Page 62 Notes...
- Page 63 Notes...
- Page 64 Notes...
- Page 65 Notes...
- Page 66 Invacare representatives/distributors Australia: Canada: Ireland: New Zealand: Invacare Australia Pty. Ltd. Invacare Canada L.P. Invacare Ireland Ltd, Invacare New Zealand Ltd 1 Lenton Place, North Rocks NSW 570 Matheson Blvd East, Unit 8 Unit 5 Seatown Business Campus 4 Westfield Place, Mt Wellington 1060 2151 CDN Mississauga, On.
Need help?
Do you have a question about the Leo and is the answer not in the manual?
Questions and answers