Table of Contents
Advertisement
Quick Links
Advertisement
Table of Contents
Troubleshooting

Related Manuals for Invacare Leo


Summary of Contents for Invacare Leo
- Page 1 Owner’s Operator and Maintenance Manual Leo Scooter DEALER: This manual MUST be given to the user of the scooter. USER: BEFORE using this scooter, read this manual and save for future reference. For more information regarding Invacare products, parts, and services, please visit www.invacare.com...
-
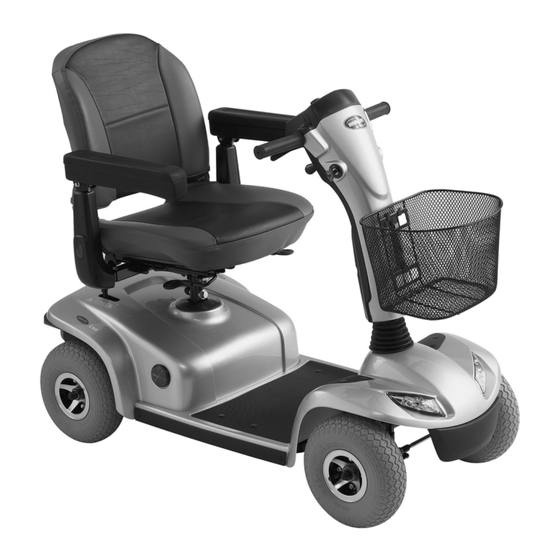
Page 2: Typical Product Parameters
ACCESSORIES WARNING Invacare products are specifically designed and manufactured for use in conjunction with Invacare accessories. Accessories designed by other manufacturers have not been tested by Invacare and are not recommended for use with Invacare products. -
Page 3: Table Of Contents
Removing/Installing the Front Wheel ............................... 30 SECTION 11—BATTERIES ................... 31 Recommended Battery Type................................31 Removing/Installing the Batteries............................... 32 Charging the Batteries..................................34 SECTION 12—TRANSPORTING THE SCOOTER ............. 35 Transporting the Scooter ..................................35 LIMITED WARRANTY ....................36 Part No. 1163141 Leo Scooter... -
Page 4: Special Notes
THE INFORMATION CONTAINED IN THIS DOCUMENT IS SUBJECT TO CHANGE WITHOUT NOTICE. As a manufacturer of powered scooters, Invacare endeavors to supply a wide variety of powered scooters to meet many needs of the end user. However, final selection of the type of powered scooter to be used by an individual rests solely with the user and his/her healthcare professional capable of making such a selection. -
Page 5: Section 1-General Guidelines
DO NOT service or adjust your powered scooter while occupied, unless otherwise noted. Scooters should be examined during maintenance for signs of corrosion (water exposure, incontinence, etc.). Electrical components damaged by corrosion should be replaced IMMEDIATELY. Scooters that are used by incontinent users and/or are frequently exposed to water may require replacement of electrical components more frequently. Operation Information Invacare products are specifically designed and manufactured for use in conjunction with Invacare accessories. Accessories designed by other manufacturers have not been tested by Invacare and are not recommended for use with Invacare products. Performance adjustments should only be made by professionals of the healthcare field or persons fully conversant with this process and the driverʹs capabilities. Incorrect settings could cause injury to the driver, bystanders and damage to the scooter and to surrounding property. Before using the scooter, verify that the motor is plugged into the harness. DO NOT connect any medical devices such as ventilators, life support machines, etc., to the battery. This could cause unexpected failure of the device and the powered scooter. DO NOT operate the powered scooter until you have checked that the surroundings are clear and that the area is safe for travel. DO NOT make sharp turns in the forward or reverse direction at excessive speed. Failure to observe the warning can cause the scooter to tip over and may result in injury to user and/or damage to the product. DO NOT operate on roads, streets or highways. Otherwise, serious injury or damage may occur. DO NOT attempt to move up or down an incline with water, ice or oil film. Avoid operating the scooter in dark or poorly lit areas. DO NOT climb and/or go up or down ramps or traverse slopes greater than 8°. When negotiating ramps, if the throttle control lever is released while in the forward motion, the powered scooter will roll back approximately one foot before the brake engages. If the throttle control lever is released while in the reverse motion, the powered scooter will roll back approximately three feet before the brake engages. DO NOT attempt to drive over curbs or obstacles. Doing so may cause your powered scooter to turn over and cause bodily harm and/or damage to the scooter. DO NOT use an escalator to move a powered scooter between floors. Serious bodily injury may occur. Powered scooter with batteries and seat weighs 184 lbs. Use proper lifting techniques (lift with your legs) to avoid injury. Part No. 1163141 Leo Scooter... - Page 6 DO NOT hang items off of the tiller adjustment lever. DO NOT stand on the frame of the powered scooter. DO NOT stand on the shroud(s) of the powered scooter. DO NOT operate the powered scooter without the rear shroud installed, to avoid injury and/or damage to scooter. DO NOT attempt to reach objects if you have to move forward in the seat or pick them up from the floor by reaching between your knees. DO NOT lean over the top of the back upholstery to reach objects behind you, as this may cause the powered scooter to tip over. DO NOT shift your weight or sitting position toward the direction you are reaching as the powered scooter may tip over. Determine and establish your particular safety limits by practicing bending, reaching and transferring activities in the presence of a qualified healthcare professional before attempting active use of the powered scooter. For individuals with balance problems, DO NOT attempt to transfer into or out of the powered scooter without assistance. Practice transferring activities with an assistant in the presence of a qualified healthcare professional. Ensure that the seat is properly locked before use. Otherwise the user may fall from the scooter resulting in bodily harm. Attempting unsafe transfers may cause the user to fall, resulting in serious injury. Ensure that the seat is locked in the forward position before and during the operation of the scooter. Otherwise, injury to the user and/or damage to the scooter may result. Ensure that the tiller is properly adjusted before driving the scooter. After making any tiller angle adjustment and before use, the tiller must be securely locked into position. Otherwise the user may fall from the scooter resulting in bodily harm and/or damage to the scooter. Gently push/pull the tiller to ensure that the tiller is securely engaged. DO NOT overtighten hardware attaching to the frame. This could cause damage to the frame tubing. ALWAYS keep hands and fingers clear of moving parts to avoid injury. ALWAYS check hand grips for looseness before using the powered scooter. If loose and/or worn, replace immediately. ALWAYS wear your seat positioning strap. Inasmuch as the seat positioning strap is an option on this scooter (you may order with or without the seat positioning strap), Invacare strongly recommends ordering the seat positioning strap as an additional safeguard for the scooter user. The seat positioning strap is a positioning belt only. It is not designed for use as a safety device withstanding high stress loads such as auto or aircraft safety belts. If signs of wear appear, belt must be replaced immediately. Leo Scooter Part No. 1163141...
-
Page 7: Electrical
Grounding Instructions DO NOT, under any circumstances, cut or remove the round grounding prong from any plug used with or for Invacare products. Some devices are equipped with three‐prong (grounding) plugs for protection against possible shock hazards. Where a two‐prong wall receptacle is encountered, it is the personal responsibility and obligation of the customer to contact a qualified electrician and have the two‐prong receptacle replaced with a properly grounded three‐prong wall receptacle in accordance with the National Electrical Code. If you must use an extension cord, use ONLY a three‐wire extension cord having the same or higher electrical rating as the device being connected. In addition, Invacare has placed RED/ORANGE warning tags on some equipment. DO NOT remove these tags. Batteries The warranty and performance specifications contained in this manual are based on the use of deep cycle gel cell batteries. Invacare strongly recommends their use as the power source for this unit. Carefully read battery/battery charger information prior to installing, servicing or operating your powered scooter. Rain Test Invacare has tested its powered scooters in accordance with ISO 7176 “Rain Test”. This provides the end user or his/her attendant sufficient time to remove his/her power powered scooter from a rain storm and retain powered scooter operation. DO NOT leave the powered scooter in a rain storm of any kind. DO NOT use the powered scooter in a shower. DO NOT leave the powered scooter in a damp area for any length of time. Direct exposure to rain or dampness will cause the scooter to malfunction electrically and mechanically; may cause the powered scooter to prematurely rust. Check to ensure that all electrical connections are secure at all times. Weight Training Invacare DOES NOT recommend the use of its powered scooters as a weight training apparatus. Invacare powered scooters have NOT been designed or tested as a seat for any kind of weight training. If occupant uses said powered scooter as a weight training apparatus, Invacare shall NOT be liable for bodily injury and the warranty is void. Weight Limitation The weight limitation is 350 lbs. Part No. 1163141 Leo Scooter... -
Page 8: Section 2-Label Locations
Otherwise, injury may occur. -------------------------------------------------------------------------------------------- Number DO NOT lift scooter up by the front or rear shroud. Otherwise injury or damage to the scooter may occur. 1118373 Rev A Label NOTE: The battery wiring label is located on the underside of the top shroud. Leo Scooter Part No. 1163141... -
Page 9: Section 3-Emi Information
NOTE: Other types of hand-held devices, such as cordless phones, laptop computers, AM/FM radios, TV sets, CD players, cassette players, and small appliances, such as electric shavers and hair dryers, so far as we know, are not likely to cause EMI problems to your pow- ered wheelchair. Part No. 1163141 Leo Scooter... - Page 10 2) This device has been tested to a radiated immunity level of 20 volts per meter. 3) The immunity level of the product is unknown. Modification of any kind to the electronics of this scooter as manufactured by Invacare may adversely affect the EMI immunity levels. Leo Scooter Part No. 1163141...
-
Page 11: Section 4-Safety/Handling Of Powered Scooters
ALWAYS wear your seat positioning strap. Inasmuch as the seat positioning strap is an option on this scooter (you may order with or without the seat positioning strap), Invacare strongly recommends ordering the seat positioning strap as an additional safeguard for the scooter user. -
Page 12: Escalators
DO NOT use an escalator to move a powered scooter between floors. Serious bodily injury may occur. Powered scooter with batteries and seat weighs 184 lbs. Use proper lifting techniques (lift with your legs) to avoid injury. Follow this procedure for moving the powered scooter between floors when an elevator is not available: Remove the occupant from the powered scooter. Disassemble the scooter. Refer to Transporting the Scooter on page 35. Carefully move the powered scooter components up or down the stairway. Once all the components of the scooter are transported to the desired location reassemble the scooter. Refer to Transporting the Scooter on page 35. Leo Scooter Part No. 1163141... -
Page 13: Section 5-Safety Inspection
❑ Clean upholstery and armrests. ❑ Ensure armrest pad sits flush against arm tube. ❑ Inspect the seat upholstery for rips and tears. ❑ Inspect seat swivel for release and engagement (seat locks into the determined swivel positions). ❑ Inspect for excessive side movement or binding when the drive wheels are raised or turned. ❑ Inspect front wheel/fork assembly for proper tension by spinning the wheel. The front wheel should come to a gradual stop. ❑ Check the front fork for damage or corrosion. ❑ Tighten locknut if the front wheel wobbles noticeably or loosen locknut if the wheel binds to a stop. ❑ Ensure that wheel bearings are clean and free of moisture. ❑ Ensure that the bolts and fasteners on the caster assemblies are tight. ❑ Inspect tires for flat spots and wear. ❑ Clean molded body shrouds. ❑ Check that all labels are present and legible. Inspect/Adjust Weekly ❑ Ensure that tiller adjustment mechanism engages and disengages properly and securely. ❑ Ensure that the scooter stops completely when throttle is released (i.e., does not continue to roll as if the throttle is activated). ❑ Inspect tires for flat spots and wear. Part No. 1163141 Leo Scooter... - Page 14 ❑ Tighten locknut if the front wheel wobbles noticeably or loosen locknut if the wheel binds to a stop. ❑ Inspect seat swivel for release and engagement (seat locks into the determined swivel positions). ❑ Inspect the seat positioning strap for signs of wear. Replace if worn or damaged. ❑ Inspect seat positioning strap for any signs of wear. Ensure buckle latches. Verify that the hardware that attaches the seat positioning strap to the frame is secure and undamaged. Replace if necessary. ❑ Ensure that the bolts and fasteners on the caster assemblies are tight. Inspect/Adjust Periodically ❑ Ensure that the powered scooter drives straight (no excessive drag or pull to one side). ❑ Check frame for damage and corrosion. ❑ Ensure that the brake release lever is easy to engage/disengage. ❑ Inspect for no excessive side movement or binding when the drive wheels are raised or turned. ❑ Check front fork for damage or corrosion. ❑ Ensure wheel bearings are clean and free of moisture. ❑ Clean upholstery and armrests. ❑ Inspect the seat upholstery for rips and tears. ❑ Ensure armrest pad sits flush against arm tube. ❑ Check that all labels are present and legible. ❑ Inspect electrical components for signs of corrosion. Replace is corroded or damaged. Leo Scooter Part No. 1163141...
-
Page 15: Section 6-Maintenance And Troubleshooting
Use care in storage. DO NOT allow any metallic objects to contact the exposed terminals. CAUTION Only use a damp cloth and gentle detergent for cleaning. Do not use any abrasive or scouring liq- uids. Suggested Maintenance Procedures Before using the powered scooter, make sure all nuts and bolts are tight. Check any parts for damage or wear and replace. Check all parts for proper adjustment. Ensure that batteries are properly maintained and charged as required. The wheels and tires should be checked periodically for cracks and wear, and should be replaced by a qualified technician. Regularly check for loose nuts and/or bolts in the front and drive wheels. If loose, have them adjusted by a qualified technician. Clean dirt, dust and grease from exposed components. Periodically have the bearings of the front wheel checked to make sure they are clean and free from moisture. Part No. 1163141 Leo Scooter... -
Page 16: Troubleshooting
Check all connections. Secure connections. Refer to Removing/Installing the Batteries on page 32. Status bar indicator is An error has occurred Count the number of blinks and refer to blinking Service Indicator Error Codes on page 17. Leo Scooter Part No. 1163141... -
Page 17: Service Indicator Error Codes
This may be due to a faulty motor. • Check the motor and associated connections and wiring. Contact your Invacare dealer. • Turn the scooter off, leave for a few minutes and turn back on again. -
Page 18: Section 7-Operation Of The Powered Scooter
Charge batteries immediately. beeps 3 times ALL - GREEN, Dark (not lit) None Charge batteries immediately. YELLOW and RED Status Display The status display LED is located on the top of the control panel. The status display indicates if the scooter is On or Off and also flashes to indicate error codes. Refer to Service Indicator Error Codes on page 17. Speed Control Knob The speed control knob is located in the center of the control panel. The Turtle icon represents the slowest speed and the Rabbit icon represents the fastest speed. Horn Button The horn button is located on the left side of the control panel. Warning Blinker Button The warning blinker button flashes the YELLOW indicator lights (front and rear, left and right) when pressed. Leo Scooter Part No. 1163141... -
Page 19: Operating The Scooter
For individuals with balance problems, practice transferring activities with an assistant in the presence of a qualified healthcare professional. DO NOT attempt to transfer into or out of the powered scooter without assistance. NOTE: For this procedure, refer to FIGURE 7.1 on page 20. Before operating the powered scooter, review Control Panel on page 18. Install the batteries. Refer to Removing/Installing the Batteries on page 32. Charge the batteries. Refer to Charging the Batteries on page 34. Part No. 1163141 Leo Scooter... - Page 20 NOTE: Throttle control levers operate such that moving one will also move the opposite side throttle control lever. NOTE: The throttle control lever is located below the control panel. To operate the scooter, depress the throttle control lever in the following manner: • To Move Forward ‐ Push the right side throttle control lever (away from the user) or pull the left side throttle control lever towards the user). • To Move in Reverse ‐ Push the left side throttle control lever (away from the user) or pull the right side throttle control lever (towards the user). • To Stop ‐ Release the throttle control lever and the powered scooter will quickly slow down and the brake will engage. The powered scooter is equipped with a ʺproportionalʺ control meaning that the farther you depress the throttle control lever, the faster the powered scooter travels. With a proportional control, you can drive as slowly in the high speed setting as you can in the low speed setting. Your top speed, however, is limited by the setting of the speed‐control knob. For safety reasons, reverse speed is limited to approximately 50% of forward speed. When first learning to drive, adjust speed control knob for a slow speed and try to drive the powered scooter as slowly as possible by depressing the throttle control lever only slightly. This exercise will help you learn to utilize the full potential of the proportional control and allow you to start and stop smoothly. DETAIL “A” - KEY Control Panel Throttle Control Lever FIGURE 7.1 Operating the Scooter Leo Scooter Part No. 1163141...
-
Page 21: Engaging/Disengaging The Brake Release Lever
"click" when stopping and starting the scooter. NOTE: For the following procedure, refer to FIGURE 7.2. The brake release lever manually engages and disengages the brake. The brake release lever is located under the seat on the right side. The brake must be engaged in normal driving conditions. Activation of the throttle control lever automatically releases the brake so that the powered scooter can drive. Releasing the throttle control lever automatically engages the brake so as to prevent the powered scooter from rolling on its own. When the brake release lever is disengaged and the key is removed, the powered scooter can be pushed. The powered scooter cannot be driven with the brake in the disengaged position. To engage the brake release lever (Drive) ‐ Depress the button and pull back the brake release lever. To disengage the brake release lever (Push) ‐ Depress the button and push the brake release lever forward . Button Push Forward to Disengage (Push) Brake Release Lever Pull Back to Engage (Drive) FIGURE 7.2 Engaging/Disengaging the Brake Release Lever Part No. 1163141 Leo Scooter... -
Page 22: Activating/Deactivating The Audible Signals
3 + 4 Activated Hazard Lamps Lighting + Warning Deactivated Blinker 5 + 6 Activated Battery Charge Display LED Numbers Left Direction Warning Blinker Indicator Lighting Right Direction Indicator FIGURE 7.3 Activating/Deactivating the Audible Signals Leo Scooter Part No. 1163141... -
Page 23: Section 8-Seat And Arms
NOTE: For this procedure, refer to FIGURE 8.1. Removing Pull up the seat lock lever. Turn the seat to one side. Hold the seat assembly firmly by the backrest and the front edge of the seat. Lift the seat assembly up and away from the seat post. Installing Pull up the seat lock lever. Lower the seat assembly onto the seat post. Turn the seat so it faces forward and locks into position. Lift up on seat assembly to ensure the seat is secure. Backrest Seat Lock Lever Front Edge of the Seat FIGURE 8.1 Removing/Installing the Seat Part No. 1163141 Leo Scooter... -
Page 24: Adjusting Seat Height
DETAIL “B” - TOP SHROUD DETAIL “C” - SEAT POST REMOVED MOUNTING HARDWARE Seat Post Seat Post Mounting Screw Washer Washer Mounting Holes Locknut Frame Tube Frame Tube Mounting Mounting Hole Top Shroud Hardware FIGURE 8.2 Adjusting Seat Height Leo Scooter Part No. 1163141... -
Page 25: Adjusting 90° Seat Swivel
Seat Seat Seat Lock Lever FIGURE 8.3 Adjusting 90° Seat Swivel Adjusting the Seat Position Forward/Rearward NOTE: For this procedure, refer to FIGURE 8.4. Pull the seat position lever to disengage the seat. NOTE: The seat position lever is located on the right side of the seat. Slide the seat forward or rearward into the desired position. Release the lever to lock the seat in position. Seat Seat Position Lever FIGURE 8.4 Adjusting the Seat Position Forward/Rearward Part No. 1163141 Leo Scooter... -
Page 26: Adjusting The Arm Width
Arm Pad Remove the mounting screw and washer that secure the arm pad to the arm. Remove the old arm pad. Use the mounting screw and washer to install the new arm pad. Securely tighten. Washer If necessary, repeat STEPS 1‐3 to replace the other armrest pad. Mounting Screw FIGURE 8.6 Replacing Armrest Pad Adjusting Armrest Angle NOTE: For this procedure, refer to FIGURE 8.7. Armrest Life the armrest up. Loosen the jam nut. Rotate the screw up or down for the desired arm angle. Tighten the jam nut. If necessary, repeat STEPS 1‐3 for the other armrest. Screw Jam Nut FIGURE 8.7 Adjusting Armrest Angle Leo Scooter Part No. 1163141... -
Page 27: Installing The Seat Positioning Strap
Secure one side of the seat positioning strap to the mounting bracket using the bolt and nut (Detail “B”). NOTE: The nut should go towards the center of the scooter. Repeat STEPS 1‐2 on the opposite side of the seat with the remaining side of the seat positioning strap. DETAIL “A” - BRACKET Seat Bracket DETAIL “C” - SEAT POSITIONING DETAIL “B” - HARDWARE STRAP INSTALLED Bolt Bracket Seat Positioning Seat Positioning Strap Strap FIGURE 8.8 Installing the Seat Positioning Strap Part No. 1163141 Leo Scooter... -
Page 28: Section 9-Tiller Adjustment
Otherwise, a fall from the scooter could occur causing bodily injury and/or damage to the scooter. Gently, push/pull against tiller to ensure that the tiller is securely engaged. NOTE: For this procedure, refer to FIGURE 9.1. NOTE: The powered scooters feature an adjustable tiller. The tiller can also be folded down for transportation and storage. Pull and hold the tiller adjustment lever. Move the tiller to the desired position. Release the tiller adjustment lever to lock the tiller into the desired position. Gently push/pull against tiller to ensure that the tiller is securely locked. Tiller Assembly Tiller Adjustment Lever FIGURE 9.1 Adjusting the Tiller Angle Leo Scooter Part No. 1163141... -
Page 29: Section 10-Wheels And Casters
NOTE: Use a wheel puller if necessary to remove the wheel from the drive shaft. Remove the large washer from the drive shaft. Remove keystock from drive shaft. Set aside. If necessary, repeat STEPS 1‐7 to remove other drive wheel. Installing Place keystock in cutout on drive shaft as shown in FIGURE 10.1. NOTE: The keystock in the drive shaft MUST lineup with the cutout in the wheel hub (not shown). NOTE: If necessary, use a rubber hammer to gently tap drive wheel completely into position on the drive shaft. Install the large washer onto the drive shaft. Install the drive wheel onto the drive shaft. Secure wheel to drive shaft by installing the small washer and locknut onto the threaded end of the drive shaft. Securely tighten. Install the cap. Repeat STEPS 1‐5 to install the other drive wheel. Install the seat. Refer to Removing/Installing the Seat on page 23. Keystock Drive Wheel Drive Shaft Small Washer Threaded End Locknut Large Washer FIGURE 10.1 Removing/Installing the Drive Wheels Part No. 1163141 Leo Scooter... -
Page 30: Removing/Installing The Front Wheel
SECTION 10—WHEELS AND CASTERS Removing/Installing the Front Wheel NOTE: For this procedure, refer to FIGURE 10.2. NOTE: Take note of position and orientation of wheel and mounting hardware before removing. Removing Turn power off and remove the key from the ignition. Place the front of the powered scooter up on blocks so that the front wheels are off the ground. Remove the cap, locknut and washer that secure the front wheel to the front axle. Remove the front wheel from the front axle. Installing Align the front wheel with the front axle. Use the washer and locknut to secure the front wheel to the front axle. Securely tighten the front wheel mounting hardware. Install the cap. Front Wheel Washer Front Axle Locknut FIGURE 10.2 Removing/Installing the Front Wheel Leo Scooter Part No. 1163141... -
Page 31: Section 11-Batteries
Recommended Battery Type WARNING The warranty and performance specifications contained in this manual are based on the use of deep cycle gel cell batteries. Invacare strongly recommends their use as the power source for this unit. CAUTION Failure to use the correct battery size and/or voltage may cause damage to the powered scooter and give unsatisfactory performance. -
Page 32: Removing/Installing The Batteries
Pull up to remove the rear cover (Detail “A” of FIGURE 11.2). Open the battery retention strap (Detail “B” of FIGURE 11.2). Disconnect the battery harness connectors. Remove the batteries from the base frame (Detail “C” of FIGURE 11.2). Pull the battery terminal covers up on the battery wiring harnesses to expose the mounting screws (Detail “D” of FIGURE 11.2). Disconnect the battery wiring harnesses from the batteries. Remove the mounting screws securing the: A. NEGATIVE (‐) BLACK battery cables to the NEGATIVE (‐) battery terminals. B. POSITIVE (+) RED battery cables to the POSITIVE (+) battery terminals. Installing Connect the battery wiring harnesses to the new batteries (Detail “D” of FIGURE 11.2). Use the mounting screws to secure the: A. NEGATIVE (‐) BLACK battery cables to the NEGATIVE (‐) battery terminals. B. POSITIVE (+) RED battery cables to the POSITIVE (+) battery terminals. Slide the battery terminal covers down to cover the battery terminals. Install the two new batteries into the base frame (Detail “C” of FIGURE 11.2). NOTE: Orient the batteries as shown in Detail “B” of FIGURE 11.2. Connect the battery harness connectors. Secure the batteries to the base frame using the battery retention strap. Securely tighten. NOTE: The battery retention strap should go under the battery harnesses as shown in Detail “B” of FIGURE 11.2. Install the rear cover (Detail “A” of FIGURE 11.2). Reinstall the seat. Refer to Removing/Installing the Seat on page 23. Leo Scooter Part No. 1163141... - Page 33 BLACK NEGATIVE (-) Battery Terminal Cover BLACK BLACK NEGATIVE (-) NEGATIVE Battery Terminal (-) Battery Wire Mounting Screws POSITIVE Base Frame RED POSITIVE (+) Battery (+) Battery Terminal Wire RED POSITIVE (+) Battery Terminal Cover FIGURE 11.2 Removing/Installing the Batteries Part No. 1163141 Leo Scooter...
-
Page 34: Charging The Batteries
The range per battery charge using recommended batteries should be approximately five to nine hours of typical operation. Extensive use on inclines may substantially reduce per charge mileage. NOTE: For this procedure, refer to FIGURE 11.3 on page 34. Turn the key to the Off position. Move the battery charger port cap to expose the battery charger port. NOTE: The battery charger port is located on the left side of the scooter. Plug one end of the battery charger cable into the battery charger port. Plug the other end of the battery charger cable into a 110‐volt wall outlet (Detail “A”). NOTE: The battery charger power LED will be GREEN to indicate that the charger power is On. NOTE: The battery charging LED will be ORANGE while charging. If the battery charging LED turns GREEN immediately and the battery is not charged, contact a Dealer or Invacare for assistance. If the battery charging LED is Off, the battery is already fully charged. Allow the batteries to charge until the charging LED turns GREEN. NOTE: If the charging LED does not turn from ORANGE to GREEN contact a Dealer or Invacare for assistance. Unplug the battery charger from the wall outlet. Unplug the battery charger from the scooter. Move the battery charger port cap to cover the battery charger port. DETAIL “A” Battery Charger Port Cap Wall Battery Outlet Charger Port FIGURE 11.3 Charging the Batteries Leo Scooter Part No. 1163141... -
Page 35: Section 12-Transporting The Scooter
Hold the seat post with one hand. Frame With the other hand, push the release lever to the rear Curved of the scooter. Bracket On Front of Scooter Lift the seat post to separate the front frame assembly Rear Frame from the rear frame assembly. Post Fold tiller down to lowest locked position. Refer to FIGURE 12.1 Transporting the Scooter Adjusting the Tiller Angle on page 28. Assembling Unfold tiller. Refer to Adjusting the Tiller Angle on page 28. Hold the seat post and align the curved brackets on the front frame assembly with the posts on the rear frame assembly. While holding the seat post, slowly pivot the front frame assembly down until the release lever locks. Ensure the release lever is locked and the front and rear frame assemblies are connected. Connect the main wiring harness connector. Install the batteries. Refer to Refer to Removing/Installing the Batteries on page 32. Install the seat. Refer to Removing/Installing the Seat on page 23. Install the basket. Part No. 1163141 Leo Scooter... -
Page 36: Limited Warranty
(12) months from the date of purchase from Invacare or a dealer. Invacare warrants all batteries for a period of six (6) months from the date of purchase from Invacare or a dealer.
Need help?
Do you have a question about the Leo and is the answer not in the manual?
Questions and answers