Table of Contents
Advertisement
Available languages
Available languages
Quick Links
USER MANUAL
WIRELESS WEATHER STATION
Thank you for your purchasing of BALDR Wireless Weather Station.
To ensure proper use, please read the user manual carefully before
use. If you have any problems during use, please feel free to contact
us for support.
MODEL:B0340WST2H2R-V7
WITH TOUCH BUTTONS
DST
ALWAYS
Email: baldrservice@baldr.com
USA Tel.: 1-833-381-5659
Advertisement
Chapters
Table of Contents

Related Manuals for BALDR B0340WST2H2R-V7


Summary of Contents for BALDR B0340WST2H2R-V7
- Page 1 WIRELESS WEATHER STATION WITH TOUCH BUTTONS ALWAYS Thank you for your purchasing of BALDR Wireless Weather Station. To ensure proper use, please read the user manual carefully before use. If you have any problems during use, please feel free to contact us for support.
-
Page 2: Table Of Contents
Contents 1. PRODUCT OVERVIEW 1.1 WEATHER STATION(MAIN UNIT) 1.2 BUTTONS INTRODUCTION 1.3 REMOTE SENSOR 2.PACKAGING INCLUDES 3.QUICK SET-UP GUIDE 3.1 POWER UP 3.2 RCC FUNCTION 3.3 MANUAL SETTINGS 3.4 REMOTE SENSOR INSTALLATION 3.5 ALARM SETTING 3.6 SNOOZE MODE 3.7 MAX/MIN TEMPERATURE & HUMIDITY RECORDS 4.TEMPERATURE &... -
Page 3: Product Overview
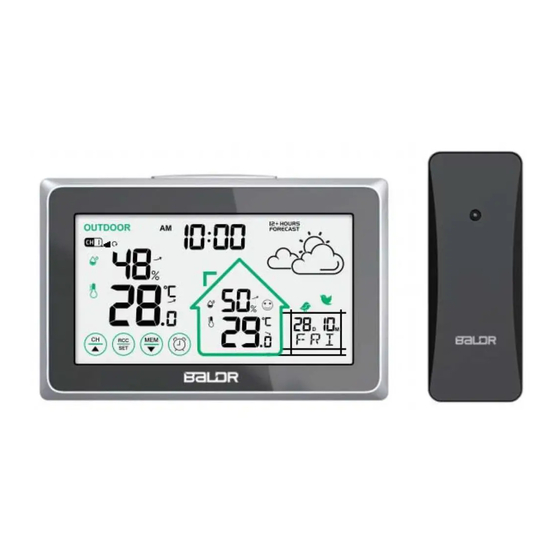
1.PRODUCT OVERVIEW 1.1 WEATHER STATION(MAIN UNIT) ALWAYS 1.Outdoor Sensor Channel Indicator 12.Comfort Level Indicator From CH1,CH2,CH3 to Circular Channels model 13.Humidity Trend Arrow 2.Current Outdoor Temperature and Humidity 14.Weather Forecast Icon 3.“CH/▲” Button Weather forecast for next 12-24 hours Switch channel, re-connect to sensor or increase 15.RCC Function Symbol the value 16.Backlight/Snooze Button (at top position) -
Page 4: Buttons Introduction
1.2 BUTTONS INTRODUCTION BUTTONS FUNCTIONS Normal Mode: 1.PRESS to switch channel from CH1, CH2, CH3, or Circular Channels Mode “ ”. 2.PRESS AND HOLD 3 seconds to re-connect the sensor. Time Setting or Alarm Setting: 1.PRESS to increase the value by 1. 2.PRESS AND HOLD 3 seconds to increase the value continuously. -
Page 5: Remote Sensor
1.3 REMOTE SENSOR 1.Signal Indicator Light 3. Battery Compartment 2.Hanging Hole 4. Channel 1-2-3 Switch To get accurate readings, please keep the main unit away from any unusual source of heat or cold and make sure that the outdoor sensor is also protected from direct sunlight, rain, or the heat it may experi- ence from being mounted on a warm wall, or be closed near to a warm wall. -
Page 6: Quick Set-Up Guide
3. QUICK SET-UP GUIDE NOTE: Prepare new and high quality alkaline batteries. Do not mix old and new batteries. Heavy duty or rechargeable batteries are not recommended. 3.1 POWER UP 1.1. Remove the main unit’s battery compartment cover, insert 3 new AAA batteries in the back of the display console (please take note of the battery polarity before inserting the batteries). -
Page 7: Rcc Function
3.2 RCC FUNCTION After the 3 MINUTES RF signal receiving, the main unit will start searching WWVB radio signal for 7 minutes. 1. The antenna symbol “ ” will flashing during receiving time, if signal received, the main unit will display the received time/month/date/weekday with symbol “... -
Page 8: Manual Settings
3.3 MANUAL SETTINGS NOTE: After RCC signal received, if there is no need for other settings, you can skip the manual settings part. If no RCC signal received or you need to set other settings, please follow the bellow steps to finish setting. TIPS: 1.Press and hold “RCC/SET”... - Page 9 Hours from GMT Time Zone Description Atlantic Standard Time Eastern Standard Time Central Standard Time Mountain Standard Time Pacific Standard Time AKST Alaska Standard Time Hawaii Standard Time 4.Press “RCC/SET” button to DST ON/OFF part. Default setting: ON. Press “CH/▲” or “MEM/▼” button to select DST ON if you do observe Daylight Saving Time.
-
Page 10: Remote Sensor Installation
Press “CH/▲” or “MEM/▼” button to select M/D or D/M format (M: Month ,D: Date). 10.Press “RCC/SET” button to MONTH part. Press “CH/▲” or “MEM/▼” button to adjust the value. 11.Press “RCC/SET” button to DATE part. Press “CH/▲” or “MEM/▼” button to adjust the value. - Page 11 If place the sensor here, If place the sensor there, the temperature goes down, the temperature goes up, the humidity goes up. the humidity goes down. (1).This is forbidden, if the outdoor sensor is directly exposed to rain, facing direct sunlight and close to any heat source. (2).Keep well-ventilated and leave a certain space of gap between the sensor and the wall to avoid blocking the vent of the sensor.
- Page 12 (3).Place the sensor at a height about 1.2-2.5 meters/3.93-8.20 feet vertically. ≥5ft (4).You are near the sensor to connect the main unit. Avoid thick walls between the units or or strong interference source using same signal frequency(433Ghz). (such as TVs, microwaves, computers, etc). (5).If the main unit disconnects most likely the sensor is too far from the main unit.
-
Page 13: Alarm Setting
3.5 ALARM SETTING 3.5.1 Set Alarm Clock in Order: Hour > Minute> Exit. (1).Press and hold “ ” button for 3-4 secs to start. (2).The “Hour” symbol begins to flash. Press “CH/▲” or “MEM/▼” button to set up “Hour”. Press “ ”... -
Page 14: Max/Min Temperature & Humidity Records
3.7 MAX/MIN TEMPERATURE & HUMIDITY RECORDS (1).Check: Press “MEM /▼” button to switch MAX or MIN readings. The readings will shows for 5 seconds and then will turn back to normal model. (2).Manually Clear: Press “MEM /▼” button to enter “MAX/MIN” Record Mode. -
Page 15: Weather Forecast
DRY: Humidity ≤44% COMFORT: 45% ≤Humidity≤ 65% 68°F ≤Temperature≤ 79°F WET: Humidity ≥ 66% 6. WEATHER FORECAST Weather Icons Sunny Partly Cloudy Cloudy Rainy Snowy (1).The weather icon, where data hourly calculated from indoor/outdoor temperature and humidity forecasts the weather in the next 12 hours. (2).IT IS NOT THE CURRENT WEATHER. -
Page 16: Low Battery Indicator
8. LOW BATTERY INDICATOR (1).When Battery Indicator shows next to the Outdoor Temperature, replace batteries in your remote sensor. (2).When Battery Indicator shows next to the Indoor Temperature, replace batteries in your weather station main unit. 9. SPECIFICATIONS 9.1 TECHNICAL SPECIFICATIONS Indoor Temperature Range: 14 °F~ 122 °F(-10℃~ 50.0℃). -
Page 17: Troubleshooting Guide
10. TROUBLESHOOTING GUIDE Problem Possible Solution 1.Press and hold the "CH/▲” button for 5-6 seconds to resynchronize (Please make sure the sensor and main unit are in same channel). 2.If the the synchronization fails, bring the sensor with main unit together and try the bellow steps: Factory Restart: (1).Remove all the batteries of sensor and main unit.(2).Set the sensor channel to "CH1". -
Page 18: Precautions
"LL.L". If higher than 140 °F/+60℃, the reading will be “HH.H”. If your BALDR weather station still can't be worked well after trying the above troubleshooting steps, please contact the seller on your order page or visit https://www.baldr.com or email us by baldrservice@baldr.com for help. -
Page 19: Fcc Statement
12. FCC Statement This device complies with part 15 of FCC rules. Operation is subject to the following two conditions: 1- This device may NOT cause harmful interference, and 2- This device must accept any interference received, including interfer- ence that may cause undesired operation. WARNING: Changes or modifications to this unit not expressly approved by the party responsible for compliance could void the user’s authority to operate the equipment. -
Page 20: Warranty
13. WARRANTY Dear customer, Thank you for choosing BALDR. We provide 1-year limited warranty on this product from the date of purchase. This product has undergone thorough quality inspection at the factory to ensure that the product is in good condition. We will remedy all defects in workmanship or materials within the warranty period. - Page 21 ALWAYS Nous vous remercions d'avoir acheté la station météorologique sans fil BALDR. Pour garantir une utilisation correcte, veuillez lire attentive- ment le manuel d'utilisation avant de l'utiliser. Si vous avez des problèmes pendant l'utilisation, n'hésitez pas à nous contacter pour obtenir de l'aide.
- Page 22 TABLE DES MATIERES 1. PRÉSENTATION DU PRODUIT 1.1 STATION MÉTÉO(UNITÉ CENTRALE) 1.2 INTRODUCTION DES BOUTONS 1.3 CAPTEUR SANS FIL 2. INCLUS DANS LE PACKAGE 3. GUIDE D'INSTALLATION RAPIDE 3.1 MISE SOUS TENSION 3.2 FONCTION RCC 3.3 RÉGLAGE MANUEL 3.4 INSTALLATION DU CAPTEUR SANS FIL 3.5 RÉGLAGE DE L'ALARME 3.6 MODE SNOOZE 3.7 MAX/MIN TEMPÉRATURE &...
-
Page 23: Présentation Du Produit
1. Présentation du produit 1.1 Station météo( unité centrale) ALWAYS 1.Indicateur de canal de capteur extérieur 12.Indication du niveau du confort De CH1, CH2, CH3 au modèle de canaux circulaires 13.Flèche de tendance d’Humidité 2. Température et humidité extérieures actuelles 14. -
Page 24: Introduction Des Boutons
1.2 INTRODUCTION DES BOUTONS BUTTONS FUNCTIONS Mode Normal : 1.PRESSER pour changer de canal entre CH1, CH2, CH3, ou le Modèle de Canaux Circulaires “ ”. 2. Maintenez appuyé pendant 3 secondes pour reconnecter le capteur. Réglage de l'heure ou de l'alarme 1. -
Page 25: Capteur Sans Fil
1.3 CAPTEUR SANS FIL 1.Témoin lumineux de signal 3. Compartiment batterie 2.Trou d'accrochage 4. Commutateur des canaux 1-2-3 Pour obtenir des relevés précis, veuillez éloigner l'unité centrale de toute source inhabituelle de chaleur ou de froid et veillez à ce que le capteur extérieur soit également protégé... -
Page 26: Guide D'installation Rapide
3. GUIDE D'INSTALLATION RAPIDE NOTE : Utilisez des piles alcalines neuves et de qualité supérieure. Ne pas mixer des vielles et de nouvelles piles Les piles à usage intensif ou rechargeables ne sont pas recommandées. 3.1 MISE SOUS TENSION 1.1. Retirez le couvercle du compartiment à piles de l'unité centrale, insérez 3 nouvelles piles AAA à... -
Page 27: Fonction Rcc
3.2 FONCTION RCC Après la réception du signal RF pendant 3 MINUTES, l'unité centrale commence à rechercher le signal radio WWVB pendant 7 minutes. 1. Le symbole de l'antenne " " clignote pendant le temps de réception, si le signal est reçu, l'unité centrale affiche l'heure/mois/date/jour de la semaine avec le symbole "... -
Page 28: Réglage Manuel
3.3 RÉGLAGE MANUEL NOTE : Après réception du signal RCC, si aucun autre réglage n'est nécessaire, vous pouvez sauter la partie des réglages manuels. Si aucun signal RCC n'est reçu ou si vous avez besoin de régler d'autres paramètres, veuillez suivre les étapes ci-dessous pour terminer le réglage. ASTUCES : 1. - Page 29 Fuseau Heures GMT Description Horaire Fuseau Standard Atlantique Fuseau standard de l'Est Fuseau standard centrale Fuseau montagne standard Fuseau Normale du Pacifique AKST Fuseau Alaska Heure d’Hawaii 4. Appuyez la touche "RCC/SET" sur la partie DST ON/OFF. Réglage par défaut : ON. Appuyez sur la touche "CH/▲" ou " MEM/ ▼ " pour sélectionner DST ON ou ALWAYS ON si vous appliquez l'heure d'été.
-
Page 30: Installation Du Capteur Sans Fil
9. Appuyez sur la touche "RCC/SET" pour accéder à la partie FORMAT D'AFFICHAGE DU MOIS ET DE LA DATE. Presser la touche “ CH/▲” ou "MEM/ ▼" pour sélectionner le format M/D ou D/M. (M : Mois, D : Date). 10. - Page 31 *Si on place le capteur ici, *Si on place le capteur là-bas, la température baisse, la température augmente, l'humidité augmente. l'humidité diminue. (1). Ceci est interdit, si le capteur extérieur est directement exposé à la pluie, à la lumière directe du soleil et à proximité d'une source de chaleur. (2).
- Page 32 (3). Placez le capteur à une hauteur verticale d'environ 1,2-2,5 mètres/3,93-8,20 pieds. ≥5ft (4). Vous êtes près du capteur pour connecter l'unité centrale. Évitez les murs épais entre les unités ou les sources d'interférences fortes utilisant la même fréquence de signal (433Ghz). (Comme les téléviseurs, les micro-ondes, les ordinateurs, etc).
-
Page 33: Réglage De L'alarme
3.5 Réglage de l'alarme 3.5.1 Régler le réveil dans l'ordre : Heure> Minute> Quitter. (1) Appuyez et maintenez la touche " " pendant 3-4 secondes pour commencer. (2) Le symbole "Heure" commence à clignoter. Appuyez sur la touche "CH/▲" ou " MEM/ ▼ " pour régler « l’heure ». Appuyez sur la touche " "... -
Page 34: Mode Snooze
3.6 Mode Snooze (1) Lorsque l'alarme sonne, appuyez sur le BOUTON DU HAUT pour passer en mode "snooze", l'alarme sonnera à nouveau après 5 minutes d'intervalle de répétition. Et le symbole " " clignotera à l'écran pour indiquer le mode "snooze". -
Page 35: Indication Du Niveau Du Confort
Indicateur de Humidité Température flèches Augmentation de 3% Augmentation de 1.8℉ de l'humidité relative relative en une heure ou Flèche vers en une heure ou par par rapport à la dernière le haut rapport à la dernière lecture. lecture. Diminution de 3% de Diminution de 1.8℉... -
Page 36: Fonction De Rétroéclairage
(3). Veuillez noter que cette prévision n'est pas comparable aux services météorologiques professionnels soutenus par des satellites et des ordinateurs performants. (4). Il fournit simplement une indication approximative des développements actuels. Veuillez donner la priorité aux prévisions météorologiques du service local de prévisions météorologiques. -
Page 37: Spécifications Des Mesures
Unité Principale : 3 piles alcalines AAA (non incluses). Capteur sans fil : 2 piles alcalines AA (non incluses). 9.2 SPÉCIFICATIONS DES MESURES Le tableau suivant présente les spécifications des paramètres de mesure. Mesure Gamme Précision Résolution ±2 °F (température entre 32~122°F, si Température intérieure 14 °F~ 122 °F 0.1 °F... - Page 38 "LL.L". Si elle est supérieure à 140 °F/+60℃, la lecture sera "HH.H". Si votre station météo BALDR ne fonctionne toujours pas correctement après avoir essayé les étapes de dépannage, contactez le distributeur sur la page de vente, visitez https://www.baldr.com ou veuillez nous envoyer un e-mail à baldrservice@baldr.com pour...
-
Page 39: Précautions
12. GARANTIE Cher client, Merci d'avoir choisi BALDR. Nous offrons une garantie limitée d'un an sur ce produit à partir de la date d'achat. Ce produit a fait l'objet d'un contrôle de qualité approfondi à l'usine afin de s'assurer que le produit est en bon état. - Page 40 Pour des détails complets sur la garantie, contactez-nous par : EMAIL : baldrservice@baldr.com CONTACT AMAZON STORE : Sous 24h US TEL: 1-833-381-5659 (Heure ouvrable:Lundi-Vendredi, 9:00A.M.-5:00P.M. HNP)
Need help?
Do you have a question about the B0340WST2H2R-V7 and is the answer not in the manual?
Questions and answers