Table of Contents
Advertisement
Quick Links
Advertisement
Table of Contents

Subscribe to Our Youtube Channel
Related Manuals for Winmate FM10Q


Summary of Contents for Winmate FM10Q
- Page 1 Vehicle Mounted Computer Qualcomm Snapdragon™ 660 octa-core, 2.2 GHz Android 9.0 OS FM10Q Quick Start Guide Version 1.9 Document Part No. 9152111I102W Please read these instructions carefully before using this product, and save this manual for future use.
-
Page 2: Table Of Contents
10.4" Vehicle Mount Computer FM10Q Quick Start Guide Contents PREFACE I. UNPACKING TANDARD ACKAGE ONTENT PTIONAL CCESSORIES II. COMPONENTS III. INTEGRATED KEYPAD IV. FUNCTION BUTTONS V. DOCKING AND UNDOCKING THE DEVICE VI. POWER CABLE INSTALLATION IRING THE OWER ABLE ONNECTING THE... -
Page 3: Preface
Warranty Winmate Inc. warrants that each of its products is free from material and workmanship defect for a period of one year starting from the invoice date. If the customer discovers a defect, Winmate Inc. will, at its option, repair or replace the defective product at no charge to the customer, provided it is returned during the warranty period, with transportation charges prepaid. - Page 4 10.4" Vehicle Mount Computer FM10Q Quick Start Guide Advisory Conventions Four types of advisories are used throughout the user manual to provide helpful information or to alert you to the potential for hardware damage or personal injury. These are Notes, Important, Cautions, and Warnings. The following is an example of each type of advisory.
- Page 5 Preface CE Notice (European Union) This device has been tested and found to conform to the limits set for a Class B product. • EN 55022 — “Limits and Methods of Measurement of Radio Interference Characteristics of Information Technology Equipment” •...
- Page 6 10.4" Vehicle Mount Computer FM10Q Quick Start Guide Read Me First Follow and adhere to all warnings and instructions in this manual. For your safety, please read all safety and operating instructions before using the product. Keep this manual for future reference.
- Page 7 Preface Informations de sécurité (FR) Suivez et respectez tous les avertissements et instructions figurant sur l’écran. Pour votre sécurité, s’il vous plaît lire toutes les consignes de sécurité et de fonctionnement avant d’utiliser le device. Gardez ce manuel pour référence future. Lire avec attention toutes les recommandations et precautions d’emploi avant d’utiliser ce produit.
- Page 8 Important: The battery is consumable part. Therefore, it is recommended to replace the battery pack every two years with a new one recommended by Winmate. Contact our Service Center or sales representatives for more information on replacing the battery pack.
-
Page 9: Unpacking
Before using this device, make sure that all the items listed below are included in your package: • VMC Computer • Dock + Latch • Power Cable with Fuse • USB Cable • 84W Adapter FM10Q Locking Key with Power Cable • Quick Start • Wi-Fi Antenna • Power Converter Cable •... -
Page 10: Components
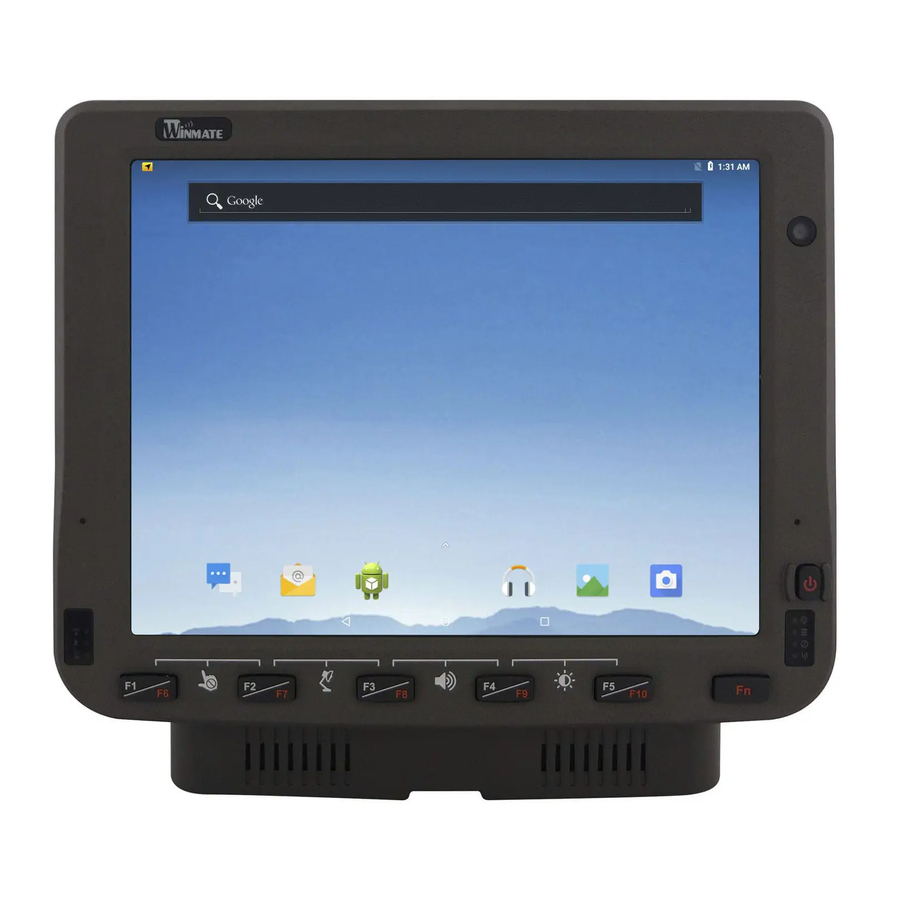
10.4" Vehicle Mount Computer FM10Q Quick Start Guide II. Components Front View Item Description 10.4” Touch Screen Acts as one of the inputs for the device Power Button Press and hold the button for 3 second to turn on the device... - Page 11 II. Components Rear View with Vehicle Dock Item Description VESA Mount Hole VESA 75, 100, and RAM Mount Release Latch Press to release the device and the docking Kensington Lock Connect to a security lock, protecting your device from being stolen Set the switch to on (I) to provide the supply power to the device and Power switch it will automatically connect to the ignition system of the vehicle...
- Page 12 10.4" Vehicle Mount Computer FM10Q Quick Start Guide Side View with Vehicle Dock COM1 COM2 Item Description COM1 and COM2 Connects a peripheral device such as a printer or scanner with serial port COM1 Node: persist.sys.dock.com1 COM2 Node: persist.sys.dock.com2 Connects USB peripheral devices such as USB Flash drive, mouse, USB 2.0 x 2...
-
Page 13: Integrated Keypad
Note: Sign plus “+” means that you have to press both function keys at the same time. IV. Function Buttons Winmate® FM10Q Vehicle Mounted Computer comes with preinstalled APP called Winmate® Key Mapping (WKM) which let users to assign functions of function keys F1 ~ F10. -
Page 14: Docking And Undocking The Device
10.4" Vehicle Mount Computer FM10Q Quick Start Guide Default Settings: Function Key Description F1 + F2 Touch Keypad Lock/ Unlock F2 + F3 Lamp On/Off F3 + F4 Volume adjustment F4 + F5 Brightness adjustment Camera In Application Selector window of the F1 click NEW to open the drop-down menu of function keys. In this example, we have selected to set up functions for F1 function key. -
Page 15: Power Cable Installation
Wiring Instruction 1. Place the device on the vehicle dock and make sure the device is Off. 2. Connect the CN2 to the FM10Q vehicle dock by aligning the connector pins and then push it, twist to fasten the connection. - Page 16 10.4" Vehicle Mount Computer FM10Q Quick Start Guide Warning! Do not perform the installation on a moving or live electric forklift. Avertissement! Ne pas effectuer l'installation sur un mobile ou un chariot élévateur électrique sous tension. Wiring Instruction 1. Remove the vehicle battery before connecting the power cable 2.
-
Page 17: Power Cable Routing
10. Press the power button on the front of the device See Power Button. d. Power Cable Routing There are many cables available for the FM10Q including power cable, CAN Bus cable, or USB cable. To secure these cables, there are five cable clamps secured the FM10 vehicle dock to prevent the cable strain. -
Page 18: Power On Behavior
Note: • The FM10Q has to be docked in a powered vehicle docking station or UPS battery has to have a sufficient charge to power the device. • If no external power available and the UPS battery do not have enough charge, pressing the... -
Page 19: Standby And Wakeup Behavior
By default, the FM10Q turns off if the user turns off the device through the system or presses the power button for 10 seconds with a critical shut down. The FM10Q will also be off when there is no connection to a power source or the UPS battery is depleted. -
Page 20: Ignition Control
10.4" Vehicle Mount Computer FM10Q Quick Start Guide VIII. Ignition Control Winmate provides Ignition Control feature in Winset application to control the timing of delay. You can select 1 to 120 seconds for each period of timing delay. Note: If you don’t plan to use the ignition feature connect the green wire to the vehicle’s positive power source. -
Page 21: External/ Vehicle Remote Antenna Installation
The FM10Q equipped with internal antennas on the Computer side as well as external antennas on the Vehicle Dock side. When the FM10Q Computer is on the Vehicle Dock, it will by default use the external antennas on the Dock that are attached through the SMA Connectors for better signal strength. Only when the FM10Q computer is removed from the dock will it use the internal antennas. -
Page 22: Screen Blanking
10.4" Vehicle Mount Computer FM10Q Quick Start Guide XI. Screen Blanking Winmate® FM10Q has screen blanking function. Once activated, it will lock the screen display to prevent or restrict the use of the in-vehicle computer. This application allows setting the threshold to perform preset actions while device is moving. -
Page 23: Defroster (If Equipped)
XI. Defroster (If Equipped) XI. Defroster (If Equipped) Notice that defroster is an optional feature and may not be presented in your device. Warning! The defroster is always disabled when the device is operating from UPS battery power. Avertissement! Le dégivreur est toujours désactivé lorsque l'appareil fonctionne à partir d'une alimentation par batterie UPS. - Page 24 10.4" Vehicle Mount Computer FM10Q Quick Start Guide 2. Depending on the defroster trip point, to trigger the Defroster ON, the defroster on trip point need to be lower than 0°C. The defroster on trip point is configurable as follow :...
-
Page 25: Ram Mount Installation
The docking of this device is designed to be mounted to RAM Mount solutions, which provides various mount types to fit any industrial use or vehicle. Notice that RAM Mount kits are not standard accessory of Winmate. We recommend ordering RAM Mount accessories from RAM Mount. -
Page 26: Mounting Kit 2 - Drill Solution
10.4" Vehicle Mount Computer FM10Q Quick Start Guide RAM Mount Part Component Description Number Clamp Mounts - on the RAM-D-247U-4 Clamp base with 2.25” Ball forklift RAM Arm RAM-D-201U Arm for 2.25” Ball(L:8.375”) RAM Ball on the 75x75mm VESA with 2.25”... -
Page 27: Ram Mount Assembly
XIII. RAM Mount Installation c. RAM Mount Assembly Step 1 Install RAM Clamp to vehicle or forklift 1.1 Determine the position for mounting the RAM clamp mount according to RAM Mounts installation guide and specification. 1.2 Place the upper clamp with ball on the beam, insert the bolt. 1.3 Place the lower clamp below the beam. -
Page 28: Keyboard Assembly
10.4" Vehicle Mount Computer FM10Q Quick Start Guide RAM Mount Part Component Description Number Winmate Keyboard 4 VESA Holes on the plate to Adapter Plate device and 4 AMPS holes to RAM Ball (designed by Winmate) Screw SUS304 M5 x 20mm Screw... - Page 29 XIII. RAM Mount Installation 2. Fasten the keyboard adapter on the other end of the RAM mount ball. 3. Fasten the RAM mount ball screws on the back of the device, so all mounting parts are fastening together.
-
Page 30: Appendix
10.4" Vehicle Mount Computer FM10Q Quick Start Guide Appendix Appendix A: Product Specifications Model Name FM10Q Display Specifications Size / Technology 10.4" (4:3) Resolution 1024 x 768 Brightness 400 nit (optional 800 nit) Touch 10-point PCAP multi-touch, with Hand, Stylus, and Glove support... -
Page 31: Appendix B: Order Information
10V-60V with power isolation and ignition control Tablet Power Input 12V DC in Battery Integrated Li-Ion maintenance UPS with 30-min life at 0°C (32°F) Appendix B: Order Information The FM10Q Vehicle Mount Computer available in the following configurations: Model Number High Brightness Panel Defroster FM10Q FM10Q-LA... - Page 32 Winmate Inc. 9F, No.111-6, Shing-De Rd., San-Chung District, New Taipei City 24158, Taiwan, R.O.C www.winmate.com Copyright © Winmate Inc. All rights reserved.
Need help?
Do you have a question about the FM10Q and is the answer not in the manual?
Questions and answers