Table of Contents
Advertisement
Quick Links
Advertisement
Table of Contents

Related Manuals for Winmate FM10Q


Summary of Contents for Winmate FM10Q
- Page 1 Vehicle Mounted Computer Qualcomm Snapdragon™ 660 octa-core, 2.2 GHz Android 9.0 OS FM10Q Product Reference Guide Version 1.4 Document Part No. 9152111I102V Please read these instructions carefully before using this product, and save this manual for future use.
-
Page 2: Table Of Contents
10.4" Vehicle Mount Computer FM10Q Product Reference Guide Table of Contents PREFACE CHAPTER 1: INTRODUCTION 1.1 A BOUT UIDE 1.2 P ACKAGE ONTENTS 1.3 O PTIONAL CCESSORIES 1.4 C OMPONENTS CHAPTER 2: HARDWARE 2.1 S YSTEM ARDWARE 2.2 C ENTRAL ROCESSING 2.3 I... -
Page 3: Preface
Preface 3.6 W INSET 3.6.1 System Information 3.6.2 Ignition Control 3.6.3 Screen Blanking 3.6.4 Function Buttons 3.7 W ® H (WHM) INMATE ANAGER 3.7.1 How to Lock Applications 3.7.2 How to Reset WHM Settings 3.7.3 How to Change WHM Password 3.8 B LUETOOTH 3.9 C... -
Page 4: Preface
Warranty Winmate Inc. warrants that each of its products is free from material and workmanship defect for a period of one year starting from the invoice date. If the customer discovers a defect, Winmate Inc. will, at its option, repair or replace the defective product at no charge to the customer, provided it is returned during the warranty period, with transportation charges prepaid. - Page 5 Preface Advisory Conventions Four types of advisories are used throughout the user manual to provide helpful information or to alert you to the potential for hardware damage or personal injury. These are Notes, Important, Cautions, and Warnings. The following is an example of each type of advisory. Note: A note is used to emphasize helpful information Important: An important note indicates information that is important for you to know.
- Page 6 10.4" Vehicle Mount Computer FM10Q Product Reference Guide CE Notice (European Union) This device has been tested and found to conform to the limits set for a Class B product. • EN 55022 — “Limits and Methods of Measurement of Radio Interference Characteristics of Information Technology Equipment”...
- Page 7 Preface Read Me First Attention: Pour réduire le risque d’incendie ou de choc électrique ne pas exposer l’appareil à la pluie ou à l’humidité. VERIFIER que le cordon électrique est la prise murale pour un delai d’inactivite prolongé. Pour arrêter complètement l’alimentation de l’appareil, débranchez le cordon d’alimentation de la prise AC.
- Page 8 10.4" Vehicle Mount Computer FM10Q Product Reference Guide Informations de sécurité (FR) Suivez et respectez tous les avertissements et instructions figurant sur l’écran. Pour votre sécurité, s’il vous plaît lire toutes les consignes de sécurité et de fonctionnement avant d’utiliser le device. Gardez ce manuel pour référence future.
- Page 9 Important: The battery is consumable part. Therefore, it is recommended to replace the battery pack every two years with a new one recommended by Winmate. Contact our Service Center or sales representatives for more information on replacing the battery pack.
-
Page 10: Chapter 1: Introduction
1.1 About This Guide This Product Reference Guide provides instruction for the system administrator to follow when configuring and using the FM10Q Vehicle Mount Computer. This Product Reference Guide has been developed for a FM10Q with Android 9.0 operating system. -
Page 11: Package Contents
VMC Computer Dock + Latch Power Cable with Fuse USB Cable 84W Adapter FM10Q Locking Key with Power Cable Varies by product Part No. 98D000A0000A Part No. 98K000A0006O Part No. 9483098080K0 Part No. 922D084W12V1 specifications ... -
Page 12: Components
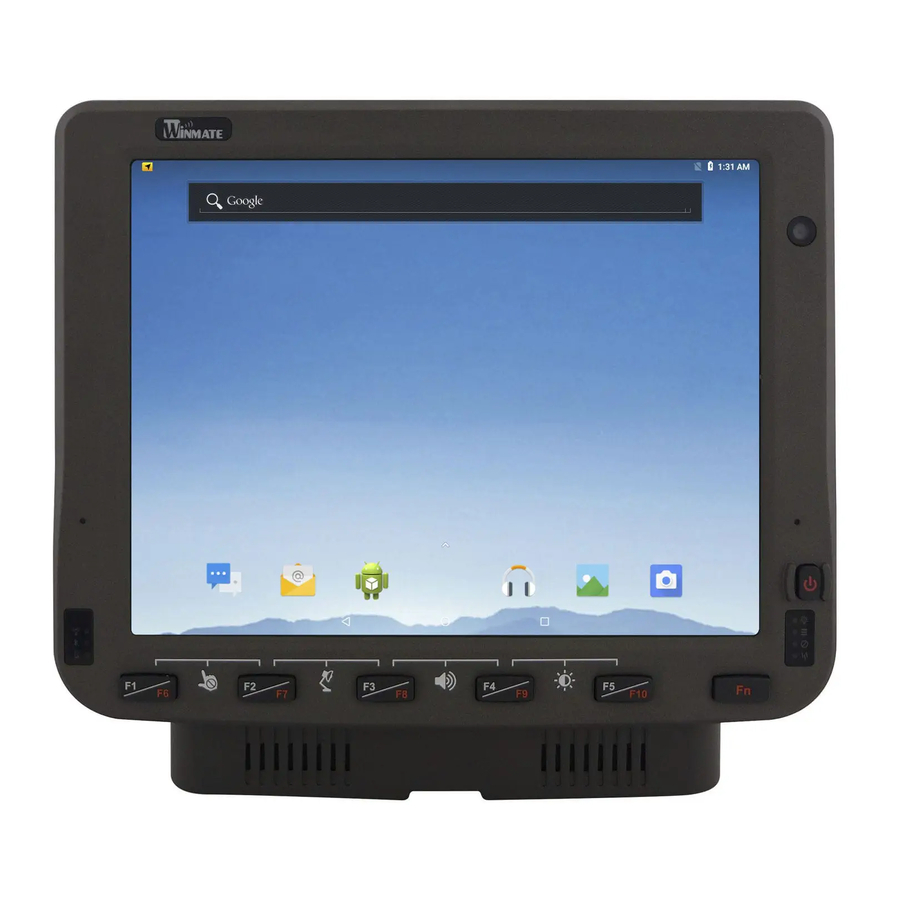
10.4" Vehicle Mount Computer FM10Q Product Reference Guide 1.4 Components Front View Item Description 10.4” Touch Screen Acts as one of the inputs for the device Power Button Press and hold the button for 3 second to turn on the device... - Page 13 Chapter 1: Introduction Rear View with Vehicle Dock Item Description VESA Mount Hole VESA 75, 100, and RAM Mount Release Latch Press to release the device and the docking Kensington Lock Connect to a security lock, protecting your device from being stolen Set the switch to on (I) to provide the supply power to the device and Power switch it will automatically connect to the ignition system of the vehicle...
- Page 14 10.4" Vehicle Mount Computer FM10Q Product Reference Guide Side View with Vehicle Dock Item Description COM1 and COM2 Connects a peripheral device such as a printer or scanner with serial port Connects USB peripheral devices such as USB Flash drive, mouse, USB 2.0 x 2...
-
Page 15: Chapter 2: Hardware
Chapter 2: Hardware 2.1 System Hardware 2.2 Central Processing Unit The FM10Q is running on Qualcomm Snapdragon™ 660 octa-core 2.2 GHz CPU, and Android 9.0 operating system. 2.3 Input and Output Connectors The FM10Q device supports the following I/O connectors: ... -
Page 16: System Memory
10.4" Vehicle Mount Computer FM10Q Product Reference Guide 2.4 System Memory The main system memory is 3 GB LPDDR4. 2.5 Audio Interface Your device is equipped with two speakers which are located on the bottom of the vehicle dock. A microphone is also available for voice communication and voice recording. -
Page 17: Power Management Modes
By default, the FM10Q turns off if the user turns off the device through the system or presses the power button for 10 seconds with a critical shut down. The FM10Q will also be off when there is no connection to a power source or the UPS battery is depleted. -
Page 18: Power Control
NOTE: • The FM10Q has to be docked in a powered vehicle docking station or UPS battery has to have a sufficient charge to power the device. • If no external power available and the UPS battery do not have enough charge, pressing the power button will cause no action. -
Page 19: Battery
Warning! Do not drop, puncture, and crush the battery unit. If you notice any damages on the battery, stop using the battery and replace it. Important: When the battery level reaches 0%, the FM10Q will automatically shut down. 2.12.1 UPS Battery Your device has UPS battery. -
Page 20: Backup Battery
Warning! The backup battery should be replaced only be authorized service personnel. 2.13 External Connectors Power OFF the FM10Q before connecting cables to any port. Most of the external connectors for the FM10Q are located on the vehicle dock. COM1 connects to a device such as printer or scanner. - Page 21 Chapter 2: Hardware Signal Description Data Carrier Detect – Input CN1-1 Receive Data – Input CN1-2 Transmit Data – Output CN1-3 Data Terminal Ready – Output CN1-4 CN1-5 Signal / Power Ground Data Set Ready – Input CN1-6 Request to send – Output CN1-7 Clear to send –...
- Page 22 10.4" Vehicle Mount Computer FM10Q Product Reference Guide 2.13.1.2 USB 2.0 (DB9 Male) Connector Signal CN1-1 CN1-2 USB1_D+ CN1-3 USB1_D- CN1-4 USB1_VCC CN1-5 CN1-6 CN1-7 USB2_D+ CN1-8 USB2_D- CN1-9 USB2_VCC CN2, CN3 Signal Description CN2-1 USBVCC1 CN2-2 USB1_DM White CN2-3...
- Page 23 Chapter 2: Hardware 2.13.1.3 USB 2.0 (DB9 Male) to Serial Port (COM3) & USB Type A Cable Signal CN1-1 CN1-2 USB1_D+ CN1-3 USB1_D- CN1-4 USB1_VCC CN1-5 CN1-6 CN1-7 USB2_D+ CN1-8 USB2_D- CN1-9 USB2_VCC...
- Page 24 10.4" Vehicle Mount Computer FM10Q Product Reference Guide Signal Description CN2-1 USBVCC1 CN2-2 USB1_DM White CN2-3 USB1_DP Green CN2-4 Black CN3-1 USBVCC2 CN3-2 USB2_DM White CN3-3 USB2_DP Green CN3-4 Black Signal CN3-1 CN3-2 USB1_D+ CN3-3 USB1_D- CN3-4 USB1_VCC CN3-5 CN3-6...
- Page 25 Chapter 2: Hardware Pin No. Signal Pin No. Signal CAN_GND CN1-A CN3-3 CAN_GND CAN_GND CN2-A CAN_V+ CN1-B CAN3-15 CAN_V+ CN2-B CAN_H CN1-C CN3-13 CAN_H CAN_H CN2-C CAN_L CN1-D CN3-2 CAN_L CAN_L CN2-D CAN_SHLD CN1-E CN3-12 CAN_SHLD CAN_SHLD CN2-E CN3-5 CN3 SHELL CN3-11 Pin No.
- Page 26 10.4" Vehicle Mount Computer FM10Q Product Reference Guide 2.13.1.6 Power Connector 1. Power Connector 2. Power Switch Power Connector Pin No. SYMBOL VIN + CN2-1 VIN + CN2-2 VIN - CN2-3 CN2-4 VIN - CN2-5 Earth_GND VIN + CN2-6 VIN +...
-
Page 27: Canbus Cable Installation Reference
The FM10Q equipped with internal antennas on the Computer side as well as external antennas on the Vehicle Dock side. When the FM10Q Computer is on the Vehicle Dock, it will by default use the external antennas on the Dock that are attached through the SMA Connectors for better signal strength. -
Page 28: Keyboard Options
10.4" Vehicle Mount Computer FM10Q Product Reference Guide Wi-Fi Antenna Installation Wi-Fi and WWAN Antenna Installation 4. Attach plastic fixing bracket to fix the position of each antenna. 2.17 Keyboard Options 2.17.1 Integrated Keypad The integrated keypad contains ten programmable keys, F1~ F10 are user programmable keys. Key Mapping is configured via the Hot Tab application on the control panel. -
Page 29: Usb Keyboard / Mouse
*Sign plus “+” means that you have to press both function keys at the same time. 2.17.2 USB Keyboard / Mouse A standard USB keyboard or mouse can be attached to the FM10Q using the appropriate adapter cable. The cable attached to the device and provides USB connector. -
Page 30: Connection And Ups Battery Leds
Indicator Type LED Behavior System State Solid Red System off and in suspend mode Power System On 2.19 Display The FM10Q display measures 10.4-inches diagonally, have display resolution of 1024 x 768 pixels and bonded with Projected Capacitive (P-CAP) multi-touch. -
Page 31: Touch Screen
Chapter 2: Hardware 2.19.1 Touch Screen The touch screen is a Projected Capacitive (P-CAP) multi-touch; the technology offers a fast and sensitive response and professional-grade reliability combined with a stylish, sleek design. P-CAP multi-touch offers fast and sensitive touch response, excellent optical clarity and long-term stability over temperature. Note: Always use the tip of the stylus for tapping or making strokes Do not use any sharp objects for tapping, touching, or making strokes... -
Page 32: Chapter 3: Software
This section includes the software and hardware installation, the FM10Q configuration, the wireless communication, and some other optional features. Since this FM10Q is bundled with several software and utility programs for its configurations and operations, the examples describe in this section are to be used as a guideline only;... - Page 33 Chapter 3: Software Description Icon Back Opens the previous screen you were working in, even if it was in a different app. Once you back up to the Home screen, you can’t go back any further. Home Returns to the Home screen. To get suggestions based on the screen you’re currently viewing, touch &...
-
Page 34: Quick Settings
10.4" Vehicle Mount Computer FM10Q Product Reference Guide 3.2.2 Quick Settings You can open your device’s Settings app from the All Apps screen or from Quick Settings. For example, to change notification sounds, and volume go to Settings > Device > Sound to change the volume. -
Page 35: Status And Notification Icons
Chapter 3: Software 3.3 Status and Notification Icons To open the status bar appears at the top of every screen. On the left are notification icons and on the right are status icons, along with the current time. Notification icons Status icons 3.3.1 Status Icons Pull down from the right top of the screen to get the notifications area.The following icons indicate the... -
Page 36: Control Panel
10.4" Vehicle Mount Computer FM10Q Product Reference Guide 3.4 Control Panel 3.4.1 Using the Touch Screen The touch screen is a touch-sensitive device that allows you to control and make selections on the device by controlling the location of the pointer on the screen. -
Page 37: System Settings
Chapter 3: Software 3.4.2 System Settings 3.4.2.1 Display In the Android 8.1 user can adjust the screen brightness. Pull down from the top of the screen to get the notifications area. You can also access display settings in settings: To adjust the brightness of the screen: 1. - Page 38 10.4" Vehicle Mount Computer FM10Q Product Reference Guide 3.4.2.2 Region and Language The instruction for installing, changing and uninstalling language in this section are applicable to FM10Q with Android OS. To access region and language settings, perform the following: Settings >...
- Page 39 Chapter 3: Software 3.4.2.3 Sound To access sound settings, perform the following: Settings > System > Sound & Notification...
- Page 40 10.4" Vehicle Mount Computer FM10Q Product Reference Guide In this option you can adjust volume, change phone ringtone, and other volume settings. 3.4.2.4 Touch Lock Press F1 and F2 simultaneously to perform touch lock. While the touch is locked, all function keys and touch will not be able to work, until you slide the bar to unlock the touch lock.
- Page 41 Chapter 3: Software 3.4.2.5 Reading Lamp Press F2 and F3 button simultaneously to turn On/Off a reading lamp located at the bottom of the dock. This lamp is to provide illumination for user to read in the dark environment. Lamp Off Lamp On...
- Page 42 10.4" Vehicle Mount Computer FM10Q Product Reference Guide 3.4.2.6 Volume Adjustment Press F3 and F4 simultaneously to perform volume adjustment. The adjustment slide bar will appear on screen transparently. Slide to the right side to increase the volume and slide to the left side to decrease the volume.
-
Page 43: Ethernet
3.5 Ethernet Vehicle computer supports Ethernet LAN. To use the Ethernet LAN feature to connect to the network, perform the following procedure: Step 1 Connect Ethernet Cable to the FM10Q device. Step 2 Touch All APPS icon, and the open Ethernet application. -
Page 44: Configuring Ethernet Settings
10.4" Vehicle Mount Computer FM10Q Product Reference Guide 3.5.1 Configuring Ethernet Settings Go to All Apps > Ethernet > Configure Ethernet Connection Type Setting Description DHCP (default) The device automatically capture IP-address from the router Static IP Allows to manually set up IP-address, DNS, Network and Gateway 3.5.2 Checking the Ethernet Settings... -
Page 45: Winset
Chapter 3: Software 3.6 Winset 3.6.1 System Information User can check system information such as OS version, serial number, model name, WDC version and USB CANBus settings in Winset application. -
Page 46: Ignition Control
10.4" Vehicle Mount Computer FM10Q Product Reference Guide 3.6.2 Ignition Control Winmate provides Ignition Control feature in Winset application to control the timing of delay. You can select 1 to 120 seconds for each period of timing delay. Go to APPS > Winset >... -
Page 47: Screen Blanking
Chapter 3: Software 3.6.3 Screen Blanking Winmate® FM10Q has screen blanking function. Once activated, it will lock the screen display to prevent or restrict the use of the in-vehicle computer. This application allows setting the threshold to perform preset actions while device is moving. -
Page 48: Function Buttons
3.6.4 Function Buttons Winmate® FM10Q Vehicle Mounted Computer comes with preinstalled APP called Winmate® Key Mapping (WKM) which let users to assign functions of function keys F1 ~ F10. To set function keys open Winset You can set the application which the favorite you want as a shortcut in corresponding key. - Page 49 Chapter 3: Software Default Settings: Function Key Description F1 + F2 Touch Keypad Lock/ Unlock F2 + F3 Lamp On/Off F3 + F4 Volume adjustment F4 + F5 Brightness adjustment Camera In Application Selector window of the F1 click NEW to open the drop-down menu of function keys. In this example, we have selected to set up functions for F1 function key.
-
Page 50: Winmate® Home Manager (Whm)
3.7 Winmate® Home Manager (WHM) Winmate® FM10Q Vehicle Mounted Computer comes with preinstalled APP called Winmate® Home Manager (WHM) which let the device manager to lock the launcher then the user can only use one application assigned by the device manager. - Page 51 Chapter 3: Software 2. Go to “Application Selector”, and chose the app which you want to run up automatically after booting. 3. Go back to “Home Selector” and press “Clear and Reset Default Home”. 4. Select “Restrict Home” and “Always”, and then restart the computer to enable these settings.
-
Page 52: How To Reset Whm Settings
10.4" Vehicle Mount Computer FM10Q Product Reference Guide The system will automatically start the application which you selected and lock it. Any time user presses home key or back key, the system will go back to the same application which you have selected. -
Page 53: How To Change Whm Password
Chapter 3: Software Default password is “0000”. 3. Restart the system and you will go back to the normal Launcher. 4. In the Home manager->Home Selector Tab-> click the “Clear and Rest Default Home”. Specify the “Launcher 3” and “Always”, it would go back to the origin launcher. 3.7.3 How to Change WHM Password 1. - Page 54 10.4" Vehicle Mount Computer FM10Q Product Reference Guide 2. The default password is “0000”. Enter a new password in New Password field, and then tap Change Password.
-
Page 55: Bluetooth
3. To turn the Bluetooth on or off, tap Bluetooth. A check mark indicates the Bluetooth adapter is turned on. 4. Click the Bluetooth icon in the windows notification area, a contextual menu for Bluetooth is displayed. Note: When FM10Q is connected to other devices by Bluetooth, the flash light will be ON. - Page 56 10.4" Vehicle Mount Computer FM10Q Product Reference Guide To add a device: 1. Go to Settings > Connected Devices > Bluetooth...
- Page 57 Chapter 3: Software Choose the Bluetooth device that you want to connect and follow onscreen prompt to continue pairing and using the Bluetooth device.
-
Page 58: Connecting To Wi-Fi Networks
10.4" Vehicle Mount Computer FM10Q Product Reference Guide 3.9 Connecting to Wi-Fi Networks Turn On Wi-Fi and Connect to Wi-Fi Network 1. Pull down from the right top of the screen to open the status area. 2. Check the status of Wi-Fi The device scans for available Wi-Fi networks and displays the list of it. - Page 59 Chapter 3: Software 4. To check the details about the speed, security, address and related settings, tap its name in the Wi-Fi settings screen.
- Page 60 2. Input the SSID (name) of the network, if the network is secured, tap the security menu and then tap the type of security deployed on the network. 3. Enter any required security credentials. 4. Tap Save. Note: When FM10Q is connected to other devices by Wi-Fi, the flash light will be ON.
-
Page 61: Wwan
Chapter 3: Software 3.10 WWAN For vehicle computers equipped with wireless WAN (3G or 4G/LTE) card, to use the wireless WAN feature to connect to the network, perform the following procedure: 1. Go to Settings > Networks and Internet > Mobile Network You can check the wireless WWAN connection status through the wireless network connection status icon in the status area. -
Page 62: Camera Features
10.4" Vehicle Mount Computer FM10Q Product Reference Guide 3.11 Camera Features Your device has a built in camera. 3.11.1 Taking Pictures To open Camera: 1. From the lock screen, touch Camera and swipe away from the camera icon in the bottom right corner. -
Page 63: Making Videos
Chapter 3: Software When you open Camera, you can choose from several different camera modes. The Camera icon indicates Camera mode. To take a picture: 1. Frame your subject. If you want to make fine adjustments to focus, watch for the focus ring. To focus on a different part of the image, touch it. -
Page 64: Camera Settings
Follow the software update guide to update the software. All the programming guides can be found in the driver CD included in the package. You need to download image tool driver to the SD card. Insert SD card to the FM10Q device to perform OTA Updates. -
Page 65: Image Tool Download
Download OS Image Tool update guide from Winmate Download Center. http://www.winmate.com/ > Support > Download Center > VMC > FM10Q > OS Image 3.12.2 OTA Update Guide OTA is a tool which can help you to update OS image. To receive Android OS image file contact our sales representatives. - Page 66 10.4" Vehicle Mount Computer FM10Q Product Reference Guide 4. Check "I agree to update" and click "UPDATE". 5. Wait for download finish it will take some time.
- Page 67 Chapter 3: Software 6. Click "REBOOT NOW"”. 7. Wait for OTA to update. Important: Do not disconnect the power source! Do not remove the battery! 8. When Update finish, the computer opens desk screen.
-
Page 68: Os Image Update Guide
10.4" Vehicle Mount Computer FM10Q Product Reference Guide 3.12.3 OS Image Update Guide 1. Please make sure that the device is in the shutdown state, first press FN and then press the Power key to enter the burning mode. 2. When the device enters the burning mode, please click the downloaded image file. There is a Burn_Image.bat in the file. -
Page 69: Chapter 4: Accessories Installation
Chapter 4: Accessories Installation Chapter 4: Accessories Installation 4.1 Installing a SIM Card The Vehicle mounted computer supports data connection using 4G LTE SIM cards and fits up to two Micro-SIM cards. (Note: 4G LTE feature is optional). Perform the following to install the SIM card to your vehicle mounted computer: 1. -
Page 70: Installing A Stylus With The Holder
10.4" Vehicle Mount Computer FM10Q Product Reference Guide 1. Reposition the removed service window and then screw to secure the service window 4.3 Installing a Stylus with the holder Perform the following to dock the device Align the screw hole between the stylus holder and the rear side of device, fasten it with the given screw. -
Page 71: Chapter 5: Vehicle Mounting
5.1 Introduction The FM10Q is designed to be mounted to a docking station on the vehicle with RAM mount. The vehicle mount holds the dock and FM10Q attaches to the dock. The FM10Q can operate on another vehicle equipped with the docking station without the need to mount the device again. -
Page 72: Ram Mount Installation
The docking of this device is designed to be mounted to RAM Mount solutions, which provides various mount types to fit any industrial use or vehicle. Notice that RAM Mount kits are not standard accessory of Winmate. We recommend ordering RAM Mount accessories from RAM Mount. -
Page 73: Mounting Kit 2 - Drill Solution
Chapter 5: Vehicle Mounting 5.3.2 Mounting Kit 2 – Drill Solution Part Number: 98K000A0006P Winmate Part RAM Mount Part Component Description Number Number RAM round base 3.68” Round Base with 2.25” mounts - on the 9B000000008R RAM-D-202U Ball forklift A1-1... -
Page 74: Ram Mount Assembly
10.4" Vehicle Mount Computer FM10Q Product Reference Guide 5.3.3 RAM Mount Assembly Step 1 Install RAM Clamp to vehicle or forklift 1.1 Determine the position for mounting the RAM clamp mount according to RAM Mounts installation guide and specification. 1.2 Place the upper clamp with ball on the beam, insert the bolt. -
Page 75: Mounting Kit 3 - Keyboard Mounting Installation
Chapter 5: Vehicle Mounting 5.3.4 Mounting Kit 3 – Keyboard Mounting Installation Part Number: 98K000A0005X Winmate Part RAM Mount Part Component Description Number Number Winmate Keyboard 4 VESA Holes on the plate to Adapter Plate 821009131600 device and 4 AMPS holes to... -
Page 76: Keyboard Assembly
10.4" Vehicle Mount Computer FM10Q Product Reference Guide 5.3.5 Keyboard Assembly This part shows the steps to install the keyboard. 1. Fasten all four screws on the RAM mount ball on the back of the keyboard. 2. Fasten the keyboard adapter on the other end of the RAM mount ball. -
Page 77: Docking And Undocking The Device
Chapter 5: Vehicle Mounting 3. Fasten the RAM mount ball screws on the back of the device, so all mounting parts are fastening together. 5.4 Docking and Undocking the Device Perform the following to dock the device: 1. Align the golden connector and guide pin holes on the device with the golden connector and guide pins on the docking station 2. -
Page 78: Power Cable Installation
10.4" Vehicle Mount Computer FM10Q Product Reference Guide Perform the following to undock the device: 1. While holding the device, push the release latch on the docking station and then lift the device to un- dock it. 5.5 Power Cable Installation 5.5.1 Wiring the Power Cable... -
Page 79: Connecting The Power Cable For Installation On The Vehicle
Chapter 5: Vehicle Mounting 1. Place the device on the vehicle dock and make sure the device is Off. 2. Connect the CN2 to the FM10 vehicle dock by aligning the connector pins and then push it, twist to fasten the connection. 3. - Page 80 10.4" Vehicle Mount Computer FM10Q Product Reference Guide Fuse Specification : Two Fuses , 15A, 250Volt, UDA Type Fuses Warning! All power wiring must use the supplied power cable. Avertissement! Tout le câblage électrique doit utiliser le câble d'alimentation fourni.
-
Page 81: Power Cable Routing
5.4.4 Power Cable Routing There are many cables available for the FM10Q including power cable, CAN Bus cable, or USB cable. To secure these cables, there are five cable clamps secured the FM10 vehicle dock to prevent the cable strain. -
Page 82: Appendix
Appendix Appendix A: Product Specifications Model Name FM10Q Display Specifications Size / Technology 10.4" (4:3) Resolution 1024 x 768 Brightness 400 nit (optional 1000 nit) Touch Projected capacitive PCAP multi-touch Contrast Ratio 1200:1 Viewing Angle -88~88(H) ; -88~88(V) •G-Sensor •Temperature Sensor... -
Page 83: Appendix B: Order Information
Power Input 10V-60V with power isolation and ignition control Battery Integrated Li-Ion maintenance UPS with 30-min life at 0°C (32°F) Appendix B: Order Information The FM10Q Vehicle Mount Computer available in the following configurations: Model Number FM10Q FM10Q-LA 4G LTE... - Page 84 Winmate Inc. 9F, No.111-6, Shing-De Rd., San-Chung District, New Taipei City 24158, Taiwan, R.O.C www.winmate.com Copyright © Winmate Inc. All rights reserved.
Need help?
Do you have a question about the FM10Q and is the answer not in the manual?
Questions and answers