
Related Manuals for Zip Rapid Deploy SEE010


Summary of Contents for Zip Rapid Deploy SEE010
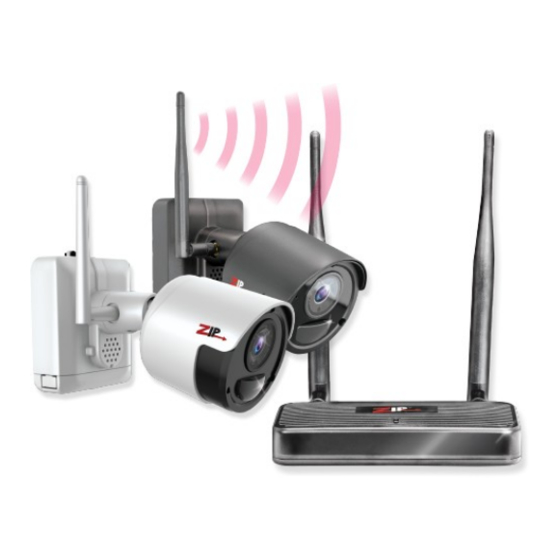
- Page 1 Instruction Manual Rapid Deploy Range Wireless Battery Powered CCTV Cameras © 2021 System Q Ltd ZipNVR.com...
-
Page 2: Table Of Contents
Rapid Deploy Manual Table of Contents Part 1 Introduction to the Rapid Deploy Range 1 Key Features ........................1 2 Required Tools / Handy Extras ..................2 Part 2 Connections & Wiring 1 Overview ........................3 2 Cameras ......................... 4 3 Batteries ......................... -
Page 3: Part 1 Introduction To The Rapid Deploy Range
Rapid Deploy - Fast to fit The new Zip range of rapid deploy cameras are a great add-on to your Zip DVR or NVR CCTV system as no cabling means they take only a minute to fit. WiFi style Transmission... -
Page 4: Required Tools / Handy Extras
4 Rapid Deploy Cameras per Receiv er Up to 4 of these camera units can transmit wirelessly to a mini receiver that simply plugs in to the back of your Zip NVR or DVR using a standard USB lead. Black or White Compact Camera Design... -
Page 5: Part 2 Connections & Wiring
1 Rapid Deploy Receiver can be used per Zip DVR or Zip NVR · The Rapid Deploy cameras use the IP channels when connected to Zip DVRs. This means you can add 4 Rapid Deploy cameras to 8Ch and 16Ch DVRs or 2 Rapid Deploy cameras to a 4Ch Zip DVR. -
Page 6: Cameras
Rapid Deploy Manual 2.2 Cameras When the PIR is activated then the camera is activated and transmits data to the receiver. It works by measuring the Infra Red (IR) light radiating from an object such as a human being in its field of view and detecting the subsequent radiant heat emitted. At night time the light sensor is used to determine if the Infra-Red LEDs are also activated when the camera is activated by the PIR. -
Page 7: Batteries
Battery pack are rechargeable using a standard micro USB B type lead. 2.4 Receiver Rapid Deploy Receiver (SEE020) that plugs directly into the USB of your compatible Zip DVR or NVR. Once plugged in you will see a green Status LED. -
Page 8: Part 3 Powering & Charging
The firmware required for the DVR and NVR is version 8 onwards. 4.1 POE NVR Channel Setup For PoE ZIP NVRs, the channel configuration for IP Channels need altering before setting up the USB wireless channels. Go to the menu of the DVR Video >... - Page 9 Setup Considerations Then proceed with Channel Setup © 2021 System Q Ltd ZipNVR.com...
-
Page 10: Dvr Channel Setup
Rapid Deploy Manual 4.2 DVR Channel Setup The channels needs configuring for the Rapid Deploy Receiver and Cameras. Go to the menu of the DVR Video > Channel Config (2 on a 4Ch DVR) DVR channel list > USB Wireless On the last 4 cameras in the Select... -
Page 11: Pairing
Setup Considerations 4.3 Pairing When the channels have been set then the Rapid Deploy Cameras need pairing with the Receiver. Pairing can only be done in the menu on the recorder. Go to the menu of the DVR Video > USB Wireless Pair Click to start the pairing mode with the Receiver... - Page 12 Rapid Deploy Manual Pairing successful! Will display once complete Select Switch to for the Rapid Deploy Channel Apply Click © 2021 System Q Ltd ZipNVR.com...
-
Page 13: Constant Recording
Setup Considerations 4.4 Constant Recording Post Recording can be adjusted for how long the DVR records for after the PIR has been activated. Apply Once set, Click Once the Battery is fully charged then the camera can be set to continuous recording. Apply Once set, Click ©... - Page 14 Rapid Deploy Manual This is only available if the USB is constantly connected to the Rapid Deploy camera. © 2021 System Q Ltd ZipNVR.com...
-
Page 15: Part 5 Mounting
Mounting Mounting The Rapid Deploy cameras are supplied with an simple mounting plate for quick and easy installation. To mount the camera just follow the steps below: 1. Fix the mounting plate to the mounting surface using the screws and plugs provided. 2. -
Page 16: Part 6 Troubleshooting
Rapid Deploy Manual 3. Finally secure the camera with the small locking screw. Troubleshooting 6.1 Problem - The receiver is connected but nothing shows in USB Wireless Solution(s): 1. The camera channels need to be altered to USB Wireless before attempting to pair, please go to channel setup 6.2 Problem - The battery is draining too quickly in the... -
Page 17: Part 7 General Maintenance
General Maintenance General Maintenance · Ensure that nothing is obscuring the field of view, position the camera to ensure the PIR and Lens can see clearly. · Routinely clean the camera to prevent dust build up as this can effect the performance of the camera. -
Page 18: General Company Disclaimer
WEE/CG0783SS collection point as defined by your local council. 9.3 Copyright © Copyright 2021 Zip is a registered trademark of System Q Ltd, Chesterfield. Derbyshire. S40 2WB © 2021 System Q Ltd ZipNVR.com... - Page 19 Index Index - M - Maintenance - A - Menu 8, 9, 11 Micro USB Socket Microphone Audio Mounting - B - - N - Battery 1, 5, 6 Battery Life - O - - C - Overview Camera Receiver Cameras - P - Channel...
- Page 20 Rapid Deploy Manual - U - USB Receiver USB Socket - V - Video 9, 14 Voltage - W - WEEE Declaration Wifi Wireless 1, 6, 8 Wiring - Z - ZipDVR ZipNVR © 2021 System Q Ltd ZipNVR.com...
Need help?
Do you have a question about the Rapid Deploy SEE010 and is the answer not in the manual?
Questions and answers