Makita DMR300 Instruction Manual
Job site charger radio
Hide thumbs
Also See for DMR300:
- Instruction manual (141 pages) ,
- Instruction manual (84 pages) ,
- Instruction manual (109 pages)
Table of Contents
Advertisement
Advertisement
Table of Contents

Related Manuals for Makita DMR300


Summary of Contents for Makita DMR300
- Page 1 INSTRUCTION MANUAL Job Site Charger Radio DMR300 DMR301 Read before use.
-
Page 2: Specifications
SPECIFICATIONS Model: DMR300 DMR301 AC power adaptor DC 24 V / 5.0 A, inner sleeve positive Battery UM-3 (AA size) x 2 for back up CXT battery: DC 10.8 V - 12 V max LXT battery: DC 14.4 V - 18 V... -
Page 3: Safety Warnings
Bluetooth SIG, Inc. and any use of such marks by Makita is under license. Other trademarks and trade names are those of their respective owners. The following table indicates the operating time on a single charge in Radio mode. - Page 4 Use battery operated radio only with specif- 23. Be careful not to drop or strike the radio. ically designated battery packs. Use of any Broken shell may slash your finger or stab other batteries may create a risk of fire. your body.
- Page 5 It will Make sure cord is located so that it will not be also void the Makita warranty for the Makita tool and stepped on, tripped over, or otherwise sub- charger.
-
Page 6: Parts Description
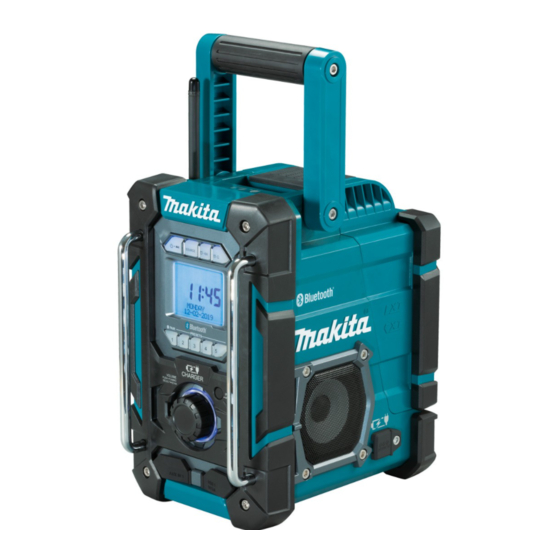
INTRODUCTION Parts description Body ► a) Left side b) Front c) Right side d) Back (battery cover closed) e) Back (battery cover opened) f) Top Handle Soft bended rod antenna Speaker Menu/Info button Volume/Tuning control/ Auxiliary input socket USB power supply port DC IN socket Select knob (AUX IN 1) - Page 7 Buttons and LCD display Power/Sleep timer Source button Radio alarm button Buzzer alarm button button "TIMER TO ALARM" "TIMER TO SPEAKER" Icon for delay charge Band icon icon Icon for sleep timer PM indicator for clock Stereo symbol No power indicator Error icon for charging Indicator for battery Indicator for AC power...
-
Page 8: Installing Back Up Batteries
Installing back up batteries FUNCTIONAL DESCRIPTION NOTE: Keeping back up batteries inside the compart- ment prevent stored data in preset memories from being lost. Installing or removing battery Pull up the battery compartment to unlock it and cartridge then open the battery cover. CAUTION: Hold the tool and the battery car- tridge firmly when installing or removing battery... - Page 9 WARNING: Use the AC power adaptor sup- plied with the product or specified by Makita only. (For LXT battery only) WARNING: Do not hold the power supply cable and plug by your mouth. Doing so might NOTE: Depending on the conditions of use and the cause an electric shock.
-
Page 10: Auxiliary Input Socket
Open the cover and insert the adaptor plug into the DC IN socket Adjust the volume setting on your external audio on the side of the radio. Plug the adaptor into a standard mains source to ensure an adequate signal level. After that, socket outlet. -
Page 11: Charging The Battery Cartridge
NOTE: No matter if the radio is AC powered or battery NOTE: It will take several seconds until the indicator powered, you can charge a USB device when the for battery status/capacity appears after the AC power radio is switched on and in FM radio mode, Bluetooth adaptor is plugged into the mains. -
Page 12: Operation
Presetting stations in FM/AM or DAB OPERATION There are 5 preset stations each for FM/AM or DAB radio. Switching on/off the radio They are used in the same way for each waveband. Press the Power button to switch on your radio. Press the Power button to switch on the radio. -
Page 13: Setting The Clock
Setting the clock Setting the alarm clock Your radio has two alarms which can each be set to wake Setting the time and date format you to AM/FM/DAB radio or buzzer alarm. The alarms may be set while the unit is in standby mode or while playing. NOTE: The selected time and date format is also used when setting the alarms. - Page 14 Loudness Rotate the Tuning control knob and the display will show the frequency options for the alarm. You can get compensation on lower and higher The alarm options are as follows: frequency for your radio by adjusting the loudness function. ONCE The alarm will sound once...
-
Page 15: Disconnecting Your Bluetooth ® Device
“ CONNECTED BLUETOOTH” will turn to be "PAIR To maintain product SAFETY and RELIABILITY, BLUETOOTH". repairs, any other maintenance or adjustment should be performed by Makita Authorized or Factory Service Press the Power button Centers, always using Makita replacement parts. Language options... - Page 16 Makita Europe N.V. Jan-Baptist Vinkstraat 2, 3070 Kortenberg, Belgium Makita Corporation 3-11-8, Sumiyoshi-cho, Anjo, Aichi 446-8502 Japan DMR300- ENEU-1911 www.makita.com 20201222...
Need help?
Do you have a question about the DMR300 and is the answer not in the manual?
Questions and answers