Table of Contents
Advertisement
Quick Links
Advertisement
Table of Contents

Related Manuals for Schulze BLUEpress


Summary of Contents for Schulze BLUEpress
- Page 1 Instruction manual Version 11.01 Pneumatic press BLUEpress Version 11.01...
-
Page 2: Table Of Contents
1. Introduction 1.1 Content 1. Introduction 1.1 Content 1.2 Illustration of the heat press 1.3 Illustration of the heat press 1.4 Technical data 1.5 Exchangeable heating plates 1.6 Exchangeable base plates 1.7 Safety arrangements of the press 1.8 Safety arrangements at the workspace 2. -
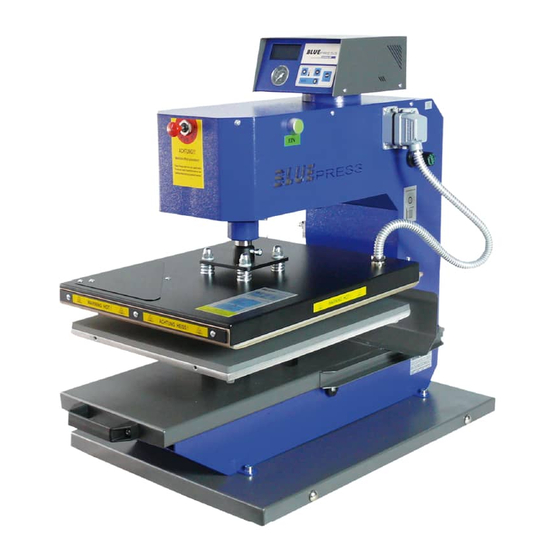
Page 3: Illustration Of The Heat Press
1.2 Illustration of the heat press Display of the electronic devices 10. Chassis Upper part of the press 11. Handle to pull out the base plate Press key EIN 12. Fixation screw of the heating plate Plug of the heating plate 13. -
Page 4: Illustration Of The Heat Press
1.3 Illustration of the heat press 18. Compressed air connection 21. Temperature and time adjustment 19. Main fuse12A 22. Power cable 20. Main switch 23. Air filter with water separator 1.4 Technical data Dimensions of the press: 750 x 500 x 850 mm Working plate: 40 x 50 cm Weight:... -
Page 5: Exchangeable Heating Plates
43 cm 1.7 Safety arrangements of the heat press The BLUEpress is equipped with different safety arrangements, to make a safe usage possible. Main fuse 12A The main fuse 12A is placed in the pivoting upper part of the heat press. In case of overcharge, the main fuse prevents the heat press from getting damaged. -
Page 6: Safety Arrangements At The Workspace
2.1 Tips for transport The SCHULZE BLUEpress is covered in protective foil for transport and fixed onto the pallet. Right after the receiving you should check if the foil and the press are in good condition. Later on, if you have to send the press somewhere, we ask you to fix the press in the same way on the pallet. -
Page 7: Installation Of The Heat Press
2.4 Power supply Die BLUEpress has to be connected to a voltage of 230VAC/ 50Hz. The press is equipped with a plug. Make sure that the power outlet is in the right condition and that the grounding is connected to the power outlet. -
Page 8: Working With The Heat Press
3. Working with the heat press 3.1 Programming of electronic devices Version 11.01... - Page 9 Pre-pressing To activate the pressing process, press button 1 (confirmation). On the display there's the pre- pressing time 2. After the pre-pressing the adjusted time for the normal pressing appears on the display. Programming of the electronic devices 1. Press button 1 for 5 seconds. The display shows: Temperature.
-
Page 10: Resetting The Press
Confirm the action with button 2 or cancel it with button 3. 3.3 Error reports The electronic devices of the BLUEpress control the main functions of the press. Here is a list of possible messages: ERR.1 – No connection of the electronic devices to the temperature sensor. (Temperature sensor defect/ cable not connected) ERR.2 –... -
Page 11: Application Range And Sample Adjustments Of The Heat Press
3.4 Application range and sample adjustments of the press This press is used to put transfers and transfer films on textiles. To get good achievements, get in contact with the producer of the textiles. Here are some settings: Film Flex 150°C –... -
Page 12: Exchanging And Rotating The Heating Plate
3.6 Exchanging and rotating the heating plate To exchange the heating plate, the press must be disconnected from electricity and cold. Now disconnect the spiral tube plug of the heating plate- Loosen fixation screw 1 with a wrench (4 rotations to the left). Take hold of the plate und put it down carefully on the base plate. Take the heating plate carefully and put it on a soft underground, because the Teflon cover should not be damaged. -
Page 13: Exchanging And Rotating The Base Plate
3.7 Exchanging and rotating the base plate If you want to exchange the base plate you have to loosen the fixation screw 1 and 2. Then you can take of the base plate. After exchanging the base plate, you have to tighten the fixation screws again (the pointed sides have to face up). Rotating the base plate about 90°... -
Page 14: Maintenance
4. Maintenance 4.1 Daily Maintenance The working surface of the heating plate and the base plate have to be clean. The heating plate can be cleaned with a clean, dry cloth. Avoid contact with the heating plate – risk of burns. The silicon gum can be cleaned with a soft cloth. -
Page 15: Replacing The Main Fuse
4.3 Replacing the main fuse If the heat press does not work after switching on (the main switch is glowing, but the display is not), check the main fuse of the press. The main fuse 12A is placed in the upper part of the press (photo 1).To exchange the fuse, switch off the heat press first and pull the plug. -
Page 16: Replacing The Electronic Devices
4.5 Replacing the electronic devices Inside the upper part of the press there are electronic devices, which control the temperature and time of the press. To exchange the electronic devices, turn off the press and pull the plug. Loosen the srews in the upper part of the press (photo 1) and remove the cover (photo 2). -
Page 17: Replacing The Thermal Fuse
4.7 Replacing the thermal fuse The replacing may only be done by an authorized person. For the replacement of the thermal fuse, the heat press must be disconnected from the electricity and cold. Remove the cap from the heating plate and remove the heat isolation (photo 1). Then remove the thermal fuse (photo 2) and connect a new one (photo 3). Tighten it on the heating plate, put in the heat isolation and tighten the cap again. -
Page 18: Troubleshooting
Reset the electronic devices, but Malfunction of the electronic devices Temperature on the display – Temperature too high/low first contact Walter Schulze GmbH The press heats up very slowly – over 30 minutes One of the tow heating elements is defect... -
Page 19: Connection Diagram
4.10 Connection diagram Version 11.01... -
Page 20: Controlling Of The Pneumatics
4.11 Controlling of the pneumatics Version 11.01... -
Page 21: Testing Report
EN 292-1 EN 292-2 safety of machines EN 60204-1 electrical equipment of machines Berlin , .._____________________________ Peter Meidinger President All SCHULZE heat presses are exempt from the waste disposal law under reg. no. DE 231060054. Version 11.01... -
Page 22: Spare Parts And Illustrations
5. Spare parts and illustrations 5.1 Illustration 1: Pneumatics Version 11.01... -
Page 23: Illustration 2: The Heat Press
5.2 Illustration 2: The heat press Version 11.01... -
Page 24: Illustration 3: The Heat Press
5.3 Illustration 3: The heat press Version 11.01... -
Page 25: Table Of Spare Parts
5.4 Table of spare parts Symbol Characterization 56.001 Connection part 6550-10; Spcs 7 56.002 Fixing plate – top 56.003 Spring R-09 pcs 16 56.004 Impression cylinder 56.005 Fixing plate – bottom 56.006 Threaded nut M10 56.007 Axle Ø30 56.008 Safety valve PX21423281 56.009 plastic clot 40x80;... - Page 26 5.4 Tabelle Ersatzteile Symbol Characterization 56.053 Axle Ø2 56.054 Flat bar 56.055 Springs S-04 56.056 Countersink screw M4x30 56.057 Teflon 56.058 Threaded nut M8x20 56.059 Grommet 56.060 Spiral tube Ø17 56.061 Part Sws 6m-10 56.062 Spring S-01 56.063 Screw M4x10 56.064 Triangle 56.065...
- Page 27 5.4 Tabelle Ersatzteile Symbol Characterization 56.105 Allen screw M6x20 pcs 5 56.106 Grommet M10 56.107 Allen screw M10x40 56.108 ball bearing 6000 ZZ 56.109 Aluminium part 20x20x73 56.110 Connection piece 5180-1/4 56.111 Connection piece 6463-6-1/8 56.112 Allen screw M6x15 pcs 2 56.113 Grommet Ø6 56.114...
Need help?
Do you have a question about the BLUEpress and is the answer not in the manual?
Questions and answers