
Related Manuals for AVANT A424201


Summary of Contents for AVANT A424201
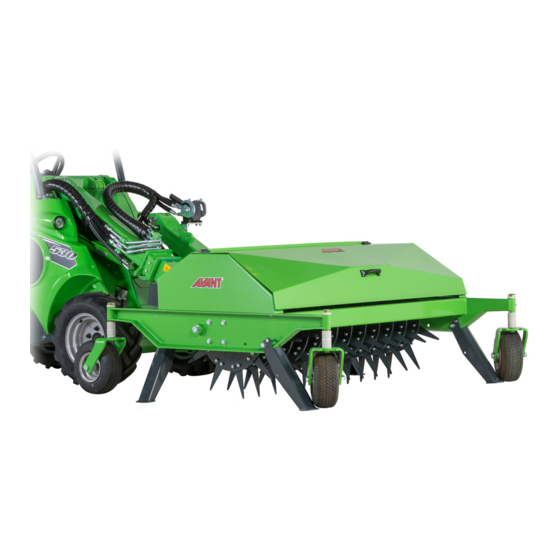
- Page 1 English Aerator 2018 1 Operator's Manual for Attachment Aerator Product number A424201 www.avanttecno.com A431964 2018 1 EN 2018-...
- Page 2 Aerator 2018 1...
-
Page 3: Table Of Contents
Aerator 2018 1 CONTENTS 1. FOREWORD ............................4 Warning symbols used in this manual ..........................5 2. DESIGNED PURPOSE OF USE ......................6 3. SAFETY INSTRUCTIONS FOR USING THE ATTACHMENT ............7 Personal protective equipment ........................... 8 Safe shutdown procedure ............................ 8 4. TECHNICAL SPECIFICATIONS ......................9 Safety labels and main components of the attachment.................. -
Page 4: Foreword
If you sell or transfer the equipment, be sure to hand over this manual to the new owner. If the manual is lost or damaged, you can request a new one from your Avant dealer or from the manufacturer. -
Page 5: Warning Symbols Used In This Manual
5 (22) Warning symbols used in this manual The following warning symbols are used throughout this manual. They indicate factors that must be taken into account to reduce the risk of personal injury or damage to property: WARNING: SAFETY ALERT SYMBOL This symbol means: “Warning, be alert! Your safety is involved!”... -
Page 6: Designed Purpose Of Use
2. Designed purpose of use The AVANT Aerator is an attachment suitable for use with all AVANT multi purpose loaders, as shown in Table 1. The Aerator is intended for cutting holes into the soil. The attachment is especially useful in a more compacted soil for recovering the growth of lawn. -
Page 7: Safety Instructions For Using The Attachment
7 (22) 3. Safety instructions for using the attachment Please bear in mind that safety is the result of several factors. The loader-attachment combination is highly powerful and improper or careless use or maintenance may cause serious personal injury or property damage. -
Page 8: Personal Protective Equipment
8 (22) 3.1 Personal protective equipment Remember to wear proper personal protective equipment: The noise level at the driver's seat may exceed 85 dB(A) depending on loader model and operating cycle. Extended exposure to loud noise can cause hearing impairment. Wear hearing protection while working with the loader. ... -
Page 9: Technical Specifications
6 pcs Length of the blades: 615 mm Compatible AVANT loaders: See Table 1, Designed purpose of use 4.1 Safety labels and main components of the attachment Listed below are the labels and markings on the attachment. They must be visible and readable on the equipment. - Page 10 10 (22) Table 3 - Decal locations and warning messages Decal Warning message 1 A46771 Misuse hazard - Read instructions before use. 2 A46772 Crushing hazard - Do not go under a raised attachment; stay away from raised equipment. 3 A46803 Pinching and cutting hazard, keep clear of moving parts, do not leave the equipment...
-
Page 11: Attaching The Attachment
Do not stay in the area between the attachment and the loader. Mount the attachment only on level surface. WARNING Never move or lift an attachment that has not been locked. Avant quick coupling system: Step 1: Lift the quick attach plate locking pins up and turn them backwards into the slot so that they are locked in the upper position. - Page 12 If your loader is not listed in Table 1 on page 6, ask your Avant dealer before using this attachment.
-
Page 13: Operating The Attachment
13 (22) 6. Operating the attachment Check the attachment and the operating environment once more before starting to work, and that all obstacles have been removed from the operating area. Quick inspection of the equipment and the operating area before use are parts of ensuring safety and the best performance of the equipment. -
Page 14: Use
14 (22) 6.2 Use Using the Aerator: Lift the storage supports of the aerator and lock them to upper position before use. Set the attachment to working position on the lawn. Set the position loader boom and the angle of the quick coupling so that the floating linkage of the ... -
Page 15: Setting The Floating Linkage
15 (22) 6.2.1 Setting the floating linkage The Aerator is equipped with a mechanical floating system, which makes it possible to use the aerator efficiently on lawns. Floating system refers to a linkage that allows the attachment to follow the contours of the lawn without moving the loader boom. -
Page 16: Adjusting The Operating Depth
16 (22) 6.3 Adjusting the operating depth The operating depth can be adjusted by adjusting the support wheels of the aerator. Wheels are adjusted by using the plastic sleeves on the vertical axles of the wheels. The attachment does not need to be disconnected from the loader while adjusting the height. -
Page 17: Transport Position
17 (22) 6.5 Transport position Keep the loader stable. Always transport the attachment as low and close to the ground as possible. Keep the telescopic boom retracted during drive. -
Page 18: Maintenance And Service
18 (22) 7. Maintenance and Service The attachment has been designed to be as maintenance free as possible. Continuous maintenance includes regular cleaning and lubrication, and monitoring the condition of the attachment. Because of the crushing hazard caused by lowering machine parts, all maintenance work must be done when moving parts have been lowered down completely and the attachment is lowered flat against the ground. -
Page 19: Lubrication
19 (22) 7.3 Lubrication A small amount of lubricant should be added to the lubrication points regularly. Correct lubrication interval depends heavily on operating conditions but lubricant must be added at least after every 10 hours of use. Clean the end of the nipple before greasing and add only a small amount of grease at a time. All lubrication nipples are standard R1/8"... -
Page 20: Warranty Terms
20 (22) 8. Warranty terms Avant Tecno Oy grants a warranty of one year (12 months) from the date of purchase for the attachment it manufactures. The warranty covers repair costs as follows: Work costs are covered, if the repair is not performed at the factory.
Need help?
Do you have a question about the A424201 and is the answer not in the manual?
Questions and answers