Table of Contents
Advertisement
Quick Links
Model
A-LIFT-R
A-LIFT-R-HP
A-LIFT-S
A-LIFT-S-HP
A-LIFT-S-EHP
A-LIFT-CB
A-LIFT-CB-HP
A-LIFT-CB-EHP
A-LIFT-DK (Optional Deck)
A-LIFT-PN (Optional 10" pneumatic rear wheels)
Receiving instructions:
After delivery, remove the packaging from the product. Inspect the product closely to determine whether it
sustained damage during transport. If damage is discovered, record a complete description of it on the bill of
lading. If the product is undamaged, discard the packaging.
NOTE:
The end-user is solely responsible for confirming that product design, installation, use, and maintenance
comply with laws, regulations, codes, and mandatory standards applied where the product is used.
Signal Words................................................................................................................................. 2
Hazards of Improper Use.................................................................................................................... 2
Product specifications by model......................................................................................................... 3
FIG 1A: HP & EHP models have telescoping mast frame......................................................................... 3
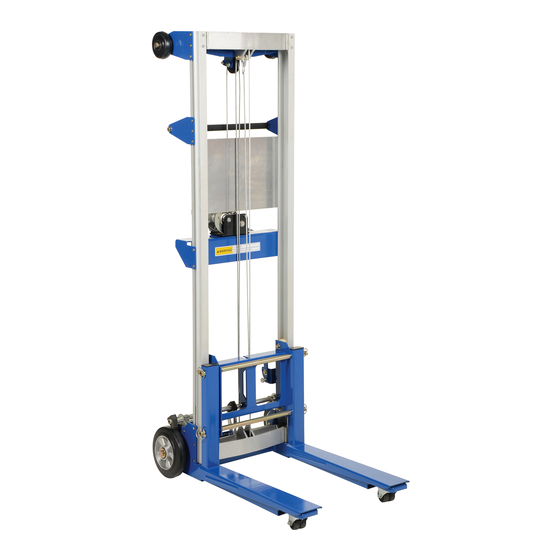
FIG. 1B: Diagram of Assembled A-Lift................................................................................................... 4
Assembly Instructions................................................................................................................... 5-7
Operation Instructions................................................................................................................... 7-9
Inspections & Maintenance.................................................................................................................... 10
Labeling diagram.......................................................................................................................... 11
Limited warranty.......................................................................................................................... 12
Copyright 2017 Vestil Manufacturing Corp.
Rev. 9/5/2017
A-LIFT Manual Winch Lift Trucks
Instruction Manual
A-LIFT-S
Overall Size
24" x 35" x 68"
24" x 35" x 68"
29" x 43" x 68"
29" x 43" x 68"
29" x 43" x 79"
29" x 47" x 68"
29" x 47" x 68"
29" x 47" x 79"
1
1
20
/
" x 24
/
2
4
T able of Contents
U
Vestil Manufacturing Corp.
2999 North Wayne Street, P.O. Box 507, Angola, IN 46703
Telephone: (260) 665-7586 -or- Toll Free (800) 348-0868
Fax: (260) 665-1339
Web:
www.vestilmfg.com
A-LIFT-R
Maximum Rated Load
500 lb. (227kg)
400 lb. (182kg)
500 lb. (227kg)
400 lb. (182kg)
350 lb. (159kg)
500 lb. (227kg)
400 lb. (182kg)
350 lb. (159kg)
"
A-LIFT, MANUAL
e-mail:
s ales@vestil.com
H U
A-LIFT-CB
Net Weight
136 lb. (62kg)
140 lb. (64kg)
140 lb. (64kg)
145 lb. (66kg)
154 lb. (70kg)
396 lb. (180kg)
418 lb. (190kg)
449 lb. (204kg)
25 lb. (11kg)
20 lb.
(9kg)
Page 1 of 12
U
Advertisement
Table of Contents

Subscribe to Our Youtube Channel
Related Manuals for Vestil A-LIFT-R


Summary of Contents for Vestil A-LIFT-R
-
Page 1: Table Of Contents
FIG 1A: HP & EHP models have telescoping mast frame…………………………………………………………..3 FIG. 1B: Diagram of Assembled A-Lift…………………………………………………………………………….... 4 Assembly Instructions……………………………………………………………………………………………………. 5-7 Operation Instructions……………………………………………………………………………………………………. 7-9 Inspections & Maintenance……………………………………………………………..........10 Labeling diagram…………….……………………………………………………………………….…………………... 11 Limited warranty………………………………………………………………………………………………………….. 12 Copyright 2017 Vestil Manufacturing Corp. Page 1 of 12... -
Page 2: Signal Words
DO NOT modify the lifter in any way UNLESS you U f irstU obtain written approval from Vestil. Unauthorized modifications automatically void the limited warranty (see p. 12) and might make the lifter unsafe to use. -
Page 3: Product Specifications By Model
[NOTE: Forks shown attached to carriage right- side-up; forks can also be attached upside down.] 4 & 4a -CB models: base configuration -S models: base configuration 9 or 23 or 30 Copyright 2017 Vestil Manufacturing Corp. Page 3 of 12... -
Page 4: Assembly Instructions
A-Lift-36 Assembly Instructions: Vestil ships winch lifts to its customers in a mostly assembled form. The minimal assembly that is required differs by model, so follow the directions that correspond to your lifter. If you purchased an A-LIFT-R or A-LIFT-S, you will receive 3 pieces: 1). - Page 5 Set the handle latch pin (circled) to lock the handle, and then fasten the handle to the handle connector handle connector with the bolt and washer that you removed in step (c). Copyright 2017 Vestil Manufacturing Corp. Page 5 of 12...
- Page 6 Align the casters with the bolt wrenches. holes in the weldment. S tep 2 : Attach the weldment to the main assembly. b. Lock both of the casters Copyright 2017 Vestil Manufacturing Corp. Page 6 of 12...
-
Page 7: Operation Instructions
DO NOT operate the winch lift until you read AND understand all of the instructions. If you do not understand an instruction, contact Vestil for clarification. Review ALL of the safety guidelines on p. 5 before each use;... - Page 8 Set the load on the forks. Lower the forks until forks to a The load must rest against load comfortable the back of the forks. inches above height. adjustable leg (shown arrow photo above). Copyright 2017 Vestil Manufacturing Corp. Page 8 of 12...
- Page 9 1. Remove the forks and store the forks and fork retaining pins. 2. Lower the carriage completely. 3. Rotate the pivoting carriage latch as shown by photos a & b to the right. Copyright 2017 Vestil Manufacturing Corp. Page 9 of 12...
-
Page 10: Inspections & Maintenance
N EVER modify the unit without first receiving express, written approval from Vestil. Modifications automatically void the limited warranty and might make the lifter unsafe to use. S tep 5 : Make a dated record of the repairs, adjustments and/or replacements. -
Page 11: Labeling Diagram
Rev. 9/5/2017 A-LIFT, MANUAL Labeling diagram: Only use the A-Lift if ALL labels are readable and undamaged. Contact Vestil for replacement labels. Warning label (on back side of warning label plate) “UTILITY LIFT Product model name; INSTRUCTIONS” Load capacity in kilograms;... -
Page 12: Limited Warranty
(you) for warranty service. Who may request service? Only a warrantee may request service. You are a warrantee if you purchased the product from Vestil or from an authorized distributor AND Vestil has been fully paid.
Need help?
Do you have a question about the A-LIFT-R and is the answer not in the manual?
Questions and answers