
Related Manuals for Sandstrom Lifestyle DAB HiFi


Summary of Contents for Sandstrom Lifestyle DAB HiFi
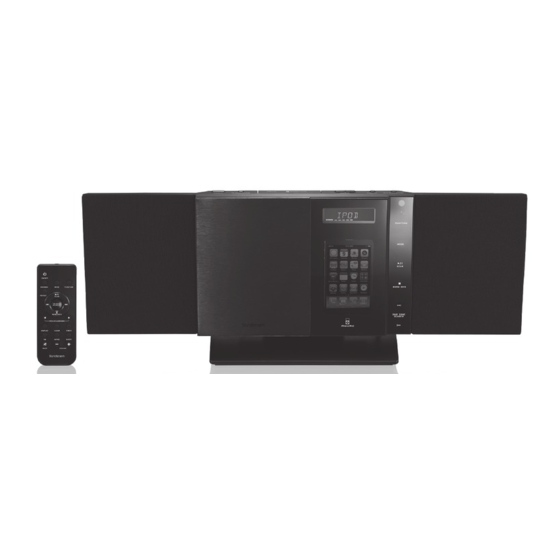
- Page 1 Instruction Manual Lifestyle DAB HiFi with a 30-pin dock for iPhone and iPod SHFJMC11...
-
Page 3: Table Of Contents
Contents Safety Warnings ........................5 Unpacking ..........................7 Product Overview .........................8 Front View ...............................8 Top View ................................8 Rear View .................................9 Remote Control ........................10 Remove the Insulating Strip from the Remote Control ...........11 Battery Replacement for the Remote Control ..............11 Remote Control Operation Range ..................12 Wall Mounting ........................12 Connections ........................13 Mains Power .............................. - Page 4 Compatible Disc Types .......................23 CD/MP3/WMA Disc Operation ...................23 Playback ................................ 23 To Pause Playback ............................. 24 To Stop Playback ............................24 Skipping to Another Track ........................24 Fast Forward / Fast Reverse ........................24 ID3 Operation (For MP3/WMA Mode) ....................24 Repeat Playback ............................
-
Page 5: Safety Warnings
Safety Warnings • Read all the instructions carefully before Ventilation using the unit and keep them for future • To prevent the risk of electric shock or reference. fire hazard due to overheating, ensure • Retain the manual. If you pass the unit that curtains and other materials do not obstruct the ventilation vents. - Page 6 Batteries CAUTION • Batteries used in the remote control for this RISK OF ELECTRIC SHOCK DO NOT OPEN unit are easily swallowed by young children and this is dangerous. The lightning flash with arrowhead symbol, within an equilateral • Keep loose batteries away from young triangle, is intended to alert the children and make sure that the battery user to the presence of uninsulated...
-
Page 7: Unpacking
Thank you for purchasing your new Sandstrøm Lifestyle DAB HiFi with a 30-pin dock for iPhone and iPod. We recommend that you spend some time reading this instruction manual in order that you fully understand all the operational features it offers. You will also find some hints and tips to help you resolve any issues. -
Page 8: Product Overview
Product Overview Front View FUNCTION MODE SCAN MENU INFO SKIP TUNE SEARCH iPhone/iPod MODE Icon Speakers /SCAN Icon CD/iPod Door /MENU/INFO Icon LCD Display Window IR Sensor 10. SKIP/TUNE/SEARCH Icon STANDBY Indicator 11. SKIP/TUNE/SEARCH Icon FUNCTION Icon Top View ON/OFF CD OPEN/CLOSE VOLUME DISPLAY... -
Page 9: Rear View
Rear View LINE IN Earphones FM Aerial Socket Mains switch LINE IN Socket Mains Cable... -
Page 10: Remote Control
Remote Control ON/OFF RANDOM MODE FUNCTION REPEAT SELECT/ MONO/ST. FOLDER/ARROW MENU/INFO SCAN DISPLAY CLOCK DISP TIMER INTRO SLEEP – MUTE VOLUME ON/OFF 11. MODE Button Button 12. FOLDER/ARROW RANDOM Button Button REPEAT Button Button 14. FOLDER/ARROW Button Button SELECT/MONO/ST. Button /SCAN Button /MENU/INFO Button 16. -
Page 11: Remove The Insulating Strip From The Remote Control
Remove the Insulating Strip from the Remote Control Remove the insulating mylar strip from the battery if the battery is being used for the first time. It is located at the bottom back side of the remote control. Battery Replacement for the Remote Control The remote control requires a CR2032, 3V Lithium battery. -
Page 12: Remote Control Operation Range
Handling the Remote Control • Be aware of your fingernails when you press and hold the battery release tab. • Do not drop or cause impact to the remote control. • Do not spill water or liquid on the remote control. • Do not place the remote control on a wet object. -
Page 13: Connections
Connections Mains Power • This unit was designed to operate with an AC 230V-240V ~50Hz power supply. • Connecting the unit to any other power source may cause damage to the unit. Unwind the mains cable to its full length. Connect the mains plug to a mains socket. Make sure the mains plug is fully inserted into the mains socket. -
Page 14: Playing Music From An Audio Device
Playing music from an Audio Device The AUX input is located on the rear side of the unit. Use a 3.5mm stereo audio cable (not included) to connect the audio device through the LINE IN socket. Rear Side of the unit Audio Device 3.5mm Stereo LINE IN... -
Page 15: General Operation
General Operation Powering ON/OFF Connect the unit to the mains socket. Switch the mains switch at the rear side of the unit to the ON position. The unit will be in standby mode and the standby indicator will illuminate. • Press the ON/OFF button on the unit or the remote control to switch the unit to ON mode. -
Page 16: Manual Setting The Clock
Manual Setting the Clock Connect the unit to the mains socket. Switch the mains switch at the rear side of the unit to ON position. The unit will be in Standby mode, and the display will show “00 : 00 : 00”. The unit will scan the time automatically. -
Page 17: To Cancel The Daily Timer (Remote Control Only)
Press the TIMER button on the remote control again, the display will show “the Volume level ” and flash. Press the SKIP/TUNE/SEARCH buttons on the remote control to adjust the volume. Press the TIMER button on the remote control to confirm. 10. -
Page 18: Dab Operation
DAB Operation Before switching your unit on, please fully extend the aerial. Switch the mains switch to on position and then press the ON/OFF button is pressed to turn the unit to ON mode. The first time you do this, the unit will automatically enter into DAB mode and perform a quick auto scan function. -
Page 19: Storing Stations
Storing Stations You can store up to 30 of your favourite stations to the memory. This will enable you to access your favourite stations quickly and easily. To store a preset, you must first be listening to the station that you would like to save. Press the DISPLAY button on the unit or the remote control, “Preset Empty #”... -
Page 20: Dab Display Modes
DAB Display Modes Every time you tap the /MENU/INFO icon on the unit or press the /MENU/INFO button on the remote control, the display will cycle through the following display modes: Ensemble/Multiplex (Group name), Frequency, Audio Bit Rate, Signal Strength, Time/ Date, Programme Type, DLS. -
Page 21: Fm Operation
FM Operation Switching from DAB to FM Mode During ON mode, to switch the unit to FM mode, tap the FUNCTION icon on the unit or press the FUNCTION button on the remote control repeatedly to select FM. The display will show FM and the frequency. -
Page 22: Recalling A Stored Station
There are some preset stations in default setting. You can overwrite these as you like. Recalling a Stored Station Once you have saved a station to one of the preset buttons, you can recall it by pressing the DISPLAY button on the remote control. Press the SKIP/TUNE SEARCH buttons on the unit or the remote control to select your desired preset station number. -
Page 23: Compatible Disc Types
Compatible Disc Types Disc Types Disc Logo Recorded Content CD-R (CD Recordable) AUDIO CD-RW (CD-Rewritable) AUDIO AUDIO-CD (Compact Disc Digital Audio) AUDIO Some recorded files may not be able to be played due to the type and format of disc or condition of the recording. CD/MP3/WMA Disc Operation Playback During ON mode, tap the MODE icon on the unit or press the MODE button on the remote... -
Page 24: To Pause Playback
c) It can “Playback Transfer Rate in 32-320 kbps for MP3 files, 64-320 kbps for WMA files. Max Readable Folders 99 and 999 tracks. d) If there is no disc or the disc can’t be read, “NO DISC” will show on the display. To Pause Playback /SCAN icon on the unit or press the /SCAN button... -
Page 25: Repeat Playback
Repeat Playback For CD Mode Press the REPEAT button once on the remote control, “REP_1” will show on the display. The CD will play the current track repeatedly. Press the REPEAT button twice on the remote control, “REP_ALL“ will show on the display. -
Page 26: Programme Cancel
Press the DISPLAY button on the remote control to confirm the track number. Repeat steps 2-5 to preset P-02, P-03, … /SCAN icon on the unit or press the /SCAN Tap the button on the remote control. The unit will start playback of the programmed tracks. -
Page 27: Usb Operation
USB Operation During ON mode, connect a USB device to the USB port directly. Tap the MODE icon on the unit or press the MODE button on the Folder Track remote control repeatedly to select USB mode. The unit will search for all available MP3/WMA files, and start playback automatically. -
Page 28: Iphone/Ipod Operation
iPhone/iPod Operation Inserting the iPhone/iPod and Selecting iPhone/iPod Mode This unit can support iPhone 3G/3GS/4 and various models of iPod players with 30-pin dock connectors, such as iPod touch 1 Generation, iPod Classic, iPod nano Generation, iPod 5 Generation (video), iPod 4 Generation (with and without colour display) and iPod mini. -
Page 29: Control Iphone/Ipod (Navigation Menu)
/SCAN 10. If the “ ” indicator is shown on the display, tap the icon on the unit or press the /SCAN button on the remote control to start playback. 11. Select your desired music, or videos, etc., and play the connected iPhone/iPod as usual. -
Page 30: Charging Your Iphone/Ipod
Charging Your iPhone/iPod Your iPhone/iPod has an internal non-removable battery, the battery may need to be charged if the iPod has not been used for awhile. You can charge the iPhone/iPod through the unit automatically under POWER ON or STANDBY mode when the mains switch at the rear panel of the unit is switched to the ON position. -
Page 31: Maintenance
Maintenance Handling Discs • Do not touch the playback side of the disc. • Do not attach paper or tape to the disc. Playback side Cleaning Discs • Fingerprints and dust on the disc cause picture and sound deterioration. Wipe the disc from the centre outwards with a soft cloth. -
Page 32: Hints And Tips
Hints and Tips If a problem does occur, it may often be due to something very minor. The following table contains various tips. Problem Cause / Solution No power. • Ensure the mains plug is connected. • Make sure that the unit is turned on. • Make sure that you select ON mode. - Page 33 Problem Cause / Solution iPod iPhone/iPod does not • iPhone/iPod may not be docked properly or installed respond to the speaker properly. Remove your iPhone/iPod from the dock and system. check for obstructions on the connectors in the dock and on your iPhone/iPod. • Make sure that your iPhone/iPod is working properly before docking.
-
Page 34: Specifications
Specifications Model SHFJMC11 Disc Format CD, CD-R, CD-RW, MP3, WMA Audio Characteristic 2-Channel Analogue Terminals USB 2.0 x 1, SD Card Reader x 1, LINE IN Socket x 1, Earphones Socket x 1, iPhone/iPod Dock x 1, CD Tray x 1 Frequency Range DAB: 174 –... - Page 35 For general information about this appliance and handy hints and tips, please visit www.knowhow.com/knowledgebank or call 0844 5611234. Visit Partmaster.co.uk today for the easiest way to buy electrical spares and accessories. With over 1 million spares and accessories available we can deliver direct to your door the very next day.
- Page 36 DSG Retail Ltd. (co. no. 504877) Maylands Avenue, Hemel Hempstead, Herts., HP2 7TG, UK 227-8075LF-Q43-V4...
Need help?
Do you have a question about the Lifestyle DAB HiFi and is the answer not in the manual?
Questions and answers