
Related Manuals for Qsan Technology XCubeNXT XN8012D


Summary of Contents for Qsan Technology XCubeNXT XN8012D
- Page 1 XCubeNXT Hardware Manual Applicable Models: XN8012D / XN8016D / XN8024D / XN8026D QSAN Technology, Inc. www.QSAN.com...
- Page 2 Edition 1.0 (September 2020) This document applies to QSAN XCubeNXT XN8000D unified storage systems. QSAN believes the information in this publication is accurate as of its publication date. The information is subject to change without notice. Trademarks QSAN, the QSAN logo, XCubeNXT, and QSAN.com are trademarks or registered trademarks of QSAN Technology, Inc.
-
Page 3: Regulatory Statements
Notices The Information contained in this manual has been reviewed for accuracy. It may include typographical errors or technical inaccuracies. Changes are made to the document periodically. These changes will be incorporated in new editions of the publication. QSAN may make improvements or changes in the products. - Page 4 BSMI Statement VCCI Statement VCCI-A KCC Statement (This equipment has approved for EMC on purpose of business use and there is possible for radio interference for home use.) © Copyright 2020 QSAN Technology, Inc. All Rights Reserved.
-
Page 5: Notices
Safety Warnings The XCubeNXT can operate normally in the temperature of 0ºC~40ºC (31.99 ~ 103.99°F). Please make sure the environment is well-ventilated. The power cord and devices connected to the XCubeNXT must provide a correct supply voltage (100-127V~/ 10A, 50-60Hz. 200-240V~/ 5A, 50-60Hz). Do not place the XCubeNXT in direct sunlight or near chemicals. - Page 6 QSAN provides a limited warranty for QSAN-branded hardware products: System hardware and peripheral product (s): 3 years limited warranty from date of original purchase. For more detail warranty policy, please refer to QSAN official website: https://www.qsan.com/en/warranty.php © Copyright 2020 QSAN Technology, Inc. All Rights Reserved.
-
Page 8: Table Of Contents
Cabling the System ............................ 52 Quick Maintenance ..........................55 10.1. Replace Fan Module ..........................56 10.2. Replace Power Supply Unit ........................57 Support and Other Resources ........................59 11.1. Getting Technical Support ......................... 59 © Copyright 2020 QSAN Technology, Inc. All Right Reserved. - Page 9 11.2. Documentation Feedback .......................... 60 Appendix ................................61 End-User License Agreement (EULA) ........................61 Expansion Enclosure List ............................63 Contents...
-
Page 11: Preface
Preface About This Manual This manual provides technical guidance for designing and implementing QSAN XN8000D system, and it is intended for use by system administrators, storage consultants, or anyone who has purchased this product and is familiar with servers and computer networks, network administration, storage system installation and configuration, network attached storage management and relevant protocols. -
Page 12: Technical Support
INFORMATION provides useful knowledge, definition, or terminology for reference. TIP: TIP provides helpful suggestions for performing tasks more effectively. CAUTION: CAUTION indicates that failure to take a specified action could result in damage to the system. © Copyright 2020 QSAN Technology, Inc. All Rights Reserved. -
Page 13: Conventions
Conventions The following table describes the typographic conventions used in this manual. Conventions Description Indicates text on a window, other than the window title, including Bold menus, menu options, buttons, fields, and labels. Example: Click the OK button. Indicates a variable, which is a placeholder for actual text provided <Italic>... -
Page 14: Overview
AC Power cord *2 Console cable *2 Screws for 3.5’’&2.5” drives (#6-32) Screws for 2.5” SFF Tray x 50 (2U x 50, 3U x 70, 4U x 100) (2U26 Form Factor only) © Copyright 2020 QSAN Technology, Inc. All Rights Reserved. -
Page 15: Xn8000D Product Overview
1.2. XN8000D Product Overview QSAN XN8000D is a powerful unified storage system, composed of the system hardware and the QSM operating system, designed for both enterprise and SMB users. The system hardware is a modular design and FRU (field replacement unit) optimized, features the Intel enterprise level Xeon CPU and up to 128GB of DDR4 ECC RAM. - Page 16 Note: Model specifications are subject to change without notice. Please refer to http://www.qsan.com for the latest information. LFF : Large Form Factor / 3.5” disk drive, SFF : Small From Factor / 2.5” disk drive. Slot 2 only provides 20Gb bandwidth. © Copyright 2020 QSAN Technology, Inc. All Rights Reserved.
-
Page 17: Hardware Overview
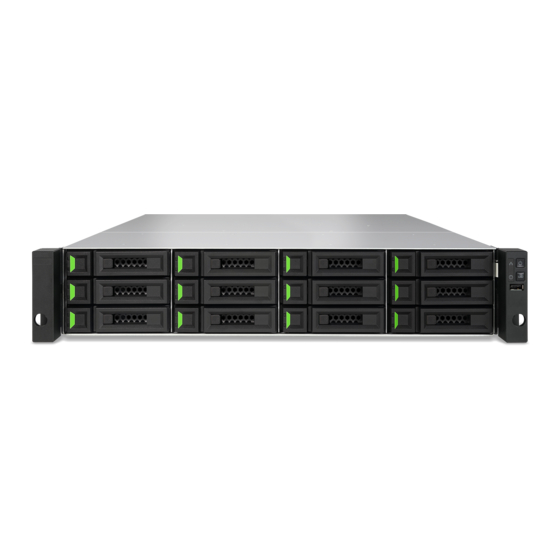
Hardware Overview This chapter outlines the key hardware components of the XN8000D system. After reading this chapter, you will have a basic understanding of each XN8000D hardware component and give you the ability to be able to successfully configure and operate your XN8000D system. Following is the key components of XN8000D: ... - Page 18 Figures and the table below illustrate LFF & SFF system front panel components. Components Table 2-2 LFF & SFF System Front Panel Number Description System Left Ear Disk Drive Tray System Right Ear The System Controls and Indicators Front Panel © Copyright 2020 QSAN Technology, Inc. All Rights Reserved.
- Page 19 Table 2-4 LFF & SFF Rear Panel Number Description Power Supply Unit 1 Fan Module 1 Slot for Memory Cache Protection Module: Flash Module Controller Module 1 Controller Module 2 Fan Module 2 Power Supply Unit 2 Dummy Slot Controller Module...
- Page 20 12Gb/s SAS Wide Port 2 (SFF8644) For a better understanding of the related colors and behaviors of each indicator on the front panel, please refer to the chapter 7. LED Indicator Table section. © Copyright 2020 QSAN Technology, Inc. All Rights Reserved.
-
Page 21: System Disk Drive Numbering
2.2. System Disk Drive Numbering Figures below illustrate XN8000D system disk drive numbering. You can find a disk drive numbering sticker on the top cover of the system chassis. -
Page 22: Disk Drive Form Factors
If you would like to maximize volume space with RAID being set, we recommend that all your installed drives be the same size. Please contact a QSAN authorized reseller for details purchasing information. © Copyright 2020 QSAN Technology, Inc. All Rights Reserved. -
Page 23: Install The System Hardware
Install the System Hardware This chapter will show you the procedure of XN8000D hardware installation and initial configuration. 3.1. Install the Disk Drive in the Tray 3.1.1. Tools and Parts for Drive Installation A screwdriver (Phillips #1). At least one 3.5” or 2.5” SAS/SATA drive (please visit www.qsan.com for compatible drive models). -
Page 24: Install The Disk Drive (Lff & Sff)
3.1.3. Install the Disk Drive (LFF & SFF) Open the drive tray. Unlock and open the carrier handle of a disk drive tray (LFF & SFF) © Copyright 2020 QSAN Technology, Inc. All Rights Reserved. - Page 25 Hold the carrier handle and pull out the disk drive tray, repeat the steps above to remove other disk drive trays.
- Page 26 Install a drive in LFF. Place the drive on the tray. Secure the drive from the four spots indicate below with four #6-32 screws provided in the accessory box. © Copyright 2020 QSAN Technology, Inc. All Rights Reserved.
- Page 27 Install a drive into SFF. Place the drive in the blue area (shown below) of the tray. Turn the tray upside down and secure the drive from the bottom of the tray with four M3 screws provided in the accessory box. Repeat the steps above to install all prepared drives.
-
Page 28: Upgrade Memory
The controller module is very heavy, please use both hands while installing, removing, or carrying the controller module. Recommended place for removing the controller module: the system is in a well secured rack or on a stable surface. © Copyright 2020 QSAN Technology, Inc. All Rights Reserved. - Page 29 When you remove the controller from the system chassis, the sensitive internal components are exposed. Please avoid touching anything other than the memory module when you add or remove a memory module. Insert a new memory module into the slot. Push the retaining clips on the slot out to the sides.
- Page 30 16GB 16GB 16GB 16GB 64GB 32GB 32GB 64GB 32GB 32GB 32GB 32GB 128GB CAUTION: To ensure the system stability, you MUST install genuine QSAN memory modules for system memory size expansion. © Copyright 2020 QSAN Technology, Inc. All Rights Reserved.
- Page 31 TIP: In order to achieve dual-channel RAM performance, it is suggested that you install memory modules with the same capacity in pairs. Pair 1: Slot #1 and Slot #3 Pair 2: Slot #2 and Slot #4 Memory module support: 1 RAM: Supports one module inserted into any slot as single-channel memory configuration.
-
Page 32: Install The Optional Host Card
Use one hand to hold one end of the controller module (the side with release levers) and the other hand hold the bottom of the controller. Pull out the controller module until it is free from the system chassis. © Copyright 2020 QSAN Technology, Inc. All Rights Reserved. - Page 33 CAUTION: When you remove the controller from the system chassis, the sensitive internal components are exposed. Please avoid touching any irrelevant components to prevent damage. Remove the dummy host card bracket. Loosen the screw(s) on the controller. Remove the dummy host card bracket. Install the host card.
- Page 34 If you want to purchase the optional adapter card, please contact your nearest local reseller or visit QSAN official website: https://qsan.com/location See the recommended adapter cards from the QSAN website: https://www.qsan.com/en/download.php © Copyright 2020 QSAN Technology, Inc. All Rights Reserved.
-
Page 35: Replace System Fan
3.4. Replace System Fan If a system fan failed to function, please see the instructions below to replace the malfunctioning fan: CAUTION: The fan module is a heavy and fragile; please use both hands while installing, removing, or carrying them. Recommended place for removing the system fan module: the system is in a well-secured rack or on a stable surface. -
Page 36: Replace Malfunctioning Psu
If the system failed to function, please contact QSAN support for further examination. If you need to replace the system controller, please see the instructions below: CAUTION: 1. The controller module is heavy and fragile, please use both hands while installing, removing, or carrying the controller module. © Copyright 2020 QSAN Technology, Inc. All Rights Reserved. - Page 37 Recommended place for removing the controller module: the system is in a well secured rack or on a stable surface. 2. The controller must be installed into slot 1 (the top slot of the system from the rear view). Remove the controller from the system chassis. Loosen the screws below the release lever on the back of the XCubeNXT.
-
Page 38: Replace Memory Cache Protection Modules
Hold the release tab and handle to pull out the modules. 2. Align the memory cache protection module cage to the slot and then push it all the way in to the system chassis until hear a “click” sound. © Copyright 2020 QSAN Technology, Inc. All Rights Reserved. -
Page 39: Install The Rail Kits
3.8. Install the Rail Kits Rail kit is an optional accessory XCubeNXT, if you did not purchase QSAN qualified rail kit, you can skip the steps of the system installation tasks. If you want to purchase QSAN qualified rail kit: full extension and thin slide with tool-less bracket: AA612508 series, please contact QSAN authorized reseller. - Page 40 Ensure ball bearing retainer is located at the front of the middle member. Insert chassis into the middle-outer member. When hitting the stop, pull/push release tab to unlock and retract chassis into rack. Use M5x20 screws to fasten the chassis ear. © Copyright 2020 QSAN Technology, Inc. All Rights Reserved.
-
Page 41: Connect The System To The Host
3.9. Connect the System to the Host XN8000D has two on-board 10GbE and one on-board 1GbE LAN ports for host connections. You can learn more about the path configuration in cabling for XN8000D by following images: One LAN connection b. Multiple LAN connections... -
Page 42: 3.10. Start Up Your System
The Following are the operational conditions for XN8000D: Temperature: Operating temperature 0 to 40°C Shipping temperature -10°C to 50°C Operating Relative Humidity 20% to 80% non-condensing Non-Operating Relative Humidity 10% to 90% © Copyright 2020 QSAN Technology, Inc. All Rights Reserved. -
Page 43: Discover And Install Qsm
Discover and Install QSM After hardware setup is finished, the next step is to discover the system on the network and start the initial configuration. To discover and install the QSAN Storage Manager (QSM), please follow the steps below: 1. Power on the XCubeNXT. 2. - Page 44 Find the memory status in Monitor app Hardware. If your system cannot recognize the expanded memory or the network expansion card or failed to start up, please check again and ensure the unit is properly installed. © Copyright 2020 QSAN Technology, Inc. All Rights Reserved.
-
Page 46: Restart/Shutdown/Logout Qsm
Vswitch will be deleted. Port trunking will be disabling. After configs are deleted, restart the XCubeNXT. Log out QSAN Cloud. DNS settings. DDNS and UPNP settings. © Copyright 2018 QSAN Technology, Inc. All Rights Reserved. - Page 47 2. Reset all settings: Press and hold the reset button on the rear panel for 10 seconds, you will hear a short beep sound at the third second and a long beep sound at the tenth second. The operating system (including reset the administrator password and all the network settings) will be reinstalled, the system configuration will result in: ...
- Page 48 2. Click the Reset Device button to proceed. © Copyright 2018 QSAN Technology, Inc. All Rights Reserved.
-
Page 49: Xn8000D Led Indicator Table
LED Indicator Table 7.1. XN8000D LED Indicator Table XN8000D features the button and indication module on both the front panel and the rear panel. Please refer to the following content for definitions of LED behaviors. Table 7-1 Descriptions of the System Controls and Indicators LEDs Number Description Definition... - Page 50 0.5 sec: firmware is upgrading, or RAID rebuilding is in a process. Off: the system is healthy. Disk Drive Power LED Blue: the disk drive is inserted and no data access. © Copyright 2018 QSAN Technology, Inc. All Rights Reserved.
- Page 51 Blue flashes: the disk data is being accessed. Off: no disk drive is inserted. Disk Drive Status LED Off: the disk drive is healthy. Amber: the disk drive has read/write error. Amber flashes (interval of 0.5 sec): the disk drive is rebuilding.
-
Page 52: Memory Cache Protection Module Leds And Button
Amber: Asserted when a 1G link is established and maintained. Green: Asserted when a 100M link is established and maintained. OFF: No link is detected, or link fails. © Copyright 2018 QSAN Technology, Inc. All Rights Reserved. - Page 53 HQ-10G4S2 (10GbE via SFP+) Number Definition Link Status LED (Left): Green flashes: Asserted when the link is established, and packets are being transmitted along with any receive activity (Access). OFF: No link is detected, or link fails. Speed LED (Right): ...
- Page 54 Note 2: The beep sound will not be triggered if buzzer function is disabled from the QSM. You can check the error messages through the Notification Center on QSM. © Copyright 2018 QSAN Technology, Inc. All Rights Reserved.
-
Page 55: Expansion Configuration Rules
Deployment Topology This chapter will show detailed deployment topology for XCubeNXT. You can build up a deployment plan for your XCubeNXT storage environment. It supports a maximum of up to 232 drives for the system storage space expansion, both single and dual path cabling are supported. 9.1. -
Page 56: Cabling The System
Connect your XCubeNXT to one or more expansion unit(s) via the SAS port and SAS cable(s). The following images illustrate some examples of expansion types for your system: a. Single Path Expansion © Copyright 2018 QSAN Technology, Inc. All Rights Reserved. - Page 57 b. Dual Path Expansion After connected to the expansion units, you can check the deployment topology on QSM Control Panel Storage app Overview Enclosure Map.
- Page 58 The status of each expansion unit will be shown on QSM Monitor app Hardware. © Copyright 2018 QSAN Technology, Inc. All Rights Reserved.
-
Page 59: 10. Quick Maintenance
10. Quick Maintenance This chapter provides quick maintenance and instruction of removing/installing FRU (Field Replaceable Unit) or optional components of XCubeNXT. Any of the FRU components can be hot swapped and replaced with zero downtime in the rare event of a component failure. If you encounter any issues caused by FRU components while operating the XCubeNXT, please refer to related section and follow the quick troubleshooting procedures step by step. -
Page 60: Replace Fan Module
Hardware. The System Health and Fan Speed will show “Error” if failed. You can also check the status by clicking Dashboard on the top right corner on the desktop. The System Status will also display “Error” and its message, “Fan(No.) is not functioning”. © Copyright 2018 QSAN Technology, Inc. All Rights Reserved. -
Page 61: Replace Power Supply Unit
If you see the error message shown above, which means your fan module needed to be replaced immediately. To replace the malfunction fan module, please refer to chapter 3.4 Replace System Fan. After the new fan module is successfully installed, you can see the fan speed displaying its Revolutions Per Minute(RPM) value on QSM. - Page 62 To replace the malfunction PSU, please refer to chapter 3.5 Replace Malfunctioning PSU. After the new PSU is successfully installed, the PSU status LED will and you can see the PSU status displaying “Good” on QSM. green © Copyright 2018 QSAN Technology, Inc. All Rights Reserved.
-
Page 63: 11. Support And Other Resources
11. Support and Other Resources 11.1. Getting Technical Support After installing your device, locate the serial number on the sticker located on the side of the chassis and register your product at partner.qsan.com/ (End-User Registration). We recommend registering your product in QSAN partner website for firmware updates, document download, and latest news in eDM. -
Page 64: Documentation Feedback
When submitting your feedback, including the document title, part number, revision, and publication date located on the front cover of the document. © Copyright 2018 QSAN Technology, Inc. All Rights Reserved. -
Page 65: Appendix
ACCORDANCE WITH THE RESELLER'S APPLICABLE RETURN POLICY. General QSAN Technology, Inc. ("QSAN") is willing to grant you (“User”) a license of software, firmware and/or other product sold, manufactured or offered by QSAN (“the Product”) pursuant to this EULA. License Grant... - Page 67 License Limitations User may not, and may not authorize or permit any third party to (a) use the Product for any purpose other than in connection with the Product or in a manner inconsistent with the design or documentations of the Product; (b) license, distribute, lease, rent, lend, transfer, assign or otherwise dispose of the Product or use the Product in any commercial hosted or service bureau environment;...
- Page 68 This EULA shall be governed by and constructed according to the laws of R.O.C. Any disputes arising from or in connection with this EULA, User agree to submit to the jurisdiction of Taiwan Shilin district court as first instance trial. © Copyright 2018 QSAN Technology, Inc. All Rights Reserved.
-
Page 69: Expansion Enclosure List
Expansion Enclosure List Expansion XD5312-D XD5316-D XD5324-D XD5326-D Enclosures XD5312-S XD5316-S XD5324-S XD5326-S Configurations Single Controller or Dual Controllers Host Wide Ports 5 x 12 Gb/s SAS wide ports connectors (SFF-8643, internal) Per System Enclosures LFF 2U12 LFF 3U16 LFF 4U24 SFF 2U26 No.
Need help?
Do you have a question about the XCubeNXT XN8012D and is the answer not in the manual?
Questions and answers