Table of Contents

Related Manuals for Qsan Technology XN5012RE


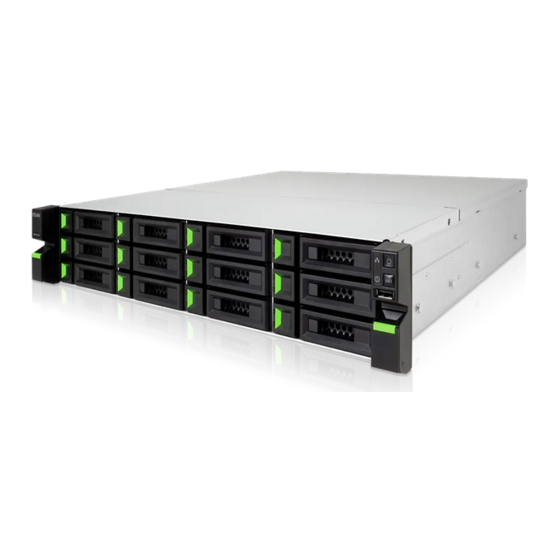
Summary of Contents for Qsan Technology XN5012RE
- Page 1 XN5012RE Hardware Owner’s Manual QSAN Technology, Inc. www.qsan.com © Copyright 2019 QSAN Technology, Inc. All rights reserved. No part of this document may be reproduced or transmitted without written permission from QSAN Technology, Inc.
- Page 2 Edition 1.0 (March 2019) This edition applies to QSAN XCubeNAS XN5012RE NAS storage systems. QSAN believes the information in this publication is accurate as of its publication date. The information is subject to change without notice. Trademarks QSAN, the QSAN logo, XCubeNAS, and QSAN.com are trademarks or registered trademarks of QSAN Technology, Inc.
-
Page 3: Notices
Notices The Information contained in this manual has been reviewed for accuracy. It may include typographical errors or technical inaccuracies. Changes are made to the document periodically. These changes will be incorporated in new editions of the publication. QSAN may make improvements or changes in the products. - Page 4 Notice: The changes or modifications not expressly approved by the party responsible for compliance could void the user’s authority to operate the equivalent. BSMI Statement VCCI Statement VCCI-A © Copyright 2019 QSAN Technology, Inc. All Right Reserved.
-
Page 5: Safety Warnings
Safety Warnings The XCubeNAS can operate normally in the temperature of 0ºC~40ºC (31.99 ~ 103.99°F). Please make sure the environment is well-ventilated. The power cord and devices connected to the XCubeNAS must provide a correct supply voltage (100-240V~/ 5A-2.5A, 50-60Hz). Do not place the XCubeNAS in direct sunlight or near chemicals. - Page 6 QSAN provides a limited warranty for QSAN-branded hardware products: System hardware and peripheral product (s): 3 years limited warranty from date of original purchase. For more detail warranty policy, please refer to QSAN official website: https://www.qsan.com/en/warranty.php © Copyright 2019 QSAN Technology, Inc. All Right Reserved.
-
Page 7: Table Of Contents
Information, Tip and Caution ......................8 Conventions ............................. 9 Overview ..........................10 1.1. Package Contents ......................10 1.2. XN5012RE Product Overview ................... 11 Hardware Overview ......................13 2.1. Front and Rear Panel ......................13 2.2. System Disk Drive Numbering ..................15 2.3. - Page 8 11. Support and Other Resources ..................57 11.1. Getting Technical Support ....................57 11.2. Documentation Feedback ....................58 Appendix ............................. 59 End-User License Agreement (EULA) ..................59 Expansion Enclosure List ......................62 © Copyright 2019 QSAN Technology, Inc. All Rights Reserved.
-
Page 9: Preface
Preface About This Manual This manual provides technical guidance for designing and implementing QSAN XN5012RE system, and it is intended for use by system administrators, NAS designers, storage consultants, or anyone who has purchased this product and is familiar with servers and computer networks, network administration, storage system installation and configuration, network attached storage management and relevant protocols. -
Page 10: Technical Support
INFORMATION provides useful knowledge, definition, or terminology for reference. TIP: TIP provides helpful suggestions for performing tasks more effectively. CAUTION: CAUTION indicates that failure to take a specified action could result in damage to the system. © Copyright 2019 QSAN Technology, Inc. All Rights Reserved. -
Page 11: Conventions
Conventions The following table describes the typographic conventions used in this manual. Conventions Description Indicates text on a window, other than the window title, including Bold menus, menu options, buttons, fields, and labels. Example: Click the OK button. Indicates a variable, which is a placeholder for actual text provided <Italic>... -
Page 12: Overview
NAS system which is designed for composite SMB and enterprise applications for enterprise and SMB users. Before setting up your new XN5012RE, please check the package contents to verify those items below. Besides, make sure to read the safety instructions carefully. -
Page 13: Xn5012Re Product Overview
1.2. XN5012RE Product Overview QSAN XN5012RE is a powerful NAS system which is designed for both enterprise and SMB users. The system hardware features the Intel enterprise level Celeron CPU and up to 64GB of DDR4 RAM. The additional PCIe slots also delivered to enhance the performance and scale up with expansion enclosures. - Page 14 FCC Class A • CE Class A • BSMI Class A • VCCI Class A • RCM Class A Note: Model specifications are subject to change without notice. Please refer to http://www.qsan.com for the latest information. LFF : Large Form Factor / 3.5” disk drive © Copyright 2019 QSAN Technology, Inc. All Rights Reserved.
-
Page 15: Hardware Overview
This chapter outlines the key hardware components of the XN5012RE system. After reading this chapter, you will have a basic understanding of each XN5012RE hardware component and give you the ability to be able to successfully configure and operate your XN5012RE system. Following is the key components of XN5012RE: Front and Rear Panel ... - Page 16 Additional PCIe Slot for Expansion (Gen3 x 4) HDMI Port For a better understanding of the related colors and behaviors of each indicator on the front panel, please refer to the chapter 7. LED Indicator Table section. © Copyright 2019 QSAN Technology, Inc. All Rights Reserved.
-
Page 17: System Disk Drive Numbering
2.2. System Disk Drive Numbering Figures below illustrate XN5012RE system disk drive numbering. 2.3. Disk Drive Form Factors QSAN has tested and approved the popular SATA HDDs and SSDs models available on the market, you have the highest flexibility to choose the most advanced HDDs or SSDs available from the manufacturers or purchase the best cost/performance SATA HDDs or SSDs from the market, it will significantly reduce your IT infrastructure investment cost. -
Page 18: Install The System Hardware
Install the System Hardware This chapter will show you the procedure of XN5012RE hardware installation and initial configuration. 3.1. Install the Disk Drive in the Tray 3.1.1. Tools and Parts for Drive Installation A screwdriver (Phillips #1). At least one 3.5” or 2.5” SATA drive (please visit www.qsan.com for compatible drive models). - Page 19 3.1.3. Install the Disk Drive (LFF) 1. Open the drive tray. Push the release button from right to left to open the carrier handle. Hold the carrier handle and pull out the disk drive tray, repeat the steps above to remove other disk drive trays.
- Page 20 Place the drive in the blue area (shown below) of the tray. Turn the tray upside down and secure the drive from the bottom of the tray with four M3 screws provided in the accessory box. © Copyright 2019 QSAN Technology, Inc. All Rights Reserved.
- Page 21 4. Install a LFF tray into the XCubeNAS. Insert the loaded drive tray into the empty drive bay all the way to the back until the carrier handle can be closed. Push the disk drive lock from right to left to lock the drive tray. TIP: Make sure the tray is pushed in all the way, otherwise the drive might not function properly.
-
Page 22: Upgrade Memory
NAS. XN5012RE is installed with two 4GB DDR4 memory module by default. If you want to install, check, or remove a memory module on your XCubeNAS, please follow the steps as illustrated below: 1. - Page 23 3. Insert a new memory module into the slot. Push the retaining clips on the slot out to the sides. Align the notch on the gold edge of the module with the notch in the memory slot. Push down on the memory module with firm and even pressure. The retaining clips will snap into position as the module is correctly inserted.
- Page 24 The Suggested Installation Combination for Memory. Pair #1 Pair #2 Total Memory Slot #1 Slot #3 Slot #2 Slot #4 8GB (Default) 16GB 16GB 32GB 32GB 16GB 16GB 64GB 16GB 16GB 16GB 16GB © Copyright 2019 QSAN Technology, Inc. All Rights Reserved.
- Page 25 CAUTION: To ensure the system stability, you MUST install genuine QSAN memory modules for system memory size expansion. TIP: In order to achieve dual-channel RAM performance, it is suggested that you install memory modules with the same capacity in pairs. Pair 1: Slot #1 and Slot #3 Pair 2: Slot #2 and Slot #4 Memory module support:...
-
Page 26: Install The Optional Adapter Card
Pull the rear top cover, and put it aside. CAUTION: When you remove the rear top cover, the sensitive internal components are exposed. Please avoid touching any irrelevant components to prevent damage. © Copyright 2019 QSAN Technology, Inc. All Rights Reserved. - Page 27 3. Install the adapter card. Remove the screw that secures the expansion slot’s cover. Lift the expansion slot’s cover. Align the card’s connector with the expansion slot, and insert the card into the slot. CAUTION: Make sure the connector is fully inserted. Otherwise, the network expansion card might not be able to function properly.
- Page 28 Align the pin at the side of the rear top cover with the slots on the chassis’ edge, and push the rear top cover back in position. Put back and fasten the screw on the back of the XCubeNAS. © Copyright 2019 QSAN Technology, Inc. All Rights Reserved.
-
Page 29: Replace System Fan
The following table is the recommended adapter card configuration. Please note that if you install a SAS 12Gb or a thunderbolt 3 adapter card in the PCIe Gen3 x4 slot, the speed will be limited to Gen3 x4. Table 3-3 The Recommended Adapter Card Configuration. - Page 30 Align the connectors on and fan module to the connector on the mainboard. Slide the fan module into the fan holder rail. Make sure both sides are aligned properly as illustrated below, then push the module all the way down. © Copyright 2019 QSAN Technology, Inc. All Rights Reserved.
-
Page 31: Replace Malfunctioning Psu
5. Put back the rear top cover you lifted in step 2. Align the pin at the side of the rear top cover with the slots on the chassis’ edge, and push the rear top cover back in position. Put back and fasten the screw on the back of the XCubeNAS. 3.5. - Page 32 3. Prepare a new PSU, and push it back to the slot until you hear a click. Please make sure that the direction of the PSU is correctly installed, to prevent any potential damage by improper installation. © Copyright 2019 QSAN Technology, Inc. All Rights Reserved.
-
Page 33: Install The Rail Kits
3.6. Install the Rail Kits Rail kit is an optional accessory XCubeNAS, if you did not purchase QSAN qualified rail kit, you can skip the steps of the system installation tasks. If you want to purchase QSAN qualified rail kit: full extension and thin slide with tool-less bracket: AA612508 series, please contact QSAN authorized reseller. - Page 34 Install the inner member onto the chassis. Install the outer rail/bracket assembly to the frame. Repeat this step for the other side. © Copyright 2019 QSAN Technology, Inc. All Rights Reserved.
- Page 35 Use two M5 screws to fasten the bracket to the rail kit, one on each rail. (For the complete safety, you can use four optional M4 screws to fasten the bracket to the rail kit.) Insert the chassis to complete the installation Pull the middle member fully extended in locked position.
-
Page 36: Connect The System To The Host
3.7. Connect the System to the Host XN5012RE has four onboard 1Gbps LAN ports for host connections. You can learn more about the path configuration in cabling for XN5012RE by following images: a. One LAN connection b. Multiple LAN connections... -
Page 37: Start Up Your System
c. Direct attachment 3.8. Start Up Your System Before you power on your XCubeNAS for the first time, please make sure the following tasks are done: 1. Connect one end of each power cord to the power ports located on the back of the XCubeNAS and the other end to a power outlet. - Page 38 The power cord rating is the minimum requirement. The rating of the power cord that you purchase must equal to or be higher than the minimum requirement to ensure the system safety and reliability. INFORMATION: The Following are the operational conditions for XN5012RE: Temperature: Operating temperature 0 to 40°C ...
-
Page 39: Discover And Install Qsm
Discover and Install QSM After hardware setup is finished, the next step is to discover the system on the network and start the initial configuration. To discover and install the QSAN Storage Manager (QSM), please follow the steps below: 1. Power on the XCubeNAS. 2. - Page 40 3. Click “Connect” on the Web Finder or double click on your XCubeNAS on the XFinder, the welcome page will be launched on your web browser. 4. Click Quick Setup or Custom Setup to start the setup process and follow the onscreen instructions. © Copyright 2019 QSAN Technology, Inc. All Rights Reserved.
- Page 41 5. If you accidentally leave the quick install page, you can always return to the setup page by go through the steps above from step 1 again. 6. After quick setup is finished, login to the QSM as “admin” (default account name) with the password you set on former instructions.
-
Page 42: Restart/Shutdown/Logout Qsm
1. To restart or shutdown QSM, please click on the QSAN logo on the top left corner, then choose the option which you would like to proceed. Click Yes button on the confirm window. © Copyright 2019 QSAN Technology, Inc. All Rights Reserved. - Page 43 2. To log out QSM, please click User Profile on the top right corner, then choose Logout. Click Yes button on the confirm window.
-
Page 44: Reset To Default
Vswitch will be deleted. Port trunking will be disabling. After configs are deleted, restart the XCubeNAS. Log out QSAN Cloud. DNS settings. DDNS and UPNP settings. © Copyright 2019 QSAN Technology, Inc. All Rights Reserved. - Page 45 2. Reset all settings: Press and hold the reset button on the rear panel for 10 seconds, you will hear a short beep sound at the third second and a long beep sound at the tenth second. The operating system (including reset the administrator password and all the network settings) will be reinstalled, the system configuration will result in: Reset all network settings to factory default.
- Page 46 2. Click the Reset Device button to proceed. © Copyright 2019 QSAN Technology, Inc. All Rights Reserved.
-
Page 47: Led Indicator Table
LED Indicator Table XN5012RE features the button and indication module on both the front panel and the rear panel. Please refer to the following content for definitions of LED behaviors. Table 7-1 Descriptions of the System Controls and Indicators LEDs... - Page 48 Off: no disk drive is inserted. Disk Drive Status LED Off: the disk drive is healthy. Amber: the disk drive is error. © Copyright 2019 QSAN Technology, Inc. All Rights Reserved.
- Page 49 Amber flashes (interval of 0.5 sec): the disk drive is rebuilding or identify a specific disk drive. LAN Port Activity/Link: Light OFF: No connection. Light ON: Connected to the internet Light flashes: when data is being accessed. ...
-
Page 50: Buzzer Indicator Table
Note 2: The beep sound will not be triggered if buzzer function is disabled from the QSM. You can check the error messages through the Notification Center on QSM. © Copyright 2019 QSAN Technology, Inc. All Rights Reserved. -
Page 51: Deployment Topology
SATA SSD: 2 TB) XD5312 12 + 12 x 8 = 1,512 TB (2U 12Bay) XD5316 12 + 16 x 8 = 1,960 TB XN5012RE with (3U 16Bay) SAS 12G Adapter XD5324 12 + 24 x 8 = Card 2,856 TB (4U 24Bay) -
Page 52: Cabling The System
Connect your XCubeNAS to one or more expansion unit(s) via the SAS adapter card and SAS cable(s). The following images illustrate some examples of expansion types for your system: a. Single Path Expansion © Copyright 2019 QSAN Technology, Inc. All Rights Reserved. - Page 53 b. Dual Path Expansion After connected to the expansion units, you can check the deployment topology on QSM Control Panel Storage app Overview Enclosure Map.
- Page 54 The status of each expansion unit will be shown on QSM Monitor app Hardware. © Copyright 2019 QSAN Technology, Inc. All Rights Reserved.
-
Page 55: Quick Maintenance
10. Quick Maintenance This chapter provides quick maintenance and instruction of removing/installing FRU (Field Replaceable Unit) or optional components of XCubeNAS. Any of the FRU components can be hot swapped and replaced with zero downtime in the rare event of a component failure. If you encounter any issues caused by FRU components while operating the XCubeNAS, please refer to related section and follow the quick troubleshooting procedures step by step. -
Page 56: Replace Fan Module
Hardware. The System Health and Fan Speed will show “Error” if failed. You can also check the status by clicking Dashboard on the top right corner on the desktop. The System Status will also display “Error” and its message, “Fan(No.) is not functioning”. © Copyright 2019 QSAN Technology, Inc. All Rights Reserved. -
Page 57: Replace Power Supply Unit
If you see the error message shown above, which means your fan module needed to be replaced immediately. To replace the malfunction fan module, please refer to chapter 3.4 Replace System Fan. After the new fan module is successfully installed, you can see the fan speed displaying its Revolutions Per Minute(RPM) value on QSM. - Page 58 To replace the malfunction PSU, please refer to chapter 3.5 Replace Malfunctioning PSU. After the new PSU is successfully installed, the PSU status LED will be green and you can see the PSU status displaying “Good” on QSM. © Copyright 2019 QSAN Technology, Inc. All Rights Reserved.
-
Page 59: Support And Other Resources
The following system information is necessary for technical support, please refer to following for what and where to get the information of your XCubeNAS XN5012RE model. If the technical support requests you to download the service log, please navigate to the QSM UI ... -
Page 60: Documentation Feedback
To help us improve the documentation, email any errors, suggestions, or comments to docsfeedback@qsan.com. When submitting your feedback, including the document title, part number, revision, and publication date located on the front cover of the document. © Copyright 2019 QSAN Technology, Inc. All Rights Reserved. -
Page 61: Appendix
PRODUCT TO THE RESELLER WHERE YOU PURCHASED IT FOR A REFUND IN ACCORDANCE WITH THE RESELLER'S APPLICABLE RETURN POLICY. General QSAN Technology, Inc. ("QSAN") is willing to grant you (“User”) a license of software, firmware and/or other product sold, manufactured or offered by QSAN (“the Product”) pursuant to this EULA. - Page 62 Liability will apply to the maximum extent permitted by applicable law. Some jurisdictions do not allow the exclusion or limitation of incidental or consequential damages, so the exclusions and limitations set forth above may not apply. © Copyright 2019 QSAN Technology, Inc. All Rights Reserved.
- Page 63 Termination If User breaches any of its obligations under this EULA, QSAN may terminate this EULA and take remedies available to QSAN immediately. Miscellaneous QSAN reserves the right to modify this EULA. QSAN reserves the right to renew the software or firmware anytime. ...
-
Page 64: Expansion Enclosure List
88 x 438 x 491 (mm) 80 PLUS Platinum, two redundant 770W (1+1) AC Input 100-127V, 10A, 50-60Hz Power Supply 200-240V 5A, 50-60Hz DC Output +12V 63.4A +5VSB 2.0A Topologies Cascade, Reverse, Tree © Copyright 2019 QSAN Technology, Inc. All Rights Reserved.
Need help?
Do you have a question about the XN5012RE and is the answer not in the manual?
Questions and answers