Raritan Dominion KX III User Manual
Hide thumbs
Also See for Dominion KX III:
- Administrator's manual (525 pages) ,
- User manual (225 pages) ,
- Quick setup manual (10 pages)

Related Manuals for Raritan Dominion KX III


Summary of Contents for Raritan Dominion KX III
- Page 1 Dominion KX III User Guide Release 3.7.0 Copyright © 2020 Raritan, Inc. DKX3-v3.7.0-0N-E November 2020 255-62-0001-00...
- Page 2 VCCI Information (Japan) Raritan is not responsible for damage to this product resulting from accident, disaster, misuse, abuse, non-Raritan modification of the product, or other events outside of Raritan's reasonable control or not arising under normal operating conditions. If a power cable is included with this product, it must be used exclusively for this product.
- Page 3 Welcome Contents Dominion KX III Release 3.7.0 User Guide What's New in KX III Release 3.7.0 Support for disk image files on virtual media: Access a Virtual Media Image File (on page 29) Support for Smart Card and Client Certificate Authentication:...
-
Page 4: Table Of Contents
Contents Photos ............................... 3 Supported Number of Ports and Remote Users per Model .............. 4 KX III Remote/Local Console Interfaces and User Station ................5 KVM Client Applications ..........................5 KX III Online Help ............................5 Chapter 2 Get Started Using KX III Install and Configure KX III.......................... - Page 5 Contents Access a Virtual Media Image File ....................29 Mounting CD-ROM/DVD-ROM/ISO Images ..................30 Disconnect from Virtual Media Drives .................... 31 Virtual Media in a Linux Environment ......................31 Active System Partitions ......................... 31 Mapped Drives ..........................31 Drive Partitions..........................32 Root User Permission Requirement ....................
- Page 6 Contents HTML KVM Client (HKC) ..........................78 Connection Properties ........................80 Connection Info ..........................83 USB Profile............................84 Input Menu ............................. 84 Video Menu ............................. 96 View Menu ............................ 101 Tools Menu ........................... 102 Virtual Media Menu ........................103 Audio Menu ........................... 107 Power Control Menu ........................
- Page 7 Contents Changing a Password ..........................151 Managing Favorites ..........................152 Enable Favorites ..........................152 Access and Display Favorites ......................153 Discovering Devices on the Local Subnet ..................153 Discovering Devices on the KX III Subnet ..................154 Chapter 9 KX III Local Console Accessing a Target Server .........................
- Page 8 Contents Connecting the Paragon II to the KX III ..................... 174 Appendix C Updating the LDAP Schema Returning User Group Information ......................176 From LDAP/LDAPS ......................... 176 From Microsoft Active Directory ....................176 Setting the Registry to Permit Write Operations to the Schema ............. 177 Creating a New Attribute .........................
- Page 9 Contents BSMI Certification ............................. 207 Appendix E Informational Notes Overview ..............................208 Java Runtime Environment (JRE) Notes ....................208 Disable Java Caching and Clear the Java Cache................208 Java Not Loading Properly on Mac ....................209 AKC Download Server Certification Validation IPv6 Support Notes ............209 Dual Stack Login Performance Issues .......................
- Page 10 Contents Smart Card Notes ............................. 221 Virtual KVM Client (VKC) Smart Card Connections to Fedora Servers .......... 221 CC-SG Notes.............................. 221 Virtual KVM Client Version Not Known from CC-SG Proxy Mode ..........221 Moving Between Ports on a Device ....................221 Browser Notes ............................
-
Page 11: In This Chapter
Chapter 1 Introduction The Dominion KX III is an enterprise-class, secure, KVM-over-IP switch that provides multiple users with remote BIOS-level control of 8 to 64 servers. KX III comes with standard features such as DVI/HDMI/DisplayPort digital and analog video, audio, virtual media, smart card/CAC, blade server support, and mobile access. - Page 12 Chapter 1: Introduction D2CIM-VUSB D2CIM-DVUSB D2CIM-DVUSB-DVI D2CIM-DVUSB-HDMI D2CIM-DVUSB-DP Required for PS2 connection: DCIM-PS2 • DVI monitor support from the DVI local port VGA support via a DVI to VGA converter DVI support via a standard DVI cable ...
-
Page 13: Photos
CC Unmanage feature to remove device from CC-SG control • Support of Raritan PDUs • • Support for remote IP access from the new Dominion KX III User Station Support for access to serial targets using the Dominion Serial Access • Module (DSAM) Photos... -
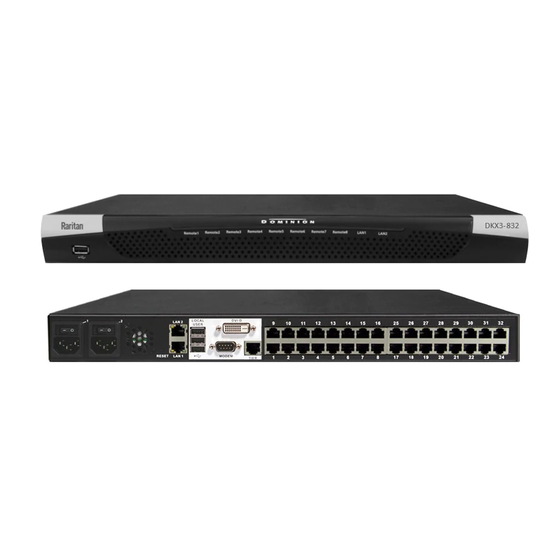
Page 14: Supported Number Of Ports And Remote Users Per Model
Chapter 1: Introduction Hardware models vary. Newer 2020 models have moved the DVI port to the bottom position. Diagram key Dual Power AC 100V/240V Dual 10/100/1000 Ethernet access Local USB ports DVI-D port KVM ports for UTP Cabling (Cat5/5e/6) Tier port for tiering devices Modem port for external modems Dominion Serial Access Module USB port (optional) -
Page 15: Kx Iii Remote/Local Console Interfaces And User Station
Online help is accompanied by the KX III Quick Setup Guide, which is included with your KX III and can be found on the Support page of Raritan's website (http://www.raritan.com/support/firmware-and-documentation). The Support page also contains a PDF version of the end user help sections of online help, and a PDF containing the KX III administrator help sections. -
Page 16: Chapter 2 Get Started Using Kx
If you have not already done so, install and configure KX III. See the KX III Quick Setup Guide that came with the KX III device or download it from the Raritan Support website http://www.raritan.com/support. Default Login - Change the Password The KX III device is shipped with the following default settings. -
Page 17: Security Warnings And Validation Messages
Chapter 2: Get Started Using KX III Security Warnings and Validation Messages When logging in to KX III, security warnings and application validation messages may appear. These include - • Additional security warnings based on your browser and security settings Additional Security Warnings (on page 8) If you choose to use the Virtual KVM Client (VKC/VKCS), you may see Java... -
Page 18: Additional Security Warnings
Chapter 2: Get Started Using KX III Additional Security Warnings Even after an SSL certificate is installed in the KX III, depending on your browser and security settings, additional security warnings may be displayed when you log in to KX III. It is necessary to accept these warnings to launch the KX III Remote Console. - Page 19 Chapter 2: Get Started Using KX III Note: If you are not prompted by the browser, manually select the Settings or Options for your browser, and import the certificate. The following example shows the IE > Tools > Internet Options method. 1.
-
Page 20: Example 2: Add The Kx Iii To Trusted Sites And Import The Certificate
Chapter 2: Get Started Using KX III Example 2: Add the KX III to Trusted Sites and Import the Certificate In this example, the KX III's URL is added as a Trusted Site, and the Self Signed Certificate is added as part of the process. 1. - Page 21 Chapter 2: Get Started Using KX III Next, import the Certificate. 1. Open an IE browser, then log in to KX III. 2. Click More Information on the first Java security warning. ™ 3. Click View Certificate Details on the More Information dialog. You are prompted to install the certificate.
-
Page 22: Converting A Binary Certificate To A Base64-Encoded Der Certificate (Optional)
Chapter 2: Get Started Using KX III Converting a Binary Certificate to a Base64-Encoded DER Certificate (Optional) KX III requires an SSL certificate in either Base64-Encoded DER format or PEM format. If you are using an SSL certificate in binary format, you cannot install it. However, you can convert your binary SSL certificate. - Page 23 Chapter 2: Get Started Using KX III 3. Click "Copy to File...". 4. The Certificate Export Wizard opens. Click Next to start the Wizard. 5. Select "Base-64 encoded X.509" in the second Wizard dialog. 6. Click Next to save the file as a Base-64 encoded X.509. You can now install the certificate on your KX III.
-
Page 24: Logging In To Kx Iii
Chapter 2: Get Started Using KX III Logging In to KX III Log in to your KX III Remote Console from any workstation with network connectivity. See the Release Notes for supported browser versions. Logging in and using KX III requires you to allow pop-ups. For information on security warnings and validation messages, and steps to Security Warnings and Validation Messages reduce or eliminate them, see... -
Page 25: Login With A Pki Certificate In The Browser
Chapter 2: Get Started Using KX III If login fails, check the Audit log for failure information. Login with a PKI Certificate in the Browser When Client Certificate Authentication is enabled and configured, you can access KX III with a client certificate installed in your browser. To login with a PKI certificate in the browser: 1. -
Page 26: Chapter 3 Kx Iii Interface And Navigation
Chapter 3 KX III Interface and Navigation The KX III Remote Console and the KX III Local Console are web-based graphical user interfaces. Use the Remote Console interface to configure and manage the KX III over a network connection. Use the Local Console interface to access the KX III while at the rack. Access targets from either the Remote or Local console from one of the supported KVM clients. -
Page 27: Port Access Page (Remote Console Display)
Chapter 3: KX III Interface and Navigation Port Access Page (Remote Console Display) After a successful login, the Port Access page opens listing all ports along with their status and availability. Ports connected to KVM target servers (blades and standard servers) are displayed in blue. - Page 28 Chapter 3: KX III Interface and Navigation Tiered Devices - Port Access Page If you are using a tiered configuration in which a base KX III device is used to access multiple other tiered devices, the tiered devices are viewed on the Port Access page by clicking on the Expand Arrow icon to the left of the tier device name.
- Page 29 Chapter 3: KX III Interface and Navigation View by Search Tab The View by Search tab allows you to search by port name. The search feature supports the use of an asterisk (*) as a wildcard, and full and partial names. View by Serial Tab The View By Serial tab is visible when a Dominion Serial Access Module (DSAM) is connected by USB.
-
Page 30: Port Action Menu
Chapter 3: KX III Interface and Navigation Port Action Menu When you click a Port Name in the Port Access list, the Port Action menu appears. Choose the desired menu option for that port to execute it. Note that only currently available options, depending on the port's status and availability, are listed in the Port Action menu. - Page 31 Chapter 3: KX III Interface and Navigation Note: This menu item is not available on the KX III Local Console. Disconnect • Disconnect - Disconnects this port and closes the KVM Client page for this target server This menu item is available only when the port status is up and connected, or up and busy.
-
Page 32: Dkx3-808 Fast Switching
Chapter 3: KX III Interface and Navigation Power On • Power On - Powers on the target server through the associated outlet This option is visible only when there are one or more power associations to the target, and when the user has permission to operate this service. Provided you have privileges to do so, you can manage power from the Virtual KVM Client (VKC) and Active KVM Client (AKC) as well. -
Page 33: Left Panel
Chapter 3: KX III Interface and Navigation Left Panel The left panel of the KX III interface contains the following information. Note that some information is conditional - meaning it is displayed based on your role, features being used and so on. Conditional information is noted here. Information Description When displayed? -
Page 34: Kx Iii Local Console Interface
Chapter 3: KX III Interface and Navigation Information Description When displayed? PowerIn2 Status of the power 2 outlet Always connection. Either on or off, or Auto-detect off Configured As Base If you are using a tiering When the KX III is part or Configured As configuration, this indicates of a tiered... -
Page 35: Chapter 4 Virtual Media
Chapter 4 Virtual Media In This Chapter Overview ......................25 Prerequisites for Using Virtual Media ..............26 Mounting Local Drives ..................27 Supported Tasks Via Virtual Media ..............27 Supported Virtual Media Types ................27 Supported Virtual Media Operating Systems ............. 28 Number of Supported Virtual Media Drives ............ -
Page 36: Prerequisites For Using Virtual Media
Chapter 4: Virtual Media Prerequisites for Using Virtual Media KX III Virtual Media Prerequisites • For users requiring access to virtual media, the KX III permissions must be set to allow access to the relevant port, as well as virtual media access (VM Access port permission) for the port. -
Page 37: Mounting Local Drives
Chapter 4: Virtual Media Mounting Local Drives This option mounts an entire drive, which means the entire disk drive is mounted virtually onto the target server. Use this option for hard drives and external drives only. It does not include network drives, CD-ROM, or DVD-ROM drives. -
Page 38: Conditions When Read/Write Is Not Available
Chapter 4: Virtual Media Conditions when Read/Write is Not Available Virtual media Read/Write is not available in the following situations: • For Linux and Mac clients ® ® • When the drive is write-protected • When the user does not have Read/Write permission: Port Permission Access is set to None or View ... -
Page 39: Access A Virtual Media Image File
Chapter 4: Virtual Media media drive or cause the virtual media drive to fail. To access a virtual media drive on the client computer: 1. From the KVM client, choose Virtual Media > Connect Drive, or click the Connect Drive... button . -
Page 40: Mounting Cd-Rom/Dvd-Rom/Iso Images
Chapter 4: Virtual Media DMG images files of a folder on a Mac Drive are recognized only on Mac OS targets. Image should be created via Mac Disk Utility using the following settings: Encryption: None; Image format: read/write. Not supported: Encrypted or compressed dmg images, MacOS install ... -
Page 41: Disconnect From Virtual Media Drives
Chapter 4: Virtual Media b. Choose Hostname and Image from the drop-down list. The file servers and image paths available are those that you configured using the Virtual Media Shared Images page. Only items you configured using the Virtual Media Shared Images page will be in the drop-down list. File Server Username - User name required for access to the file server. -
Page 42: Drive Partitions
Chapter 4: Virtual Media Drive Partitions The following drive partition limitations exist across operating systems: • Windows and Mac targets are not able to read Linux formatted partitions ® • Windows and Linux cannot read Mac formatted partitions • Only Windows Fat partitions are supported by Linux Root User Permission Requirement Your virtual media connection can be closed if you mount a CD ROM from a Linux client to a target and then unmount the CD ROM. -
Page 43: Connect Drive Permissions (Mac)
Chapter 4: Virtual Media Connect Drive Permissions (Mac) For a device to be available to connect to a target from a Mac client, you must ® have read-only permissions to the removable device, and also unmount the drive after doing so. For /dev/sdb1, run the following commands as root user: root@administrator-desktop:~# chmod 664 /dev/sdb1 root@administrator-desktop:~# ls -l /dev/sdb1... -
Page 44: Chapter 5 Kvm Clients
Chapter 5 KVM Clients KX III can be accessed with a variety of KVM clients that support your individual configuration. • HKC is best for Linux and Mac users without Java. AKC is best for Windows Platforms, using Windows or Edge browsers. •... -
Page 45: Virtual Kvm Client (Vkc And Vkcs) Help
Chapter 5: KVM Clients Virtual KVM Client (VKC and VKCs) Help Overview There is one Virtual KVM Client for each target server connected. Virtual KVM Client windows can be minimized, maximized, and moved around your computer desktop. IMPORTANT: Refreshing your browser closes the Virtual KVM Client connection. -
Page 46: Virtual Kvm Client Java Requirements
Chapter 5: KVM Clients Virtual KVM Client Java Requirements A supported Java version is required. Check the release notes for latest supported version. If Java is not installed, a prompt is displayed that the file cannot be opened, with an option to search for the program. Note: VKC cannot be launched from Safari, Edge, Chrome 45 or later, Firefox 42 or later. - Page 47 Chapter 5: KVM Clients Internet Explorer: You must click Open at the bottom of the browser to • launch. • Safari: Save the jnlp file locally. Hold down the Ctrl key when selecting to open, then click Open in displayed prompt •...
-
Page 48: Proxy Server Configuration
Chapter 5: KVM Clients Proxy Server Configuration When the use of a Proxy Server is required, a SOCKS proxy must also be provided and configured on the remote client PC. Note: If the installed proxy server is only capable of the HTTP proxy protocol, you cannot connect. -
Page 49: Configuring Connection Properties
Chapter 5: KVM Clients 2. Click Connect. Port Action Menu (on page 20) for details on additional available menu options. Configuring Connection Properties Connection properties manage streaming video performance over remote connections to target servers. The properties are applied only to your connection - they do not impact the connection of other users accessing the same target servers. - Page 50 Chapter 5: KVM Clients Default Connection Property Settings - Optimized for Best Performance The KX III comes configured to provide optimal performance for the majority of video streaming conditions. Default connection settings are: Optimized for: Text Readability - video modes are designed to maximize •...
- Page 51 Chapter 5: KVM Clients Color Accuracy When Color Accuracy is selected, all video modes are rendered in full 24-bit color with more compression artifacts. This setting applies to viewing video streams such as movies or other broadcast streams. In lower quality video modes, sharpness of fine detail, such as text, is sacrificed. Video Mode The Video Mode slider controls each video frame's encoding, affecting video quality, frame rate and bandwidth.
-
Page 52: Connection Information
Chapter 5: KVM Clients Noise Filter Unless there is a specific need to do so, do not change the noise filter setting. The default setting is designed to work well in most situations. The Noise Filter controls how much interframe noise is absorbed by the KX III. - Page 53 Chapter 5: KVM Clients Note: Clicking Copy to Clipboard copies the information for pasting. Current connection information: • Name of the KX III • IP address of the KX III Port - The KVM communication TCP/IP port used to access KX III. •...
-
Page 54: Usb Profiles
Chapter 5: KVM Clients USB Profiles Select a USB profile that best applies to the KVM target server. For example, if the server is running Windows operating system, it would be ® best to use the Generic profile. Or, to change settings in the BIOS menu or boot from a virtual media drive, depending on the target server model, a BIOS profile may be more appropriate. -
Page 55: Keyboard
Chapter 5: KVM Clients Keyboard Send Ctrl+Alt+Del Macro Due to its frequent use, a Ctrl+Alt+Delete macro is preprogrammed. Selecting Keyboard > Send Ctrl+Alt+Del, or clicking on the Ctrl+Alt+Delete button in the toolbar sends this key sequence to the server or to the KVM switch to which you are currently connected. - Page 56 Chapter 5: KVM Clients Keyboard Macros Keyboard macros ensure that keystroke combinations intended for the target server are sent to and interpreted only by the target server. Otherwise, they might be interpreted by your client PC. Macros are stored on the client PC and are PC-specific. If you use another PC, you cannot see your macros.
- Page 57 Chapter 5: KVM Clients 8. Click Close to close the Keyboard Macros dialog. The macro now appears on the Keyboard menu in the application. 9. Select the new macro on the menu to run it or use the keystrokes you assigned to the macro.
-
Page 58: Video Properties
Chapter 5: KVM Clients The macros are then imported. If a macro is imported that contains a hot key that already exists, the hot key for the imported macro is discarded. Export Macros 1. Choose Tools > Export Macros to open the Select Keyboard Macros to Export dialog. - Page 59 Chapter 5: KVM Clients Auto-Sense Video Settings The Auto-sense Video Settings command forces a re-sensing of the video settings (resolution, refresh rate) and redraws the video screen. To automatically detect the video settings: Choose Video > Auto-sense Video Settings, or click the Auto-Sense Video •...
- Page 60 Chapter 5: KVM Clients 2. Adjust the following settings as required. As you adjust the settings the effects are immediately visible: PLL Settings Clock - Controls how quickly video pixels are displayed across the video screen. Changes made to clock settings cause the video image to stretch or shrink horizontally.
- Page 61 Chapter 5: KVM Clients 5. Click OK to apply the settings and close the dialog. Click Apply to apply the settings without closing the dialog. Note: Some Sun background screens, such as screens with very dark borders, may not center precisely on certain Sun servers. Use a different background or place a lighter colored icon in the upper left corner of the screen.
-
Page 62: Mouse Options
Chapter 5: KVM Clients Mouse Options You can operate in either single mouse mode or dual mouse mode. When in a dual mouse mode, and provided the option is properly configured, the mouse cursors align. When controlling a target server, the Remote Console displays two mouse cursors - one belonging to your KX III client workstation, and the other belonging to the target server. - Page 63 Chapter 5: KVM Clients Intelligent Mouse Mode In Intelligent Mouse mode, the device can detect the target mouse settings and synchronize the mouse cursors accordingly, allowing mouse acceleration on the target. Intelligent mouse mode is the default for non-VM targets. Enter Intelligent Mouse Mode To enter intelligent mouse mode: •...
- Page 64 Chapter 5: KVM Clients Standard Mouse Mode Standard Mouse mode uses a standard mouse synchronization algorithm. The algorithm determines relative mouse positions on the client and target server. In order for the client and target mouse cursors to stay in synch, mouse acceleration must be disabled.
-
Page 65: Tool Options
Chapter 5: KVM Clients Single Mouse Mode Single Mouse mode uses only the target server mouse cursor; the client mouse cursor no longer appears onscreen. Note: Single mouse mode does not work on Windows or Linux targets when the client is running on a Virtual Machine. To enter single mouse mode, do one the following: Choose Mouse >... - Page 66 Chapter 5: KVM Clients French (Belgium) Norwegian (Norway) Portuguese (Portugal) Danish (Denmark) Swedish (Sweden) German (Switzerland) Hungarian (Hungary) Spanish (Spain) Italian (Italy) Slovenian Translation: French - US Translation: French - US International ...
- Page 67 Chapter 5: KVM Clients 5. Click OK. Keyboard Limitations Turkish Keyboards Turkish keyboards are only supported on Active KVM Client (AKC). Slovenian Keyboards The < key does not work on Slovenian keyboards due to a JRE limitation. Language Configuration on Linux Because the Sun JRE on Linux has problems generating the correct Key Events for foreign-language keyboards configured using System Preferences, configure foreign keyboards using the methods described in the following table.
- Page 68 Chapter 5: KVM Clients Language Configuration method Swedish Keyboard Indicator Hungarian System Settings (Control Center) Spanish System Settings (Control Center) Italian System Settings (Control Center) Slovenian System Settings (Control Center) Portuguese System Settings (Control Center) Note: The Keyboard Indicator should be used on Linux systems using Gnome as a desktop environment.
- Page 69 Chapter 5: KVM Clients Select 'Enable Single Cursor Mode' to enable single mouse mode as the default mouse mode when the server is accessed. Select 'Enable Scale Video' to automatically scale the display on the target server when it is accessed. ...
- Page 70 Chapter 5: KVM Clients Configuring Port Scan Settings in VKC/VKCS and AKC Configuring port scan options in VKC/VKCS and AKC applies to scanning from the Remote Console. To configure port scan options for the Local Console, see Configure Local Console Scan Settings (on page 160) Use the port scanning feature to search for selected targets, and display them in a slide show view, allowing you to monitor up to 32 targets at one time.
- Page 71 Chapter 5: KVM Clients 6. Click OK. Collecting a Diagnostic Snapshot of the Target Administrators are able to collect a "snapshot" of a target. The "snapshot" function generate log files and image files from the target. It then bundles these files in a zip file that can be sent to Technical Support to help diagnose technical problems you may be encountering.
- Page 72 Chapter 5: KVM Clients Log.txt file: • These are the client logs. Note that the logs are included even if you have not enabled information to be captured in them. VKC uses internal memory to capture the information in this case. Collect a Diagnostic Snapshot...
- Page 73 Chapter 5: KVM Clients To capture a diagnostic snapshot: Steps Access a target, and then click Tools > Collect a Diagnostic Snapshot. Several messages are displayed as the information is collected. You are prompted to save the zip file containing the diagnostic files. The zip file containing the diagnostic files is saved.
-
Page 74: View Options
Chapter 5: KVM Clients View Options View Toolbar You can use the Virtual KVM client with or without the toolbar display. To toggle the display of the toolbar (on and off): • Choose View > View Toolbar. View Status Bar By default, the status bar is displayed at the bottom of the target window. -
Page 75: Connect To Virtual Media
Chapter 5: KVM Clients Full Screen Mode When you enter Full Screen mode, the target's full screen is displayed and acquires the same resolution as the target server. The hot key used for exiting this mode is specified in the Options dialog, see Tool Options (on page 55). - Page 76 Chapter 5: KVM Clients Smart Card Minimum System Requirements, CIMs and Supported/Unsupported Smart Card Readers Before you begin using a smart card reader, review the following: • Smart Card Minimum System Requirements (on page 195) Supported Computer Interface Module (CIMs) Specifications (on page •...
- Page 77 Chapter 5: KVM Clients Mount a Smart Card Reader When mounted onto the target server, the card reader and smart card will cause the server to behave as if they had been directly attached. Removal of the smart card or smart card reader will cause the user session to be locked or you will be logged out depending on how the card removal policy has been setup on the target server OS.
-
Page 78: Digital Audio
Chapter 5: KVM Clients Digital Audio The KX III supports end-to-end, bidirectional, digital audio connections for digital audio playback and capture devices from a remote client to a target server. The audio devices are accessed over a USB connection. Current device firmware is required. •... - Page 79 Chapter 5: KVM Clients Digital Audio VKC and AKC Icons Audio Icon name Description icons Speaker These icons are located in status bar at the bottom of the client window. Green, blinking waves indicate an audio playback session is currently streaming. A black speaker icon is displayed when the session is muted.
- Page 80 Chapter 5: KVM Clients Recommendations for Audio Connections when PC Share Mode is Enabled If you are using the audio feature while running PC Share mode, audio playback and capture are interrupted if an additional audio device is connected to the target.
- Page 81 Chapter 5: KVM Clients In practice, the bandwidth used when an audio device connects to a target is higher due to the keyboard and video data consumed when opening and using an audio application on the target. A general recommendation is to have at least a 1.5MB connection before running audio/video.
- Page 82 Chapter 5: KVM Clients Connecting to Multiple Targets from a Single Remote Client Connect to audio on up to four (4) target servers at the same time from a single, remote client. Connecting and Disconnecting from a Digital Audio Device (on page 72) for information on connecting to audio devices.
- Page 83 Chapter 5: KVM Clients Note: If there are no available audio devices connected to the remote client PC, the Audio icon is grayed out. . 4. Check Connect Playback Device if you are connecting to a playback device. 5. Select the device that you wish to connect from the drop-down list. 6.
-
Page 84: Power Control Using Vkc, Vkcs, And Akc
Chapter 5: KVM Clients Adjusting Capture and Playback Buffer Size (Audio Settings) Once an audio device is connected, the buffer size can be adjusted as needed. This feature is useful for controlling the quality of the audio, which may be impacted by bandwidth limitations or network spikes. -
Page 85: Version Information - Virtual Kvm Client
Version Information - Virtual KVM Client For version information about the client, in case you require assistance from Raritan Technical Support. Choose Help > About Raritan Virtual KVM Client. • Active KVM Client (AKC) Help To launch AKC, enter https://<IP address>/akc in a browser. -
Page 86: Akc Supported Browsers
Chapter 5: KVM Clients AKC Supported Browsers See the Release Notes for supported browser versions. Prerequisites for Using AKC Allow Cookies Ensure the cookies from the IP address of the device that is being accessed are not currently being blocked. Include KX III IP Address in 'Trusted Sites Zone' Windows 7 users should ensure that the IP address of the device being... -
Page 87: Connect To A Target From Virtual Kvm Client (Vkc), Standalone Vkc (Vkcs), Or Active Kvm Client (Akc)
Chapter 5: KVM Clients IMPORTANT: Do not select 'Use the same proxy server for all protocols'. Note: The default port for a SOCKS proxy (1080) is different from HTTP proxy (3128). Click OK at each dialog to apply the settings. 2. -
Page 88: Html Kvm Client (Hkc)
Chapter 5: KVM Clients HTML KVM Client (HKC) The HTML KVM client (HKC) provides KVM over IP access that runs in the browser without the need for applets or browser plugins. HKC uses Javascript, NOT Java. HKC runs on Linux and Mac clients, and on Windows clients in Internet Explorer 11, Edge, Firefox, Chrome and Safari browsers. - Page 89 Chapter 5: KVM Clients Favorites • • Audio capture • Dual video targets not supported on Safari. Use Chrome or Firefox to connect to dual video targets on Mac OS. Known Issues: • Ensure that the device certificate is installed and trusted. The certificate Common name should match the IP address/Hostname used to connect to the device.
-
Page 90: Connection Properties
Chapter 5: KVM Clients No audio support on IE. • Connection Properties Connection properties manage streaming video performance over remote connections to target servers. The properties are applied only to your connection - they do not impact the connection of other users accessing the same target servers. If you make changes to connection properties, they are retained by the client. - Page 91 Chapter 5: KVM Clients Text Readability Text Readability is designed to provide video modes with lower color depth but text remains readable. Greyscale modes are even available when applying lower bandwidth settings. This setting is ideal when working with computer GUIs, such as server administration.
- Page 92 Chapter 5: KVM Clients In general, moving the slider to the left results in higher quality at the cost of higher bandwidth and, in some cases, lower frame rate. Moving the slider to the right enables stronger compression, reducing the bandwidth per frame, but video quality is reduced.
-
Page 93: Connection Info
Chapter 5: KVM Clients Connection Info Open the Connection Information dialog for real-time connection information on your current connection, and copy the information from the dialog as needed. Default Connection Properties (on page 80) for help configuring the connection properties. Name of the device •... -
Page 94: Usb Profile
Chapter 5: KVM Clients USB Profile Select a USB profile that best applies to the KVM target server. For example, if the server is running Windows operating system, it would be ® best to use the Generic profile. Or, to change settings in the BIOS menu or boot from a virtual media drive, depending on the target server model, a BIOS profile may be more appropriate. - Page 95 Chapter 5: KVM Clients en-us Send Macro Due to frequent use, several keyboard macros are preprogrammed. To send a preprogrammed macro: • Choose Input > Send Macro, then select the macro: Ctrl+Alt+Del: Sends the key sequence to the target without affecting ...
- Page 96 Chapter 5: KVM Clients Macro Editor Keyboard macros ensure that keystroke combinations intended for the target server are sent to and interpreted only by the target server. Otherwise, they might be interpreted by your client PC. Macros are stored on the client PC and are PC-specific. If you use another PC, you cannot see your macros.
- Page 97 Chapter 5: KVM Clients 2. Click Add New Macro. 3. Enter a Name for the new macro. The name will appear in the Send Macro menu once the macro is saved. 4. Click Add Key, then press the key you want to add to the macro. The key press and key release appear in the Keys list.
- Page 98 Chapter 5: KVM Clients 7. Click OK to save. To use this macro from your toolbar, click Use in Toolbar. Add a Macro to the Toolbar (on page 89) for more details. This example shows a macro for a Mac bootup sequence that requires a 2-second delay.
- Page 99 Chapter 5: KVM Clients 3. Click OK. Add a Macro to the Toolbar You can add a single macro to your HKC toolbar, so that you can use the macro by clicking an icon. To add a macro to the toolbar: 1.
- Page 100 Chapter 5: KVM Clients 3. Click Use in Toolbar. 4. A message appears to confirm the macro is added to the toolbar. To remove the macro from the toolbar, click Remove from Toolbar, or select a different macro and click Use in Toolbar. 5.
- Page 101 Chapter 5: KVM Clients Import and Export Macros Macros created with HKC are only available with the current browser and KVM device. If you use HKC in more than one browser, or more than one KX III, your macros will only be available on the browser and KX III where they were created.
- Page 102 Chapter 5: KVM Clients Known Issues for Macros • You cannot add the Command (Windows) key to a macro from Fedora browsers. The key is consumed by the OS. Send Text to Target Use the Send Text to Target function to send text directly to the target. If a text editor or command prompt is open and selected on the target, the text is pasted there.
- Page 103 Chapter 5: KVM Clients Absolute Mouse Synchronization In this mode, absolute coordinates are used to keep the client and target cursors in synch, even when the target mouse is set to a different acceleration or speed. This mode is supported on servers with USB ports and is the default mode for virtual media CIMs.
- Page 104 Chapter 5: KVM Clients Standard Standard Mouse mode uses a standard mouse synchronization algorithm. The algorithm determines relative mouse positions on the client and target server. In order for the client and target mouse cursors to stay in synch, mouse acceleration must be disabled.
- Page 105 Chapter 5: KVM Clients To exit Single mouse mode: Press Esc. • Mouse mode changes back to dual mode. • Mouse Sync In dual mouse mode, the Synchronize Mouse command forces realignment of the target server mouse cursor with the client mouse cursor. Note: This option is available only in Standard and Intelligent mouse modes.
-
Page 106: Video Menu
Chapter 5: KVM Clients Video Menu Refresh Screen The Refresh Screen command forces a refresh of the video screen. Video settings can be refreshed automatically in several ways: • The Refresh Screen command forces a refresh of the video screen. •... - Page 107 Chapter 5: KVM Clients 2. The screenshot file appears as a download to view or save. Exact options depend on your client browser. Auto Sense The Auto Sense command forces a re-sensing of the video settings, such as resolution and refresh rate, and redraws the video screen. To automatically re-sense the video settings: Choose Video >...
- Page 108 Chapter 5: KVM Clients Color Calibration The Color Calibration command optimizes the color levels, such as hue, brightness, and saturation, of the transmitted video images. The color settings are on a target server-basis. Note: When color is successfully calibrated, the values are cached and reused each time you switch to the target.
- Page 109 Chapter 5: KVM Clients Brightness Blue - Controls the brightness of the blue signal. Contrast Red - Controls the red signal contrast. Contrast Green - Controls the green signal. Contrast Blue - Controls the blue signal. If the video image looks extremely blurry or unfocused, the settings for clock and phase can be adjusted until a better image appears on the active target server.
- Page 110 Chapter 5: KVM Clients Vertical Offset - Controls the vertical positioning of the target server display on your monitor.
-
Page 111: View Menu
Chapter 5: KVM Clients Clear Video Settings Cache You can clear the video settings cache to delete old settings that do not apply anymore, such as when a target server is replaced. When you clear the video settings cache, the server automatically does a video auto-sense and color calibration. -
Page 112: Tools Menu
Chapter 5: KVM Clients Tools Menu The Tools menu contains options for HKC target connection settings. Client Settings: Choose Tools > Client Settings to access the Disable Menu in Fullscreen • option. When selected, the menu bar will not be available in fullscreen mode. This •... -
Page 113: Virtual Media Menu
Chapter 5: KVM Clients Launch Settings: Tap Tools > Launch Settings to access the Enable Scale Video option. When • enabled, target video scales to the current KVM window size. Touch Settings - enabled for iOS clients: Tap Tools > Touch Settings to access the Client Touch Settings. Customize •... - Page 114 Chapter 5: KVM Clients Connect Files and Folders The Connect Files and Folders command provides an area to drag and drop files or folders that you want to connect to on virtual media. Supported browsers: Chrome, Firefox, Safari File size limit: 4GB per file To connect files and folders: 1.
- Page 115 Chapter 5: KVM Clients 3. A message appears to show virtual media is connected. After a short time, a VM drive containing the selected files or folders will be mapped to the target server. To disconnect files and folders: • Choose Virtual Media >...
- Page 116 Chapter 5: KVM Clients 2. Select the option for your file's location: Select ISO Image if the image file is directly accessible on your client. Click Browse, select the ISO, DMG or IMG file, and click OK. The filename appears next to the Browse button. Select Remote Server ISO Image for ISO files on a remote server.
-
Page 117: Audio Menu
Chapter 5: KVM Clients Audio Menu The Audio menu contains audio connection and settings. Audio quality deteriorates if multiple target connections are open. To preserve quality, limit to four target connections open on HKC when an audio session is running. Note: IE does not support audio. - Page 118 Chapter 5: KVM Clients 2. In the Connect Audio Device dialog, select the Connect Playback Device checkbox. 3. Select the Format. 4. Select the "Mount selected playback device automatically on connection to target" checkbox to enable the option. This setting will connect audio automatically the next time you connect to targets.
-
Page 119: Power Control Menu
Chapter 5: KVM Clients Audio Settings The Audio Settings option is enabled when audio is connected. Use the Audio Settings to set the buffer and volume. Increasing the buffer size improves the audio quality but may impact the delivery speed. The maximum available buffer size is 400 milliseconds since anything higher than that greatly impacts audio quality. - Page 120 Chapter 5: KVM Clients Install Certificate on Apple iOS Device You must install a CA-signed certificate on your Apple iOS device before you can connect to KX III. Access is prevented if only the default certificate is present. Depending on your browser, you may see an error such as "This Connection is Not Private".
- Page 121 Chapter 5: KVM Clients 5. When complete the certificate is marked Verified. Tap Done.
- Page 122 Chapter 5: KVM Clients 6. To enable the certificate, go to Settings > General > About, then scroll all the way down. Tap Certificate Trust Settings. 7. Tap the certificate that was installed earlier to enable. A warning appears. Tap Continue to enable. The certificate slider displays green for enabled.
- Page 123 Chapter 5: KVM Clients Touch Mouse Functions Use the touchscreen equivalent for each mouse function. Some touch settings Tools Menu are configurable. See (on page 102). Single Finger Touch Mouse Equivalent touch down - move - release move mouse pointer short tap left click double short tap...
- Page 124 Chapter 5: KVM Clients Keyboard Access on Mobile Keyboard access to the target is through a virtual keyboard, available on the toolbar. For all other actions requiring keyboard input, the IOS popup keyboard displays automatically. Manage HKC iOS Client Keyboard Macros The HKC iOS client includes a list of default macros.
- Page 125 Chapter 5: KVM Clients Launch Settings: Tap Tools > Launch Settings to access the Enable Scale Video option. When • enabled, target video scales to the current KVM window size. Touch Settings - enabled for iOS clients: Tap Tools > Touch Settings to access the Client Touch Settings. Customize •...
- Page 126 Chapter 5: KVM Clients Limitations on Apple iOS Devices Mobile access with iOS devices is supported for several Raritan products. Not all limitations apply to all products. Differences are noted. Target connections are closed after about one minute if the browser is in •...
- Page 127 Chapter 5: KVM Clients The VM Files and Folders Option from the Virtual Media menu is disabled • as not possible to drag and drop files to panel. Not all Accented letters are processed from iOS client. • • Macro files exported from iOS devices using Safari are automatically given the name "unknown"...
-
Page 128: Chapter 6 Serial Access With Dominion Serial Access Module
Chapter 6 Serial Access With Dominion Serial Access Module Connecting a KX III and a Dominion Serial Access Module (DSAM) provides access to devices such as LAN switches and routers that have a RS-232 serial port. The DSAM is a 2- or 4 port serial module that derives power from the KX III. Connect a maximum of 2 DSAM modules to the KX III using USB cables. -
Page 129: Dsam Led Operation
Chapter 6: Serial Access With Dominion Serial Access Module 2. Connect the serial devices to the serial ports on the DSAM unit. DSAM LED Operation The DSAM unit has one LED for status, and 2 LEDs on each port. - Page 130 Chapter 6: Serial Access With Dominion Serial Access Module Status LED: The Status LED is labeled on the unit front. Light is on back. The Status LED gives information at bootup and upgrade. • Green LED - Slow blink: DSAM booting up but not controlled by KX III. Blue LED - Slow blink: DSAM controlled by KX III.
-
Page 131: Supported Usb Device Combinations
Chapter 6: Serial Access With Dominion Serial Access Module Supported USB Device Combinations Each USB device draws from a fixed pool of USB resources. There are limits on the number of USB devices that can be connected to the KX III at the same time. -
Page 132: View Dsam Serial Ports
Chapter 6: Serial Access With Dominion Serial Access Module View DSAM Serial Ports When a DSAM unit is connected to the KX III, a new tab is available in the Ports page. The View by Serial tab shows all connected serial ports. To view DSAM serial ports: In the Port Access page, click the View By Serial tab. - Page 133 Port Access page. To use this feature, you need Raritan remote rack PDU(s). 1. Select the Power Strip Name and associate a name with each of the power strip's outlets by selecting from the Outlet Name drop-down.
- Page 134 Chapter 6: Serial Access With Dominion Serial Access Module Force DTE causes KX III to act as a piece of data terminal detection equipment to detect targets connected to it. Force DCE causes KX III to act as a piece of data communications equipment to detect equipment connected to it.
-
Page 135: Configure Serial Port Keyword List
Chapter 6: Serial Access With Dominion Serial Access Module Raritan recommends that you do not use [ or Ctrl-[. Either of these may cause unintended commands, such as invoking the Escape Command unintentionally. This key sequence is also triggered by the arrow keys on the keyboard. -
Page 136: Upgrade Dsam Firmware
Chapter 6: Serial Access With Dominion Serial Access Module Upgrade DSAM Firmware DSAM firmware is upgraded automatically during KX III device firmware upgrades if a new DSAM version is detected in the device firmware. You can also upgrade your DSAM firmware manually. To upgrade the DSAM firmware manually: 1. -
Page 137: Supported Cli Commands
Chapter 6: Serial Access With Dominion Serial Access Module Supported CLI Commands Port Connect Commands Connect to a serial port using port number or port name. Use double quotes around port names that contain space symbols. For example: "DSAM Port 1". admin >... - Page 138 Chapter 6: Serial Access With Dominion Serial Access Module admin > [portname] > powerstatus Toggle Power On/Off of this port. admin > [portname] > powertoggle Power on the target. admin > [portname] > poweron Power off the target. admin > [portname] > poweroff Power cycle the target.
- Page 139 Parameters example, Ctrl- => escapemode=control, escapechar= escapechar char-Escape character Raritan recommends that you do not use or Ctrl- as the Escape command. Either of these may cause unintended commands, such as opening a menu, instead of invoking the Escape Command.
-
Page 140: Command Line Interface Shortcuts
Chapter 6: Serial Access With Dominion Serial Access Module Command Description Parameters linedelay - Delay inserted between lines (0-9999) in ms escapechar - Escape character encoding - <DEFAULT/US-ASCII/ISO-8859-1/ISO-8859-15/U TF-8/Shift-JIS/EUC-JP/EUC-CN/EUC-KR> - Target encoding type multiwrite <true/false> - Port set in multiple writer mode ... -
Page 141: Supported Escape Key Characters
Chapter 6: Serial Access With Dominion Serial Access Module Supported Escape Key Characters The default escape key is CTRL ] The following characters are supported for customized escape keys. • • • • • • • • Browser Tips for HSC Some browsers have limitations that affect HSC. -
Page 142: Connect To Dsam Serial Target With Url Direct Port Access
Chapter 6: Serial Access With Dominion Serial Access Module 2. Click the port name you want to connect to. Click Connect. 3. The HTML Serial Console (HSC) window opens. See HTML Serial Console (HSC) Help (on page 133) 4. To exit the serial port, hit the hot-key. Default hot key is Scrolllock-Scrollock. -
Page 143: Connect To Dsam Serial Target Via Ssh
7. Type "quit", then enter main CLI interface. HTML Serial Console (HSC) Help You can connect to serial targets using HSC. HSC is supported with several Raritan products that offer serial connections. Not all products support all HSC features. Differences are noted. -
Page 144: Hsc Functions
Chapter 6: Serial Access With Dominion Serial Access Module HSC Functions KX4-101 does not support power functions in HSC. Emulator IMPORTANT: HSC sessions are affected by the KX III Idle Timeout. If you have not changed the KX III Idle Timeout setting from the default, your session could be closed automatically if it exceeds the Idle Timeout period. - Page 145 Chapter 6: Serial Access With Dominion Serial Access Module Note: KX3 administrators can set Terminal emulation settings in Setup > Port Configuration. KX4-101 administrators can set terminal emulation settings in DSAM Serial Ports > Settings. 1. Choose Emulator > Settings. The Terminal Properties dialog displays the default settings.
- Page 146 Chapter 6: Serial Access With Dominion Serial Access Module 8. The Backspace Sends default is ASCII DEL, or you can choose Control-H from the Backspace Sends drop-down menu. 9. Click OK to save. If you changed the Language setting, the HSC changes to that language when the Display Settings window is closed.
- Page 147 Chapter 6: Serial Access With Dominion Serial Access Module To get Write Unlock, choose Emulator > Write Unlock. Send Break Some target systems such as Sun Solaris servers require the transmission of a null character (Break) to generate the OK prompt. This is equivalent to issuing a STOP-A from the Sun keyboard.
- Page 148 Chapter 6: Serial Access With Dominion Serial Access Module Copy and Paste and Copy All Data on the current visible page can be selected for copying. Copy and Paste are accessible in the HSC by right click in the terminal window. Select Copy or Paste in the context menu that appears.
- Page 149 Chapter 6: Serial Access With Dominion Serial Access Module If there is currently no target connected, nothing is visible on the screen. Note, if you are using a Mac and/or Safari , do the following in order to ® ®...
- Page 150 Chapter 6: Serial Access With Dominion Serial Access Module Tools: Start and Stop Logging The Tools menu contains options for creating a data history file and downloading it. 1. Choose Tools > Start Logging to start the storage of serial port data in memory.
- Page 151 Chapter 6: Serial Access With Dominion Serial Access Module Status may also show no associated outlet, or no power permission to the port. Power on a Target Use this option to power on a target from HSC. This option is visible only when there are one or more power associations to the target, and when you have permission to manage the target's power.
- Page 152 Chapter 6: Serial Access With Dominion Serial Access Module 2. Click OK in the success message. Power Off a Target Use this option to power off a target from HSC. This option is visible only when there are one or more power associations to the target, and when you have permission to manage the target's power.
- Page 153 Chapter 6: Serial Access With Dominion Serial Access Module Browser Tips for HSC Some browsers have limitations that affect HSC. • Internet Explorer has an internal limitation on the number of websockets that are allowed to be created to a single server (6). This can be changed by modifying a registry variable as shown here : https://msdn.microsoft.com/en-us/library/ee330736(v=vs.85).aspx#webso cket_maxconn.
-
Page 154: Chapter 7 Dominion User Station
To use a standalone appliance for remote access to KX III target servers instead of using the VKC or AKC clients on a PC or laptop, purchase Dominion User Stations from Raritan. The User Station is perfect for environments like labs, studios and control rooms where a PC or laptop is not wanted. -
Page 155: User Station Photo And Features
Chapter 7: Dominion User Station A USB Keyboard, USB mouse, and one or two HDMI- or DisplayPort-interfaced monitors Analog or digital audio appliances Optional smart card reader for remote IT device authentication External drives as virtual media, such as CD-ROM USB drives for virtual media or User Station software update Optional integration with CC-SG User Station Photo and Features... - Page 156 Chapter 7: Dominion User Station For initial login, use Raritan's default username and password: admin and raritan. 3. Add KX III's data. See Logging In to KX III (on page 14). 4. The added KX III's are displayed in the Port Navigator window.
-
Page 157: Chapter 8 Kx Iii Remote Console
Chapter 8 KX III Remote Console In This Chapter Overview ......................147 Scanning Ports - Remote Console ..............147 Changing a Password ..................151 Managing Favorites ..................152 Overview When you log in to the KX III using a network connection, you access the Remote Console. -
Page 158: Scanning Ports Slide Show - Remote Console
Chapter 8: KX III Remote Console Scanning Ports Slide Show - Remote Console When you start a scan, the Port Scan window opens. As each target is found, it is displayed as a thumbnail in a slide show. The slide show scrolls through the target thumbnails based on the default interval of 10 seconds or according to the interval you specify. -
Page 159: Target Status Indicators During Port Scanning - Remote Console
Chapter 8: KX III Remote Console Target Status Indicators During Port Scanning - Remote Console The status of each target is indicated by green, yellow and red lights that are displayed below the target thumbnail. As the target is the focus of the rotation, the indicator is in the task bar also shows the status. -
Page 160: Using Scan Port Options
Chapter 8: KX III Remote Console Using Scan Port Options Following are options available to you while scanning targets. With the exception of the Expand/Collapse icon, all of these options are selected from the Options menu in the upper left of the Port Scan viewer. The options will return to their defaults when you close the window. -
Page 161: Scan For Targets
Chapter 8: KX III Remote Console Scan for Targets To scan for targets: 1. Click the Set Scan tab on the Port Access page. 2. Select the targets you want to include in the scan by selecting the checkbox to the left of each target, or select the checkbox at the top of the target column to select all targets. -
Page 162: Managing Favorites
Chapter 8: KX III Remote Console Note: If strong passwords are in use, this page displays information about the format required for the passwords. For more information about passwords and strong passwords, see Strong Passwords. Managing Favorites A Favorites feature is provided so you can organize and quickly access the devices you use frequently. -
Page 163: Access And Display Favorites
Chapter 8: KX III Remote Console Access and Display Favorites To access a favorite KX III devices: • Click on a KX III listed beneath Favorite Devices in the left of the Remote Console. To display favorites by Name, IP Address or Host Name: •... -
Page 164: Discovering Devices On The Kx Iii Subnet
The KX III Remote Console automatically discovers the KX III devices, and any other Raritan device, in the subnet of the KX III. To discover devices on the device subnet: 1. Choose Manage > Discover Devices - KX III Subnet. -
Page 165: Chapter 9 Kx Iii Local Console
Chapter 9 KX III Local Console The Local Console interface provides access to the KX III while at the rack. This section contains help on tasks performed by end users at the Local Console. In This Chapter Accessing a Target Server ................. 155 Local Console Video Resolution Behavior............ -
Page 166: Local Console Video Resolution Behavior
Chapter 9: KX III Local Console Local Console Video Resolution Behavior By default, monitors are typically set to the highest resolution they support. Once a monitor is connected to the KX III Local Console, KX III detects the monitor's native resolution. As long as the native resolution is supported by the Local Console, KX III uses that resolution. -
Page 167: Return To The Local Console From A Target Device - Default Hot Key
Chapter 9: KX III Local Console Return to the Local Console from a Target Device - Default Hot Key Press the Scroll Lock hot key twice rapidly • The video display switches from the target device interface to the KX III Local Console interface. -
Page 168: Special Sun Key Combinations
Chapter 9: KX III Local Console Special Sun Key Combinations The following key combinations for Sun Microsystems server’s special keys ™ operate on the Local Console port. These special keys are available from the Keyboard menu when you connect to a Sun target device: Sun key Local port key combination Again... -
Page 169: Scanning Port Slide Show - Local Console
Chapter 9: KX III Local Console Scanning Port Slide Show - Local Console When you start a scan, the Port Scan window opens. As each target is found, it is displayed as a thumbnail in a slide show. The slide show scrolls through the target thumbnails based on the default interval of 10 seconds or according to the interval you specify. -
Page 170: Target Status Indicators During Port Scanning - Local Console
Chapter 9: KX III Local Console Target Status Indicators During Port Scanning - Local Console When scanning on the Local Console, the status of each target is indicated below the thumbnail. The scanning status of each target is displayed as: •... -
Page 171: Scan For Targets - Local Console
Chapter 9: KX III Local Console Scan for Targets - Local Console To scan for targets: 1. Click the Set Scan tab on the Port Access page. 2. Select the targets you want to include in the scan by selecting the checkbox to the left of each target, or select the checkbox at the top of the target column to select all targets. - Page 172 Chapter 9: KX III Local Console To update the Card Readers Detected list: Click Refresh if a new smart card has been mounted. The Card Readers • Detected list will be refreshed to reflect the newly added smart card reader. Note: If a smart card reader is selected for local port login in Security>Local Smart Card Authentication, then that card reader cannot be selected for target connections;...
-
Page 173: Using A Smart Card At The Local Port
Chapter 9: KX III Local Console Using a Smart Card at the Local Port When Local Smart Card Authentication is enabled, you can be authenticated by using your smart card at the card reader connected to a KX III USB port. If Local Smart Card Authentication is enabled but not required, the Login tab remains accessible to allow for username/password login. -
Page 174: Local Console Usb Profile Options
Chapter 9: KX III Local Console Local Console USB Profile Options From the USB Profile Options section of the Tools page, you can choose from the available USB profiles. The ports that can be assigned profiles are displayed in the Port Name field and the profiles that are available for a port appear in the Select Profile To Use field after the port is selected. -
Page 175: Resetting The Kx Iii Using The Reset Button
Chapter 9: KX III Local Console 2. Choose the appropriate reset option from the following options: Full Factory Reset Removes the entire configuration and resets the appliance completely to the factory defaults. Because of the complete nature of this reset, you will be prompted to confirm the factory reset. - Page 176 Chapter 9: KX III Local Console 4. Continue holding the Reset button for 10 seconds.
-
Page 177: Appendix A Connecting A Kx Iii And Cat5 Reach Dvi - Provide Extended Local Port Functionality
An extended local port extends the reach of the local port beyond the rack the KX III is located, for example to another KVM switch. This can be achieved by configuring a KX III to work with a Raritan Cat5 Reach DVI transmitter and receiver, which are then connected to a remote console or other device. - Page 178 4. Connect the local console ports of the KVM switch to the transmitter. Plug one end of the Raritan-provided DVI cable into the DVI-I IN port on the transmitter, and the other end into the KVM switch's video port.
- Page 179 Appendix A: Connecting a KX III and Cat5 Reach DVI - Provide Extended Local Port Functionality 2. Use a Cat5e/6 cable to connect the transmitter and receiver. 3. Connect the transmitter and receiver to an appropriate power source respectively. 4. Connect the KVM switch to the transmitter. 5.
-
Page 180: Appendix B Accessing A Paragon Ii From The Kx
Appendix B Accessing a Paragon II from the KX III In This Chapter Overview ......................170 Supported Paragon II CIMS and Configurations ..........171 Connecting the Paragon II to the KX III ............. 174 Overview Connect the Paragon II system to a KX III device that is managed by CC-SG so that Paragon II is accessible from CC-SG. -
Page 181: Supported Paragon Ii Cims And Configurations
Appendix B: Accessing a Paragon II from the KX III When you access the Paragon II system from KX III or CC-SG (if the KX III is managed by CC-SG), the Paragon II OSUI login screen appears for you to log in. In this integration, you can perform any OSUI functions implemented with current Paragon II firmware or any KX III function implemented with current KX III firmware except for the virtual media feature. -
Page 182: Kx Iii-To-Kx Iii Paragon Cim Guidelines
Appendix B: Accessing a Paragon II from the KX III KX III-to-KX III Paragon CIM Guidelines The following system configuration guidelines should be followed when you are using Paragon CIMs in a KX III-to-KX III configuration: Concurrent Access Both KX III KVM switches should be configured with the same policy for concurrent access to targets - both PC-Share or both Private. -
Page 183: Kx Iii-To-Paragon Ii Guidelines
Appendix B: Accessing a Paragon II from the KX III If access is denied because the target is busy, a notification is displayed. Working from CC-SG Operations initiated from CC-SG are based on the Status, Availability and CIM name reported by the managed KX III. When the target is connected to two managed KX IIIs and the devices are added to CC-SG, two nodes will be created. -
Page 184: Supported Connection Distances Between Paragon Ii And Kx Iii
Appendix B: Accessing a Paragon II from the KX III Paragon II Mode description Supported? operation mode Public View While one user is accessing Not supported. a server or other device on This mode cannot be used a specific channel port, when connecting the CIM to a other users can select that Paragon II and the KX III. - Page 185 Appendix B: Accessing a Paragon II from the KX III If the system is a two- or three-tier system, ensure the Paragon II user station is connected to the base KX III device (first tier). 3. Connect the Paragon II user station to a KX III device via a Cat5 UTP cable up to 150 feet (45 m).
-
Page 186: Appendix C Updating The Ldap Schema
Appendix C Updating the LDAP Schema In This Chapter Returning User Group Information ..............176 Setting the Registry to Permit Write Operations to the Schema ..... 177 Creating a New Attribute .................. 177 Adding Attributes to the Class ................178 Updating the Schema Cache ................ -
Page 187: Setting The Registry To Permit Write Operations To The Schema
Appendix C: Updating the LDAP Schema Setting the Registry to Permit Write Operations to the Schema To allow a domain controller to write to the schema, you must set a registry entry that permits schema updates. To permit write operations to the schema: 1. -
Page 188: Adding Attributes To The Class
Appendix C: Updating the LDAP Schema 3. Click New and then choose Attribute. When the warning message appears, click Continue and the Create New Attribute dialog appears. 4. Type rciusergroup in the Common Name field. 5. Type rciusergroup in the LDAP Display Name field. 6. - Page 189 Appendix C: Updating the LDAP Schema 2. Scroll to the user class in the right pane and right-click it. 3. Choose Properties from the menu. The user Properties dialog appears. 4. Click the Attributes tab to open it. 5. Click Add. 6.
-
Page 190: Updating The Schema Cache
Appendix C: Updating the LDAP Schema 7. Click OK in the Select Schema Object dialog. 8. Click OK in the User Properties dialog. Updating the Schema Cache To update the schema cache: 1. Right-click Active Directory Schema in the left pane of the window and ®... - Page 191 Appendix C: Updating the LDAP Schema 3. Go to the directory where the support tools were installed. Run adsiedit.msc. The ADSI Edit window opens. 4. Open the Domain. 5. In the left pane of the window, select the CN=Users folder.
- Page 192 Appendix C: Updating the LDAP Schema 6. Locate the user name whose properties you want to adjust in the right pane. Right-click the user name and select Properties. 7. Click the Attribute Editor tab if it is not already open. Choose rciusergroup from the Attributes list.
-
Page 193: Appendix D Specifications
Appendix D Specifications In This Chapter Hardware ......................183 Software ......................204 BSMI Certification ..................... 207 Hardware Dimensions and Physical Specifications Dominion KX III Description Power & Dimensions Weight Operating Humidity model heat (WxDxH) temp dissipation 8 server DKX3-108 Dual Power 17.3"... - Page 194 Appendix D: Specifications Dominion KX III Description Power & Dimensions Weight Operating Humidity model heat (WxDxH) temp dissipation users 1.8A 60W 52 439x334x44 4.12kg 32º - 113º F KCAL 1 local port for use at the rack 32 server...
- Page 195 Appendix D: Specifications Dominion KX III Description Power & Dimensions Weight Operating Humidity model heat (WxDxH) temp dissipation users 1.8A 60W 52 439x334x44 4.52kg 32º - 113º F KCAL 1 local port for use at the rack 32 server...
-
Page 196: Supported Target Server Video Resolutions
Appendix D: Specifications Supported Target Server Video Resolutions When using digital CIMs, you set the target's video resolution to match your monitor's native display resolution. The native display resolution is set when configuring ports for digital CIMs (see Configure the CIM Target Settings). Following is a complete list of supported video resolutions when accessing a target from the Remote Console. -
Page 197: Kx Iii Supported Local Port Dvi Resolutions
Appendix D: Specifications 1152x870@75.1Hz • • 1280x720@60Hz • 1280x960@60Hz 1280x960@85Hz • • 1280x1024@60Hz 1280x1024@75Hz • • 1280x1024@85Hz • 1360x768@60Hz 1366x768@60Hz • • 1368x768@60Hz 1400x1050@60Hz • • 1440x900@60Hz • 1600x1200@60Hz 1680x1050@60Hz • • 1920x1080@60Hz • 1920x1200@60Hz (Requires Reduced Blanking Time) For 1920x1200@60Hz, you must use a digital CIM and set the CIM’s preferred resolution to 1920x1200@60Hz. -
Page 198: Target Server Video Resolution - Supported Connection Distances And Refresh Rates
Appendix D: Specifications Target Server Video Resolution - Supported Connection Distances and Refresh Rates The maximum supported distance is a function of many factors including the type/quality of the Cat5 cable, server type and manufacturer, video driver and monitor, environmental conditions, and user expectations. The following table summarizes the maximum target server distance for various video resolutions and refresh rates: Target server video resolution... - Page 199 Appendix D: Specifications CIM model Description Dimensions (WxDxH) Weight 1.3" x 3.0" x 0.6" 0.20lb D2CIM-VUSB USB CIM for: 33 x 76 x 15mm 0.09kg OS virtual media Absolute Mouse Synchronization 1.7" x 3.5" x 0.8" ...
- Page 200 Appendix D: Specifications CIM model Description Dimensions (WxDxH) Weight 1.7" x 3.5" x 0.8" 0.25lb D2CIM-DVUSB-HDMI Digital CIM that provides digital-to-analog conversion and 43 x 90 x 19mm 0.11kg support for: OS virtual media Smartcard/CAC ...
-
Page 201: Supported Digital Video Cims For Mac
Appendix D: Specifications CIM model Description Dimensions (WxDxH) Weight 1.3" x 3.0" x 0.6" 0.20lb DCIM-USBG2 CIM for USB and Sun USB 33 x 76 x 15mm 0.09kg Supported Digital Video CIMs for Mac Use a digital video CIM to connect to the following Mac ports: ®... -
Page 202: Digital Cim Timing Modes
Appendix D: Specifications Digital CIM Timing Modes Following are the default timing modes that are used when the KX III communicates with a video source via a digital CIM. The timing mode that is used is dependent on the native resolution of the video source. -
Page 203: Dvi Compatibility Mode
Appendix D: Specifications Digital CIM Established Modes • 720x400@70Hz IBM, VGA 640x480@60Hz IBM, VGA • • 640x480@67Hz Apple Mac ® • 640x480@72Hz VESA 640x480@75Hz VESA • • 800x600@56Hz VESA 800x600@60Hz VESA • • 800x600@72Hz VESA • 800x600@75Hz VESA 832x624@75Hz Apple Mac II •... -
Page 204: Supported Remote Connections
Appendix D: Specifications Supported Remote Connections Remote connection Details Network 10BASE-T, 100BASE-T, and 1000BASE-T (Gigabit) Ethernet Protocols TCP/IP, UDP, SNTP, HTTP, HTTPS, RADIUS, LDAP/LDAPS Network Speed Settings KX III network speed setting Network Auto 1000/Full 100/Full 100/Half 10/Full 10/Half switch port Highest 1000/Full KX III:... -
Page 205: Dell Chassis Cable Lengths And Video Resolutions
Appendix D: Specifications Supported Functions; not recommended NOT supported by Ethernet specification; product will communicate, but collisions will occur Per Ethernet specification, these should be “no communication,” however, note that the KX III behavior deviates from expected behavior Note: For reliable network communication, configure the KX III and the LAN switch to the same LAN Interface Speed and Duplex. - Page 206 Appendix D: Specifications Target Server Requirements When using smart card readers, the basic requirements for interoperability at the target server are: The IFD (smart card reader) Handler must be a standard USB CCID device • driver (comparable to the generic Microsoft USB CCID driver).
-
Page 207: Supported Smart Card Readers
Appendix D: Specifications • Create a Java Library Link ® A soft link must be created to the libpcsclite.so after upgrading RHEL 4, RHEL 5 and FC 10. For example, ln –s /usr/lib/libpcsclite.so.1 /usr/lib/libpcsclite.so, assuming installing the package places the libraries in /usr/lib or /user/local/lib •... -
Page 208: Unsupported Smart Card Readers
Appendix D: Specifications Unsupported Smart Card Readers The following card readers are not supported. If a smart card reader does not appear in the supported smart card readers table or in the unsupported smart card readers table, it's function cannot be guaranteed. - Page 209 Appendix D: Specifications Bandwidth Requirements The table below details the audio playback and capture bandwidth requirements to transport audio under each of the selected formats. Audio format Network bandwidth requirement 44.1 KHz, 16bit stereo 176 KB/s 44.1 KHz, 16bit mono 88.2 KB/s 2.05 KHz, 16bit stereo 88.2 KB/s...
-
Page 210: Number Of Supported Audio/Virtual Media And Smartcard Connections
Appendix D: Specifications Audio in a Mac Environment Following are known issues in a Mac environment. ® • On Mac clients, only one playback device is listed on the Connect Audio panel. The device listed is the default and is displayed on the Connect Audio panel as Java Sound Audio Engine. -
Page 211: Mac Mini Bios Keystroke Commands
Appendix D: Specifications Language Regions Keyboard layout example, Netherlands UK English United Kingdom UK layout keyboard Chinese Hong Kong S. A. R., Republic of Chinese Traditional Traditional China (Taiwan) Chinese Mainland of the People’s Republic Chinese Simplified Simplified of China Korean South Korea Dubeolsik Hangul... - Page 212 Appendix D: Specifications Keystroke Description Virtual Media CIM Dual Virtual Media Mac Lion Server HDMI CIM Mac OS X Install disc Press D during Start up in Apple startup Hardware Test (AHT) May need BIOS Mac May need BIOS May need BIOS profile for the Mac profile for Mac profile for the...
-
Page 213: Using A Windows Keyboard To Access Mac Targets
Appendix D: Specifications Using a Windows Keyboard to Access Mac Targets A Windows keyboard can be used to access a Mac connected to a KX III. ® ® Windows keys are then used to emulate the special Mac keys. This is the same as connecting a Windows keyboard directly to the Mac. -
Page 214: Software
For best results, we recommend that Java Plug-in Caching is not enabled. For greater security and fewer Java and browser warning messages, • Raritan recommends customers upload a SSL certificate to each KX III switch. • Customers need to affirmatively click through all security warnings for the Raritan Java applets to load. -
Page 215: Multi-Language Keyboard Jre Requirement
Appendix D: Specifications Operating Systems Browsers Java Fedora Firefox ® Red Hat 7.5 Firefox Mac 10.14, 10.15 Safari Chrome Firefox Solaris 10 64-bit Firefox ® JRE Requirements and Browser Considerations for Mac Java Runtime Environment Requirements for Mac Install Java Runtime Environment 8 (JRE) on PCs and Macs when using the ®... -
Page 216: Events Captured In The Audit Log And Syslog
Appendix D: Specifications Events Captured in the Audit Log and Syslog Following is a list and description of the events that are captured by the KX III audit log and syslog: • Access Login - A user has logged in to the KX III Access Logout - A user has logged out of the KX III •... -
Page 217: Bsmi Certification
Appendix D: Specifications BSMI Certification... -
Page 218: Appendix E Informational Notes
This section includes important notes on KX III usage. Future updates will be documented and available online through the Help link in the KX III Remote Console interface. Note: Some topics in this section reference other multiple Raritan appliances because various appliances are impacted by the information. Java Runtime Environment (JRE) Notes... -
Page 219: Java Not Loading Properly On Mac
Appendix E: Informational Notes d. Click OK. 4. To clear the Java cache: From the Temporary Files Settings dialog, click the Delete Files button. The Delete Temporary Files dialog appears. b. Select the temporary files that you want to delete. Click OK. -
Page 220: Target Video Picture Not Centered (Mouse Out Of Synch)
Appendix E: Informational Notes Target Video Picture Not Centered (Mouse Out of Synch) At certain resolutions when using an HDMI or DVI CIM with the KX III: • The video display may not be centered properly - black rectangles can be seen at the edges of the screen The mouse on the target may appear to be slightly out of synch •... -
Page 221: Virtual Media Via Vkc And Akc In A Windows Environment
Appendix E: Informational Notes Virtual Media via VKC and AKC in a Windows Environment When Virtual Media is enabled, access to fixed drives and fixed drive partitions will not be accessible with a Standard Windows user. To access those drives, a Windows Administrator user must be used. -
Page 222: Disconnecting Mac And Linux Virtual Media Usb Drives
Appendix E: Informational Notes Disconnecting Mac and Linux Virtual Media USB Drives In a Linux or Mac environment: ® ® • For Linux users, if there is /dev/sdb and /dev/sdb1, the client only uses /dev/sdb1 and advertise it as removable disk /dev/sdb is not available for the user. -
Page 223: Help Choosing Usb Profiles
Appendix E: Informational Notes Help Choosing USB Profiles When you are connected to a KVM target server via the Virtual KVM Client (VKC), you can view information about USB profiles via the Help on USB Profiles command on the USB Profile menu. USB profile help appears in the USB Profile Help window. -
Page 224: Changing A Usb Profile When Using A Smart Card Reader
Appendix E: Informational Notes Target server information, manufacturer, model, BIOS, manufacturer, and version. b. The intended use (e.g. redirecting an image to reload a server’s operating system from CD). Changing a USB Profile when Using a Smart Card Reader There may be certain circumstances under which you will need to change the USB profile for a target server. -
Page 225: Black Stripe/Bar(S) Displayed On The Local Port
2. If using a digital CIM, then change the Display Native Resolution on the Port Configuration page to another resolution, or 3. If using the HDMI CIM, use the DVI Compatibility Mode. Contact Raritan Technical Support for additional assistance. Sun Composite Synch Video composite synch video is not supported. -
Page 226: Keyboard Notes
Appendix E: Informational Notes Keyboard Notes French Keyboard Caret Symbol (Linux Clients Only) The Virtual KVM Client (VKC) do not process the key combination of Alt Gr + 9 as the caret symbol (^) when using French keyboards with Linux clients. -
Page 227: Keyboard Language Preference (Fedora Linux Clients)
Appendix E: Informational Notes Tilde Symbol From the Virtual KVM Client (VKC), the key combination of Alt Gr + 2 does not produce the tilde (~) symbol when using a French keyboard. To obtain the tilde symbol: Create a macro consisting of the following commands: •... -
Page 228: Macros Not Saving On Linux Targets
Appendix E: Informational Notes Note: The Keyboard Indicator should be used on Linux systems using Gnome as a desktop environment. When using a Hungarian keyboard from a Linux client, the Latin letter U with Double Acute and the Latin letter O with Double Acute work only with JRE 1.6 (and later). -
Page 229: Mac Keyboard Keys Not Supported For Remote Access
Appendix E: Informational Notes Mac Keyboard Keys Not Supported for Remote Access When a Mac is used as the client, the following keys on the Mac keyboard are ® ® not captured by the Java Runtime Environment (JRE ™ ™ •... -
Page 230: Audio
Appendix E: Informational Notes Audio Audio Playback and Capture Issues Features that May Interrupt an Audio Connection If you use any of the following features while connected to an audio device, your audio connection may be interrupted. These features are not recommended if you are connected to an audio device: •... -
Page 231: Smart Card Notes
When the Virtual KVM Client (VKC) is launched from CommandCenter Secure Gateway (CC-SG) in proxy mode, the VKC version is unknown. In the About Raritan Virtual KVM Client dialog, the version is displayed as “Version Unknown”. Moving Between Ports on a Device If you move a between ports on the same Raritan device and resume management within one minute, CC-SG may display an error message. -
Page 232: Appendix F Frequently Asked Questions
Appendix F Frequently Asked Questions In This Chapter General FAQs ....................222 Remote Access ....................224 Universal Virtual Media ..................227 Bandwidth and KVM-over-IP Performance ............229 IPv6 Networking ....................232 Servers ......................234 Blade Servers ....................234 Installation ......................236 Local Port - KX IIII .................... - Page 233 OS-independent; users can troubleshoot and reconfigure servers even when servers are down. At the rack, Dominion KX III provides the same functionality, convenience, and space and cost savings as traditional analog KVM switches. However, Dominion KX III also integrates the industry’s highest performing KVM-over-IP...
-
Page 234: Remote Access
How large is the Dominion KX III? Dominion KX III is only 1U high (except the KX3-864 and KX3-464, which are 2U), fits in a standard 19" rack mount and is only 11.4" (29 cm) deep. The Dominion KX3-832 and KX3-864 are 13.8"... - Page 235 Web-accessible, it doesn’t require customers to software or network configuration is install proprietary software on clients used for required? access. Dominion KX III can be accessed through major Web browsers, including: Internet Explorer ® Firefox . Dominion KX III can be accessed on ®...
- Page 236 What is the file size of the applet The Virtual KVM Client (VKC) applet used to access that’s used to access Dominion KX III? Dominion KX III is approximately 500KB in size. The following chart describes the time required to How long does it take to retrieve? retrieve Dominion KX III’s applet at different...
-
Page 237: Universal Virtual Media
How do I access servers connected to You can access servers at the rack or via modem. Dominion KX III if the network ever Dominion KX III offers a dedicated modem port for becomes unavailable? attaching an external modem. Universal Virtual Media... - Page 238 Appendix F: Frequently Asked Questions Question Answer What is required for virtual media? A Dominion KX III virtual media CIM is required. There are two VGA-based CIMs: a D2CIM-VUSB or D2CIM-DVUSB. The D2CIM-VUSB has a single USB connector and is for customers who will use virtual media at the OS level.
-
Page 239: Bandwidth And Kvm-Over-Ip Performance
Appendix F: Frequently Asked Questions Question Answer Why would I use a USB profile? USB profiles are most often required at the BIOS level where there may not be full support for the USB specification when accessing virtual media drives. However, profiles are sometimes used at the OS level, for example, for mouse synchronization for Mac and Linux servers. - Page 240 Appendix F: Frequently Asked Questions Question Answer How is bandwidth used in Dominion KX III offers totally new video processing KVM-over-IP systems? that provides flexible, high performance video, efficient use of bandwidth and anytime/anywhere access via LAN, WAN or Internet.
- Page 241 Appendix F: Frequently Asked Questions Question Answer What factors affect bandwidth? There are many factors that determine how much bandwidth will be used. The primary factor, noted above, is the amount of change in the target server’s video display. This is dependent on the user’s task and actions.
-
Page 242: Ipv6 Networking
Connection Properties settings to the left for increased video performance. What is the maximum remote (over The Dominion KX III is the first and only IP) video resolution supported? KVM-over-IP switch to support full high definition (HD) remote video resolution – 1920x1080 at frame rates up to 30 frames per second with digital audio. - Page 243 Appendix F: Frequently Asked Questions Question Answer What is IPv6? IPv6 is the acronym for Internet Protocol Version 6. IPv6 is the "next generation" IP protocol which will replace the current IP Version 4 (IPv4) protocol. IPv6 addresses a number of problems in IPv4, such as the limited number of IPv4 addresses.
-
Page 244: Servers
What about mouse synchronization? In the past, KVM-over-IP mouse synchronization was a frustrating experience. The Dominion KX III’s Absolute Mouse Synchronization provides for a tightly synchronized mouse without requiring server mouse setting changes on Windows and Apple Mac servers. - Page 245 Can I access the blade server’s Yes. You can define the URL of the management management module? module and access it from the Dominion KX III or from our CommandCenter Secure Gateway. If configured, one-click access is available. How many blade servers can I...
-
Page 246: Installation
Installation Question Answer Besides the appliance itself, what do I Each server that connects to Dominion KX III need to order to install Dominion KX requires a Dominion or Paragon computer III? interface module (CIM), an adapter that connects directly to the keyboard, video and mouse ports of the server. - Page 247 How many servers can be connected Dominion KX III models range from 8, 16 or 32 to each Dominion KX III appliance? server ports in a 1U chassis, to 64 server ports in a 2U chassis.
-
Page 248: Local Port - Kx Iiii
Question Answer Can I access my servers directly from Yes. At the rack, Dominion KX III functions just like a the rack? traditional KVM switch – allowing control of up to 64 servers using a single keyboard, monitor and mouse. -
Page 249: Extended Local Port
This means that: If the Dominion KX III is configured to interact with an external RADIUS, LDAP or Active Directory ® server, users attempting to access the local port will authenticate against the same server. -
Page 250: Intelligent Power Distribution Unit (Pdu) Control
(RPC) power strips. These come in many outlet, connector and amp variations. Note that you should not connect the PM series of power strips to the Dominion KX III as these power strips do not provide outlet-level switching. How many PDUs can be connected to... -
Page 251: Ethernet And Ip Networking
Appendix F: Frequently Asked Questions Question Answer Does Dominion KX III support servers Yes. Dominion KX III can be easily configured to with multiple power supplies? support servers with multiple power supplies connected to multiple power strips. Four power supplies can be connected per target server. - Page 252 Appendix F: Frequently Asked Questions Question Answer Can I use Dominion KX III with a VPN? Yes. Dominion KX III uses standard Internet Protocol (IP) technologies from Layer 1 through Layer 4. Traffic can be easily tunneled through standard VPNs.
-
Page 253: Local Port Consolidation, Tiering And Cascading
What could be the problem? Ethernet auto-negotiation. On some networks, 10/100 auto-negotiation does not work properly, and the Dominion KX III appliance must be set to 100 Mb/full duplex or the appropriate choice for its network. Duplicate IP address. If the IP address of the... - Page 254 Question Answer How do I physically connect multiple To physically connect multiple KX III appliances Dominion KX III appliances together together for consolidated local access, you can connect the Tiering ports of multiple "tiered" (or into one solution? "cascaded") KX III switches to a "base" KX III using the Tiering port of the KX III.
- Page 255 Yes. Analog KVM switches can be connected to one switch to Dominion KX III? of Dominion KX III’s server ports. Simply use a USB computer interface module (CIM), and attach it to the user ports of the existing analog KVM switch.
-
Page 256: Computer Interface Modules (Cims)
III. Also note that when connected to Dominion KX III, Paragon CIMs transmit video at a distance of up to 150 feet (46 m), the same as Dominion KX III CIMs – not at 1,000 feet (304 m), as they do when connected to Paragon. - Page 257 Appendix F: Frequently Asked Questions Question Answer Is the Dominion KX III FIPS 140-2 The Dominion KX III uses an embedded FIPS 140-2 Certified? validated cryptographic module running on a Linux platform per FIPS 140-2 implementation guidelines. This cryptographic module is used for...
-
Page 258: Smart Cards And Cac Authentication
For more information, see the FIPS 201 standards. Which KX III models support smart All Dominion KX III models are supported. The cards/CAC? Dominion KX III-101 models do not currently support smart cards and CAC. -
Page 259: Manageability
Java Runtime Environment (JRE) version installed. Besides the initial setting of Dominion KX III’s IP address, everything about the solution can be completely set up over the network. (In fact, using a crossover Ethernet cable and Dominion KX III’s default IP address, you can even configure the initial settings via Web browser.) -
Page 260: Documentation And Support
Appendix F: Frequently Asked Questions Question Answer Can Dominion KX III integrate with Yes. In addition to Dominion KX III’s own internal syslog? logging capabilities, Dominion KX III can send all logged events to a centralized syslog server. Can Dominion KX III integrate with Yes. -
Page 261: Miscellaneous
The Dominion KX III’s default username and username and password? password are admin/raritan. However, for the highest level of security, the Dominion KX III forces the administrator to change the Dominion KX III default administrative username and password when the appliance is first booted up. Username is not case sensitive. - Page 263 Index About the Cat5 Reach DVI • 167 Bandwidth and KVM-over-IP Performance • 229 Absolute Mouse Synchronization • 52, 92 Bandwidth Requirements • 70, 199 Access a Virtual Media Drive on a Client Computer Black Stripe/Bar(s) Displayed on the Local Port • •...
- Page 264 Index Configuring Port Scan Settings in VKC/VKCS and Digital CIM Established Modes • 193 AKC • 60, 159 Digital CIM Standard Modes • 193 Connect • 20 Digital CIM Timing Modes • 192 Connect Audio • 107 Dimensions and Physical Specifications • 183 Connect Cat5 Reach DVI and Cat5 Reach DVI •...
- Page 265 Index Front View • 3 Keyboard Language Preference (Fedora Linux Full Screen Mode • 65 Clients) • 217 Keyboard Layout • 84 Keyboard Limitations • 57 Keyboard Macros • 46 General FAQs • 222 Keyboard Notes • 216 General Settings • 55 Known Issues for Macros •...
- Page 266 Index Macros Not Saving on Linux Targets • 218 Power Off a Target • 142 Manage HKC iOS Client Keyboard Macros • 114 Power On • 22 Manageability • 249 Power on a Target • 141 Managing Favorites • 24, 152 Power Status •...
- Page 267 Index Send LeftAlt+Tab (Switch Between Open Windows Supported Remote Connections • 194 on a Target Server) • 45 Supported Smart Card Readers • 161, 197 Send Macro • 85 Supported Target Server Video Resolutions • 186, Send Smart Card Remove and Reinsert Notifications •...
- Page 268 Index Using a Smart Card at the Local Port • 163 Using a Windows Keyboard to Access Mac Targets • 203 Welcome • iii Using HKC on Apple iOS Devices • 109 Windows 3-Button Mouse on Linux Targets • 209 Using Scan Port Options •...
Need help?
Do you have a question about the Dominion KX III and is the answer not in the manual?
Questions and answers