Raritan Dominion KX III User Manual
Kvm-over-ip switch
Hide thumbs
Also See for Dominion KX III:
- Administrator's manual (525 pages) ,
- User manual (268 pages) ,
- Quick setup manual (10 pages)

Related Manuals for Raritan Dominion KX III


Summary of Contents for Raritan Dominion KX III
- Page 1 Dominion KX III User Guide Release 3.0.0 Copyright © 2014 Raritan, Inc. DKX3-v3.0.0-0B-E February 2014 255-62-0001-00...
- Page 2 Raritan, Inc. © Copyright 2014 Raritan, Inc. All third-party software and hardware mentioned in this document are registered trademarks or trademarks of and are the property of their respective holders.
-
Page 3: Table Of Contents
Contents Chapter 1 Introduction Overview ............................1 What's New in Help ........................1 Package Contents .......................... 2 KX III Device Photos and Features ....................2 Hardware ..........................2 Software ..........................3 Dominion KX3-832....................... 4 Dominion KX3-864....................... 6 Supported Users and Ports per Model ................7 KX III Remote and Local Console Interfaces ................. - Page 4 Contents Default Connection Property Settings - Optimized for Best Performance ......28 Optimize for: Selections ..................... 29 Video Mode ........................29 Noise Filter ......................... 30 Connection Information ........................ 31 Access and Copy Connection Information ................ 31 USB Profiles ..........................32 Keyboard ............................
- Page 5 Contents Mount a Smart Card Reader ..................... 62 Update a Smart Card Reader .................... 63 Send Smart Card Remove and Reinsert Notifications ............63 Unmount (Remove) a Smart Card Reader ................ 63 Digital Audio ..........................64 Supported Audio Device Formats ..................64 Audio Playback and Capture Recommendations and Requirements .......
- Page 6 Contents Chapter 7 KX III Local Console - KX III End User Help Overview ............................85 Accessing a Target Server ......................85 Local Console Video Resolutions ....................86 Simultaneous Users ........................86 Hot Keys and Connect Keys ......................86 Return to the KX III Local Console Interface - Default Hot Key ........87 Connect Key Examples .....................
- Page 7 Contents Supported Remote Connections ..................118 Network Speed Settings ....................118 Dell Chassis Cable Lengths and Video Resolutions ............120 Smart Card Minimum System Requirements ..............120 Supported Smart Card Readers ..................122 Unsupported Smart Card Readers .................. 123 Audio Playback and Capture Recommendations and Requirements ......123 Number of Supported Audio/Virtual Media and Smartcard Connections ......
- Page 8 Contents Audio ............................144 Audio Playback and Capture Issues................144 Audio in a Linux Environment ..................144 Audio in a Windows Environment ..................145 Smart Card Notes ........................145 Virtual KVM Client (VKC) Smart Card Connections to Fedora Servers ......145 Browser Notes ...........................
-
Page 9: Chapter 1 Introduction
KX III KVM Client Applications ..............7 KX III Online Help ..................8 Overview The Dominion KX III is an enterprise-class, secure, KVM-over-IP switch that provides 1, 2, 4 or 8 users with remote BIOS-level control of 8 to 64 servers. -
Page 10: Package Contents
Chapter 1: Introduction Package Contents Each KX III ships as a fully-configured stand-alone product in a standard 1U (2U for <kxx-864) 19" rackmount chassis. Each KX III device ships with the following contents: Amount Item included KX III device KX III Quick Setup Guide Rackmount kit AC power cords Set of 4 rubber feet (for desktop use) -
Page 11: Software
Chapter 1: Introduction DCIM-PS2 DVI monitor support from the DVI local port VGA support via a DVI to VGA converter DVI support via a standard DVI cable Support for tiering in which a base KX III device is used to access multiple other tiered devices ... -
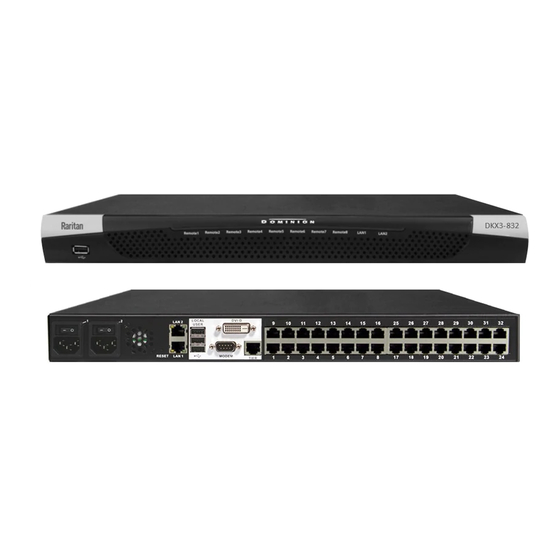
Page 12: Dominion Kx3-832
IPv4 and IPv6 support Power control associated directly with servers to prevent mistakes Integration with Raritan's CommandCenter Secure Gateway (CC-SG) management unit CC Unmanage feature to remove device from CC-SG control Support of Raritan PX1 and PX2 appliances... - Page 13 Chapter 1: Introduction Diagram key Dual Power AC 100V/240V Local USB Ports DVI-D Port 32 KVM Ports UTP Cabling (Cat5/5e/6) Dual 10/100/1000 Ethernet Access Tier Port Note: Release KX III 3.0.0 does not provide modem support, but will in a future release.
-
Page 14: Dominion Kx3-864
Chapter 1: Introduction Dominion KX3-864 KX3-864 Photos KX3-864 Features Diagram key Dual Power AC 100V/240V Local USB Ports DVI-D Port 64 KVM Ports UTP Cabling (Cat5/5e/6) Dual 10/100/1000 Ethernet Access Tier Port... -
Page 15: Supported Users And Ports Per Model
Chapter 1: Introduction Diagram key Note: Release KX III 3.0.0 does not provide modem support, but will in a future release. Supported Users and Ports per Model Model Ports Remote users KX3-864 KX3-832 KX3-808 KX3-464 KX3-432 KX3-416 KX3-232 KX3-216 KX3-132 KX3-116 KX3-108 KX III Remote and Local Console Interfaces... -
Page 16: Kx Iii Online Help
KX III. KVM Client help is provided as part of KX III online help. Online help is accompanied by the KX III Quick Setup Guide, which can be found on the Raritan Firmware, Upgrades and Documentation page of Raritan's website (http://www.raritan.com/support/firmware-and-documentation). -
Page 17: Chapter 2 Getting Started
When logging in to KX III, Java 1.7 prompts you to validate KX III, and to allow access to the application. Raritan recommends installing an SSL certificate in each KX III device in order to reduce Java warnings, and enhance security. See SSL Certificates... -
Page 18: Additional Security Warnings
Chapter 2: Getting Started Additional Security Warnings Even after an SSL certificate is installed in the KX III, depending on your browser and security settings, additional security warnings may be displayed when you log in to KX III. It is necessary to accept these warnings to launch the KX III Remote Console. -
Page 19: Example 1: Import The Certificate Into The Browser
Chapter 2: Getting Started Example 1: Import the Certificate into the Browser In this example, you import the Certificate into the browser. Steps Open an IE browser, then log in to KX III. ™ Click More Information on the first Java security warning. - Page 20 Chapter 2: Getting Started Steps Click the Content tab. Click Certificates. The Certificate Import Wizard opens and walks you through each step. File to Import - Browse to locate the Certificate Certificate Store - Select the location to store the Certificate Click Finish on the last step of the Wizard.
-
Page 21: Example 2: Add The Kx Iii To Trusted Sites And Import The Certificate
Chapter 2: Getting Started Example 2: Add the KX III to Trusted Sites and Import the Certificate In this example, the KX III's URL is added as a Trusted Site, and the Self Signed Certificate is added as part of the process. Steps Open an IE browser, then select Tools >... -
Page 22: Logging In To The Kx Iii
Chapter 2: Getting Started Steps Open an IE browser, then log in to KX III. ™ Click More Information on the first Java security warning. Click View Certificate Details on the More Information dialog. You are prompted to install the certificate. Follow the wizard steps. For details see, Example 1: Import the Certificate into the Browser (on page 11) - Page 23 Chapter 2: Getting Started http://IP-ADDRESS/akc for the Microsoft .NET-based Active KVM Client IP-ADDRESS is the IP address assigned to your KX III You can also use HTTPS, or the DNS name of the KX III assigned by your administrator (if applicable). You are always redirected to the IP address from HTTP to HTTPS.
-
Page 24: Chapter 3 Kx Iii Interface And Navigation
Chapter 3 KX III Interface and Navigation In This Chapter Overview ....................16 KX III Remote Console Interface ............. 16 KX III Local Console Interface ..............24 Overview The KX III Remote Console and the KX III Local Console interfaces provide a web-based interface for device configuration and administration, as well as target server list and selection. -
Page 25: Port Access Page (Remote Console Display)
Chapter 3: KX III Interface and Navigation Port Access Page (Remote Console Display) After a successful login, the Port Access page opens listing all ports along with their status and availability. Ports connected to KVM target servers (blades and standard servers) are displayed in blue. - Page 26 Chapter 3: KX III Interface and Navigation Blade Chassis - Port Access Page The blade chassis is displayed in an expandable, hierarchical list on the Port Access page, with the blade chassis at the root of the hierarchy and the individual blades labeled and displayed below the root. Use the Expand Arrow icon next to the root chassis to display the individual blades.
- Page 27 Chapter 3: KX III Interface and Navigation View by Group Tab The View by Group tab displays blade chassis, 'standard' port groups, and dual video port groups. Click the Expand Arrow icon next to a group to view the ports assigned to the port group. View by Search Tab The View by Search tab allows you to search by port name.
-
Page 28: Port Action Menu
Chapter 3: KX III Interface and Navigation Port Action Menu When you click a Port Name in the Port Access list, the Port Action menu appears. Choose the desired menu option for that port to execute it. Note that only currently available options, depending on the port's status and availability, are listed in the Port Action menu. - Page 29 Chapter 3: KX III Interface and Navigation Switch From Switch From - Switches from an existing connection to the selected port (KVM target server). This menu item is available only for KVM targets, and only when a Virtual KVM Client is opened. Note: This menu item is not available on the KX III Local Console.
- Page 30 Chapter 3: KX III Interface and Navigation Note: This menu item is not available on the KX III Local Console. The only way to disconnect from the switched target in the Local Console is to use the hot key. Power On ...
-
Page 31: Left Panel
Chapter 3: KX III Interface and Navigation Left Panel The left panel of the KX III interface contains the following information. Note that some information is conditional - meaning it is displayed based on your role, features being used and so on. Conditional information is noted here. -
Page 32: Kx Iii Local Console Interface
Chapter 3: KX III Interface and Navigation Information Description When displayed? PowerIn1 Status of the power 1 Always outlet connection. Either on or off, or Auto-detect PowerIn2 Status of the power 2 Always outlet connection. Either on or off, or Auto-detect Configured As If you are using a tiering When the KX III is... -
Page 33: Chapter 4 Virtual Kvm Client (Vkc) Help
Chapter 4 Virtual KVM Client (VKC) Help In This Chapter Overview ....................25 Connect to a Target Server ..............26 Configuring Connection Properties ............27 Connection Information ................31 USB Profiles .................... 32 Keyboard ....................33 Video Properties ..................37 Mouse Options .................. -
Page 34: Connect To A Target Server
Chapter 4: Virtual KVM Client (VKC) Help Client connection, so exercise caution. The Virtual KVM Client (VKC) and Active KVM Client (AKC) are interfaces used to access remote targets. VKC and AKC share similar features with the exception of the following: ... -
Page 35: Configuring Connection Properties
Chapter 4: Virtual KVM Client (VKC) Help Configuring Connection Properties Access Connection Properties To access connection properties: Click Connection > Properties, or click the Connection... icon to open the Connection Properties dialog. About Connection Properties The Virtual KVM Client (VKC) and Active KVM Client (AKC) support connection property management. -
Page 36: Default Connection Property Settings - Optimized For Best Performance
Chapter 4: Virtual KVM Client (VKC) Help Default Connection Property Settings - Optimized for Best Performance KX III comes configured to provide optimal performance for the majority of video streaming conditions. Default connection settings are: Optimized for: Text Readability - video modes are designed to maximize text readability. -
Page 37: Optimize For: Selections
Chapter 4: Virtual KVM Client (VKC) Help Optimize for: Selections Text Readability When Text Readability is selected, all video modes are designed to provide high-quality, readable text. This setting is ideal when working with computer GUIs, such as when performing server administration and so on. When working in full color video modes, a slight contrast boost is provided, and text is sharper. -
Page 38: Noise Filter
Chapter 4: Virtual KVM Client (VKC) Help In general, moving the slider to the left results in higher quality at the cost of higher bandwidth and, in some cases, lower frame rate. Moving the slider to the right enables stronger compression, reducing the bandwidth per frame, but video quality is reduced. -
Page 39: Connection Information
Horizontal Resolution - The target server horizontal resolution. Vertical Resolution - The target server vertical resolution. Refresh Rate - Refresh rate of the target server. Protocol Version - Raritan communications protocol version. Access and Copy Connection Information... -
Page 40: Usb Profiles
Chapter 4: Virtual KVM Client (VKC) Help Steps Click Connection > Info... to open the Connection Info dialog. Click Copy to Clipboard. Paste the information in a file of your choosing. USB Profiles Set a USB profile for a target server from the Virtual KVM Client (VKC) by clicking USB Profile in the menu, then selecting from the menu choices. -
Page 41: Keyboard
Chapter 4: Virtual KVM Client (VKC) Help Keyboard Send Ctrl+Alt+Del Macro Due to its frequent use, a Ctrl+Alt+Delete macro is preprogrammed. Selecting Keyboard > Send Ctrl+Alt+Del, or clicking on the Ctrl+Alt+Delete button in the toolbar sends this key sequence to the server or to the KVM switch to which you are currently connected. -
Page 42: Keyboard Macros
Chapter 4: Virtual KVM Client (VKC) Help Keyboard Macros Keyboard macros ensure that keystroke combinations intended for the target server are sent to and interpreted only by the target server. Otherwise, they might be interpreted by the computer on which the Virtual KVM Client is running (your client PC). -
Page 43: Import Macros
Chapter 4: Virtual KVM Client (VKC) Help a. To remove a step in the sequence, select it and click Remove. b. To change the order of steps in the sequence, click the step and then click the up or down arrow buttons to reorder them as needed. -
Page 44: Export Macros
Chapter 4: Virtual KVM Client (VKC) Help Click Yes to replace the existing macro with the imported version. Click Yes to All to replace the currently selected and any other duplicate macros that are found. Click No to keep the original macro and proceed to the next macro ... -
Page 45: Video Properties
Chapter 4: Virtual KVM Client (VKC) Help 4. Select the folder to save the macro file to, enter a name for the file and click Save. If the macro already exists, you receive an alert message. 5. Select Yes to overwrite the existing macro or No to close the alert without overwriting the macro. -
Page 46: Calibrating Color
Chapter 4: Virtual KVM Client (VKC) Help Calibrating Color Use the Calibrate Color command to optimize the color levels (hue, brightness, saturation) of the transmitted video images. The color settings are on a target server-basis. Note: The Calibrate Color command applies to the current connection only. - Page 47 Warning: Exercise caution when changing the Clock and Phase settings. Doing so may result in lost or distorted video and you may not be able to return to the previous state. Contact Raritan Technical Support before making any changes. Horizontal Offset - Controls the horizontal positioning of the target server display on your monitor.
-
Page 48: Screenshot From Target Command (Target Screenshot)
Chapter 4: Virtual KVM Client (VKC) Help Note: Some Sun background screens, such as screens with very dark borders, may not center precisely on certain Sun servers. Use a different background or place a lighter colored icon in the upper left corner of the screen. -
Page 49: Mouse Options
Chapter 4: Virtual KVM Client (VKC) Help Mouse Options When in dual mouse mode, and provided the option is properly configured, the mouse cursors align. In dual mouse mode, when controlling a target server, the Remote Console displays two mouse cursors: one belonging to your KX III client workstation, and the other belonging to the target server. -
Page 50: Dual Mouse Modes
Chapter 4: Virtual KVM Client (VKC) Help Dual Mouse Modes Absolute Mouse Synchronization In this mode, absolute coordinates are used to keep the client and target cursors in synch, even when the target mouse is set to a different acceleration or speed. This mode is supported on servers with USB ports and is the default mode for Virtual Media CIMs. - Page 51 To be sure to avoid any problems with this function, Raritan recommends you do not have file icons or folder icons in the upper left corner of your desktop.
- Page 52 Chapter 4: Virtual KVM Client (VKC) Help Mouse Synchronization Tips If you have an issue with mouse synchronization: 1. Verify that the selected video resolution and refresh rate are among those supported by the device. The KVM Client Connection Info dialog displays the actual values that the device is seeing.
-
Page 53: Single Mouse Mode
Chapter 4: Virtual KVM Client (VKC) Help Single Mouse Mode Single Mouse mode uses only the target server mouse cursor and the local mouse pointer no longer appears onscreen. Note: Single mouse mode does not work on Windows or Linux targets when client is running on a Virtual Machine. - Page 54 Chapter 4: Virtual KVM Client (VKC) Help United Kingdom Korean (Korea) French (Belgium) Norwegian (Norway) Portuguese (Portugal) Danish (Denmark) Swedish (Sweden) German (Switzerland) Hungarian (Hungary) Spanish (Spain) Italian (Italy) ...
- Page 55 Turkish Keyboards If using a Turkish keyboard, you must connect to a target server through the Active KVM Client (AKC). It is not supported by other Raritan clients. Slovenian Keyboards The < key does not work on Slovenian keyboards due to a JRE limitation.
-
Page 56: Client Launch Settings
Chapter 4: Virtual KVM Client (VKC) Help Language Configuration method Belgian Keyboard Indicator Norwegian Keyboard Indicator Danish Keyboard Indicator Swedish Keyboard Indicator Hungarian System Settings (Control Center) Spanish System Settings (Control Center) Italian System Settings (Control Center) Slovenian System Settings (Control Center) Portuguese System Settings (Control Center) Note: The Keyboard Indicator should be used on Linux systems using... - Page 57 Chapter 4: Virtual KVM Client (VKC) Help a. Select 'Enable Single Cursor Mode' to enable single mouse mode as the default mouse mode when the server is accessed. b. Select 'Enable Scale Video' to automatically scale the display on the target server when it is accessed. c.
-
Page 58: Configuring Port Scan Settings In Vkc And Akc
Chapter 4: Virtual KVM Client (VKC) Help Configuring Port Scan Settings in VKC and AKC Configuring port scan options in VKC and AKC applies to scanning from the KX III Remote Console. To configure port scan options for the Local Console, see Configure Local Console Scan Settings (on page 92) -
Page 59: View Options
Chapter 4: Virtual KVM Client (VKC) Help 6. Click OK. View Options View Toolbar You can use the Virtual KVM client with or without the toolbar display. To toggle the display of the toolbar (on and off): Choose View > View Toolbar. View Status Bar By default, the status bar is displayed at the bottom of the target window. -
Page 60: Scaling
Chapter 4: Virtual KVM Client (VKC) Help Scaling Scaling your target window allows you to view the entire contents of the target server window. This feature increases or reduces the size of the target video to fit the Virtual KVM Client window size, and maintains the aspect ratio so that you see the entire target server desktop without using the scroll bar. -
Page 61: Virtual Media
Chapter 4: Virtual KVM Client (VKC) Help Virtual Media All KX III models support virtual media. Virtual media extends KVM capabilities by enabling target servers to remotely access media from a client PC and network file servers. With this feature, media mounted on client PCs and network file servers are essentially "mounted virtually"... -
Page 62: Mounting Local Drives
Chapter 4: Virtual KVM Client (VKC) Help CIMs Required for Virtual Media You must use one of the following CIMs is to use virtual media: D2CIM-VUSB D2CIM-DVUSB D2CIM-DVUSB-DVI D2CIM-DVUSB-HDMI D2CIM-DVUSB-DP Note that the black connector on the DVUSB CIMs are used for the keyboard and mouse. -
Page 63: Supported Virtual Media Types
ISO images (disk images) Digital audio devices* Note: ISO9660 is the standard supported by Raritan. However, other ISO standards can be used. Conditions when Read/Write is Not Available Virtual media Read/Write is not available in the following situations: ... -
Page 64: Number Of Supported Virtual Media Drives
Chapter 4: Virtual KVM Client (VKC) Help Number of Supported Virtual Media Drives With the virtual media feature, you can mount up to two drives (of different types) that are supported by the USB profile currently applied to the target. These drives are accessible for the duration of the KVM session. - Page 65 You can access the media just like any other drive. Mounting CD-ROM/DVD-ROM/ISO Images This option mounts CD-ROM, DVD-ROM, and ISO images. Note: ISO9660 format is the standard supported by Raritan. However, other CD-ROM extensions may also work. To access a CD-ROM, DVD-ROM, or ISO image: 1.
-
Page 66: Virtual Media In A Windows Xp Environment
Chapter 4: Virtual KVM Client (VKC) Help c. File Server Username - User name required for access to the file server. The name can include the domain name such as mydomain/username. d. File Server Password - Password required for access to the file server (field is masked as you type). -
Page 67: Virtual Media In A Linux Environment
Chapter 4: Virtual KVM Client (VKC) Help Virtual Media in a Linux Environment Active System Partitions You cannot mount active system partitions from a Linux client. Linux Ext3/4 drive partitions need to be unmounted via umount /dev/<device label> prior to a making a virtual media connection. Drive Partitions The following drive partition limitations exist across operating systems: ... -
Page 68: Virtual Media File Server Setup (File Server Iso Images Only)
Virtual Media File Server Setup (File Server ISO Images Only) This feature is only required when using virtual media to access file server ISO images. ISO9660 format is the standard supported by Raritan. However, other CD-ROM extensions may also work. -
Page 69: Smart Cards
Chapter 4: Virtual KVM Client (VKC) Help Smart Cards Using the KX III, you are able to mount a smart card reader onto a target server to support smart card authentication and related applications. For a list of supported smart cards, smart card readers, and additional system requirements, see Smart Card Minimum System Requirements, CIMs and Supported/Unsupported Smart Card... -
Page 70: Smart Card Reader Detected
Chapter 4: Virtual KVM Client (VKC) Help Smart Card Reader Detected After a KVM session is established with a target server, a Smart Card menu and button are available in VKC and AKC. Once the Smart Card button is selected or Smart Card is selected from the menu, the smart card readers that are detected as attached to the remote client are displayed in a dialog. -
Page 71: Update A Smart Card Reader
Chapter 4: Virtual KVM Client (VKC) Help Update a Smart Card Reader To update the smart card in the Select Smart Card Reader dialog: Click Refresh List if a new smart card reader has been attached to the client PC. Send Smart Card Remove and Reinsert Notifications To send smart card remove and reinsert notifications to the target:... -
Page 72: Digital Audio
Note: Audio CDs are not supported by virtual media so they do not work with the audio feature. Before you begin using the audio feature, Raritan recommends you review the audio related information documented in the following sections of Help: ... -
Page 73: Audio Playback And Capture Recommendations And Requirements
Chapter 4: Virtual KVM Client (VKC) Help Audio Playback and Capture Recommendations and Requirements Audio Level Set the target audio level to a mid-range setting. ® For example, on a Windows client, set the audio to 50 or lower. This setting must be configured through the playback or capture audio device, not from the client audio device control. - Page 74 Chapter 4: Virtual KVM Client (VKC) Help In practice, the bandwidth used when an audio device connects to a target is higher due to the keyboard and video data consumed when opening and using an audio application on the target. A general recommendation is to have at least a 1.5MB connection before running playback and capture.
-
Page 75: Saving Audio Settings
Chapter 4: Virtual KVM Client (VKC) Help Saving Audio Settings Audio device settings are applied on a per KX III device basis. Once the audio devices settings are configured and saved on the KX III, the same settings are applied to it. ®... -
Page 76: Connecting And Disconnecting From A Digital Audio Device
Chapter 4: Virtual KVM Client (VKC) Help Operating System Audio Playback Support Review the table shown here to see which Raritan client works with audio playback/capture for each operating system: Operating system Audio playback and capture supported ® Active KVM Client (AKC) Windows ... - Page 77 Chapter 4: Virtual KVM Client (VKC) Help 6. Select the audio format for the playback device from the Format: drop-down. Note: Select the format that you wish to use based on the available network bandwidth. Formats with lower sampling rates consume less bandwidth and may tolerate more network congestion.
- Page 78 Chapter 4: Virtual KVM Client (VKC) Help A Speaker icon is displayed in the status bar at the bottom of the client window. It is grayed out when no audio is being used. When the Speaker icon and Microphone icon are displayed in the status bar, the session is being captured as it is streamed.
-
Page 79: Adjusting Capture And Playback Buffer Size (Audio Settings)
2. Adjust the capture and/or playback buffer size as needed. Click OK. Version Information - Virtual KVM Client This menu command provides version information about the Virtual KVM Client, in case you require assistance from Raritan Technical Support. To obtain version information: 1. Choose Help > About Raritan Virtual KVM Client. -
Page 80: Chapter 5 Active Kvm Client (Akc) Help
This allows you to run the client in a Windows environments without using the Java ® Runtime Environment (JRE), which is required to run Raritan's Virtual KVM Client (VKC). AKC also works with CC-SG. AKC provides the same features as VKC with the exception of the following: ... -
Page 81: Akc Supported Microsoft .Net Framework
.NET installed, you will receive a message instructing you to check the .NET version. ® Note: Raritan recommends Windows XP operating system users verify you have a working version of .NET 3.5 or 4.0 already installed before you launch AKC. -
Page 82: Akc Supported Browsers
Chapter 5: Active KVM Client (AKC) Help AKC Supported Browsers ® Internet Explorer 8 (and later) If you attempt to open AKC from a browser other than Internet Explorer 8 (and later), you will receive an error message instructing you to check your browser and to switch to Internet Explorer. -
Page 83: Chapter 6 Kx Iii Remote Console - Kx Iii End User Help
Chapter 6 KX III Remote Console - KX III End User Help In This Chapter Overview ....................75 Logging In to the KX III ................76 Scanning Ports - Remote Console ............77 Changing a Password ................82 Managing Favorites ................. 83 Overview When you log in to the KX III via a network connection, you access the Remote Console. -
Page 84: Logging In To The Kx Iii
Chapter 6: KX III Remote Console - KX III End User Help Logging In to the KX III Log in to your KX III Remote Console from any workstation with network ™ ® connectivity that has Microsoft .NET and/or Java Runtime Environment installed. -
Page 85: Scanning Ports - Remote Console
Chapter 6: KX III Remote Console - KX III End User Help Scanning Ports - Remote Console Use the port scanning feature to search for selected targets and display them in individual thumbnails as part of a slide show. This feature allows you to monitor up to 32 targets at one time since you can view each target server individually as it is displayed during the slide show. -
Page 86: Scanning Ports Slide Show - Remote Console
Chapter 6: KX III Remote Console - KX III End User Help Scanning Ports Slide Show - Remote Console When you start a scan, the Port Scan window opens. As each target is found, it is displayed as a thumbnail in a slide show. The slide show scrolls through the target thumbnails based on the default interval of 10 seconds or according to the interval you specify. -
Page 87: Target Status Indicators During Port Scanning - Remote Console
Chapter 6: KX III Remote Console - KX III End User Help Target Status Indicators During Port Scanning - Remote Console The status of each target is indicated by green, yellow and red lights that are displayed below the target thumbnail. As the target is the focus of the rotation, the indicator is in the task bar also shows the status. -
Page 88: Using Scan Port Options
Chapter 6: KX III Remote Console - KX III End User Help Using Scan Port Options Following are options available to you while scanning targets. With the exception of the Expand/Collapse icon, all of these options are selected from the Options menu in the upper left of the Port Scan viewer. The options will return to their defaults when you close the window. -
Page 89: Scan For Targets
Chapter 6: KX III Remote Console - KX III End User Help Scan for Targets To scan for targets: 1. Click the Set Scan tab on the Port Access page. 2. Select the targets you want to include in the scan by selecting the checkbox to the left of each target, or select the checkbox at the top of the target column to select all targets. -
Page 90: Changing A Password
Chapter 6: KX III Remote Console - KX III End User Help Changing a Password To change your KX III password: 1. Choose User Management > Change Password. The Change Password page opens. 2. Type your current password in the Old Password field. 3. -
Page 91: Managing Favorites
Chapter 6: KX III Remote Console - KX III End User Help Managing Favorites A Favorites feature is provided so you can organize and quickly access the devices you use frequently. The Favorite Devices section is located in the lower left side (sidebar) of the Port Access page and provides the ability to: ... -
Page 92: Access And Display Favorites
Chapter 6: KX III Remote Console - KX III End User Help Access and Display Favorites To access a favorite KX III device: Click the device name (listed beneath Favorite Devices). A new browser opens to that device. To display favorites by name: ... -
Page 93: Chapter 7 Kx Iii Local Console - Kx Iii End User Help
Chapter 7 KX III Local Console - KX III End User Help In This Chapter Overview ....................85 Accessing a Target Server ..............85 Local Console Video Resolutions ............86 Simultaneous Users ................86 Hot Keys and Connect Keys ..............86 Scanning Ports - Local Console .............. -
Page 94: Local Console Video Resolutions
Chapter 7: KX III Local Console - KX III End User Help Local Console Video Resolutions Once a monitor is connected to the KX III Local Console, KX III detects the native resolution of the monitor. This is typically the largest resolution supported by the monitor. -
Page 95: Return To The Kx Iii Local Console Interface - Default Hot Key
Chapter 7: KX III Local Console - KX III End User Help Return to the KX III Local Console Interface - Default Hot Key To return to the KX III Local Console from the target server: Press the Scroll Lock key twice rapidly. The video display switches from the target server interface to the KX III Local Console interface. -
Page 96: Special Sun Key Combinations
Chapter 7: KX III Local Console - KX III End User Help Standard servers Connect key action Key sequence example the local port GUI connected to target): Double Click Scroll Lock Special Sun Key Combinations Microsystems server’s special ™ The following key combinations for Sun keys operate on the local port. -
Page 97: Scanning Ports - Local Console
Chapter 7: KX III Local Console - KX III End User Help Scanning Ports - Local Console Use the port scanning feature to search for selected targets and display them in individual thumbnails as part of a slide show. This feature allows you to monitor up to 32 targets at one time since you can view each target server individually as it is displayed during the slide show. -
Page 98: Scanning Port Slide Show - Local Console
Chapter 7: KX III Local Console - KX III End User Help Scanning Port Slide Show - Local Console When you start a scan, the Port Scan window opens. As each target is found, it is displayed as a thumbnail in a slide show. The slide show scrolls through the target thumbnails based on the default interval of 10 seconds or according to the interval you specify. - Page 99 Chapter 7: KX III Local Console - KX III End User Help...
-
Page 100: Target Status Indicators During Port Scanning - Local Console
Chapter 7: KX III Local Console - KX III End User Help Target Status Indicators During Port Scanning - Local Console In thumbnail view on the Local Console, the status of each target is indicated below the thumbnail on the page until it is the focus of the slide show view. -
Page 101: Scan For Targets - Local Console
Chapter 7: KX III Local Console - KX III End User Help Display Interval - changes the scan display interval. Interval Between Ports - change interval between switching different port during scan. Scan for Targets - Local Console To scan for targets: 1. - Page 102 Chapter 7: KX III Local Console - KX III End User Help 2. From the Local Console, click Tools. 3. Select the smart card reader from the Card Readers Detected list. Select None from the list if you do not want a smart card reader mounted.
-
Page 103: Local Console Usb Profile Options
Chapter 7: KX III Local Console - KX III End User Help Local Console USB Profile Options From the USB Profile Options section of the Tools page, you can choose from the available USB profiles. The ports that can be assigned profiles are displayed in the Port Name field and the profiles that are available for a port appear in the Select Profile To Use field after the port is selected. -
Page 104: Kx Iii Local Console Factory Reset
Chapter 7: KX III Local Console - KX III End User Help KX III Local Console Factory Reset Note: It is recommended that you save the audit log prior to performing a factory reset. The audit log is deleted when a factory reset is performed and the reset event is not logged in the audit log. - Page 105 Chapter 7: KX III Local Console - KX III End User Help 2. Use a pointed object to press and hold the Reset button. 3. While continuing to hold the Reset button, power the KX III device back on. 4. Continue holding the Reset button for 10 seconds.
-
Page 106: Appendix A Connecting A Kx Iii And Cat5 Reach Dvi - Provide Extended Local Port Functionality
An extended local port extends the reach of the local port beyond the rack the KX II is located, for example to another KVM switch. This can be achieved by configuring a KX III to work with a Raritan Cat5 Reach DVI transmitter and receiver, which are then connected to a remote console or other device. -
Page 107: Connect A Kx Iii And Cat5 Reach Dvi
4. Connect the local console ports of the KVM switch to the transmitter. a. Plug one end of the Raritan-provided DVI cable into the DVI-I IN port on the transmitter, and the other end into the KVM switch's video port. - Page 108 Appendix A: Connecting a KX III and Cat5 Reach DVI - Provide Extended Local Port Functionality 5. Turn on the KVM switch. Tip: The local or remote console can be equipped with a KVM drawer instead of a set of keyboard, mouse and monitor. See the illustration below.
- Page 109 Appendix A: Connecting a KX III and Cat5 Reach DVI - Provide Extended Local Port Functionality 5. Turn on both KVM switches. To increase the distance between any computer and a KVM switch: 1. Set up an optional local console with the transmitter. 2.
-
Page 110: Appendix B Accessing A Paragon Ii From The Kx
Appendix B Accessing a Paragon II from the KX In This Chapter Overview ....................102 Supported Paragon II CIMS and Configurations ........103 Connecting the Paragon II to the KX III ..........108 Overview Connect the Paragon II system to a KX III device that is managed by CC-SG so that Paragon II is accessible from CC-SG. -
Page 111: Supported Paragon Ii Cims And Configurations
Appendix B: Accessing a Paragon II from the KX III When you access the Paragon II system from KX III or CC-SG (if the KX III is managed by CC-SG), the Paragon II OSUI login screen appears for you to log in. In this integration, you can perform any OSUI functions implemented with current Paragon II firmware or any KX III function implemented with current KX III firmware except for the virtual media feature. - Page 112 Appendix B: Accessing a Paragon II from the KX III Paragon CIM Supports Does not support Virtual media P2CIM-AUSBDUAL Servers with USB- or ™ USB-type Smart cards keyboard and mouse Absolute Mouse ports mode Automatic skew ...
-
Page 113: Kx Iii-To-Kx Iii Paragon Cim Guidelines
Appendix B: Accessing a Paragon II from the KX III KX III-to-KX III Paragon CIM Guidelines The following system configuration guidelines should be followed when you are using Paragon CIMs in a KX III-to-KX III configuration: Concurrent Access Both KX III KVM switches should be configured with the same policy for concurrent access to targets - both PC-Share or both Private. -
Page 114: Kx Iii-To-Paragon Ii Guidelines
Appendix B: Accessing a Paragon II from the KX III If a connection to the target is in place from the other KX III, the availability is checked when a connection is attempted. Access is denied or allowed consistent with the PC-Share policy in place for the KX III. Until that time, the availability is not be updated on the other KX III. -
Page 115: Supported Connection Distances Between Paragon Ii And Kx Iii
Appendix B: Accessing a Paragon II from the KX III Paragon II Mode description Supported? operation mode port can be selected and Timeout, which is configured controlled by more than on the Paragon II, is not one user, but only one supported. -
Page 116: Connecting The Paragon Ii To The Kx Iii
Appendix B: Accessing a Paragon II from the KX III Connecting the Paragon II to the KX III To connect the Paragon II system to a KX III: 1. Check whether the Paragon II user station that you want to connect to the KX III is implemented with version 4.6 firmware (or later). -
Page 117: Appendix C Specifications
Appendix C Specifications In This Chapter Hardware ....................109 Software....................130 Hardware KX III Dimensions and Physical Specifications Dominion KX Description Power & Dimensions Weight Operating Humidity III model heat (WxDxH) temp dissipation 8 server DKX3-108 Dual Power 17.3" x 8.60lbs 0º... - Page 118 Appendix C: Specifications Dominion KX Description Power & Dimensions Weight Operating Humidity III model heat (WxDxH) temp dissipation port for use at the rack 32 server DKX3-232 Dual Power 17.3" x 9.08lbs 0º - 45º C 0-85 % ports 110V/240V, 13.15'' x 50-60Hz...
- Page 119 Appendix C: Specifications Dominion KX Description Power & Dimensions Weight Operating Humidity III model heat (WxDxH) temp dissipation use at the rack 32 server DKX3-832 Dual Power 17.3" x 9.96lbs 0º - 45º C 0-85 % ports 110V/240V, 13.15'' x 50-60Hz 1.73'' ...
-
Page 120: Kx Iii Supported Target Server Video Resolutions
Appendix C: Specifications KX III Supported Target Server Video Resolutions 640x350@70Hz 640x350@85Hz 640x400@56Hz 640x400@84Hz 640x400@85Hz 640x480@60Hz 640x480@66.6Hz 640x480@72Hz 640x480@75Hz 640x480@85Hz 720x400@70Hz 720x400@84Hz 720x400@85Hz 800x600@56Hz 800x600@60Hz ... -
Page 121: Target Server Video Resolution Supported Connection Distances And Refresh Rates
KX III. Note: Due to the multiplicity of server manufacturers and types, OS versions, video drivers, and so on, as well as the subjective nature of video quality, Raritan cannot guarantee performance across all distances in all environments. -
Page 122: Supported Kx Iii Local Port Dvi Resolutions
Appendix C: Specifications Supported KX III Local Port DVI Resolutions 1920x1080@60 1280x720@60 1024x768@60 (default) 1024x768@75 1280x1024@60 1280x1024@75 1600x1200@60 800x480@60 1280x768@60 1366x768@60 1360x768@60 1680x1050@60 1440x900@60 Supported Computer Interface Module (CIMs) Specifications Digital CIMs support Display Data Channels (DDC) and Enhanced Extended Display Identification Data (E-EDID). - Page 123 Appendix C: Specifications CIM model Description Dimensions (WxDxH) Weight D2CIM-DVUS Digital CIM that provides digital-to-analog 1.7" x 3.5" x 0.8"; 43 x 0.25lb; B-DVI conversion and support for virtual media, 90 x 19mm 0.11kg smartcard/CAC, audio, Absolute and Relative Mouse Synchronization D2CIM-DVUS Digital CIM that provides digital-to-analog 1.7"...
-
Page 124: Supported Digital Video Cims For Mac
Appendix C: Specifications CIM model Description Dimensions (WxDxH) Weight Note that the black connector on the DVUSB CIMs are used for the keyboard and mouse. The gray connector is used for virtual media. Keep both plugs of the CIM connected to the device. The device may not operate properly if both plugs are not connected to the target server. -
Page 125: Digital Cim Timing Modes
Appendix C: Specifications Digital CIM Timing Modes Following are the default timing modes that are used when the KX III communicates with a video source via a digital CIM. The timing mode that is used is dependent on the native resolution of the video source. -
Page 126: Dvi Compatibility Mode
Appendix C: Specifications Digital CIM Standard Modes 1152x864@75Hz VESA 1280x960@60Hz VESA 1280x1024@60Hz VESA 1360x768@60Hz VESA 1400x1050@60Hz VESA 1440x900@60Hz VESA 1600x1200 @60Hz VESA 1680x1050@60Hz VESA 1920x1080@60Hz VESA DVI Compatibility Mode DVI Compatibility Mode may be required if you are using an HDMI CIM ®... - Page 127 Appendix C: Specifications KX III network speed setting tion tion KX III: KX III: 100/Full KX III: 100/Full 100/Half 100/Half 100/Half Communica Communicat tion Switch: Switch: Switch: 100/Full 100/Full 100/Full 100/Half 100/Half KX III: 100/Half 100/Half 100/Full Communica Communicat tion Switch: 100/Half KX III:...
-
Page 128: Dell Chassis Cable Lengths And Video Resolutions
Appendix C: Specifications Dell Chassis Cable Lengths and Video Resolutions In order to maintain video quality, Raritan recommends using the following cable lengths and video resolutions when you are connecting to ® Dell blade chassis from the KX III: Video resolution... - Page 129 Raritan device. CCID Requirements If the Raritan D2CIM-DVUSB VM/CCID is not recognized as a smart card reader by your Linux target, you may need to update the CCID driver version to 1.3.8 or above and update the driver configuration file (Info.plist).
-
Page 130: Supported Smart Card Readers
Appendix C: Specifications Create a Java ® Library Link A soft link must be created to the libpcsclite.so after upgrading RHEL 4, RHEL 5 and FC 10. For example, ln –s /usr/lib/libpcsclite.so.1 /usr/lib/libpcsclite.so, assuming installing the package places the libraries in /usr/lib or /user/local/lib ... -
Page 131: Unsupported Smart Card Readers
Appendix C: Specifications Unsupported Smart Card Readers This table contains a list of readers that Raritan has tested and found not to work with the Raritan device, therefore they are unsupported. If a smart card reader does not appear in the supported smart card readers table or in the unsupported smart card readers table, Raritan cannot guarantee it will function with the device. - Page 132 Appendix C: Specifications Recommendations for Audio Connections when PC Share Mode is Enabled If you are using the audio feature while running PC Share mode, audio playback and capture are interrupted if an additional audio device is connected to the target. For example, User A connects a playback device to Target1 and runs an audio playback application then User B connects a capture device to the same target.
-
Page 133: Number Of Supported Audio/Virtual Media And Smartcard Connections
Appendix C: Specifications In practice, the bandwidth used when an audio device connects to a target is higher due to the keyboard and video data consumed when opening and using an audio application on the target. A general recommendation is to have at least a 1.5MB connection before running playback and capture. -
Page 134: Kx Iii Supported Keyboard Languages
KX III Local Console functions. For more information about non-US keyboards, see Informational Notes (on page 133). Note: Raritan strongly recommends that you use system-config-keyboard to change languages if you are working in a Linux environment. Language Regions Keyboard layout... -
Page 135: Mac Mini Bios Keystroke Commands
Appendix C: Specifications Language Regions Keyboard layout Spanish Spain and most Spanish Spanish speaking countries Portuguese Portugal Portuguese Mac Mini BIOS Keystroke Commands ® The following BIOS commands have been tested on Intel-based Mac ® ® Mini target servers and Mac Lion servers running Mac Snow Leopard The servers were attached to a KX III with D2CIM-DVUSB and D2CIM-VUSB CIMs. -
Page 136: Using A Windows Keyboard To Access Mac Targets
HTML client, the download of client software (Virtual KVM Client (VKC)) onto the client's host, and the transfer of KVM and virtual media data streams to the client. KX III (Raritan This port is used to discover other Dominion devices and for... -
Page 137: Http And Https Port Settings
Appendix C: Specifications Port Description KVM-over-IP) communication between Raritan devices and systems, including Protocol, CC-SG for devices that CC-SG management is available. Configurable Port By default, this is set to Port 5000, but you may configure it to use any 5000 TCP port not currently in use. -
Page 138: Software
Appendix C: Specifications 2. Enter the new ports in the HTTP Port and/or HTTPS Port fields. 3. Click OK. Software Supported Operating Systems and Browsers Operating Systems Browsers Internet Explorer ® 10 and 11 ® Windows 7 Home Premium SP1 64-bit ... -
Page 139: Java And Microsoft .Net Requirements
Certain versions of Safari block Java for security reasons. Since Java is ® required to use KX III, Raritan recommends you use Firefox instead. Additionally, you may be required to navigate through a number of messages. Select 'Do Not Block' if these messages are displayed. -
Page 140: Events Captured In The Audit Log And Syslog
Appendix C: Specifications Events Captured in the Audit Log and Syslog Following is a list and description of the events that are captured by the KX III audit log and syslog: Access Login - A user has logged in to the KX III ... -
Page 141: Appendix D Informational Notes
Help link in the KX III Remote Console interface. Note: Some topics in this section reference other multiple Raritan devices because various devices are impacted by the information. Java Runtime Environment (JRE) Notes... -
Page 142: Java Not Loading Properly On Mac
Appendix D: Informational Notes a. From the Temporary Files Settings dialog, click the Delete Files button. The Delete Temporary Files dialog appears. b. Select the temporary files that you want to delete. c. Click OK. Java Not Loading Properly on Mac ®... -
Page 143: Windows 2000 Composite Usb Device Behavior For Virtual Media
As a result, the “Safely Remove Hardware” system tray icon does not appear for drives mapped by the D2CIM-VUSB and a warning message may appear when disconnecting the device. Raritan has not observed any problems or issues from this message, however. -
Page 144: Cannot Write To/From A File From A Mac Client
Appendix D: Informational Notes Cannot Write To/From a File from a Mac Client ® If you are connecting to the KX III from a Mac 10.8.5 client running ™ ® Safari 6.1 with Java 1.7 and cannot write to/from a file on a target server or access virtual media, do the following to correct this: 1. -
Page 145: Virtual Media Via Vkc And Akc In A Windows Environment
Appendix D: Informational Notes Virtual Media via VKC and AKC in a Windows Environment ® Windows XP operating system administrator and standard user ® privileges vary from those of the Windows Vista operating system and ® the Windows 7 operating system. When enabled in Vista or Windows 7, User Access Control (UAC) provides the lowest level of rights and privileges a user needs for an application. -
Page 146: Virtual Media Linux Drive Listed Twice
Appendix D: Informational Notes Virtual Media Linux Drive Listed Twice ™ For KX III, users who are logged in to Linux clients as root users, the drives are listed twice in the Local Drive drop-down. For example, you will see eg /dev/sdc and eg /dev/sdc1 where the first drive is the boot sector and the second drive is the first partition on the disk. -
Page 147: Video Mode And Resolution Notes
2. If using a digital CIM, then change the Display Native Resolution on the Port Configuration page to another resolution, or 3. If using the HDMI CIM, use the DVI Compatibility Mode. Contact Raritan Technical Support for additional assistance. Sun Composite Synch Video ™... -
Page 148: Keyboard Notes
Appendix D: Informational Notes Keyboard Notes French Keyboard Caret Symbol (Linux Clients Only) The Virtual KVM Client (VKC) do not process the key combination of Alt ® Gr + 9 as the caret symbol (^) when using French keyboards with Linux clients. -
Page 149: Keyboard Language Preference (Fedora Linux Clients)
® Because the Sun on Linux has problems generating the correct KeyEvents for foreign-language keyboards configured using System Preferences, Raritan recommends that you configure foreign keyboards using the methods described in the following table. Language Configuration method US Intl Default... -
Page 150: Macros Not Saving On Linux Target Servers
Appendix D: Informational Notes Note: The Keyboard Indicator should be used on Linux systems using Gnome as a desktop environment. When using a Hungarian keyboard from a Linux client, the Latin letter U with Double Acute and the Latin letter O with Double Acute work only with JRE 1.6 (and later). -
Page 151: Mac Keyboard Keys Not Supported For Remote Access
Appendix D: Informational Notes Mac Keyboard Keys Not Supported for Remote Access ® ® When a Mac is used as the client, the following keys on the Mac ™ ™ keyboard are not captured by the Java Runtime Environment (JRE ... -
Page 152: Audio
Features that May Interrupt an Audio Connection If you use any of the following features while connected to an audio device, your audio connection may be interrupted. Raritan recommends you do not use these features if you are connected to an audio device: ... -
Page 153: Audio In A Windows Environment
Appendix D: Informational Notes Audio in a Windows Environment ® On Windows 64-bit clients, only one playback device is listed on the Connect Audio panel when accessing the device through the Virtual KVM Client (VKC). The audio device is the default device, and is listed on the Connect Audio panel as Java Sound Audio Engine. -
Page 154: Appendix E Frequently Asked Questions
Appendix E Frequently Asked Questions In This Chapter General FAQs ..................146 Remote Access ..................148 Universal Virtual Media ................151 Bandwidth and KVM-over-IP Performance ........... 152 IPv6 Networking ..................156 Servers ....................157 Blade Servers ..................158 Installation....................160 Local Port - KX IIII ................. - Page 155 OS-independent; users can troubleshoot and reconfigure servers even when servers are down. At the rack, Dominion KX III provides the same functionality, convenience, and space and cost savings as traditional analog KVM switches. However, Dominion KX III also integrates the industry’s highest performing KVM-over-IP...
-
Page 156: Remote Access
How large is the Dominion KX III? Dominion KX III is only 1U high (except the KX3-864 and KX3-464, which are 2U), fits in a standard 19" rack mount and is only 11.4" (29 cm) deep. - Page 157 "ports." The local port can the local port? access the same server using the PC-Share feature. In order to access Dominion KX III Because Dominion KX III is completely Web-accessible, it doesn’t require customers from a client, what hardware,...
- Page 158 Dominion KX access Dominion KX III is approximately 500KB III? How long does it take to in size. The following chart describes the time required to retrieve Dominion KX III’s applet at retrieve? different network speeds: 100Mbps Theoretical .05 seconds...
-
Page 159: Universal Virtual Media
USB-connected CD/DVD drives, USB mass storage devices, PC hard drives and ISO images. What is required for virtual media? A Dominion KX III virtual media CIM is required. There are two VGA-based CIMs: a D2CIM-VUSB or D2CIM-DVUSB. -
Page 160: Bandwidth And Kvm-Over-Ip Performance
Does virtual media really support Yes. Audio playback and recording to a server audio? connected to the Dominion KX III is supported. You can listen to sounds and audio playing on a remote server in the data center using the speakers connected to your desktop PC or laptop. - Page 161 Appendix E: Frequently Asked Questions Question Answer How is bandwidth used in Dominion KX III offers totally new video KVM-over-IP systems? processing that provides flexible, high performance video, efficient use of bandwidth and anytime/anywhere access via LAN, WAN or Internet.
- Page 162 Appendix E: Frequently Asked Questions Question Answer What factors affect bandwidth? There are many factors that determine how much bandwidth will be used. The primary factor, noted above, is the amount of change in the target server’s video display. This is dependent on the user’s task and actions.
- Page 163 Appendix E: Frequently Asked Questions Question Answer How do I optimize performance KX III provides a variety of settings in our and bandwidth? remote clients for the user to optimize bandwidth and performance. The default settings will provide an at-the-rack level of performance in standard LAN/WAN environments with economical use of bandwidth.
-
Page 164: Ipv6 Networking
Appendix E: Frequently Asked Questions Question Answer What is the maximum remote (over The Dominion KX III is the first and only IP) video resolution supported? KVM-over-IP switch to support full high definition (HD) remote video resolution – 1920x1080 at frame rates up to 30 frames per second with digital audio. -
Page 165: Servers
Windows server to operate? KVM infrastructure to always be available in any scenario whatsoever (as they will likely need to use the KVM infrastructure to fix problems), Dominion KX III is designed to be completely independent from any external server. -
Page 166: Blade Servers
What comes in the Dominion KX III The following is included: (1) Dominion KX III box? unit, (2) Quick Setup Guide, (3) standard 19" rack mount brackets, (4) user manual CD-ROM, (6) localized AC line cord and (7) warranty certificate and other documentation. - Page 167 With the Dominion KX III, you don’t have to use these hotkeys. Just click on the name of the blade server, and the Dominion KX III will automatically switch to that blade without the explicit use of the hotkey.
-
Page 168: Installation
Installation Question Answer Besides the unit itself, what do I Each server that connects to Dominion KX III need to order from Raritan to requires a Dominion or Paragon computer install Dominion KX III? interface module (CIM), an adapter that connects directly to the keyboard, video and mouse ports of the server. - Page 169 How many servers can be Dominion KX III models range from 8, 16 or 32 connected to each Dominion KX III server ports in a 1U chassis, to 64 server ports in a 2U chassis.
-
Page 170: Local Port - Kx Iiii
Raritan’s Dominion SX line of secure console servers. Dominion SX offers more serial functionality at a better price point than Dominion KX III. This SX is easy to use, configure and manage, and can be completely integrated with a Dominion series deployment. -
Page 171: Extended Local Port
This means that: If the Dominion KX III is configured to interact with an external RADIUS, LDAP or Active Directory ® server, users attempting to access the local port will authenticate against the same server. -
Page 172: Dual Power Supplies
50–60 Hz. If a power supply or input fails, will The Dominion KX III front panel LED will notify I be notified? the user of a power failure. An entry will also be sent to the audit log and displayed on the KX remote client user interface. -
Page 173: Ethernet And Ip Networking
These come in many outlet, connector and amp variations. Note that you should not connect the PM series of power strips to the Dominion KX III as these power strips do not provide outlet-level switching. How many PDUs can be... - Page 174 Appendix E: Frequently Asked Questions Question Answer Can I access Dominion Yes. Dominion KX III not only uses standard KX III over a wireless connection? Ethernet, but also very conservative bandwidth with very high quality video. Thus, if a wireless...
-
Page 175: Local Port Consolidation, Tiering And Cascading
Ethernet auto-negotiation. On some networks, problem? 10/100 auto-negotiation does not work properly, and the Dominion KX III unit must be set to 100 Mb/full duplex or the appropriate choice for its network. Duplicate IP address. If the IP address of the... - Page 176 Question Answer How do I physically connect To physically connect multiple KX III devices multiple Dominion KX III devices together for consolidated local access, you can together into one solution? connect the Tiering ports of multiple "tiered" (or "cascaded") KX III switches to a "base" KX III using the Tiering port of the KX III.
-
Page 177: Computer Interface Modules (Cims)
Appendix E: Frequently Asked Questions Question Answer Do I have to physically connect Multiple Dominion KX III units do not need to Dominion KX III devices together? be physically connected together. Instead, each Dominion KX III unit connects to the network, and they automatically work together as a single solution if deployed with Raritan’s... -
Page 178: Security
Dominion KX III, Paragon CIMs transmit video at a distance of up to 150 feet (46 m), the same as Dominion KX III CIMs – not at 1,000 feet (304 m), as they do when connected to Paragon. - Page 179 128-bit encryption, both in its SSL communications as well as its own data stream. Literally no data is transmitted between remote clients and Dominion KX III that is not completely secured by encryption. Does Dominion KX III support AES Yes. The Dominion KX III utilizes the Advanced encryption as recommended by Encryption Standard (AES) for added security.
-
Page 180: Smart Cards And Cac Authentication
Yes. Customers can upload self-signed or certificate to the Dominion KX IIKX certificate authority-provided digital certificates IIII? to the Dominion KX III for enhanced authentication and secure communication. Does the KX III support a Yes. For government, military and other... -
Page 181: Manageability
CommandCenter? CommandCenter. For the local port, connect a compatible smart card reader to the USB port of the Dominion KX III. Manageability Question Answer Can Dominion KX III be remotely Yes. -
Page 182: Documentation And Support
(but are not limited to): user login, user logout, user access of a particular server, unsuccessful login, configuration changes, etc. Yes. In addition to Dominion KX III’s own Can Dominion KX III integrate with syslog? internal logging capabilities, Dominion KX III can send all logged events to a centralized syslog server. -
Page 183: Miscellaneous
DisplayPort video standards are supported with the digital video CIMs. How long is the hardware warranty The Dominion KX III comes with a standard for the KX III? two-year warranty, which can be extended to 5 years of warranty coverage. - Page 184 In general, KX II customers can continue to How do I migrate from the use their existing switches for many years. As Dominion KX II to Dominion KX III? their data centers expand, customers can purchase and use the new KX III models.
-
Page 185: Index
Index Black Stripe/Bar(s) Displayed on the Local Port • 139 Blade Chassis - Port Access Page • 18 About Connection Properties • 27 Blade Servers • 158 About the Cat5 Reach DVI • 98 Browser Notes • 145 Absolute Mouse Synchronization • 42 Build a New Macro •... - Page 186 Index General Settings • 45 Dell Chassis Cable Lengths and Video Resolutions • 120 Getting Started • 9 Digital Audio • 64 Digital CIM Established and Standard Modes • 116, 117 Hardware • 2, 109 Digital CIM Established Modes • 117 Hot Keys and Connect Keys •...
- Page 187 Index KX III Prerequisites • 53 Number of Supported Audio/Virtual Media and KX III Remote and Local Console Interfaces • Smartcard Connections • 125 Number of Supported Virtual Media Drives • KX III Remote Console - KX III End User Help •...
- Page 188 Index Scanning Ports - Remote Console • 17, 19, 50, Supported Virtual Media Operating Systems • 77, 89 Supported Virtual Media Types • 55 Scanning Ports Slide Show - Remote Console • 78 SUSE/VESA Video Modes • 139 Switch From • 21 Screenshot from Target Command (Target Screenshot) •...
- Page 189 Index Virtual Media • 53 Virtual Media Connection Failures Using High Speed for Virtual Media Connections • 138 Virtual Media File Server Setup (File Server ISO Images Only) • 60 Virtual Media in a Linux Environment • 59 Virtual Media in a Mac Environment • 59 Virtual Media in a Windows XP Environment •...
-
Page 190: United Kingdom
For CommandCenter Secure Gateway: Press 6, then Press 2 Phone: +31-10-2844040 Fax: 732-764-8887 Email: tech.europe@raritan.com Email for CommandCenter NOC: tech-ccnoc@raritan.com Email for all other products: tech@raritan.com United Kingdom Monday - Friday 8:30 a.m. to 5 p.m. GMT China Phone +44(0)20-7090-1390...
Need help?
Do you have a question about the Dominion KX III and is the answer not in the manual?
Questions and answers