Vestil WP Series Instruction Manual
Work platforms
Hide thumbs
Also See for WP Series:
- Instruction manual (17 pages) ,
- Use & maintenance manual (14 pages)
Table of Contents
Advertisement
Quick Links
03/10/03
KEEP THIS MANUAL FOR FUTURE REFERENCE OF OPERATORS. CHECK VESTIL.COM FOR UPDATES
TO THE MANUAL. DO NOT USE UNLESS EACH LABEL IS AFFIXED TO THE PLATFORM (AS SHOWN IN
FIG. 12 ON P. 14), UNDAMAGED AND READABLE.
WP-3737-FD
C
: 600
(273
APACITY
LB
Receiving instructions:
After delivery, remove the packaging from the product. Inspect the product closely to determine whether it sustained
damage during transport. If damage is discovered, record a complete description of the damage on the bill of
lading. If the product is undamaged, discard the packaging.
NOTES:
Compliance with laws, regulations, codes, and non-voluntary standards enforced in the location where the product is
used is exclusively the responsibility of the owner/end-user.
Vestil is not responsible for any consequential damages sustained as a result of failing to exercise sound judgment while
assembling, installing, using or maintaining this product.
Table of Contents
Product Introduction.............................. 2 - 3
Safety Principles..................................... 4
Safety Guidelines.................................... 4 - 5
Inspections.......................................... 5
Loading the Platform............................ 8
Use Instructions.................................. 9
(WP-3737-FD).................................. 10 - 11
Emergency Stop Switch Installation.......... 13
Labeling Diagrams............................... 11, 14, 15
Limited Warranty.................................. 16
Copyright 2017 Vestil Manufacturing Co.
V
2999 North Wayne Street, P.O. Box 507, Angola, IN 46703
Telephone: (260) 665-7586 Toll Free (800) 348-0868
Fax: (260) 665-1339
WP
SP-
AND
SERIES
I
NSTRUCTION
)
KG
rev. 3/6/2017
M
ESTIL
ANUFACTURING
www.vestilmfg.com
W
P
ORK
LATFORMS
M
ANUAL
WP-S
ERIES
1,000
(455
)
LB
KG
Table of Figures
Fig. 5A & 5B Tine Lock Operation............................... 8
WP, MANUAL
C
.
ORP
e-mail:
sales@vestil.com
SP-S
ERIES
1,000
(455
)
LB
KG
.............. 8
"
Page 1 of 16
Advertisement
Table of Contents

Related Manuals for Vestil WP Series


Summary of Contents for Vestil WP Series
-
Page 1: Table Of Contents
Compliance with laws, regulations, codes, and non-voluntary standards enforced in the location where the product is used is exclusively the responsibility of the owner/end-user. Vestil is not responsible for any consequential damages sustained as a result of failing to exercise sound judgment while assembling, installing, using or maintaining this product. -
Page 2: Product Introduction
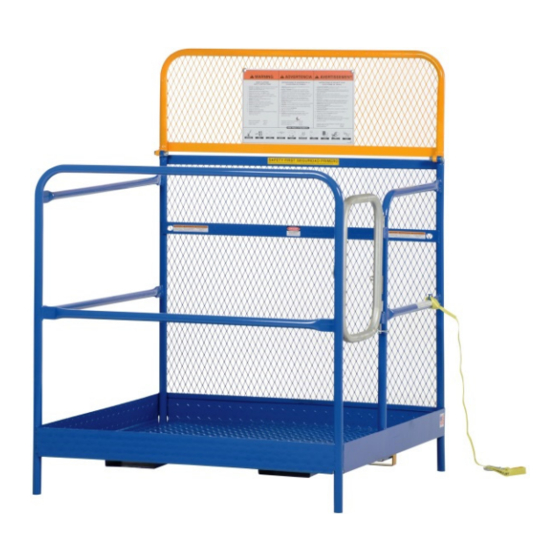
WP, MANUAL Product specifications: Thank you for purchasing a fork-mountable work platform made by Vestil Manufacturing Corporation. Our platforms are durable, high-quality products that combine safety-conscious design features and rigorous engineering. Anyone who might use or maintain this product should be familiar with the instructions provided in this manual. - Page 3 EVERY person who might assemble, use, or perform maintenance on this work platform must read and understand every instruction BEFOREHAND. Users should have access to the manual at all times and should review the directions whenever necessary. Copyright 2017 Vestil Manufacturing Co. Page 3 of 16...
-
Page 4: Safety Principles
5. If questions remain about the product after you finish reading the manual, contact Vestil for answers. DO NOT attempt to resolve any problems with the work platform unless you are authorized to do so and are certain that it will be safe to use afterwards. -
Page 5: Inspections
(see p. 12). 7. Product labels: all labels should be readable and located as shown in the diagram on p. 14. If a label(s) is unreadable or missing, contact Vestil to order a replacement. At least 1 time per month, inspect: 1. -
Page 6: Fig. 1 "Wp-Series Diagram & Parts List
½ in. x 2in. hex head bolt 36109 ½ in. – 13 UNC hex head nut D-link (secures the nylon safety strap to midrail) Nylon strap Close-up of tine lock assembly Copyright 2017 Vestil Manufacturing Co. Page 6 of 16... -
Page 7: Fig. 3 "Center Of Gravity Diagram
Immediately lower platform to the ground; then Connection between Straighten the mast guard bottom portions of mast guard. (return vertical orientation) and retighten the bolts and nuts. Copyright 2017 Vestil Manufacturing Co. Page 7 of 16... -
Page 8: Loading The Platform
However, the lock might not fit over the heel of the tine of your fork truck. If this is the case, do not modify the tine lock; simply do not use it. SP-175 tine locks WP-3737-FD tine locks Mast Forklift guard tine Cotter Copyright 2017 Vestil Manufacturing Co. Page 8 of 16... -
Page 9: Use Instructions
Only use the work platform on smooth, level, finished surfaces capable of supporting the combined weight of the person(s) occupying the platform and all equipment and/or material present on the platform, the platform, and the fork lift. Copyright 2017 Vestil Manufacturing Co. Page 9 of 16... -
Page 10: Setup/Fold-Down Instructions
Step 2: Raise the mast guard. toeboard and the slots (at the bottoms of the guardrail posts) as shown below. Slot Nylon safety strap Lift the guard to allow the pegs to fit into the slots. Copyright 2017 Vestil Manufacturing Co. Page 10 of 16... - Page 11 Sign 080 (facing platform) Sign 082 (on back of mast guard facing forklift) Label 253 (facing platform) Label 218 (on toeboard, both sides of platform) Label 821 Label 729 Label 287 (on toeboard) Copyright 2017 Vestil Manufacturing Co. Page 11 of 16...
-
Page 12: Mounting Casters To Wp-Series Platforms
Work platform with casters installed post Caster stem Knurled nut Insert caster Expansion into corner rubber post; bottom of post should Plastic spacer rest on Handrail tightening post Tightening hub Caster rig Copyright 2017 Vestil Manufacturing Co. Page 12 of 16... -
Page 13: Emergency Stop Switch Installation
Work platform attached: unplug the jumper cord from the FTJB socket; then plug the male plug of the coil cord into the socket of the FTJB. Pull the E-stop button out. Copyright 2017 Vestil Manufacturing Co. Page 13 of 16... -
Page 14: Labeling Diagrams
03/10/03 rev. 3/6/2017 WP, MANUAL Labeling diagram: The work platform should always be labeled as shown in the diagram below. Replace every label that becomes damaged or unreadable. WP-series platforms: Copyright 2017 Vestil Manufacturing Co. Page 14 of 16... - Page 15 03/10/03 rev. 3/6/2017 WP, MANUAL Labeling diagram: The work platform should always be labeled as shown in the diagram below. Replace every label that becomes damaged or unreadable. SP-series platforms: Copyright 2017 Vestil Manufacturing Co. Page 15 of 16...
-
Page 16: Limited Warranty
(you) for warranty service. Who may request service? Only a warrantee may request service. You are a warrantee if you purchased the product from Vestil or from an authorized distributor AND Vestil has been fully paid.
Need help?
Do you have a question about the WP Series and is the answer not in the manual?
Questions and answers