Advertisement
Quick Links
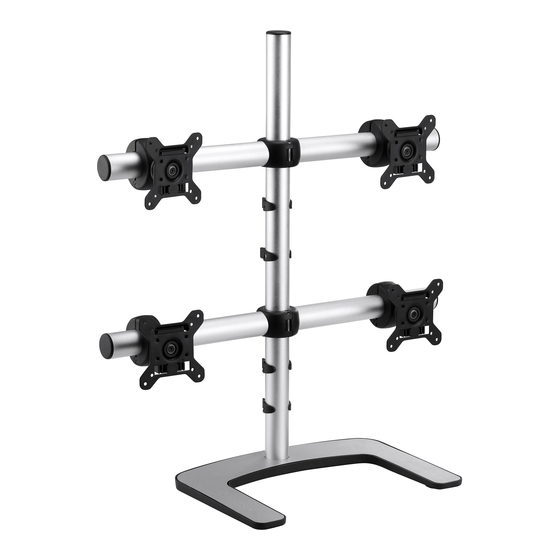
Freestanding Quad Monitor Mount
COMPONENT CHECKLIST
A
Base
(x1)
B
D
Upright
VFS Display
Pole
Head
(x1)
(x4)
IMPORTANT INFORMATION
! Please ensure this product is installed as per these installation instructions.
! Each VFS Display head supports a maximum weight as per above weight range specification.
! This product supports VESA mounting hole configurations: 75x75mm and 100x100mm.
! The manufacturer accepts no responsibility for incorrect installation.
! Curved monitors, deep devices (such as all-in-one PCs), VESA mounted accessories (such as mini PC brackets and mounts), and
offset VESA locations exert additional leverage that can exceed the capacity of the mount even though the monitor weight may
be within the stated range. Please contact Atdec if you would like further information.
C
3/5mm
Allen Key
Crossbar
(x1 each)
(x2)
Mounting
M4x16mm
E
VESA
(Optional)
Plate
Security Screw
(x4)
F
G
M8x50mm
Screw (x1)
I
J
Mounting
Screw
Screw
M4x12mm
(x16)
(x16)
L
M
Cable Ball
(x8)
(x4)
Installation Guide
H
M6x25mm
Cap Screw
(x2)
REQUIRED TOOLS
• Phillips Head Screwdriver
K
WEIGHT RANGE
Mounting
Per Monitor
Screw
M4x10mm
Flat Monitor
(x16)
0 - 8kg (0 - 17.6lb)
Curved Monitor
0 - 6kg (0 - 13.5lb)
N
NOTE
• 120mm (4.75") max overall
Cable Clip
monitor depth.
(x4)
• 1kg (2.2lb) maximum weight
difference between monitors.
VFS-Q
VFS-Q Page 1 of 4
Advertisement

Subscribe to Our Youtube Channel
Related Manuals for Atdec VFS-Q


Summary of Contents for Atdec VFS-Q
- Page 1 ! Curved monitors, deep devices (such as all-in-one PCs), VESA mounted accessories (such as mini PC brackets and mounts), and offset VESA locations exert additional leverage that can exceed the capacity of the mount even though the monitor weight may be within the stated range. Please contact Atdec if you would like further information. VFS-Q Page 1 of 4...
- Page 2 3.1 Check VESA mounting compatibility 3.2 Screw VESA plate to back of monitor using provided screws. 100mm Top of monitor 75mm NOTE: Be sure to select a screw length that suits the monitor. 100mm 75mm Too short Too long VFS-Q Page 2 of 4...
- Page 3 Note Ensure enough slack is left in cables screws evenly in to allow for movement. When the slot in small increments each pole cannot be used, use the supplied cable clips to secure the display cables. VFS-Q Page 3 of 4...
- Page 4 No portion of this document or any artwork contained herein should be reproduced in any way without the express written consent of Atdec Pty Ltd. Due to continuing product development, the manufacturer reserves the right to alter specifications without notice. ©20200703...
Need help?
Do you have a question about the VFS-Q and is the answer not in the manual?
Questions and answers