
Related Manuals for LMI Technologies MikroCAD premium


Summary of Contents for LMI Technologies MikroCAD premium
- Page 1 MikroCAD premium 80 x 60 premium 140 x 105 Quick Start Guide 15236-01.01_MANUAL_Quickstart_MikroCAD_premium80x60_premium140x105_revB...
-
Page 2: Downloading The Software
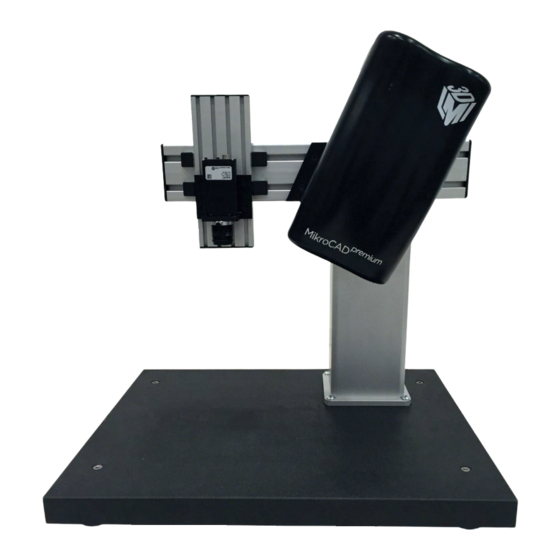
+1 604 636 1011 EMEAR LMI Technologies GmbH Berlin, Germany +49 (0)3328 9360 0 ASIA PACIFIC LMI (Shanghai) Trading Co., Ltd. Shanghai, China +86 21 5441 0711 LMI Technologies has sales offices and distributors worldwide. All contact information is listed at lmi3D.com/contact/locations. - Page 3 Hardware Included with Your MikroCAD Series Scanner When you receive your MikroCAD 3D scanner, check that all components are included: Number Description 3D Scanner and stand Calibration kit Column control box Column control power supply Scanner power supply Cable (see “Cable Description” on page 4.) MikroCAD software dongle (separate purchase;...
-
Page 4: Cable Description
Cable Description 12-pin Camera connectors 7-pin Power FireWire connector Projector connectors FireWire B 4-pin PC connectors Refer to the cable description when connecting the cables to the MikroCAD scanner. - Page 5 Installing the MikroCAD Software 1. After downloading the MikroCAD sofware installer, double-click it. See “Downloading the Software” on page 2 for information on downloading the installer. 2. Accept the license agreement and then click Next repeatedly to step through the installation setup.
- Page 6 You may change the default values if you wish, but we recommend leaving .NET Runtime 4.0 selected to ensure that it is installed.
- Page 7 3. Click Install. The installer installs the MikroCAD software. 4. Restart the computer if you are instructed to do so.
- Page 8 Installing the Projector Driver devmgmt.msc 1. Click the Start button, and in the Search programs and files field, type Then press Enter. The Device Manager opens. 2. In the Device Manager, find the GFM-USB device under Other Devices. 3. Right-click the device and choose Update Driver Software... 4.
- Page 9 5. Browse to the folder that contains the projector driver and click OK. By default, the driver is installed in C:\Program Files\LMI Technologies\MikroCAD\Alligator drivers. 6. In the dialog that opens, click Next.
- Page 10 7. In the Windows Security dialog, click Install. Windows installs the driver software.
-
Page 11: Installing The Camera Driver
Installing the Camera Driver AVTVimba_v1.3_Windows 1. Browse to the location of the Basler Pylon driver installer ( and double-click it. By default, the location is C:\Program Files\LMI Technologies\MikroCAD\Basler drivers... - Page 12 2. In the driver installer, click Next to accept the license agreement. 3. Click Next twice. 4. In the Custom Setup dialog, click the drop-down boxes next to the following features and choose Will be installed on local hard drive to select them: •...
- Page 13 Under SDKs, select pylon SDK for C++. • 5. Click Install.
- Page 14 6. Click Finish after the installation is complete. devmgmt.msc 7. Click the Start button, and in the Search programs and files field, type Then press Enter. The Device Manager opens. 8. In the Device Manager, under IEEE 1394 Bus host controllers, look for Basler Pylon 1394 Bus OHCI Generic If your FireWire card has more than one port, there will be one entry for each port.
- Page 15 10. In the dialog that opens, choose Browse my computer for driver software. 11. In the next dialog, click Let me pick from a list of devices on my computer. Basler Pylon 1394 Bus OHCI Generic 12. In the next dialog, select the driver.
- Page 16 Connecting the Camera and Projector Cables 1. Connect the FireWire B camera connector to the camera. 2. Connect the 12-pin camera connector to the camera.
- Page 17 3. Connect the USB connector to the projector. 4. Connect the 4-pin projector trigger connector to the projector.
- Page 18 5. Connect the 7-pin projector connector to the projector. 6. Connect the USB PC plug to a free USB port on the computer.
- Page 19 7. Connect the FireWire B PC connector to the FireWire port on the computer. 8. Connect the power connector on the cable to the scanner power supply’s connector. Power supply connector Cable power connector...
- Page 20 Connecting the Column Control Box 1. Connect the coiled cable coming from the back of the stand column to the column power supply. 2. Connect the coiled cable of the column control box to the column power supply. 3. Plug the column power supply into a wall outlet.
-
Page 21: Using The Scanner
Using the Scanner 1. Turn the computer on. 2. Plug the scanner power supply into a wall outlet. 3. Turn the projector on using the rocker switch on the rear of the projector. The blue LED on the projector will flash briefly. 4. - Page 22 7. Configure the brightness using the slider in the MikroCAD software. Use the Intensity Profile graph in the software to guide you. Try to set the brightness so that most of the peaks are below 256 and near the middle of the graph. If you see no image, see “Troubleshooting”...
- Page 23 9. On the Scan page, in the Acquisition group, click on Scan to perform a scan. 10. After performing a scan, click on Measure in the Acquisition group to transfer the acquired data to the measurement tools. For information on performing measurements on the acquired data, see the integrated measurement software manual.
-
Page 24: Troubleshooting
Troubleshooting If the MikroCAD software can’t connect to the scanner or you see no image in the software, verify the following. Power and Connections Check power and connections: • Ensure that the power cord is plugged into a wall outlet and that the power supply is connected to the cable. - Page 25 5. In the dialog that appears, choose Browse my computer for driver software. 6. In the next dialog, click Browse... and locate the driver in the Browse For Folder dialog. Then click OK. 7. Click Next. 8. In the Windows Security dialog, check Always trust software from “LMI Technologies” and click Install.
- Page 26 LMI Technologies, their partners, and resellers accept no liability for any damages (personal or to property) incurred as a result of improper use, incorrect assembly, failure to adhere to safety precautions, and/or mistreatment of this product (including its components). Copyright © 2016 LMI Technologies Inc. All rights reserved.
Need help?
Do you have a question about the MikroCAD premium and is the answer not in the manual?
Questions and answers