Table of Contents
Advertisement
Available languages
Available languages
Quick Links
Advertisement
Table of Contents

Related Manuals for Termozeta MYLIBERA


Summary of Contents for Termozeta MYLIBERA
- Page 1 Libretto Istruzioni Instruction Manual Uporabniški priročnik...
-
Page 2: Dati Tecnici
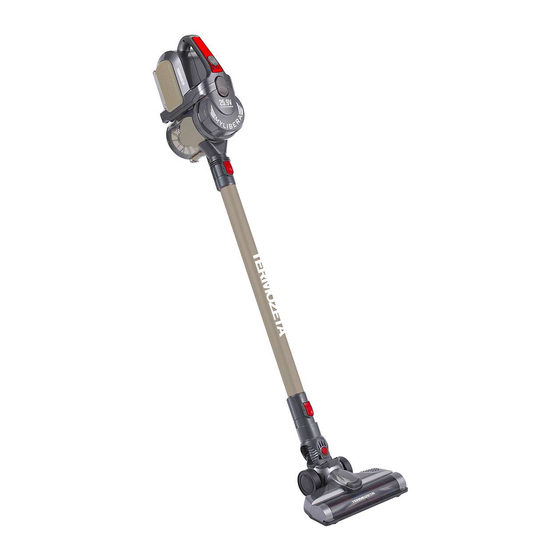
DATI TECNICI MYLIBERA Aspirapolvere ricaricabile Type 311001 Batteria: Li-Ion 25,9 V, 2200 mAh Adattatore: 30 Vdc, 500 mA Utilizzare solo l’adattatore: RKGSDC300500 Made in China... - Page 3 DESCRIZIONE 1. Pulsante accensione / regolazione potenza 2. Tasto di sgancio contenitore polvere 3. Impugnatura 4. LED Indicatori di carica batteria 5. Contenitore polvere 6. Tasto sgancio accessori 7. Tubo di prolunga 8. Tasto sgancio tubo 9. Spazzola motorizzata con LED 10.
-
Page 4: Prescrizioni Di Sicurezza
PRESCRIZIONI DI SICUREZZA Questo manuale è parte integrante del vostro apparecchio e deve essere letto con attenzione perché fornisce importanti indicazioni avvertenze sulla sicurezza, l’uso e la manutenzione del vostro apparecchio. Conservate con cura questo manuale. In caso di dubbi, non inventare ma contattare il nostro centro assistenza al Numero Verde 800-200899 •... - Page 5 • In caso di dubbi e per evitare pericoli, fate ispezionare l'apparecchio da un centro assistenza autorizzato contattando il nostro Numero Verde 800-200899 • Un errato collegamento elettrico può essere pericolosissimo, può causare danni irreversibili e, comunque, invalidare la garanzia. •...
- Page 6 ATTENZIONE!!! • Non aspirare materiale esplosivo o infiammabile, come ad esempio sigarette accese o ceneri prodotte da combustione (caminetti stufe). • Non utilizzare l’apparecchio su superfici umide o bagnate. • Non aspirare acqua o altre sostanze liquide. • Non ostruire le feritoie di uscita dell’aria poste nella parte laterale dell’apparecchio.
-
Page 7: Prima Dell'uso
PROTEGGI L'AMBIENTE! Questo apparecchio contiene numerosi materiali riutilizzabili o riciclabili. Al termine del ciclo di vita, rendere inoperante l’apparecchio scollegando prima la spina dalla presa di corrente e poi tagliando il cavo di alimentazione. Per lo smaltimento attenersi alle norme in vigore nel proprio luogo di residenza. CONSERVATE CON CURA QUESTO LIBRETTO ISTRUZIONI! Importante! -
Page 8: Montaggio Dell'apparecchio
2 – MONTAGGIO DELL’APPARECCHIO Montaggio supporto a parete (12) 1. Mantenere il supporto a parete allineato orizzontalmente alla parete. 2. Marcare i fori con una matita. 3. Forare i fori (ca. 6 mm Ø). 4. Inserire le spire fornite in dotazione nei fori. 5. - Page 9 Spazzola motorizzata (9) La spazzola motorizzata vi permetterà di aspirare i vostri pavimenti e tappeti in modo efficace. In aggiunta la luce frontale LED vi aiuterà a identificare lo sporco negli angoli bui della casa e sotto i vostri mobili. Inserire la spazzola prestando attenzione all’accoppiamento tra i terminali elettici presenti nella parte inferiore di connettore e innesto spazzola fino quando...
-
Page 10: Carica Della Batteria
3 – CARICA DELLA BATTERIA Prima di collegare il caricabatteria (13) alla rete di alimentazione controllare che la tensione indicata sulla targhetta posta al di sotto del caricabatteria corrisponda a quella della rete locale. Questo apparecchio si ricarica solo con il carica batterie in dotazione. Attenzione! Prima di usare l’apparecchio per la prima volta eseguire un ciclo completo di ricarica della durata di 5 ore. - Page 11 5 – DOPO L’USO Spegnere l’apparecchio. Svuotare il contenitore della polvere e pulire i filtri presenti all’interno dello stesso. È possibile svuotare il contenitore polvere in modo rapido e senza sporcarsi le mani. Posizionatevi sopra il cestino dei rifiuti e agite sul pulsante di sgancio presente nella parte inferiore del contenitore (2).
- Page 12 ed estrarre il coperchio superiore. Quindi estrarre il gruppo filtro della polvere 3. Ruotare il gruppo filtro superiore della polvere in senso anti-orario per staccare il filtro spugna / HEPA e il filtro a ciclone in plastica. Quindi lavare la spugna / filtro HEPA e il filtro a ciclone in plastica con acqua fredda.
-
Page 13: Guida Alla Risoluzione Dei Problemi
6 – GUIDA ALLA RISOLUZIONE DEI PROBLEMI PROBLEMA POSSIBILE CAUSA POSSIBILE SOLUTIONE L’aspirapolvere non 1. batterie scariche. 1. Caricare il prodotto. funziona 2. batteria scarica (la batteria 2. Chiamare il servizio clienti o non manterrà la carica). smaltire l'unità. 3. il connettore tra l'unità e il 3. -
Page 14: Pulizia E Manutenzione
7 – PULIZIA E MANUTENZIONE ATTENZIONE! Staccare il prodotto dal caricabatteria dalla presa di corrente prima di effettuare qualsiasi operazione di pulizia e/o manutenzione. Pulizia della spazzola motorizzata Per procedere alla pulizia della spazzola motorizzata (9) è possibile procedere come segue: 1. -
Page 15: Messa Fuori Servizio
8 – MESSA FUORI SERVIZIO A fine vita dell'apparecchio, per lo smaltimento, seguire scrupolosamente le norme in vigore nella vostra zona di residenza. A tale scopo, contattare l'ufficio ecologia del vostro comune di residenza o il relativo centro di smaltimento preposto. - Page 16 Lange Distribution S.r.l. si riserva il diritto di apportare modifiche estetiche e/o tecniche senza preavviso al fine di migliorare i propri prodotti. Termozeta is an international trademark. Copyright © 1995. All rights reserved. Lange Distribution S.r.l. - Via Treviso, 35 - 20127 Milano – Italy...
- Page 17 TECHNICAL DATA MYLIBERA Rechargeable vacuum cleaner Type 311001 Battery: Li-Ion 25.9 V, 2200 mAh Adapter: 30 Vdc, 500 mA Use only the following adapter: RKGSDC300500 Made in China...
- Page 18 DESCRIPTION 1. On-Off / power setting button 2. Dust bin release button 3. Handle 4. Battery charge LED indicators 5. Dust bin 6. Accessory release button 7. Extensible tube 8. Tube release button 9. Motorised brush with LED 10. 2 in 1 crevice and brush nozzle 11.
-
Page 19: Safety Precautions
SAFETY PRECAUTIONS This manual forms an integral part of your appliance and must be read carefully, as it provides important instructions and warnings regarding safety and the use and maintenance of your appliance. Keep this manual safe. If you have any doubts, do not rely on guesswork: contact our support centre at the Freephone Number 800-200899 •... - Page 20 Freephone Number 800-200899. • Incorrect electrical connections can be extremely dangerous. They may cause irreversible damage and, in any case, void the warranty. • If extension cords are used, ensure that they are intact and certified for the intended use. •...
- Page 21 ATTENTION!!! • Do not vacuum explosive or flammable materials, such as lit cigarettes or ashes produced by combustion (in hearths or ovens) example. • Do not use the appliance on damp or wet surfaces. • Do not vacuum water or other liquid substances. •...
-
Page 22: Protect The Environment
PROTECT THE ENVIRONMENT! This appliance contains many materials which can be reused or recycled. At the end of its life, render the appliance inoperative by first removing the plug from the electrical socket, then cutting through its power cord. For disposal, comply with the applicable standards in your area of residence. - Page 23 2 – ASSEMBLING THE APLIANCE Assembling the wall support (12) 7. Hold the wall support horizontally parallel to the wall. 8. Mark where the holes are using a pencil. 9. Drill the holes (approx. 6 mm Ø). 10. Place the threaded inserts which come with the product into the holes. 11.
- Page 24 Motorised brush (9) The motorised brush allows you to vacuum your floors and carpets efficiently. Moreover, the LED light on the front will help you to spot dirt in dark corners of your house and underneath furniture. Insert the brush, making sure to match up the electrical terminals located at the bottom of the connector and the brush wand, until you hear the “click”...
-
Page 25: Charging The Battery
3 – CHARGING THE BATTERY Before connecting the battery charger (13) to the power supply, ensure that the voltage indicated on the dataplate at the bottom of the charger corresponds to that of the local network. This appliance can only be recharged using the supplied battery charger. Attention! Before using the appliance for the first time, charge it fully for a period of 5 hours. -
Page 26: After Use
5 - AFTER USE Switch the appliance off. Empty the dust bin and clean the filters which are inside it. It is possible to empty the dust bin quickly and without getting your hands dirty. Hold it over the waste bin and press the release button located at the bottom of the dust container (2). - Page 27 3. Twist the upper dust filter group in an anti-clockwise direction to detach the sponge filter/HEPA filter and the plastic cyclone filter. Next, wash the sponge/HEPA filter and the plastic cyclone filter in cold water. After drying the sponge/HEPA filter and the plastic cyclone filter completely, twist...
-
Page 28: Troubleshooting Guide
6 – TROUBLESHOOTING GUIDE PROBLEM POSSIBLE CAUSE POSSIBLE SOLUTION The vacuum 1. dead batteries. 1. Charge the product. cleaner is not 2. spent battery (the battery 2. Call customer services or working will not hold a charge). dispose of the unit. 3. -
Page 29: Cleaning And Maintenance
7 - CLEANING AND MAINTENANCE ATTENTION! Unplug the product from the battery charger and the electrical socket before carrying out any cleaning and/or maintenance operations. Cleaning the motorised brush The motorised brush (9) can be cleaned as follows: 6. Detach the brush from the vacuum cleaner. - Page 30 8 – DECOMMISSIONING If the appliance is to be put out of use, it must be electrically disconnected. Empty the dust bin. If the appliance is to be scrapped, the battery pack must be removed and the various materials used in the construction of the appliance separated for disposal on the basis of their composition and the legal regulations which apply in the Country of use.
- Page 31 Lange Distribution S.r.l. reserves the right to make aesthetic and/or technical alterations, without prior notice, for the purpose of improving its products. Termozeta is an international trademark. Copyright © 1995. All rights reserved. Lange Distribution S.r.l. - Via Treviso, 35 - 20127 Milano – Italy...
-
Page 32: Tehnični Podatki
TEHNIČNI PODATKI MYLIBERA Akumulatorski sesalnik Vrsta 311001 Baterija: Li-Ion 25,9 V, 2200 mAh Adapter: 30 Vdc, 500 mA Uporabljajte izključno adapter: RKGSDC300500 Made in China... - Page 33 OPIS 1. Vklopna tipka / nastavitev moči 2. Tipka za odklop posode za prah 3. Ročaj 4. LED kazalci polnjenja baterije 5. Posoda za prah 6. Tipka za odklop nastavkov 7. Cevni podaljšek 8. Tipka za odklop cevi 9. Motorizirana krtača z LED 10.
-
Page 34: Varnostni Predpisi
VARNOSTNI PREDPISI Pričujoči priročnik je sestavni del naprave in ga je potrebno pozorno prebrati, saj vsebuje pomembna navodila in opozorila o varnosti, uporabi in vzdrževanju naprave. Priročnik skrbno shranite. Če ste v dvomih, ne poskušajte improvizirati, temveč se obrnite na našo službo za pomoč uporabnikom na modro številko 800-200899 •... - Page 35 • Nepravilna električna priključitev je lahko zelo nevarna, lahko povzroči nepopravljivo škodo in v vsakem primeru izniči garancijo. • Če uporabljate podaljške, poskrbite, da so celoviti in potrjeni za predvideno uporabo. • Če je napajalnik poškodovan, ga ne uporabljajte. Po potrebi se obrnite na pooblaščeno servisno službo preko naše modre številke 800-200899 •...
- Page 36 POZOR!!! • Ne sesajte eksplozivnih ali vnetljivih snovi, kot so na primer prižgane cigarete pepel (kamin peči). • Naprave ne uporabljajte na vlažnih ali mokrih površinah. • Ne sesajte vode ali drugih tekočih snovi. • ovirajte odprtin izhod zraka strani naprave.
-
Page 37: Pred Uporabo
ZAŠČITI OKOLJE! Napravo sestavljajo številni materiali, ki jih je mogoče reciklirati ali ponovno uporabiti. Ob zaključku delovne dobe naprave izključite vtič iz električne vtičnice in napravo naredite neuporabno tako, da prerežete električni kabel. Pri odlaganju odrabljene naprave spoštujte veljavne območne predpise. SKRBNO SHRANITE UPORABNIŠKI PRIROČNIK! Pomembno! -
Page 38: Montaža Naprave
2 - MONTAŽA NAPRAVE Montaža stenskega priključka (12) 13. Stenski priključek naj bo vodoravno poravnan s steno. 14. Označite luknje s svinčnikom. 15. Izvrtajte luknje (pribl. 6 mm Ø). 16. Vstavite priložene vložke v luknje. 17. Pritrdite stenski priključek z uporabo priloženih vijakov. 18. - Page 39 Motorizirana krtača (9) Motorizirana krtača omogoča učinkovito sesanje tal in preprog. Prednja LED lučka vam pomaga odkriti umazanijo v temnih kotih stanovanja in pod pohištvom. Vstavite krtačo in poskrbite, da se električni terminali na spodnji strani priključka ujemajo; zaslišali boste klik, ki nakazuje pravilno priključitev zaklepnega sistema.
-
Page 40: Polnjenje Baterije
3 - POLNJENJE BATERIJE Preden polnilec (13) priključite v električno omrežje, preverite, da napetost, označena na tablici izdelka, ustreza napetosti lokalnega omrežja. Napravo lahko polnite izključno s priloženim polnilcem. Pozor! Pred prvo uporabo naprave izvedite kompleten 5-urni polnilni cikel. Kabel polnilca baterije priključite v vhod (11) na ohišju naprave oziroma napravo priključite na stenski priključek (12), ki ste ga namestili, kot je opisano v predhodnem odstavku. - Page 41 5 - PO UPORABI Izklopite napravo. Izpraznite posodo za prah in očistite filtre znotraj posode. Posodo lahko izpraznite na hitro in ne da bi si umazali roke. Postavite jo nad koš za smeti in pritisnite na tipko za odklop na spodnji strani posode (2). Vratca na spodnji strani posode se odprejo, kar omogoča izpraznitev vsebine.
- Page 42 3. Obrnite vrhnjo filtrirno enoto za prah v nasprotni smeri urinega kazalca, da bi odstranili spužvasti filter / HEPA in plastični ciklonski filter. Operite spužvasti / HEPA filter ter plastični ciklonski filter s hladno vodo. Ko se spužvasti / HEPA filter ter plastični ciklonski filter popolnoma osušita, namestite...
- Page 43 6 - VODNIK ZA ODPRAVO TEŽAV TEŽAVA MOŽEN VZROK MOŽNA REŠITEV Sesalnik ne deluje 1. Prazne baterije. 1. Napolnite izdelek. 2. Prazna baterija (baterija ne 2. Pokličite servisno službo ali ohrani napolnjenosti). odvrzite enoto. 3. Priključek med enoto in 3. Očistite umazanijo s polnilcem je umazan.
- Page 44 7 - ČIŠČENJE IN VZDRŽEVANJE POZOR! Pred kakršnimkoli čistilnim in/ali vzdrževalnim posegom izključite vtič polnilca iz električne vtičnice. Očistite motorizirano krtačo Za čiščenje motorizirane krtače (9) lahko postopate, kot sledi: 11. Odstranite krtačo sesalnika. 12. Krtačo obrnite narobe 13. Zavrtite zaklepni element v nasprotni smeri urinega...
- Page 45 8 - ODLAGANJE Ob koncu delovne dobe naprave le-to odložite ob doslednem upoštevanju veljavnih predpisov območja, kjer živite. Za podrobnejše informacije se obrnite na okoljevarstveno službo vaše občine ali lokalno komunalno službo. Za odlaganje napravo izključite iz polnilca, izpraznite posodo za prah, baterije v celoti izpraznite in odstranite iz naprave, da bi jih lahko ločeno odložili.
- Page 46 Lange Distribution S.r.l. si pridržuje pravico do estetskih in/ali tehničnih sprememb brez predhodnega obvestila z namenom izboljšanja izdelkov. Termozeta je mednarodna blagovna znamka. Copyright © 1995. Vse pravice pridržane. Lange Distribution S.r.l. - Via Treviso, 35 - 20127 Milano – Italija...
Need help?
Do you have a question about the MYLIBERA and is the answer not in the manual?
Questions and answers